
iOS开发设计模式篇第二篇MVVM设计模式
目录
在iOS开发中,设计模式对于提升代码的可维护性、可读性和扩展性有着重要作用。其中,MVVM (Model-View-ViewModel) 是一种流行的架构模式,它通过引入 ViewModel 层解决了 View 和 Model 耦合过高的问题。本文将详细介绍MVVM的基本概念、实现原理以及在iOS中的实际应用。
一、什么是MVVM
MVVM 是一种分层架构,将应用分为以下三个部分:
-
Model(数据层):负责存储和处理数据。它可以是业务逻辑对象、数据库模型或网络响应对象。
-
View(视图层):负责显示 UI,并响应用户交互。
-
ViewModel(视图模型层):负责将 Model 转化为 View 可以使用的数据,同时接收 View 的操作并更新 Model。
通过 ViewModel,View 和 Model 之间不再直接通信,从而降低了耦合性。
二、MVVM 的主要特点
数据绑定:通过绑定机制实现 View 和 ViewModel 的双向通信。
单一职责:Model、View 和 ViewModel 各自专注于自己的职责。
易于测试:ViewModel 的逻辑独立于 UI,便于单元测试。
三、MVVM 的架构图以及MVVM的瘦身过程
我这里花了一张图,表示MVC向MVVM设计模式的演变过程。
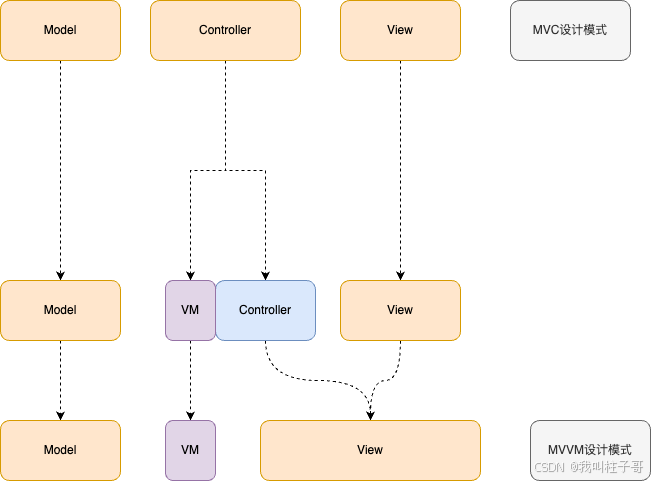
图1.MVVM的瘦身过程
在MVC的模式中,随着业务逻辑越来越复杂,Controller中的业务代码和逻辑越来越多。为了给Controller瘦身,我们把Controller中的逻辑处理部分单独抽离出来,封装成一个VM层用来处理业务逻辑,剩下的Controller和View和原来的View看做MVVM中的View。
View <-----> ViewModel <-----> Model
- View:只关心如何展示数据,通常使用 UIKit 或 SwiftUI 构建。
- ViewModel:充当中间层,负责从 Model 获取数据,并将其转换为适合展示的数据格式。
- Model:负责处理底层数据逻辑,如网络请求或数据库操作。
四、MVVM设计模式之间模块之间的通信过程
在MVVM(Model-View-ViewModel)设计模式中,模块之间的通信是核心设计的一部分。MVVM的目的之一就是解耦各个层次之间的关系,使得它们能够独立变化,而不互相干扰。因此,理解在MVVM中如何高效地进行模块间的通信是非常重要的。下面我们来详细讲解一下MVVM设计模式中不同模块之间的通信机制。
MVVM中的一个核心概念就是双向通信。下面我们详细介绍下MVVM设计模式中,各个模块之间的通信过程。
1.View和ViewModel之间的通信
在MVVM中,View和ViewModel之间的通信通常通过数据绑定(Data Binding)或回调(Callback)来实现。View负责展示UI,而ViewModel则处理与数据相关的逻辑,所有的UI更新都由ViewModel来通知View。
1.数据绑定(Data Binding)
数据绑定是MVVM中非常常见的通信方式,尤其是在Android中,但在iOS中也有类似的实现。通过数据绑定,ViewModel中的数据变化会自动反映到View上。具体来说,当ViewModel中的数据发生变化时,View会自动更新UI,反之,用户的操作会自动同步到ViewModel。
例如,可以通过KVO(Key-Value Observing)在iOS中实现数据绑定。当ViewModel中的属性发生变化时,View会通过KVO监听到这个变化,并做出相应的UI更新。
// ViewModel中定义属性
@property (nonatomic, strong) NSString *userName;

// 在View中绑定
[self.viewModel addObserver:self forKeyPath:@"userName" options:NSKeyValueObservingOptionNew context:nil];
2.回调(Callback)
当View发出用户操作时(如按钮点击、输入框内容改变等),ViewModel会处理这些操作并通过回调通知View来更新UI。View通常会有一个回调函数,当事件发生时,ViewModel会触发回调,View再根据回调结果进行UI更新。
// ViewModel中定义回调
@property (nonatomic, copy) void (^userNameUpdated)(NSString *newUserName);

// 在View中使用回调
__weak typeof(self) weakSelf = self;
self.viewModel.userNameUpdated = ^(NSString *newUserName) {
    weakSelf.userNameLabel.text = newUserName;
};
2.ViewModel和Model之间的通信
ViewModel与Model之间的通信是数据和逻辑层之间的交互。ViewModel从Model中获取数据,并且将其转换为适合View展示的格式。一般情况下,ViewModel会通过调用Model中的方法来获取数据或更新数据。
1.获取数据
ViewModel通过向Model请求数据来更新其内部状态,通常这种数据获取是同步的或异步的(比如从网络或数据库加载数据)。Model提供数据访问的接口,而ViewModel通过这些接口来请求数据。
// ViewModel调用Model获取数据
- (void)fetchUserData {
    self.userModel = [UserModel fetchDataFromDatabase];
    self.userName = self.userModel.userName;
    if (self.userNameUpdated) {
        self.userNameUpdated(self.userName);
    }
}
2.数据变更
ViewModel也可以将变更后的数据传递给Model,通常是通过调用Model的更新方法来实现。例如,用户更新了个人信息,ViewModel将变更的数据传递给Model进行存储。
// ViewModel更新Model中的数据
- (void)updateUserName:(NSString *)newUserName {
    self.userModel.userName = newUserName;
    [self.userModel saveData];
}
3.View和Model之间的通信
在严格的MVVM设计中,View和Model之间是不直接交互的。ViewModel充当了它们之间的中介,View只会与ViewModel交互,而ViewModel负责从Model获取数据并将其提供给View。ViewModel也可以将用户的操作传递给Model。
然而,在某些情况下,如果ViewModel需要通过用户输入或事件直接操作Model,View和Model之间可能会发生间接通信。
// 用户通过视图输入更新Model数据
[self.viewModel updateUserName:@"NewUserName"];
4.MVVM中的数据流
1.View到ViewModel
用户通过View进行操作(点击按钮、输入文本等),这些事件会被传递到ViewModel中,由ViewModel处理相关的业务逻辑。
2.ViewModel到Model
ViewModel向Model请求数据或更新Model中的数据。例如,ViewModel向Model发起网络请求、数据库查询,或者更新存储的用户数据。
3.Model到ViewModel
Model在数据发生变化时(如从数据库获取新数据、网络请求返回数据等),会通知ViewModel更新。ViewModel接收到数据更新后,会处理数据并通知View进行UI更新。
4.ViewModel到View
ViewModel将处理后的数据更新传递给View,View会根据新的数据刷新UI。
5.总结
在MVVM设计模式中,模块间的通信遵循了高内聚低耦合的原则,尽可能避免直接依赖。具体来说,MVVM中的通信机制通常通过以下方式实现:
• View与ViewModel之间的通信:通过数据绑定或回调实现UI更新。
• ViewModel与Model之间的通信:通过请求数据或更新数据实现,ViewModel负责获取数据并将其转换为UI需要的格式。
• View与Model之间的通信:通常是间接通过ViewModel来实现,但在某些特殊场景下,View也可以与Model交互。
通过MVVM设计模式,应用程序中的数据和UI得到了有效的解耦,极大地提高了代码的可维护性、可测试性和扩展性。MVVM的核心优势在于其数据驱动的架构,使得开发者可以专注于实现业务逻辑和UI展示,而不需要过多关注它们之间的耦合关系。
五、MVVM 与其他模式的对比
| 特性 | MVC | MVVM |
| 数据绑定 | 无 | 有 |
| View 和 Model 耦合 | 高耦合 | 松耦合 |
| 测试 | 较难测试 | 易于测试 |
| 学习成本 | 低 | 中等 |
在小型项目中,MVC 可能更加轻便;但在大型项目中,MVVM 可以显著提升代码的可维护性。
六、如何在iOS中实现MVVM
下面我们通过一个简单的示例来演示如何在iOS中实现MVVM设计模式。假设我们需要开发一个简单的页面,展示一个用户名,并允许用户通过点击按钮来更新用户名。
最终的效果图如下:

图1.mvvm的例子
1.Model
Model是应用程序中存储和管理数据的部分。在我们的示例中,Model只包含一个属性userName,它代表了我们要展示的用户名。
UserModel.h文件代码如下:
// UserModel.h
#import <Foundation/Foundation.h>

@interface UserModel : NSObject
@property (nonatomic, copy) NSString *userName;
@end
UserModel.m文件如下:
2.ViewModel
ViewModel负责从Model中获取数据并将其格式化为视图所需的形式。它还负责处理用户操作,更新Model中的数据,并将数据传递给View。
UserViewModel.h文件代码如下:
// UserViewModel.h
#import <Foundation/Foundation.h>
#import "UserModel.h"

@interface UserViewModel : NSObject

@property (nonatomic, strong) UserModel *userModel;
@property (nonatomic, copy) void (^userNameUpdated)(NSString *newUserName);

- (void)updateRandomUserName;

@end
UserViewModel.m文件如下:
// UserViewModel.m
#import "UserViewModel.h"

@implementation UserViewModel

- (instancetype)init {
    self = [super init];
    if (self) {
        _userModel = [[UserModel alloc] init];
        _userModel.userName = @"默认用户";
    }
    return self;
}

- (void)updateRandomUserName {
    NSArray *names = @[@"Alice", @"Bob", @"Charlie", @"David", @"Eve", @"Frank", @"Grace", @"Hank"];
    int index = arc4random_uniform((uint32_t)names.count);

    self.userModel.userName = names[index];

    // 触发 UI 更新
    if (self.userNameUpdated) {
        self.userNameUpdated(self.userModel.userName);
    }
}

@end
1.获取Model中的数据并把它转成View中要使用的数据格式。
在本文的代码中,我们提供一个初始化的方法,把Model中的数据转成要展示的name和age属性,同时我们通过KVO的方式监听UserModel中的变化,实时获取变化之后的最新值。
第二个提供一个方法接收View的操作并且更新Model。
import Foundation
// MARK: - ViewModel
class UserInfoViewModel: NSObject {
    @objc dynamic var name: String
    @objc dynamic var age: Int

    private var user: UserModel

    init(user: UserModel) {
        self.user = user
        self.name = user.name
        self.age = user.age
        super.init()

        // 观察 Model 的变化并同步到 ViewModel
        self.user.addObserver(self, forKeyPath: #keyPath(UserModel.name), options: [.new], context: nil)
        self.user.addObserver(self, forKeyPath: #keyPath(UserModel.age), options: [.new], context: nil)
    }

    deinit {
        // 移除观察者
        user.removeObserver(self, forKeyPath: #keyPath(UserModel.name))
        user.removeObserver(self, forKeyPath: #keyPath(UserModel.age))
    }

    override func observeValue(forKeyPath keyPath: String?, of object: Any?, change: [NSKeyValueChangeKey : Any]?, context: UnsafeMutableRawPointer?) {
        guard let keyPath = keyPath else { return }
        switch keyPath {
        case #keyPath(UserModel.name):
            if let newName = change?[.newKey] as? String {
                name = newName
            }
        case #keyPath(UserModel.age):
            if let newAge = change?[.newKey] as? Int {
                age = newAge
            }
        default:
            break
        }
    }

    func updateUser(name: String, age: Int) {
        user.name = name
        user.age = age
    }
}
3.View (ViewController)
1.View
View负责显示数据并响应用户输入。在我们的示例中,View是一个简单的UI界面,包含一个UILabel来显示用户名,并且有一个UIButton来触发用户名的更新。
#import <UIKit/UIKit.h>

NS_ASSUME_NONNULL_BEGIN

@interface UserView : UIView

@property (nonatomic, strong) UILabel *userNameLabel;
@property (nonatomic, strong) UIButton *changeNameButton;
@property (nonatomic, copy) void (^buttonTappedCallback)(void);

- (void)updateWithUserName:(NSString *)userName;


@end


NS_ASSUME_NONNULL_END
.m文件如下:
// UserView.m
#import "UserView.h"
#import <Masonry/Masonry.h>

@implementation UserView

- (instancetype)init {
    self = [super init];
    if (self) {
        self.backgroundColor = [UIColor whiteColor];

        _userNameLabel = [[UILabel alloc] init];
        _userNameLabel.textAlignment = NSTextAlignmentCenter;
        _userNameLabel.font = [UIFont boldSystemFontOfSize:20];
        [self addSubview:_userNameLabel];

        _changeNameButton = [UIButton buttonWithType:UIButtonTypeSystem];
        [_changeNameButton setTitle:@"更改用户名" forState:UIControlStateNormal];
        [_changeNameButton addTarget:self action:@selector(buttonTapped) forControlEvents:UIControlEventTouchUpInside];
        [self addSubview:_changeNameButton];

        // 使用 Masonry 布局
        [_userNameLabel mas_makeConstraints:^(MASConstraintMaker *make) {
            make.centerX.equalTo(self);
            make.top.equalTo(self.mas_top).offset(100);
        }];

        [_changeNameButton mas_makeConstraints:^(MASConstraintMaker *make) {
            make.centerX.equalTo(self);
            make.top.equalTo(self.userNameLabel.mas_bottom).offset(20);
            make.width.mas_equalTo(150);
            make.height.mas_equalTo(40);
        }];
    }
    return self;
}

- (void)updateWithUserName:(NSString *)userName {
    self.userNameLabel.text = userName;
}

- (void)buttonTapped {
    if (self.buttonTappedCallback) {
        self.buttonTappedCallback();
    }
}

@end2.ViewController
在MVVM模式中,ViewController变得非常轻量,它只负责UI的管理和响应用户事件。具体的业务逻辑交给了ViewModel。
// UserViewController.m
#import "UserViewController.h"
#import "UserView.h"
#import "UserViewModel.h"

@interface UserViewController ()

@property (nonatomic, strong) UserView *userView;
@property (nonatomic, strong) UserViewModel *viewModel;

@end

@implementation UserViewController

- (void)viewDidLoad {
    [super viewDidLoad];
    self.title = @"iOS MVVM 设计模式";
    self.view.backgroundColor = [UIColor whiteColor];

    // 初始化 View 和 ViewModel
    self.userView = [[UserView alloc] init];
    self.viewModel = [[UserViewModel alloc] init];

    [self.view addSubview:self.userView];
    self.userView.frame = self.view.bounds;

    // 绑定 ViewModel 数据更新
    __weak typeof(self) weakSelf = self;
    self.viewModel.userNameUpdated = ^(NSString *newUserName) {
        [weakSelf.userView updateWithUserName:newUserName];
    };

    // 监听 View 按钮点击事件
    self.userView.buttonTappedCallback = ^{
        [weakSelf.viewModel updateRandomUserName];
    };

    // 初始化时更新 UI
    [self.userView updateWithUserName:self.viewModel.userModel.userName];
}

@end
4.双向绑定
如果需要双向绑定,可以引入第三方库如 Combine 或 RxSwift。
这里使用KVO实现。
七、MVVM 的优缺点
1.优点
1. 低耦合:View 和 Model 解耦,便于扩展。
2. 易测试:ViewModel 不依赖 UI,测试更容易。
3. 代码复用性强:ViewModel 可以在多个 View 中复用。
2.缺点
1. 初始学习成本较高。
2. 对于小型项目可能显得过于复杂。
八、MVVM 的应用场景
1. 中大型项目:适合复杂的数据流和界面逻辑。
2. 需要数据绑定的项目:如表单输入、列表数据展示。
3. 跨平台项目:如同时支持 iOS 和 macOS 的项目,ViewModel 可以很容易地复用。
九、结语
MVVM 是一种强大的设计模式,在 iOS 开发中,特别是复杂的应用程序中,它能显著提高代码的可维护性和扩展性。通过正确地分层设计,你可以更轻松地应对不断变化的需求。
更多推荐

 27
27 0
0- 0


 已为社区贡献1条内容

所有评论(0)