
小车AI视觉识别--4.物体识别
·
一、TensorFlow简介
TensorFlow是一个使用数据流图进行数值计算的开源软件库。图中的节点表示数学运算,而图表边表示在它们之间流动的多维数据阵列(张量)。这种灵活的架构允许您将计算部署到桌面,服务器或移动设备中的一个或多个CPU或GPU,而无需重写代码。TensorFlow用户指南提供了详细的概述,并介绍了如何使用和自定义TensorFlow深度学习框架。TensorFlow最初是由研究人员和工程师在Google机器智能研究组织的Google Brain团队开发的,目的是进行机器学习和深度神经网络(DNN)研究。该系统通用性足以适用于各种其他领域。
1.1 什么是数据流图(Data Flow Graph)?
数据流图用“结点”(nodes)和“线”(edges)的有向图来描述数学计算。“节点” 一般用来表示施加的数学操作,但也可以表示数据输入(feed in)的起点/输出(push out)的终点,或者是读取/写入持久变量(persistent variable)的终点。“线”表示“节点”之间的输入/输出关系。这些数据“线”可以输运“size可动态调整”的多维数据数组,即“张量”(tensor)。张量从图中流过的直观图像是这个工具取名为“Tensorflow”的原因。一旦输入端的所有张量准备好,节点将被分配到各种计算设备完成异步并行地执行运算。
TensorFlow的关键特征:
- 数据流图:TensorFlow的核心概念是数据流图,其中节点表示数学运算,边表示多维数据数组(张量)在节点间流动。这种图形化的表示使得计算过程清晰可见,也便于优化和并行化。
- 张量和操作:在TensorFlow中,数据被表示为张量,而操作(如加法、乘法、矩阵运算等)被定义为图中的节点。这种结构使得框架能够处理从简单的数学运算到复杂的深度学习模型的各种任务。
- 自动微分:TensorFlow能够自动计算复杂计算图的梯度,这对训练神经网络至关重要。这意味着用户不必手动实现梯度计算,从而节省了大量时间和精力。
- 灵活性和模块化:TensorFlow提供了大量的模块和API,允许用户构建复杂的模型,同时也可以通过插件和扩展来增强其功能。此外,TensorFlow 2.x 版本引入了 Eager Execution 模式,使得代码更加直观,更接近即时执行,便于调试和原型设计。
- 高性能计算:TensorFlow能够利用GPU和TPU(张量处理单元)等硬件加速器,实现大规模数据集上的高效训练和推理。
- 分布式计算:TensorFlow支持分布式计算,允许模型在多个设备或服务器上并行训练,这对于处理大规模数据集尤其重要。
- 高级API:除了底层的API,TensorFlow还提供了Keras这样的高级API,使得模型构建和实验变得更加容易,同时保持了对底层细节的访问。
- 模型服务和部署:TensorFlow提供了模型部署和管理的工具,如TensorFlow Serving,使得模型可以方便地在生产环境中使用。
- 社区和生态:TensorFlow拥有一个庞大的开发者社区和丰富的生态系统,包括预训练模型、数据集和各种应用示例,这极大地促进了学习和创新。
- 教育和文档:TensorFlow提供了详细的文档和教程,以及与之相关的教育材料,帮助新手和专业人士学习和掌握机器学习技术。
- 多语言支持:除了Python接口,TensorFlow还支持C++、Java、Go、R等语言,使得它可以集成到不同的开发环境中。
二、实验源码
#导入oled屏幕库 Import oled screen library
import sys
sys.path.append('/home/pi/software/oled_yahboom/')
from yahboom_oled import *
# 创建oled对象 Create an oled object
oled = Yahboom_OLED(debug=False)
import numpy as np
import cv2
import os,time
import tensorflow as tf
from object_detection.utils import label_map_util
from object_detection.utils import visualization_utils as vis_utils
import ipywidgets.widgets as widgets
from image_fun import bgr8_to_jpeg
# Init camera
cap = cv2.VideoCapture(0) # 定义摄像头对象,参数0表示第一个摄像头 Define the camera object, parameter 0 represents the first camera
cap.set(3, 320) # set Width
cap.set(4, 240) # set Height
cap.set(5, 30) #设置帧率 Setting the frame rate
# cap.set(cv2.CAP_PROP_FOURCC, cv2.VideoWriter.fourcc('M', 'J', 'P', 'G'))
# cap.set(cv2.CAP_PROP_BRIGHTNESS, 60) #设置亮度 -64 - 64 0.0 Set Brightness -64 - 64 0.0
# cap.set(cv2.CAP_PROP_CONTRAST, 50) #设置对比度 -64 - 64 2.0 Set Contrast -64 - 64 2.0
# cap.set(cv2.CAP_PROP_EXPOSURE, 156) #设置曝光值 1.0 - 5000 156.0 Set the exposure value 1.0 - 5000 156.0
# from picamera2 import Picamera2, Preview
# import libcamera
# picam2 = Picamera2()
# camera_config = picam2.create_preview_configuration(main={"format":'RGB888',"size":(320,240)})
# camera_config["transform"] = libcamera.Transform(hflip=1, vflip=1)
# picam2.configure(camera_config)
# picam2.start()
image_widget = widgets.Image(format='jpg', width=640, height=480)
# Init tf model
MODEL_NAME = 'ssdlite_mobilenet_v2_coco_2018_05_09' #fast
PATH_TO_CKPT = MODEL_NAME + '/frozen_inference_graph.pb'
PATH_TO_LABELS = os.path.join('data', 'mscoco_label_map.pbtxt')
NUM_CLASSES = 90
IMAGE_SIZE = (12, 8)
fileAlreadyExists = os.path.isfile(PATH_TO_CKPT)
if not fileAlreadyExists:
print('Model does not exsist !')
exit
# LOAD GRAPH
print('Loading...')
detection_graph = tf.Graph()
with detection_graph.as_default():
od_graph_def = tf.compat.v1.GraphDef()
with tf.io.gfile.GFile(PATH_TO_CKPT, 'rb') as fid:
serialized_graph = fid.read()
od_graph_def.ParseFromString(serialized_graph)
tf.import_graph_def(od_graph_def, name='')
label_map = label_map_util.load_labelmap(PATH_TO_LABELS)
categories = label_map_util.convert_label_map_to_categories(label_map, max_num_classes=NUM_CLASSES, use_display_name=True)
category_index = label_map_util.create_category_index(categories)
print('Finish Load Graph..')
print(type(category_index))
print("dict['Name']: ", category_index[1]['name'])
# Main
oled.init_oled_process() #初始化oled进程 Initialize oled process
oled.add_line("OBJTYPE:", 1)
oled.add_line("None", 3)
oled.refresh()
t_start = time.time()
fps = 0
display(image_widget)
with detection_graph.as_default():
with tf.compat.v1.Session(graph=detection_graph) as sess:
while True:
#frame = picam2.capture_array()
ret, frame = cap.read()
# frame = cv2.flip(frame, -1) # Flip camera vertically
# frame = cv2.resize(frame,(320,240))
##############
image_np_expanded = np.expand_dims(frame, axis=0)
image_tensor = detection_graph.get_tensor_by_name('image_tensor:0')
detection_boxes = detection_graph.get_tensor_by_name('detection_boxes:0')
detection_scores = detection_graph.get_tensor_by_name('detection_scores:0')
detection_classes = detection_graph.get_tensor_by_name('detection_classes:0')
num_detections = detection_graph.get_tensor_by_name('num_detections:0')
# print('Running detection..')
(boxes, scores, classes, num) = sess.run(
[detection_boxes, detection_scores, detection_classes, num_detections],
feed_dict={image_tensor: image_np_expanded})
# print('Done. Visualizing..')
# 应用非极大值抑制
selected_indices = tf.image.non_max_suppression(
np.squeeze(boxes),
np.squeeze(scores),
max_output_size=100, # 根据需要设置最大输出数量
iou_threshold=0.7) # 调整重叠阈值
# 使用 tf.gather 来高效地应用索引
filtered_boxes = tf.gather(tf.squeeze(boxes), selected_indices)
filtered_scores = tf.gather(tf.squeeze(scores), selected_indices)
filtered_classes = tf.gather(tf.cast(tf.squeeze(classes), tf.int32), selected_indices)
# 在会话中运行过滤操作
(filtered_boxes, filtered_scores, filtered_classes) = sess.run([
filtered_boxes,
filtered_scores,
filtered_classes
])
# 可视化
vis_utils.visualize_boxes_and_labels_on_image_array(
frame,
filtered_boxes,
filtered_classes,
filtered_scores,
category_index,
use_normalized_coordinates=True,
line_thickness=8)
for i in range(0, 10):
if scores[0][i] >= 0.7:
print(category_index[int(classes[0][i])]['name'])
oled.clear()
objtype_str=category_index[int(classes[0][i])]['name']
oled.add_line("OBJTYPE:", 1)
oled.add_line(objtype_str, 3)
oled.refresh()
##############
fps = fps + 1
mfps = fps / (time.time() - t_start)
cv2.putText(frame, "FPS:" + str(int(mfps)), (10,25), cv2.FONT_HERSHEY_SIMPLEX, 0.9, (0,255,0), 2)
image_widget.value = bgr8_to_jpeg(frame)
k = cv2.waitKey(1) & 0xff
if k == 27:# press 'ESC' to quit
cap.release()
# 恢复屏幕基础数据显示 Restore basic data display on screen
os.system("python3 /home/pi/software/oled_yahboom/yahboom_oled.py &")
break
cap.release()
# 恢复屏幕基础数据显示 Restore basic data display on screen
os.system("python3 /home/pi/software/oled_yahboom/yahboom_oled.py &")
# picam2.stop()
# picam2.close()
#最后需要释放掉摄像头的占用 Finally, you need to release the camera's occupancy
三、实验现象
这个程序在JupyterLab运行帧率有点低的,有误识别的情况。运行时,我们可以看到oled会显示识别到的物体英文名字。
在需要关闭的时候选中运行的代码点击停止按钮关闭程序,最后记得释放掉视频流才可以在其他地方使用摄像头。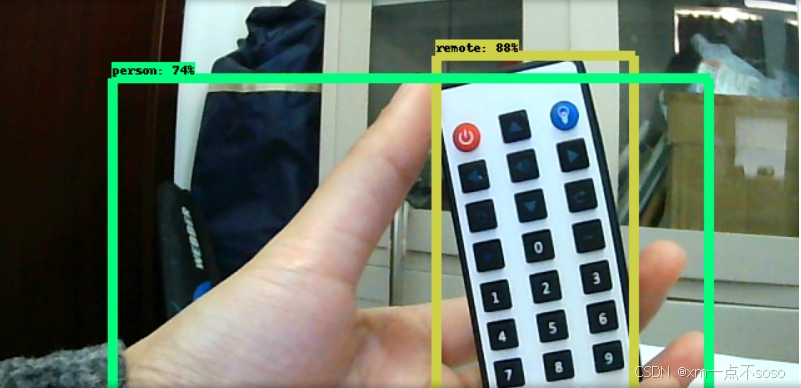
更多推荐


 25
25 0
0- 0


 已为社区贡献2条内容

所有评论(0)