
Android studio连接Mysql制作登录,注册,查询,修改界面,和一些中间遇到的一些基本问题以及知识点
Android Studio制作登录界面任务:
一. 遇到的问题
1.在AndroidMainFest.xml声明
报错:Android 异常:java.lang.IllegalStateException: Could not execute method for android:onClick
代码翻译:无法执行 android:onClick 方法的 IllegalStateException(非法状态异常)

修改代码:<activity android:name=".RegisterActivity">
报错原因:
1.无法执行onClick点击事件。原因是Activity 未在 Manifest 中声明:需要确保你的 Activity 在 AndroidManifest.xml 文件中被正确声明,这样才能被找到
2.抽象的Test 以及 Test类不存在getUser
报错:Android 异常:
"Cannot resolve method 'getUser' in 'Test'"
可能的报错原因:
-
方法不存在:
Test类中没有定义getUser方法。 -
导入错误:如果
getUser方法应该来自另一个类或库,可能没有正确导入那个类或库。 -
访问权限问题:如果
getUser方法存在,但是它的访问权限限制了从Test类中访问它(例如,它是私有的)。 -
编译问题:有时候,如果项目没有正确编译,也会导致此类错误。
代码解读:意思是:“在 Test中无法解析方法 getUser”。这是一个编译的错误,意味着我们在 Test 类中尝试调用一个不存在的 getUser 方法。
解决代码:
public class Test {
    private String user;

    public String getUser() {
        return user;
    }

    public void setUser(String user) {
        this.user = user;
    }
}
既然我们在 Test 类中找不到名为 getUser 的方法,所有我们应该确保 在Test 类中确实有一个名为 getUser 的 public 方法。这个方法应该会确保能返回一个 String 类型的值
3.在 AndroidManifest.xml里添加网络权限
报错:Android 异常:
java.net.UnknownHostException: Unable to resolve host xxx: No address associate
代码: //网络涉及:访问权限
uses-permission android:name="android.permission.INTERNET"
开发遇到网络时经常遇到这个异常,一般来说,造成这种错误的有两种情况:
1.android设备网络连接没打开,例如:WIFI网络
2.Manifest文件没有标明网络访问权限,如果确认网络已经正常连接并且还是出这种错误的话,那么请看下你的Manifest文件是否标明应用需要网络访问权限,如果没标明的话,也访问不了网络,也会造成这种情况的.
4.引用语句爆红
报错:提示Cannot resolve symbol’R’:
报错意思是:“无法解析符号R”。这通常出现在Android开发中,意味着代码中引用了一个名为‘R’的类,但是编译器找不到这个类。在Android中,‘R’类是一个自动生成的类,包含了项目中所有资源的引用。

Cannot resolve symbol ‘R’
可能出现这个问题的原因是:
-
项目没有正确编译,导致‘R’类没有被生成。
-
引用了不存在的资源,比如尝试访问一个未定义的字符串、颜色或布局等。
-
代码中手动创建了一个名为‘R’的类或变量,这可能会与自动生成的‘R’类冲突。
-
使用了错误的导入语句,比如错误地导入了其他包中的‘R’类。
代码:(我的解决方法)
@Override
protected void onCreate(Bundle savedInstanceState) {
    super.onCreate(savedInstanceState);
    setContentView(R.layout.activity_register);

    userAccount = findViewById(R.id.userAccount);
    userPassword = findViewById(R.id.userPassword);
    userName = findViewById(R.id.userName);
}
1.R.id.userAccount
这个语句是一个资源引用,用于在代码中引用XML布局文件中定义的ID,当R标红时候即R文件出错,因为实际上R是软件自动生成的,与我们无关,所以我们要认真检查自己的XML文件问题。按Alt加Enter键 Alt+Enter快捷键,重新导R包;(Alt+Enter提供了一个快速修复代码问题的功能。当你的光标位于一个有错误或者可以优化的代码行时,按下 Alt + Enter 会弹出一个上下文菜单,提供一系列可能的快速修复选项。)
5.未指定线性布局方向
报错:
Wrong orientation? No orientation specified, and the default is horizontal, yet this layout has multiple children where at least one has `layout_width="match_parent"
<LinearLayout//下面划红线
没有指定方向(orientation),默认情况下它们是水平(horizontal)的。问题在于,这个错误信息表明您在使用 LinearLayout 时遇到了布局问题。错误的核心在于 LinearLayout 的默认布局方向是水平的(horizontal),但是您在布局中至少有一个子视图设置了 layout_width="match_parent"。当子视图的宽度设置为 match_parent 时,它会尝试占据整个父视图的宽度,这在水平布局中会导致问题,因为 LinearLayout 无法在水平方向上容纳宽度为 match_parent 的多个子视图
解决代码:
android:orientation="vertical"
可以设置orientation属性为vertical
二. 如何完成的
想制作登录界面,要完成界面的登录,注册,查询,修改功能;
登录界面的制作过程过程总结
登录界面的制作
//activity_main.java界面
@Override//初始化活动界面并完成设置用户界面布局
protected void onCreate(Bundle savedInstanceState) {
super.onCreate(savedInstanceState);
setContentView(R.layout.activity_main);
}
public void login(View view){
EditText EditTextAccount = findViewById(R.id.uesrAccount);
EditText EditTextPassword = findViewById(R.id.userPassword);
//通过findViewById获取两个EditText组件的实例,分别用于输入账号(uesrAccount)和密码(userPassword)。
new Thread(){
@Override
public void run() {
UserDao userDao = new UserDao();
int msg = userDao.login(EditTextAccount.getText().toString(),EditTextPassword.getText().toString());
hand1.sendEmptyMessage(msg);
}
}.start(); }
//创建新的线程,并覆盖其run方法。在run方法中执行登录操作:
//实例UserDao对象,这个对象用来与数据库交互,执行数据操作。
//调用UserDao的login方法,传入账号和密码,执行登录验证。这个方法返回一个整型值msg
//使用hand1(一个Handler对象)发送一个空消息,消息的what字段设置为msg。Handler在UI线程中处理登录结果,更新UI或显示登录成功/失败的消息。
@SuppressLint("HandlerLeak")
final Handler hand1 = new Handler() {
@Override
public void handleMessage(Message msg) {
if (msg.what == 0){
Toast.makeText(getApplicationContext(), "登录失败", Toast.LENGTH_LONG).show();
} else if (msg.what == 1) {
Toast.makeText(getApplicationContext(), "登录成功", Toast.LENGTH_LONG).show();
} else if (msg.what == 2){
Toast.makeText(getApplicationContext(), "密码错误", Toast.LENGTH_LONG).show();
} else if (msg.what == 3){
Toast.makeText(getApplicationContext(), "账号不存在", Toast.LENGTH_LONG).show();
}
}//定义了一个Handler类的handleMessage方法,用于处理发送的msg消息。
};//通过msg的值来判断登录情况,并应对不同情况用msg的值显示不同的信息
public void reg(View view){
startActivity(new Intent(getApplicationContext(),activity_register.class));
}
public void Inquire(View view) {
Intent intent = new Intent(MainActivity.this,activity_inquire.class);
startActivity(intent);
finish();
}
public void Forget(View view) {
Intent intent = new Intent(MainActivity.this,activity_forget.class);
startActivity(intent);
finish();
}
//三个跳转界面,分别是注册界面跳转,修改和查询界面跳转的跳转事件
//实现Main XML界面跳到Regiset Inquire Forget XML界面
//activity_main.xml文件 <?xml version="1.0" encoding="utf-8"?> <androidx.constraintlayout.widget.ConstraintLayout xmlns:android="http://schemas.android.com/apk/res/android" xmlns:app="http://schemas.android.com/apk/res-auto" xmlns:tools="http://schemas.android.com/tools" android:layout_width="match_parent" android:layout_height="match_parent" tools:context=".MainActivity"> <LinearLayout android:layout_width="match_parent" android:layout_height="match_parent" android:orientation="vertical" tools:layout_editor_absoluteX="219dp" tools:layout_editor_absoluteY="207dp" android:padding="50dp" > <LinearLayout android:layout_width="match_parent" android:layout_height="wrap_content" android:orientation="horizontal"> <TextView android:id="@+id/textView" android:layout_width="wrap_content" android:layout_height="wrap_content" android:layout_weight="1" android:textSize="15sp" android:text="账号:" /> <EditText android:id="@+id/uesrAccount" android:layout_width="wrap_content" android:layout_height="wrap_content" android:layout_weight="1" android:ems="10" android:minHeight="48dp" android:inputType="phone" android:text="" android:hint="请输入账号"/> </LinearLayout> <LinearLayout android:layout_width="match_parent" android:layout_height="wrap_content" android:orientation="horizontal"> <TextView android:id="@+id/textView2" android:layout_width="wrap_content" android:layout_height="wrap_content" android:layout_weight="1" android:textSize="15sp" android:text="密码:" /> <EditText android:id="@+id/userPassword" android:layout_width="wrap_content" android:layout_height="wrap_content" android:layout_weight="1" android:ems="10" android:minHeight="48dp" android:inputType="textPersonName" android:hint="请输入密码"/> </LinearLayout> //上面是文字框的设计,设计了账号密码的输入框输入userAccount和userPassword <LinearLayout android:layout_width="match_parent" android:layout_height="wrap_content" android:orientation="horizontal"> </LinearLayout> <Button android:layout_marginTop="50dp" android:id="@+id/button2" android:layout_width="match_parent" android:layout_height="wrap_content" android:text="登录" android:onClick="login"/> <Button android:id="@+id/button3" android:layout_width="match_parent" android:layout_height="wrap_content" android:onClick="reg" android:text="注册" /> <Button android:id="@+id/button4" android:layout_width="match_parent" android:layout_height="wrap_content" android:text="改码" android:onClick="Forget"/> <Button android:id="@+id/buttob5" android:layout_width="match_parent" android:layout_height="wrap_content" android:text="查询" android:onClick="Inquire" /> //上面是按钮的设计,设计了登录,注册,修改,查询的按钮还有他们的onClick事件 </LinearLayout> </androidx.constraintlayout.widget.ConstraintLayout>
注册界面的制作
编写:


之后的查询界面(inquire),修改界面(forget)一样的方法创建
public class activity_register extends AppCompatActivity {
//定义了一个名为activity_register的类,这个类继承自AppCompatActivity。AppCompatActivity是Android中用于创建活动(Activity)的基类之一
EditText userAccount = null;
EditText userPassword = null;
EditText userName = null;
//专门用于提供userAccount和userName和userPassword字段,用来储存输入的数据
@Override
protected void onCreate(Bundle savedInstanceState) {
super.onCreate(savedInstanceState);
setContentView(R.layout.activity_register);
//这是onCreate方法的声明,protected是访问修饰符,表示这个方法可以在同一个包中的任何类以及子类中被访问
userAccount = findViewById(R.id.userAccount);
userPassword = findViewById(R.id.userPassword);
userName = findViewById(R.id.userName);
}
//它们的作用是将XML布局文件中定义的EditText控件与Java代码中的变量关联起来
//这行代码通过调用findViewById方法,并传入资源ID
//R.id.userAccount来查找布局文件中定义的EditText控件并将其引用赋值给userAccount变量。
public void register(View view){
//这是一个公共方法,接收一个View的参数,这个参数是触发事件的按钮。
String userAccount1 = userAccount.getText().toString();
String userPassword1 = userPassword.getText().toString();
String userName1 = userName.getText().toString();
//这行代码获取userAccount这个EditText控件中的文本,并将其转换为字符串。这个字符串将被用来存储输入的账号。
if (!validateInput(userAccount1, userPassword1, userName1)) {
return; // 如果输入无效,直接返回,不执行注册
}//调用validateInput方法来验证用户输入的数据是否有效。validateInput方法接受三个字符串参数,分别是账号、密码和用户名,并返回一个布尔值。如果返回值是false(即输入无效),则执行return语句,这意味着方法会提前结束,不会执行任何注册操作。
User user = new User();
//实例化了一个新的User对象,并将其引用赋值给变量user。来表示数据
user.setUserAccount(userAccount1);
user.setUserPassword(userPassword1);
user.setUserName(userName1);
user.setUserType(1);
user.setUserState(0);
user.setUserDel(0);
//这行代码调用User对象的setUserAccount方法,将输入的账号(userAccount1)传User对象
new Thread(){//创建一个新的线程
@Override
public void run() {
int msg = 0;
UserDao userDao = new UserDao();
User uu = userDao.findUser(user.getUserAccount());
//调用UserDao的findUser方法,根据用户账号查找用户
if(uu != null){
msg = 1;
//如果找到了用户(uu不为null),则设置msg为1,表示用户已存在。
}
else{
boolean flag = userDao.register(user);
if(flag){
//调用UserDao的register方法,尝试注册新用户。这个方法返回一个布尔值,表示注册是否成功。
msg = 2;
//如果注册成功(flag为true),则设置msg为2,表示用户注册成功。
}
}
hand.sendEmptyMessage(msg);
}
}.start();
}
private boolean validateInput(String account, String password, String name) {
if (account.contains(" ") || password.contains(" ") || name.contains(" ")) {
//用于检查任何一个输入字符串中是否包含空格
Toast.makeText(this, "账号、密码和用户名不能包含空格", Toast.LENGTH_LONG).show();
return false;
}
return true;
}
@SuppressLint("HandlerLeak")
final Handler hand = new Handler()
{
public void handleMessage(Message msg) {
if(msg.what == 0) {
Toast.makeText(getApplicationContext(),"注册失败",Toast.LENGTH_LONG).show();
} else if(msg.what == 1) {
Toast.makeText(getApplicationContext(),"该账号已经存在,请换一个账号",Toast.LENGTH_LONG).show();
} else if(msg.what == 2) {
Toast.makeText(getApplicationContext(), "注册成功", Toast.LENGTH_LONG).show();
Intent intent = new Intent();
//将想要传递的数据用putExtra封装在intent中
intent.putExtra("a","注册");
setResult(RESULT_CANCELED,intent);
finish();
}
}
};
}
//jegister_activity.xml <?xml version="1.0" encoding="utf-8"?> <androidx.constraintlayout.widget.ConstraintLayout xmlns:android="http://schemas.android.com/apk/res/android" xmlns:app="http://schemas.android.com/apk/res-auto" xmlns:tools="http://schemas.android.com/tools" android:layout_width="match_parent" android:layout_height="match_parent" tools:context=".activity_register"> <LinearLayout android:layout_width="match_parent" android:layout_height="match_parent" android:orientation="vertical" tools:layout_editor_absoluteX="219dp" tools:layout_editor_absoluteY="207dp" android:padding="50dp"> <LinearLayout android:layout_width="match_parent" android:layout_height="wrap_content" android:orientation="horizontal"> <TextView android:id="@+id/textView" android:layout_width="wrap_content" android:layout_height="wrap_content" android:layout_weight="1" android:textSize="15sp" android:text="账号:" /> <EditText android:id="@+id/userAccount" android:layout_width="wrap_content" android:layout_height="wrap_content" android:layout_weight="1" android:ems="10" android:minHeight="48dp" android:inputType="phone" android:hint="请输入账号"/> </LinearLayout> <LinearLayout android:layout_width="match_parent" android:layout_height="wrap_content" android:orientation="horizontal"> <TextView android:layout_width="wrap_content" android:layout_height="wrap_content" android:layout_weight="1" android:textSize="15sp" android:text="昵称:" /> <EditText android:id="@+id/userName" android:layout_width="wrap_content" android:layout_height="wrap_content" android:layout_weight="1" android:ems="10" android:minHeight="48dp" android:inputType="textPersonName" android:hint="请输入昵称"/> </LinearLayout> <LinearLayout android:layout_width="match_parent" android:layout_height="wrap_content" android:orientation="horizontal"> <TextView android:id="@+id/textView2" android:layout_width="wrap_content" android:layout_height="wrap_content" android:layout_weight="1" android:textSize="15sp" android:text="密码:" /> <EditText android:id="@+id/userPassword" android:layout_width="wrap_content" android:layout_height="wrap_content" android:layout_weight="1" android:ems="10" android:minHeight="48dp" android:inputType="textPassword" android:hint="请输入密码"/> </LinearLayout> //以上的文本内容,输入注册的账号,用户户名和密码 <LinearLayout android:layout_width="match_parent" android:layout_height="wrap_content" android:orientation="horizontal"> </LinearLayout> <Button android:layout_marginTop="50dp" android:id="@+id/button2" android:layout_width="match_parent" android:layout_height="wrap_content" android:text="注册" android:onClick="register" /> </LinearLayout> //按钮事件,点击进行对输入的账号密码等进行注册 </androidx.constraintlayout.widget.ConstraintLayout>
修改界面的设计
效果如图:
//activity_forget.java
ackage com.example.loginproject;
import android.content.Intent;
import android.os.Bundle;
import android.os.Looper;
import android.view.KeyEvent;
import android.view.View;
import android.widget.EditText;
import android.widget.Toast;
import androidx.appcompat.app.AppCompatActivity;
import com.example.loginproject.dao.UserDao;
public class activity_forget extends AppCompatActivity {
EditText userAccount;//定义控件
//账号
EditText userName;
//用户名
EditText userPassword;
//密码
@Override
protected void onCreate(Bundle savedInstanceState) {//初始化一个名为activity_forget的活动,当用户首次打开这个活动时
super.onCreate(savedInstanceState);// 系统会调用这个方法来创建活动,并显示activity_forget.xml布局文件中定义的界面。
setContentView(R.layout.activity_forget);
// 这行代码的作用是获取布局文件中ID为 userAccount 的视图,并将其引用存储在变量 userAccount 中
userAccount = findViewById(R.id.userAccount);
userName = findViewById(R.id.userName);
userPassword = findViewById(R.id.userPassword);
}
public void ForgetBack(View view) {//跳转返回
Intent intent = new Intent(activity_forget.this,MainActivity.class);
startActivity(intent);
finish();
}
//按(重置密码按键)执行从当前forget界面跳转到main界面
public void Changepsw(View view) {
new Thread(new Runnable() {//创建一个新的线程
@Override
public void run() {
String uA = userAccount.getText().toString().trim();
String uN= userName.getText().toString().trim();
String uP = userPassword.getText().toString().trim();
//从用户界面中获取账号、用户名和密码的输入。
//将这些输入从 EditText 控件的文本格式转换为字符串。
//清除字符串两端的空白字符,以确保获取的输入不包含不必要的空格等字符。
if(uA.equals("")||uN.equals("")){
Looper.prepare();
Toast toast = Toast.makeText(activity_forget.this,"所有内容都不能为空!",Toast.LENGTH_SHORT);
toast.show();
Looper.loop();
}
//防止输入空值
UserDao ud = new UserDao();
//是一个封装了数据库操作的类
Boolean result = ud.select(uA,uN);
//调用UserDao实例的select方法,传入两个参数uA和uN,这两个参数可能分别代表用户的账号(userAccount)和用户名(userName)
Looper.prepare();
if (result){
ud.update(uA,uN,uP);
Toast toast = Toast.makeText(activity_forget.this, "更新成功!", Toast.LENGTH_SHORT);
toast.show();
Intent intent = new Intent(activity_forget.this, MainActivity.class);
startActivity(intent);
finish();
Looper.loop();
}else{
Toast toast = Toast.makeText(activity_forget.this,"更新失败!信息填写错误!",Toast.LENGTH_SHORT);
toast.show();
Looper.loop();
}
}
}).start();
}
@Override
public boolean onKeyDown(int keyCode, KeyEvent event) {
if(keyCode == KeyEvent.KEYCODE_BACK){
Intent intent = new Intent(activity_forget.this,MainActivity.class);
startActivity(intent);
finish();
return true;
}
return super.onKeyDown(keyCode, event);
}
}
//按(确定修改)按键,执行更新程序语句,检查账号和用户名,进行修改密码
//activity_forget.xml <?xml version="1.0" encoding="utf-8"?> <LinearLayout xmlns:android="http://schemas.android.com/apk/res/android" xmlns:tools="http://schemas.android.com/tools" android:layout_width="match_parent" android:layout_height="match_parent" xmlns:app="http://schemas.android.com/apk/res-auto" tools:context=".activity_forget" android:orientation="vertical"> <androidx.appcompat.widget.Toolbar android:onClick="ForgetBack" android:layout_width="match_parent" android:layout_height="wrap_content" app:title="重置密码" app:titleTextColor="@color/white" android:background="@color/black" tools:ignore="MissingConstraints" />\ //写一个onClick事件,通过点击(重置密码)按键进行返回语句 <EditText android:id="@+id/userAccount" android:layout_width="match_parent" android:layout_height="wrap_content" android:hint="请输入账号" android:layout_marginLeft="30dp" android:layout_marginTop="30dp" android:layout_marginRight="30dp" android:paddingLeft="20dp" android:paddingRight="20dp" android:inputType="textPersonName" /> <EditText android:id="@+id/userName" android:layout_width="match_parent" android:layout_height="wrap_content" android:hint="请输入您的用户名" android:layout_marginLeft="30dp" android:layout_marginTop="30dp" android:layout_marginRight="30dp" android:paddingLeft="20dp" android:paddingRight="20dp" android:inputType="number" /> <EditText android:id="@+id/userPassword" android:layout_width="match_parent" android:layout_height="wrap_content" android:hint="请输入您修改的密码" android:layout_marginLeft="30dp" android:layout_marginTop="30dp" android:layout_marginRight="30dp" android:paddingLeft="20dp" android:paddingRight="20dp" android:inputType="text"/> //文本内容输入账号,用户名,密码 <Button android:onClick="Changepsw" android:layout_width="match_parent" android:layout_height="wrap_content" android:layout_marginTop="30dp" android:layout_marginRight="30dp" android:layout_marginLeft="30dp" android:background="@color/white" android:text="确认修改" android:textSize="30sp" android:textColor="@color/black"/> //按钮事件,点击确认进行修改效果 </LinearLayout>
查询界面的设计
package com.example.loginproject;
import android.annotation.SuppressLint;
import android.os.Handler;
import android.os.Message;
import android.content.Intent;
import android.os.Bundle;
import android.view.View;
import android.widget.Button;
import android.widget.TextView;
import androidx.appcompat.app.AppCompatActivity;
import com.example.loginproject.utils.JDBCUtils;
import java.sql.Connection;
import java.sql.ResultSet;
import java.sql.SQLException;
import java.sql.Statement;
public class activity_inquire extends AppCompatActivity {
private Button button;
private TextView textView;
private static final int TEST_USER_SELECT = 1;
int i =0;
@SuppressLint("HandlerLeak")
private Handler handler = new Handler(){
@Override
public void handleMessage(Message msg) {
String user;//String user; 声明了一个字符串变量 user,用于存储用户信息。
switch (msg.what){//基于消息的 what 字段(一个整数,用于标识消息的类型)来决定如何处理消息。
case TEST_USER_SELECT:
Test test = (Test) msg.obj;
user = test.getUser();
System.out.println("***********");
System.out.println("***********");
//这两行代码在控制台打印星号,用于在日志中标记信息。
System.out.println("user:"+user);
textView.setText(user);
break;
}
}
};
@SuppressLint("MissingInflatedId")
@Override
protected void onCreate(Bundle savedInstanceState) {
super.onCreate(savedInstanceState);
setContentView(R.layout.activity_inquire);
button = (Button) findViewById(R.id.bt_send);
textView = (TextView) findViewById(R.id.tv_response);
}//完成Activity的创建过程,包括设置布局、初始化按钮和文本视图
@Override
protected void onStart() {
super.onStart();
button.setOnClickListener(new View.OnClickListener() {
@Override
public void onClick(View view) {
//执行查询操作
//通多点击buttoni自增长查询对应id的name
if (i<=3){//因为数据库我就添加了三个数据条数,所以进行判断使其可以循环查询
i++;
}
else{
i=1;
}
//连接数据库进行操作需要在主线程操作
new Thread(new Runnable() {
@Override
public void run() {
Connection conn = null;
conn =(Connection) JDBCUtils.getConn();
//调用JDBCUtils.getConn()方法获取数据库连接,并将其赋值给conn变量
String sql = "select userName from user where id='"+i+"'";
//定义了一个SQL查询语句,用于从user表中查询id字段等于变量i值的userName字段
Statement st;
try {
st = (Statement) conn.createStatement();
ResultSet rs = st.executeQuery(sql);
while (rs.next()){
//因为查出来的数据试剂盒的形式,所以我们新建一个javabean存储
Test test = new Test();
test.setUser(rs.getString(1));
Message msg = new Message();
msg.what =TEST_USER_SELECT;
msg.obj = test;
handler.sendMessage(msg);
//通过之前定义的Handler实例handler发送消息,这个消息会被Handler的handleMessage方法处理。
}
st.close();
conn.close();
} catch (SQLException e) {
e.printStackTrace();
}
}
}).start();
}
});
}
public class Test {
private String user;
public String getUser() {
return user;
}
public void setUser(String user) {
this.user = user;
}
}
public void InquireBack(View view) {//跳转返回
Intent intent = new Intent(activity_inquire.this,MainActivity.class);
startActivity(intent);
finish();
}
}
<?xml version="1.0" encoding="utf-8"?> <LinearLayout xmlns:android="http://schemas.android.com/apk/res/android" xmlns:tools="http://schemas.android.com/tools" android:layout_width="match_parent" android:layout_height="match_parent" xmlns:app="http://schemas.android.com/apk/res-auto" tools:context=".activity_inquire" android:orientation="vertical"> <androidx.appcompat.widget.Toolbar android:id="@+id/main" android:onClick="InquireBack" android:layout_width="match_parent" android:layout_height="wrap_content" app:title="查询返回" app:titleTextColor="@color/white" android:background="@color/black" tools:ignore="MissingConstraints,OnClick" /> <Button android:id="@+id/bt_send" android:layout_width="match_parent" android:layout_height="wrap_content" android:text="查询数据表"/> <TextView android:id="@+id/tv_response" android:layout_width="wrap_content" android:layout_height="wrap_content" android:textStyle="bold" /> </LinearLayout>
JDBCUtils界面(连接数据库)
创建一个utils包


名为ui.login


这样我们创建了utils和JDBCUtils
package com.example.loginproject.utils;
import java.sql.Connection;
import java.sql.DriverManager;

public class JDBCUtils {
private static String driver = "com.mysql.jdbc.Driver";// MySql驱动

private static String dbName = "bookdb";// 数据库名称

private static String user = "root";// 用户名

private static String password = "Qu123123123";// 密码

public static Connection getConn(){

    Connection connection = null;
    try{
        Class.forName(driver);// 动态加载类
        String ip = "192.168.168.199";// 写成本机地址,不能写成localhost,同时手机和电脑连接的网络必须是同一个

        // 尝试建立到给定数据库URL的连接
        connection = DriverManager.getConnection("jdbc:mysql://" + ip+ ":3306/" + dbName,
                user, password);
        System.out.println("连接成功");

    }catch (Exception e){
        System.out.println("连接失败");
        e.printStackTrace();
    }
    return connection;
}
}
UserDao界面(用于封装与用户数据相关的数据库操作)
跟上面的界面相同,创建名为dao的package和UserDao的项目
//dao界面的代码
package com.example.loginproject.dao;
import com.example.loginproject.entity.User;
import com.example.loginproject.utils.JDBCUtils;
import android.util.Log;
import java.sql.Connection;
import java.sql.PreparedStatement;
import java.sql.ResultSet;
import java.sql.SQLException;
import java.util.HashMap;
public class UserDao {
private static final String TAG = "mysql-loginproject-UserDao";
/**
* function: 登录
*/
public int login(String userAccount, String userPassword) {
HashMap<String, Object> map = new HashMap<>();
// 根据数据库名称,建立连接
Connection connection = com.example.loginproject.utils.JDBCUtils.getConn();
int msg = 0;
try {
// mysql简单的查询语句。这里是根据user表的userAccount字段来查询某条记录
String sql = "select * from user where userAccount = ?";
if (connection != null) {// connection不为null表示与数据库建立了连接
PreparedStatement ps = connection.prepareStatement(sql);
if (ps != null) {
Log.e(TAG, "账号:" + userAccount);
//根据账号进行查询
ps.setString(1, userAccount);
// 执行sql查询语句并返回结果集
ResultSet rs = ps.executeQuery();
int count = rs.getMetaData().getColumnCount();
//将查到的内容储存在map里
while (rs.next()) {
// 注意:下标是从1开始的
for (int i = 1; i <= count; i++) {
String field = rs.getMetaData().getColumnName(i);
map.put(field, rs.getString(field));
}
}
connection.close();
ps.close();
if (map.size() != 0) {
StringBuilder s = new StringBuilder();
//寻找密码是否匹配
for (String key : map.keySet()) {
if (key.equals("userPassword")) {
if (userPassword.equals(map.get(key))) {
msg = 1; //密码正确
} else
msg = 2; //密码错误
break;
}
}
} else {
Log.e(TAG, "查询结果为空");
msg = 3;
}
} else {
msg = 0;
}
} else {
msg = 0;
}
} catch (Exception e) {
e.printStackTrace();
Log.d(TAG, "异常login:" + e.getMessage());
msg = 0;
}
return msg;
}
//功能:根据账号和密码登录。
//查询用户信息,并将结果存储在HashMap中。
//检查密码是否匹配,返回相应的消息代码(1为密码正确,2为密码错误,3为查询结果为空)。
/**
* function: 注册
*/
public boolean register(User user) {
HashMap<String, Object> map = new HashMap<>();
// 根据数据库名称,建立连接
Connection connection = JDBCUtils.getConn();
try {
String sql = "insert into user(userAccount,userPassword,userName,userType,userState,userDel) values (?,?,?,?,?,?)";
if (connection != null) {// connection不为null表示与数据库建立了连接
PreparedStatement ps = connection.prepareStatement(sql);
if (ps != null) {
//将数据插入数据库
ps.setString(1, user.getUserAccount());
ps.setString(2, user.getUserPassword());
ps.setString(3, user.getUserName());
ps.setInt(4, user.getUserType());
ps.setInt(5, user.getUserState());
ps.setInt(6, user.getUserDel());
// 执行sql查询语句并返回结果集
int rs = ps.executeUpdate();
if (rs > 0)
return true;
else
return false;
} else {
return false;
}
} else {
return false;
}
} catch (Exception e) {
e.printStackTrace();
Log.e(TAG, "异常register:" + e.getMessage());
return false;
}
}
//功能:注册新用户。
//将用户信息插入数据库。
//返回操作结果(true为成功,false为失败)
/**
* function: 根据账号进行查找该用户是否存在
*/
public User findUser(String userAccount) {
// 根据数据库名称,建立连接
Connection connection = JDBCUtils.getConn();
User user = null;
try {
String sql = "select * from user where userAccount = ?";
if (connection != null) {// connection不为null表示与数据库建立了连接
PreparedStatement ps = connection.prepareStatement(sql);
if (ps != null) {
ps.setString(1, userAccount);
ResultSet rs = ps.executeQuery();
while (rs.next()) {
//注意:下标是从1开始
int id = rs.getInt(1);
String userAccount1 = rs.getString(2);
String userPassword = rs.getString(3);
String userName = rs.getString(4);
int userType = rs.getInt(5);
int userState = rs.getInt(6);
int userDel = rs.getInt(7);
user = new User(id, userAccount1, userPassword, userName, userType, userState, userDel);
}
}
}
} catch (Exception e) {
e.printStackTrace();
Log.d(TAG, "异常findUser:" + e.getMessage());
return null;
}
return user;
}
//功能:根据账号和用户名查找用户。
//返回查询结果是否存在。
public boolean select(String userAccount, String uesrName) {
Connection connection = JDBCUtils.getConn();
if (connection == null) {
Log.e("lzx", "无数据库连接");
return false;
} else {
String sql = "select * from user where userAccount = ? and userName = ?";
try {
PreparedStatement pre = connection.prepareStatement(sql);
pre.setString(1, userAccount);
pre.setString(2, uesrName);
ResultSet res = pre.executeQuery();
boolean t = res.next();
return t;
} catch (SQLException e) {
return false;
}
}
}
//功能:根据账号和用户名查找用户。
//返回查询结果是否存在。
public boolean update(String userAccount, String userName, String userPassword) {
Connection connection = JDBCUtils.getConn();
if (connection == null) {
Log.e("lzx", "无数据库连接");
return false;
} else {
String sql = "update user set userPassword = ? where userAccount = ? and userName = ?";
try {
PreparedStatement pre= connection.prepareStatement(sql);
pre.setString(1, userPassword);
pre.setString(2, userAccount);
pre.setString(3, userName);
return pre.execute();
} catch (SQLException e) {
return false;
}
//功能:更新用户密码。
//更新数据库中的用户密码信息。
//返回操作结果(true为成功,false为失败)
}
}
}
同时制作一个package名为entity的User界面,其构成一个类
//界面代码
名为 User的一个实体类,用于在应用程序中表示用户的数据模型。这个类包含了用户的基本信息,如ID、账号、密码、姓名、类型、状态和删除标志等属性
package com.example.loginproject.entity;
public class User {
private int id;
private String userAccount;
private String userPassword;
private String userName;
private int userType;
private int userState;
private int userDel;
public User() {
}
public User(int id, String userAccount, String userPassword, String userName, int userType, int userState, int userDel) {
this.id = id;
this.userAccount = userAccount;
this.userPassword = userPassword;
this.userName = userName;
this.userType = userType;
this.userState = userState;
this.userDel = userDel;
}
public int getId() {
return id;
}
public void setId(int id) {
this.id = id;
}
public String getUserAccount() {
return userAccount;
}
public void setUserAccount(String userAccount) {
this.userAccount = userAccount;
}
public String getUserPassword() {
return userPassword;
}
public void setUserPassword(String userPassword) {
this.userPassword = userPassword;
}
public String getUserName() {
return userName;
}
public void setUserName(String userName) {
this.userName = userName;
}
public int getUserType() {
return userType;
}
public void setUserType(int userType) {
this.userType = userType;
}
public int getUserState() {
return userState;
}
public void setUserState(int userState) {
this.userState = userState;
}
public int getUserDel() {
return userDel;
}
public void setUserDel(int userDel) {
this.userDel = userDel;
}
}
三.Android知识
布局知识(线性布局)
线性布局,就是在线性方向上依次排列,有两个方向,包括vertical和orientation方向
我们写一段代码,只对其进行排列方向上的修改并看效果:
<LinearLayout xmins:android-"http://schemas.android.com/apk/res/android"
android:orientation="horizontal"
android: layout_ width="mlatch_ parent"
android:layout_ height="match_ parent">
<Button
android:id-"@+id/button1"
android: layout_ width="wrap_ content"
android:layout_ height="wrap_ content"
android:layout_ gravity=“top"
android:text="Button 1"/>
<Button
android:id="@+id/button2"
android: layout_ width-"wrap_ content"
android: layout_ height-"wrap_ content"
android: Layout_ gravity="center_ vertical"
android:text="Button 2"/>
<Button
android:id="@+id/button3"
android:layout_ width="wrap_ content"
android; layout_ height- "wrap_ content"
android;Layout_ gravity="bottom"
android; text="Button 3"/>

</LinearLayout>
在Linear Layout中添加三个Button,每个Button的长宽都是wrap_content,同样指定排列方向是vertical
将orientation属性值改为horizontal,这就是意味着要让Linear Layout中的控件在水平方向上依次排列,如果不指定,默认的排列方向就是horizontal
注:需要注意,如果Linearlayout的排列方向是horizontal,内部的控件就绝对不能将宽度指 定为match parent,否则,单独一个控件就会将整个 平方向占满,其他的控件就没有可放置 的位置了。同样的道理,如果 LinearLayout的排列方向是vertical,内部的控件就不能将 度 指定为match_ parent。
点击事件和监听器知识
点击事件:点击事件是通过触摸屏幕来触发的一种事件。Android提供了OnClickListener接口来监听用户的点击事件。 设置监听器:要处理点击事件,需要为视图(如按钮)设置一个监听器,当点击视图时,会调用监听器中的方法。
//java界面
public class MainActivity extends AppCompatActivity {
    @Override
    protected void onCreate(Bundle savedInstanceState) {
        super.onCreate(savedInstanceState);
        setContentView(R.layout.activity_main);
        // 获取按钮控件
        Button button = findViewById(R.id.my_button);
        // 设置点击事件监听器
        button.setOnClickListener(new View.OnClickListener() {
            @Override
            public void onClick(View view) {
        // 按钮被点击时执行的操作
                Toast.makeText(MainActivity.this, "按钮被点击了!", Toast.LENGTH_SHORT).show();
            }
        });
    }
}
//XML界面
<RelativeLayout xmlns:android="http://schemas.android.com/apk/res/android"
    xmlns:tools="http://schemas.android.com/tools"
    android:layout_width="match_parent"
    android:layout_height="match_parent"
    tools:context=".MainActivity">

    <Button
        android:id="@+id/my_button"
        android:layout_width="wrap_content"
        android:layout_height="wrap_content"
        android:text="点击" />

</RelativeLayout>
Button控件通过findViewById方法与XML布局文件中的按钮关联。
通过调用setOnClickListener方法为按钮设置了一个匿名内部类View.OnClickListener的实例作为监听器。
跳转界面代码知识
//声明两个ActivityA B界面,用于跳转
<manifest xmlns:android="http://schemas.android.com/apk/res/android"
    package="com.example.myapp">

    <application
        ...>
        <activity android:name=".ActivityA">
            <intent-filter>
                <action android:name="android.intent.action.MAIN" />
                <category android:name="android.intent.category.LAUNCHER" />
            </intent-filter>
        </activity>
        <activity android:name=".ActivityB" />
        ...
    </application>
</manifest>
在ActivityA中,你可以通过一个按钮点击事件来启动ActivityB:
import android.content.Intent;
import android.os.Bundle;
import android.view.View;
import androidx.appcompat.app.AppCompatActivity;

public class ActivityA extends AppCompatActivity {

    @Override
    protected void onCreate(Bundle savedInstanceState) {
        super.onCreate(savedInstanceState);
        setContentView(R.layout.activity_a);

        // 假设有一个按钮用于跳转到ActivityB
        findViewById(R.id.button_to_b).setOnClickListener(new View.OnClickListener() {
            @Override
            public void onClick(View view) {
                // 创建Intent对象,用于跳转到ActivityB
                Intent intent = new Intent(ActivityA.this, ActivityB.class);
                startActivity(intent); // 启动ActivityB
            }
        });
    }
}
线程的基本代码知识
线程定义:程序执行的最小单元,也是被系统独立调度和分派的基本单位。
线程的创建(三种):
第一类
//1.创建一个继承自Thread类的类
class MyThread extends Thread {
    @Override
    public void run() {
        // 这里编写线程要执行的代码
        System.out.println("线程运行中...");
    }
}
// 在其他地方创建并启动线程
public class ThreadExample {
    public static void main(String[] args) {
        MyThread myThread = new MyThread(); // 创建线程对象
        myThread.start(); // 启动线程
    }
}
第二类
//2.创建一个实现了Runnable接口的类
class MyRunnable implements Runnable {
    @Override
    public void run() {
        // 这里编写线程要执行的代码
        System.out.println("线程运行中...");
    }
}
// 在其他地方创建并启动线程
public class RunnableExample {
    public static void main(String[] args) {
        MyRunnable myRunnable = new MyRunnable(); // 创建Runnable对象
        Thread thread = new Thread(myRunnable); // 将Runnable对象传递给Thread构造器
        thread.start(); // 启动线程
    }
}
第三类
//3.使用Lambda表达式(Java 8及以上)
public class LambdaThreadExample {
    public static void main(String[] args) {
        // 使用Lambda表达式简化Runnable的创建
        Thread thread = new Thread(() -> {
            System.out.println("线程运行中...");
        });
        thread.start(); // 启动线程
    }
}
界面访问权限
举例代码
<activity
    android:name=".activity_inquire"
    android:exported="false" />
<activity
    android:name=".activity_forget"
    android:exported="false"
    android:label="@string/title_activity_forget" />
<activity
    android:name=".MainActivity2"
    android:exported="false" />
<activity
    android:name=".activity_register"
    android:exported="false" />
<activity
    android:name=".MainActivity"
    android:exported="true">
android:exported="false":当设置为false时,表示这个组件只能被定义它的应用程序内部访问。其他应用程序无法启动这个组件,也无法与其进行交互。这是默认值,如果你不希望其他应用程序能够启动或与你的组件通信,就使用这个设置。
android:exported="true":当设置为true时,在 Android 应用的 AndroidManifest.xml文件中用于指定一个组件(Activity、Service、Broadcast Receiver 或 Content Provider)是否可以被其他应用访问或启动。
总结:
设置为true,写一个Intent过滤器<intent-filter>
<intent-filter>
    <action android:name="android.intent.action.MAIN" />

    <category android:name="android.intent.category.LAUNCHER" />
</intent-filter>
<intent-filter>告诉系统.MainActivity是应用程序的启动Activity,它将显示在应用的启动器图标上,用户点击图标时会打开这个Activity。
注:(默认情况下,所有组件的 android:exported 属性都是 false,这意味着它们只能被定义它们的应用内部访问。当你将 android:exported 设置为 true 时,你需要确保你的组件是安全的,因为它们将对其他应用可见和可访问。)
四.数据库知识
制作连接和库
右键空白界面新建一个连接

选择Mysql,给其一个用户名叫bookdb,并输入密码,主机名和端口名一般不需要改,主机名一般为local host或者127.0.0.1,端口名默认3306
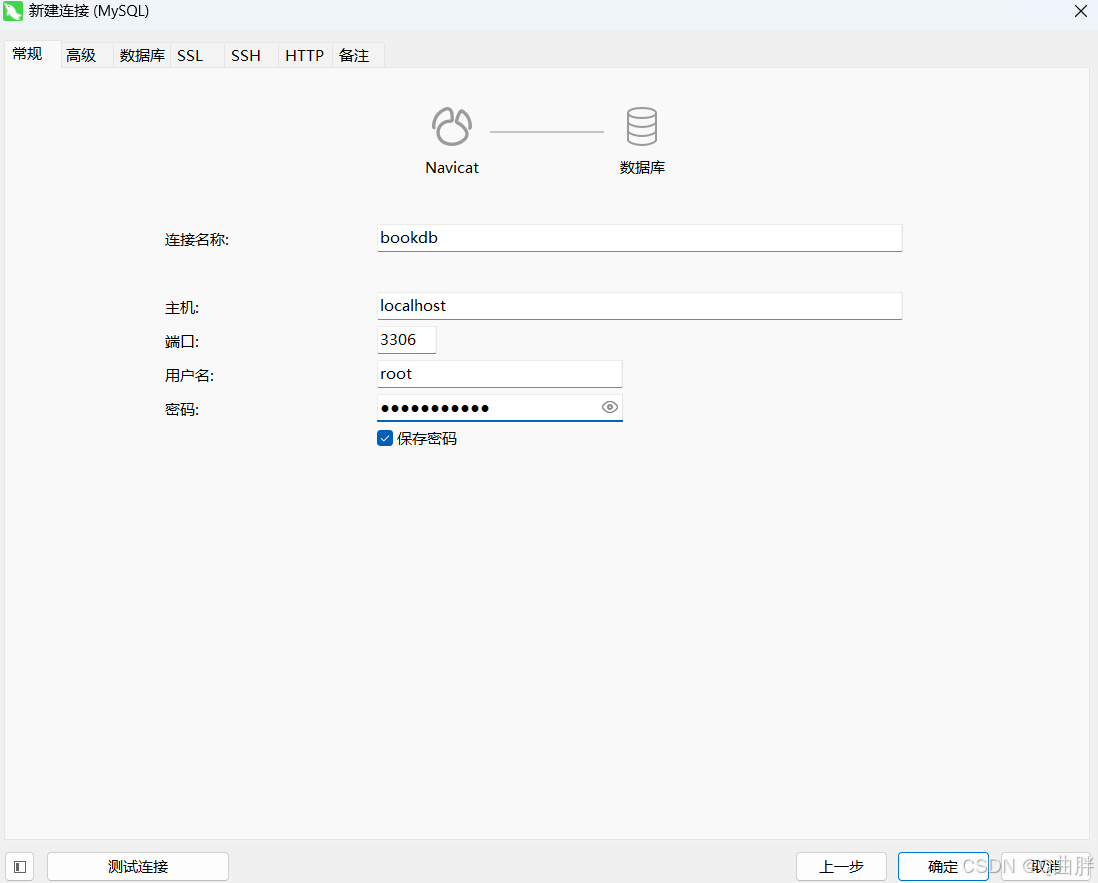
创建数据库,给名bookdb,并创建一个表给名user

继续创建字段,也注意id字段要设计为自动递增,方便以后注册时,id数往下递增

这样数据库的标题(账号,用户名,密码,身份....)就完成了。接着我们创建数据库的用户:点击表上方的对象
可以创建几个简单的账号,密码,用户名,方便以后操作

连接数据库所需的基本页面
连接所需设置:

找到连接的jar包,并复制
在创建的libs包里粘贴jar包并完成以下操作

1.网络连接及权限问题
<uses-permission android:name="android.permission.INTERNET" />
在AndroidManifest.xml 里添加网络权限
用于在AndroidManifest.xml文件中声明网络权限的XML标签。这个标签告诉Android系统,你的应用需要访问互联网。
<uses-permission android:name="android.permission.ACCESS_WIFI_STATE" />
文件中声明访问Wi-Fi状态权限的XML标签。这个标签告诉Android系统,你的应用需要访问设备的Wi-Fi状态信息。
2.设置布局并调用方法
public class MainActivity extends AppCompatActivity {

    @Override
    protected void onCreate(Bundle savedInstanceState) {
        super.onCreate(savedInstanceState);
        setContentView(R.layout.activity_main);
        Connection.mymysql();
   }
protected void onCreate(Bundle savedInstanceState) 声明了一个 onCreate 方法,它接收一个 Bundle 类型的参数,该参数可能包含之前保存的状态信息。
super.onCreate(savedInstanceState); 调用父类的 onCreate 方法,确保正确地初始化 Activity。
Connection.mymysql(); 调用了一个名为 Connection 的类的 mymysql 方法。这个方法可能是用于建立数据库连接的
//JDBCUtils.java界面
package com.example.loginproject.utils;
import java.sql.Connection;
import java.sql.DriverManager;
//导入了java.sql.Connection和java.sql.DriverManager类,这两个类是Java JDBC API的一部分,用于建立和管理数据库连接。
public class JDBCUtils {
private static String driver = "com.mysql.jdbc.Driver";// MySql驱动
private static String dbName = "bookdb";// 数据库名称
private static String user = "root";// 用户名
private static String password = "Qu123123123";// 密码
//定义了四个私有静态成员变量,用于存储数据库连接所需的信息,包括JDBC驱动类名、数据库名称、用户名和密码。
public static Connection getConn(){
Connection connection = null;
try{
Class.forName(driver);// 动态加载类
String ip = "192.168.168.199";// 写成本机地址,不能写成localhost,同时手机和电脑连接的网络必须是同一个
// 尝试建立到给定数据库URL的连接
connection = DriverManager.getConnection("jdbc:mysql://" + ip+ ":3306/" + dbName,
user, password);
System.out.println("连接成功");
}catch (Exception e){
System.out.println("连接失败");
e.printStackTrace();
}
return connection;
}}
3.UserDao对不同界面的行动进行方法定义
获取数据库连接: 使用 DBCUtils.getConn() 方法来获取数据库连接。
准备SQL查询语句: 准备一个SQL查询语句,用于检查提供的账号和密码是否与数据库中的记录匹配。
执行查询: 使用 PreparedStatement 执行查询,并设置参数防止SQL注入攻击。
处理查询结果: 检查查询结果集中是否有与提供的账号和密码匹配的记录。
返回结果状态: 根据查询结果返回不同的状态码。
public class UserDao {
private static final String TAG = "mysql-loginproject-UserDao";
/**
* function: 登录
*/
public int login(String userAccount, String userPassword) {
HashMap<String, Object> map = new HashMap<>();
// 根据数据库名称,建立连接
Connection connection = com.example.loginproject.utils.JDBCUtils.getConn();
int msg = 0;
try {
// mysql简单的查询语句。这里是根据user表的userAccount字段来查询某条记录
String sql = "select * from user where userAccount = ?";
if (connection != null) {// connection不为null表示与数据库建立了连接
PreparedStatement ps = connection.prepareStatement(sql);
if (ps != null) {
Log.e(TAG, "账号:" + userAccount);
//根据账号进行查询
ps.setString(1, userAccount);
// 执行sql查询语句并返回结果集
ResultSet rs = ps.executeQuery();
int count = rs.getMetaData().getColumnCount();
//将查到的内容储存在map里
while (rs.next()) {
// 注意:下标是从1开始的
for (int i = 1; i <= count; i++) {
String field = rs.getMetaData().getColumnName(i);
map.put(field, rs.getString(field));
}
}
connection.close();
ps.close();
if (map.size() != 0) {
StringBuilder s = new StringBuilder();
//寻找密码是否匹配
for (String key : map.keySet()) {
if (key.equals("userPassword")) {
if (userPassword.equals(map.get(key))) {
msg = 1; //密码正确
} else
msg = 2; //密码错误
break;
}
}
} else {
Log.e(TAG, "查询结果为空");
msg = 3;
}
} else {
msg = 0;
}
} else {
msg = 0;
}
} catch (Exception e) {
e.printStackTrace();
Log.d(TAG, "异常login:" + e.getMessage());
msg = 0;
}
return msg;
}
/**
* function: 注册
*/
public boolean register(User user) {
HashMap<String, Object> map = new HashMap<>();
// 根据数据库名称,建立连接
Connection connection = JDBCUtils.getConn();
try {
String sql = "insert into user(userAccount,userPassword,userName,userType,userState,userDel) values (?,?,?,?,?,?)";
if (connection != null) {// connection不为null表示与数据库建立了连接
PreparedStatement ps = connection.prepareStatement(sql);
if (ps != null) {
//将数据插入数据库
ps.setString(1, user.getUserAccount());
ps.setString(2, user.getUserPassword());
ps.setString(3, user.getUserName());
ps.setInt(4, user.getUserType());
ps.setInt(5, user.getUserState());
ps.setInt(6, user.getUserDel());
// 执行sql查询语句并返回结果集
int rs = ps.executeUpdate();
if (rs > 0)
return true;
else
return false;
} else {
return false;
}
} else {
return false;
}
} catch (Exception e) {
e.printStackTrace();
Log.e(TAG, "异常register:" + e.getMessage());
return false;
}
}
/**
* function: 根据账号进行查找该用户是否存在
*/
public User findUser(String userAccount) {
// 根据数据库名称,建立连接
Connection connection = JDBCUtils.getConn();
User user = null;
try {
String sql = "select * from user where userAccount = ?";
if (connection != null) {// connection不为null表示与数据库建立了连接
PreparedStatement ps = connection.prepareStatement(sql);
if (ps != null) {
ps.setString(1, userAccount);
ResultSet rs = ps.executeQuery();
while (rs.next()) {//用于从数据库查询结果集中提取用户信息,并使用这些信息创建一个新的 User 对象。下面是代码的逐行解释:
//注意:下标是从1开始
int id = rs.getInt(1);//这行代码从结果集 rs 中获取第一列的值,并将其赋值给变量 id。假设第一列是用户的唯一标识符或ID
String userAccount1 = rs.getString(2);。//这行代码从结果集 rs 中获取第二列的值,并将其赋值给变量 userAccount1。假设第二列是用户的账号。
String userPassword = rs.getString(3);//这行代码从结果集 rs 中获取第三列的值,并将其赋值给变量 userPassword。假设第三列是用户的密码。
String userName = rs.getString(4);//这行代码从结果集 rs 中获取第四列的值,并将其赋值给变量 userName。假设第四列是用户的姓名。
int userType = rs.getInt(5);//这行代码从结果集 rs 中获取第五列的值,并将其赋值给变量 userType。假设第五列是用户类型,可能是一个整数值,用于区分不同类型的用户。
int userState = rs.getInt(6);//这行代码从结果集 rs 中获取第六列的值,并将其赋值给变量 userState。假设第六列是用户的状态,可能是一个整数值,用于表示用户的激活状态或其他状态
int userDel = rs.getInt(7);//这行代码从结果集 rs 中获取第七列的值,并将其赋值给变量 userDel。假设第七列是用户的删除标志,可能是一个整数值,用于表示用户是否被标记为删除。
user = new User(id, userAccount1, userPassword, userName, userType, userState, userDel);//这行代码使用前面获取的变量值创建一个新的 User 对象,并将其赋值给变量 user。这里假设 User 类已经定义了相应的构造函数,该构造函数接受这些参数。
}
}
}
} catch (Exception e) {
e.printStackTrace();
Log.d(TAG, "异常findUser:" + e.getMessage());
return null;
}
return user;
}
public boolean select(String userAccount, String uesrName) {
Connection connection = JDBCUtils.getConn();
if (connection == null) {
Log.e("lzx", "无数据库连接");
return false;
} else {
String sql = "select * from user where userAccount = ? and userName = ?";
try {
PreparedStatement pre = connection.prepareStatement(sql);
pre.setString(1, userAccount);
pre.setString(2, uesrName);
ResultSet res = pre.executeQuery();
boolean t = res.next();
return t;
} catch (SQLException e) {
return false;
}
}
}
public boolean update(String userAccount, String userName, String userPassword) {
Connection connection = JDBCUtils.getConn();
if (connection == null) {
Log.e("lzx", "无数据库连接");
return false;
} else {
String sql = "update user set userPassword = ? where userAccount = ? and userName = ?";
try {
PreparedStatement pre= connection.prepareStatement(sql);
pre.setString(1, userPassword);
pre.setString(2, userAccount);
pre.setString(3, userName);
return pre.execute();
} catch (SQLException e) {
return false;
}
}
}
}
更多推荐


 21
 0
- 0


 已为社区贡献1条内容

所有评论(0)