
opencv Hough圆检测实现圆形表计在画面中位置的检测
前言
提醒:
文章内容为方便作者自己后日复习与查阅而进行的书写与发布,其中引用内容都会使用链接表明出处(如有侵权问题,请及时联系)。
其中内容多为一次书写,缺少检查与订正,如有问题或其他拓展及意见建议,欢迎评论区讨论交流。
代码与运行结果
import cv2
import numpy as np

# 初始化摄像头
cap = cv2.VideoCapture(0)

while True:
    # 读取视频流中的每一帧
    ret, frame = cap.read()
    if not ret:
        break

    # 获取图像的尺寸
    height, width = frame.shape[:2]
    center_x, center_y = width // 2, height // 2

    # 将图像转换为灰度图像
    gray = cv2.cvtColor(frame, cv2.COLOR_BGR2GRAY)

    # 应用高斯模糊,减少噪声
    blurred = cv2.GaussianBlur(gray, (15, 15), 0)

    # 使用霍夫圆变换检测圆形
    circles = cv2.HoughCircles(
        blurred,
        cv2.HOUGH_GRADIENT,
        dp=1.2,
        minDist=900,  # 圆心之间的最小距离
        param1=30,  # 边缘检测的高阈值
        param2=70,  # 圆心检测的累加器阈值
        minRadius=1,  # 最小圆半径
        maxRadius=100  # 最大圆半径
    )

    # 如果检测到圆形
    if circles is not None:
        # 将圆的坐标转换为整数
        circles = np.round(circles[0, :]).astype("int")

        # 遍历所有检测到的圆形
        for (x, y, r) in circles:
            # 绘制圆心
            cv2.circle(frame, (x, y), 3, (0, 255, 0), -1)
            # 绘制圆形
            cv2.circle(frame, (x, y), r, (0, 255, 0), 3)

            # 判断圆心的方位
            if y < center_y - 50:
                vertical_position = "Top"
            elif y > center_y + 50:
                vertical_position = "Bottom"
            else:
                vertical_position = "Center"

            if x < center_x - 50:
                horizontal_position = "Left"
            elif x > center_x + 50:
                horizontal_position = "Right"
            else:
                horizontal_position = "Center"

            # 输出圆心的方位
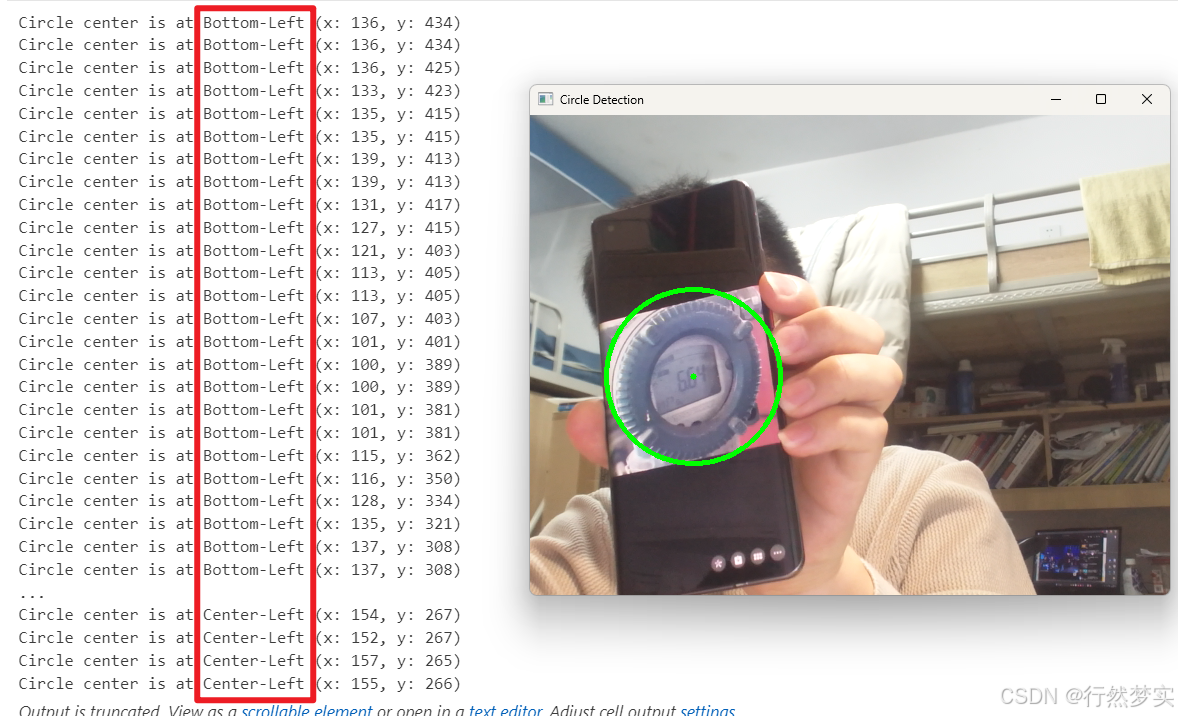
            print(f"Circle center is at {vertical_position}-{horizontal_position} (x: {x}, y: {y})")

    # 显示处理后的图像
    cv2.imshow("Circle Detection", frame)

    # 按下 'q' 键退出循环
    if cv2.waitKey(1) & 0xFF == ord('q'):
        break

# 释放摄像头资源
cap.release()
cv2.destroyAllWindows()
运行结果:
Hough检测相关知识
图像处理之Hough变换检测直线
图像处理之hough圆形检测
hough变换是如何检测出直线和圆的?
Hough直线检测数学原理
霍夫直线检测是一种在图像处理中用于检测直线的方法。其基本思想是将图像空间中的直线变换到参数空间中,通过在参数空间中寻找峰值来检测直线。
1. 直线的表示
在图像空间中,一条直线可以用以下公式表示:
y
=
m
x
+
b
y = mx + b
y=mx+b
其中,
m
m
m是斜率,
b
b
b是截距。然而,当直线接近垂直时,斜率会变得非常大,导致数值不稳定。因此,霍夫变换使用极坐标形式来表示直线:
r
=
x
cos
θ
+
y
sin
θ
r = x \cos \theta + y \sin \theta
r=xcosθ+ysinθ
其中,
r
r
r是原点到直线的垂直距离,
θ
\theta
θ是垂线与x轴的夹角。
2. 霍夫变换
霍夫变换的核心思想是将图像空间中的点映射到参数空间中。对于图像空间中的每一个点
(
x
,
y
)
(x, y)
(x,y),我们可以在参数空间中绘制一条曲线,表示所有可能通过该点的直线。这条曲线可以表示为:
r
=
x
cos
θ
+
y
sin
θ
r = x \cos \theta + y \sin \theta
r=xcosθ+ysinθ
通过改变
θ
\theta
θ的值(通常从0到180度),我们可以得到一系列的
r
r
r值。
3. 参数空间的积累
在参数空间中,每一条通过图像空间中点的曲线都会在某个点相交。这个交点代表了图像空间中的一条直线。因此,我们可以通过在参数空间中寻找交点来检测直线。
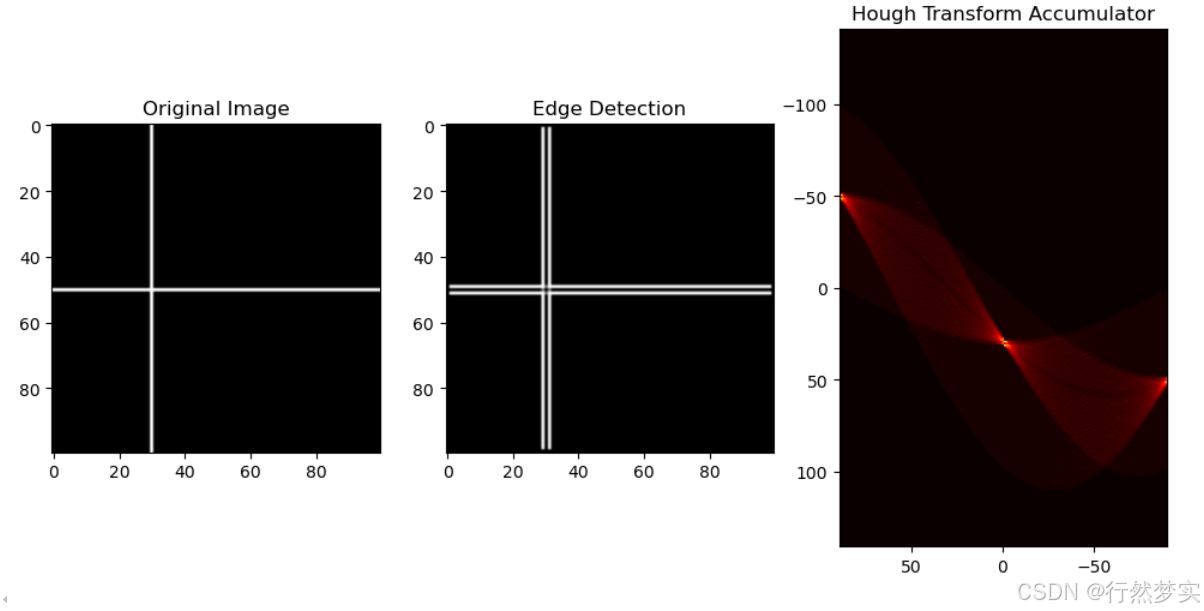
具体实现时,我们通常将参数空间离散化,形成一个累加器数组。对于图像空间中的每一个点,我们计算其在参数空间中对应的曲线,并在累加器数组中对应的位置加一。最终,累加器数组中的峰值位置就对应着图像空间中的直线。
4. 霍夫直线检测的步骤
- 边缘检测:首先对图像进行边缘检测,如使用Canny算子。
- 参数空间初始化:初始化一个累加器数组,用于存储参数空间中的值。
- 投票:对于边缘检测后的每一个点,计算其在参数空间中的对应曲线,并在累加器数组中投票。
- 检测峰值:在累加器数组中寻找峰值,这些峰值对应着图像空间中的直线。
5. 优点和缺点
优点:
- 能有效检测直线,即使直线存在断裂。
- 对噪声具有一定的鲁棒性。
缺点: - 计算复杂度较高,特别是当图像尺寸较大时。
- 需要调整的参数较多,如累加器数组的大小、峰值的阈值等。
霍夫直线检测是一种强大的直线检测工具,在计算机视觉和图像处理领域有着广泛的应用。
手动实现代码
import numpy as np
import matplotlib.pyplot as plt

# 创建一个简单的合成图像
def create_sample_image():
    image = np.zeros((100, 100))
    # 添加几条直线
    for x in range(100):
        image[50, x] = 1  # 水平直线
        image[x, 30] = 1  # 垂直直线
    return image

# Sobel边缘检测
def sobel_edge_detection(image):
    Gx = np.array([[-1, 0, 1], [-2, 0, 2], [-1, 0, 1]])
    Gy = np.array([[-1, -2, -1], [0, 0, 0], [1, 2, 1]])
    edges = np.zeros_like(image)
    for i in range(1, image.shape[0] - 1):
        for j in range(1, image.shape[1] - 1):
            Sx = np.sum(Gx * image[i-1:i+2, j-1:j+2])
            Sy = np.sum(Gy * image[i-1:i+2, j-1:j+2])
            edges[i, j] = np.sqrt(Sx**2 + Sy**2)
    return edges

# 霍夫变换
def hough_transform(edges):
    thetas = np.deg2rad(np.arange(-90, 90))
    width, height = edges.shape
    diag_len = int(np.sqrt(width**2 + height**2))
    rhos = np.linspace(-diag_len, diag_len, diag_len * 2)
    accumulator = np.zeros((2 * diag_len, len(thetas)), dtype=np.uint64)

    for y in range(height):
        for x in range(width):
            if edges[y, x] > 0:
                for theta_idx in range(len(thetas)):
                    theta = thetas[theta_idx]
                    rho = x * np.cos(theta) + y * np.sin(theta)
                    rho_idx = int(rho + diag_len)
                    accumulator[rho_idx, theta_idx] += 1

    return accumulator, thetas, rhos

# 创建样本图像
sample_image = create_sample_image()

# 边缘检测
edges = sobel_edge_detection(sample_image)

# 霍夫变换
accumulator, thetas, rhos = hough_transform(edges)

# 显示结果
plt.figure(figsize=(12, 6))

plt.subplot(1, 3, 1)
plt.title('Original Image')
plt.imshow(sample_image, cmap='gray')

plt.subplot(1, 3, 2)
plt.title('Edge Detection')
plt.imshow(edges, cmap='gray')

plt.subplot(1, 3, 3)
plt.title('Hough Transform Accumulator')
plt.imshow(accumulator, cmap='hot', extent=[np.rad2deg(thetas[-1]), np.rad2deg(thetas[0]), rhos[-1], rhos[0]])

plt.show()
运行结果:
Hough圆检测数学原理
霍夫圆形检测是一种在图像中检测圆形物体的计算机视觉技术。它基于霍夫变换,这是一种用于检测图像中几何形状的算法。以下是霍夫圆形检测的详细原理和数学公式:
- 圆形的数学表示
一个圆形在二维图像空间中可以用其中心点 ( x 0 , y 0 ) (x_0, y_0) (x0,y0) 和半径 r r r来描述。其方程为:
( x − x 0 ) 2 + ( y − y 0 ) 2 = r 2 (x - x_0)^2 + (y - y_0)^2 = r^2 (x−x0)2+(y−y0)2=r2 - 霍夫变换的基本思想
霍夫变换的基本思想是将图像空间中的点转换到参数空间中。在参数空间中,一个点对应于图像空间中的一个圆。通过在参数空间中寻找局部最大值,可以检测到图像中的圆形。 - 参数空间的构建
对于图像中的每个点 ( x , y ) (x, y) (x,y),我们可以将其转换为参数空间中的一个圆。参数空间中的每个点 ( x 0 , y 0 , r ) (x_0, y_0, r) (x0,y0,r)代表一个可能的圆心位置和半径。 - 累加器数组
霍夫圆形检测使用一个三维的累加器数组 A ( x 0 , y 0 , r ) A(x_0, y_0, r) A(x0,y0,r) 来记录每个可能的圆心位置和半径的出现次数。初始时,累加器数组被设置为0。 - 投票过程
对于图像中的每个边缘点 ( x , y ) (x, y) (x,y),我们遍历所有可能的半径 r r r和圆心角度 θ \theta θ,计算对应的圆心位置 ( x 0 , y 0 ) (x_0, y_0) (x0,y0),并在累加器数组中对应的位置增加1。计算公式为:
x 0 = x − r cos ( θ ) x_0 = x - r \cos(\theta) x0=x−rcos(θ)
y 0 = y − r sin ( θ ) y_0 = y - r \sin(\theta) y0=y−rsin(θ) - 检测圆形
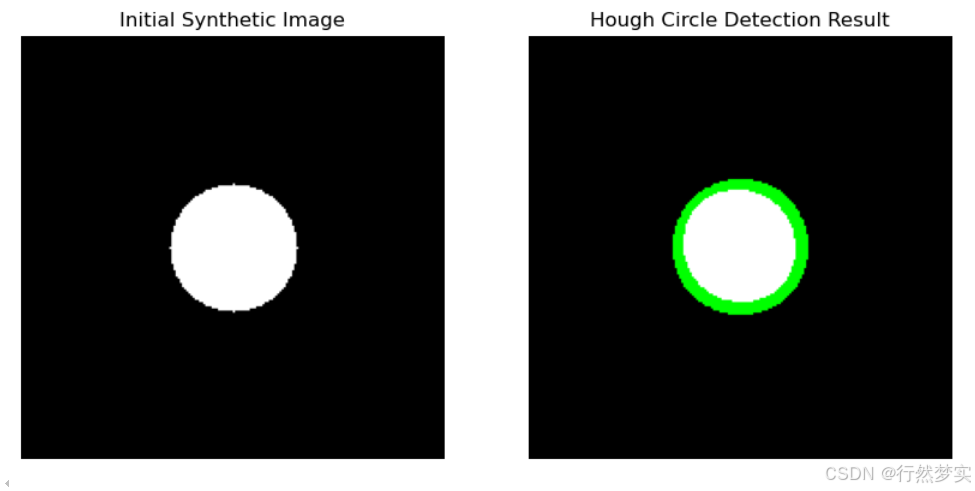
在投票过程完成后,累加器数组中的局部最大值对应于图像中的圆形。通过设定一个阈值,可以筛选出显著的圆形。 - 数学公式详细解释
7.1 圆的方程
圆的方程可以展开为:
x 2 − 2 x x 0 + x 0 2 + y 2 − 2 y y 0 + y 0 2 = r 2 x^2 - 2xx_0 + x_0^2 + y^2 - 2yy_0 + y_0^2 = r^2 x2−2xx0+x02+y2−2yy0+y02=r2
7.2 参数空间的表示
在参数空间中,我们考虑所有可能的圆心 ( x 0 , y 0 ) (x_0, y_0) (x0,y0) 和半径 r r r。对于每个边缘点 ( x , y ) (x, y) (x,y),我们将其转换为参数空间中的一系列点。
7.3 累加器数组的更新
对于每个边缘点 ( x , y ) (x, y) (x,y),我们遍历所有可能的半径 r r r,并计算对应的圆心位置 ( x 0 , y 0 ) (x_0, y_0) (x0,y0)。然后,我们在累加器数组 A ( x 0 , y 0 , r ) A(x_0, y_0, r) A(x0,y0,r)中对应的位置增加1:
A ( x 0 , y 0 , r ) = A ( x 0 , y 0 , r ) + 1 A(x_0, y_0, r) = A(x_0, y_0, r) + 1 A(x0,y0,r)=A(x0,y0,r)+1 - 算法步骤
- 预处理:对图像进行边缘检测,如使用Canny边缘检测器。
- 初始化累加器数组:创建一个三维累加器数组 A ( x 0 , y 0 , r ) A(x_0, y_0, r) A(x0,y0,r),并将所有值初始化为0。
- 投票:对于每个边缘点 ( x , y ) (x, y) (x,y),遍历所有可能的半径 r r r,计算对应的圆心位置 ( x 0 , y 0 ) (x_0, y_0) (x0,y0),并在累加器数组中对应的位置增加1。
- 检测圆形:在累加器数组中寻找局部最大值,这些最大值对应于图像中的圆形。
- 注意事项
- 噪声敏感:霍夫圆形检测对噪声敏感,因此通常需要在检测前对图像进行预处理,如边缘检测、平滑等。
- 计算复杂度:由于需要遍历多个参数,霍夫圆形检测的计算复杂度较高,特别是当图像尺寸和半径范围较大时。
手动代码实现
import cv2
import numpy as np
import matplotlib.pyplot as plt

def generate_synthetic_image(size, circle_center, circle_radius):
    # 创建一个黑色背景的图像
    image = np.zeros((size, size), dtype=np.uint8)

    # 绘制一个白色圆形
    cv2.circle(image, circle_center, circle_radius, 255, -1)

    return image

def hough_circle_detection(image, edge_threshold, radius_range):
    # 边缘检测
    edges = cv2.Canny(image, 50, 150)

    # 初始化累加器
    height, width = image.shape
    accumulator = np.zeros((height, width, radius_range[1] - radius_range[0]))

    # 投票过程
    for y in range(height):
        for x in range(width):
            if edges[y, x] > edge_threshold:
                for r in range(radius_range[0], radius_range[1]):
                    for theta in range(0, 360):
                        a = x - r * np.cos(np.deg2rad(theta))
                        b = y - r * np.sin(np.deg2rad(theta))
                        if a >= 0 and a < width and b >= 0 and b < height:
                            accumulator[int(b), int(a), r - radius_range[0]] += 1

    # 检测圆形
    circles = []
    threshold = 0.5 * np.max(accumulator)
    for r in range(radius_range[1] - radius_range[0]):
        for y in range(height):
            for x in range(width):
                if accumulator[y, x, r] > threshold:
                    circles.append((x, y, r + radius_range[0]))

    return circles

# 生成合成图像
image_size = 200
circle_center = (100, 100)
circle_radius = 30
synthetic_image = generate_synthetic_image(image_size, circle_center, circle_radius)

# 设置参数
edge_threshold = 100
radius_range = (10, 50)  # 圆的半径范围

# 执行霍夫圆检测
detected_circles = hough_circle_detection(synthetic_image, edge_threshold, radius_range)

# 绘制检测结果
output_image = cv2.cvtColor(synthetic_image, cv2.COLOR_GRAY2BGR)
for x, y, r in detected_circles:
    cv2.circle(output_image, (x, y), r, (0, 255, 0), 2)

# 显示初始图像和检测结果
plt.figure(figsize=(10, 5))

plt.subplot(1, 2, 1)
plt.title('Initial Synthetic Image')
plt.imshow(synthetic_image, cmap='gray')
plt.axis('off')

plt.subplot(1, 2, 2)
plt.title('Hough Circle Detection Result')
plt.imshow(cv2.cvtColor(output_image, cv2.COLOR_BGR2RGB))
plt.axis('off')

plt.show()
运行结果:
更多推荐


 18
 0
- 0


 已为社区贡献2条内容

所有评论(0)