
苍穹外卖Day6 | 微信登录、商品浏览、HttpClient、微信小程序开发、补充Day4的代码
目录
HttpClient
在这个项目中,学习HttpClient的目的是向微信接口服务请求服务,完成微信小程序的用户登录功能!!!!详情见微信登录模块
使用HttpClient可以构造请求并发送请求;HttpClients相当于HttpClient的构建器;
HttpClient是一个接口;CloseableHttpClient是HttpClient的实现类
1. 介绍
可以在java程序中通过编码的方式发送HTTP请求
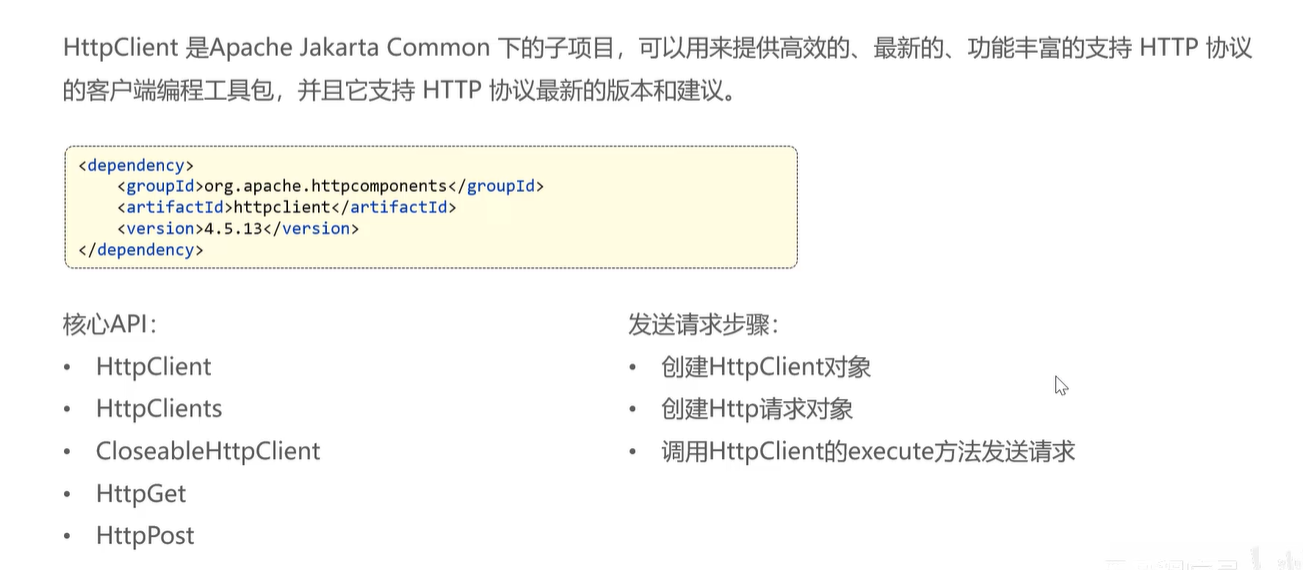
但是在这个项目中,没有导入这个依赖也可以使用,是因为导入了阿里云sdk-oss,他底层使用了HttpClient,已经传递过来jar包
2. 入门案例
分别测试get请求和post请求,在com.sky.test下新建HttpClientTest
package com.sky.test;

import com.alibaba.fastjson.JSONObject;
import org.apache.http.HttpEntity;
import org.apache.http.client.methods.CloseableHttpResponse;
import org.apache.http.client.methods.HttpGet;
import org.apache.http.client.methods.HttpPost;
import org.apache.http.entity.StringEntity;
import org.apache.http.impl.client.CloseableHttpClient;
import org.apache.http.impl.client.HttpClients;
import org.apache.http.util.EntityUtils;
import org.junit.jupiter.api.Test;
import org.springframework.boot.test.context.SpringBootTest;

import java.io.IOException;

@SpringBootTest
public class HttpClientTest {

    /**
     * 测试通过httpclient发送GET方式的请求
     */
    @Test
    public void testGET() throws Exception {
        // 创建httpclient对象
        CloseableHttpClient httpClient = HttpClients.createDefault();

        // 创建请求对象
        HttpGet httpGet = new HttpGet("http://localhost:8080/user/shop/status");

        // 发送请求,接受相应结果
        CloseableHttpResponse response = httpClient.execute(httpGet);

        // 获取服务端返回的状态码
        int statusCode = response.getStatusLine().getStatusCode();
        System.out.println("服务器端返回的状态码为:" + statusCode);

        HttpEntity entity = response.getEntity();
        String body = EntityUtils.toString(entity);
        System.out.println("服务器端返回的数据为:" + body);

        //关闭资源
        response.close();
        httpClient.close();
    }

    /**
     * 测试通过httpclient发送POST方式的请求
     */
    @Test
    public void testPOST() throws Exception{
        // 创建httpclient对象
        CloseableHttpClient httpClient = HttpClients.createDefault();

        // 创建请求对象
        HttpPost httpPost = new HttpPost("http://localhost:8080/admin/employee/login");

        JSONObject jsonObject = new JSONObject();
        jsonObject.put("username", "admin");
        jsonObject.put("password", "123456");

        StringEntity entity = new StringEntity(jsonObject.toString());
        // 指定请求编码方式
        entity.setContentEncoding("utf-8");
        // 数据格式
        entity.setContentType("application/json");
        httpPost.setEntity(entity);

        // 发送请求
        CloseableHttpResponse response = httpClient.execute(httpPost);

        // 解析返回的结果
        int statusCode = response.getStatusLine().getStatusCode();
        System.out.println("响应码为:" + statusCode);

        HttpEntity entity1 = response.getEntity();
        String body = EntityUtils.toString(entity1);
        System.out.println("响应数据为:" + body);

        // 关闭资源
        response.close();
        httpClient.close();
    }
}
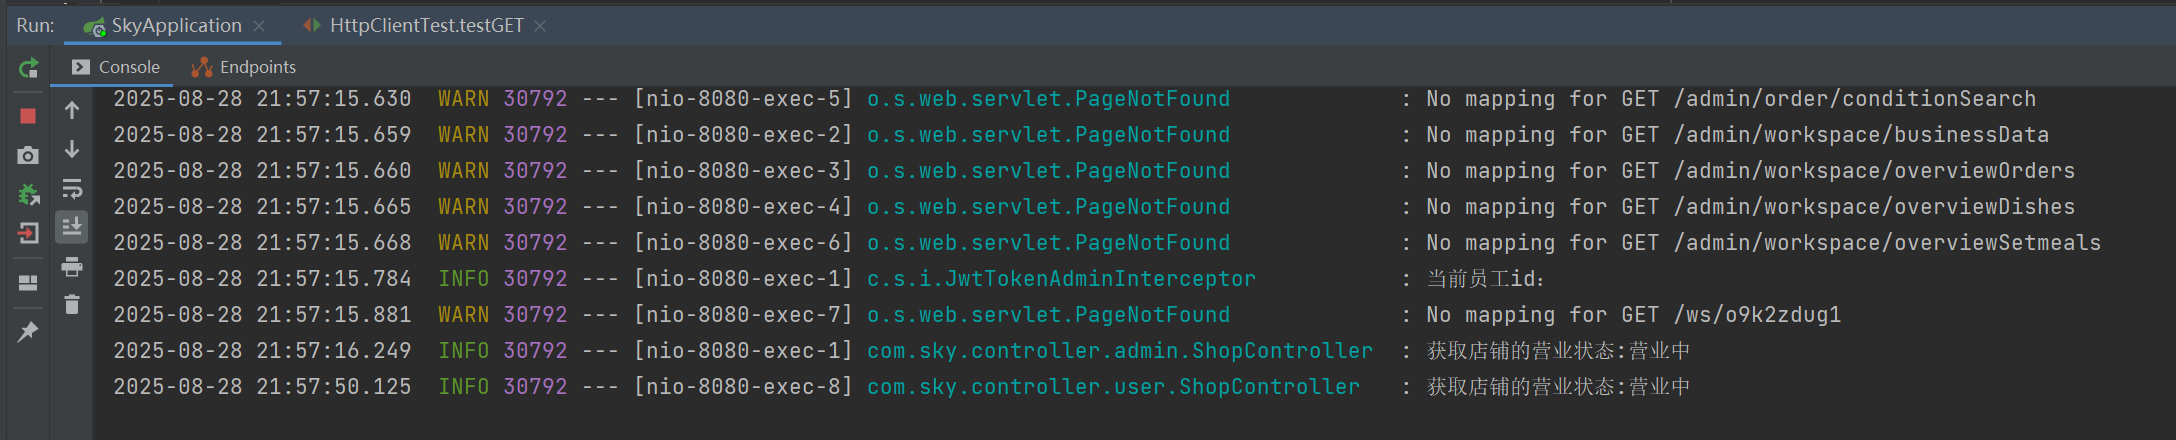
GET请求测试:
测试需要先运行SkyApplication主程序,再运行测试程序

POST请求测试:
和get的区别是需要传参数,需要提前设置对象
package com.sky.utils;

import com.alibaba.fastjson.JSONObject;
import org.apache.http.NameValuePair;
import org.apache.http.client.config.RequestConfig;
import org.apache.http.client.entity.UrlEncodedFormEntity;
import org.apache.http.client.methods.CloseableHttpResponse;
import org.apache.http.client.methods.HttpGet;
import org.apache.http.client.methods.HttpPost;
import org.apache.http.client.utils.URIBuilder;
import org.apache.http.entity.StringEntity;
import org.apache.http.impl.client.CloseableHttpClient;
import org.apache.http.impl.client.HttpClients;
import org.apache.http.message.BasicNameValuePair;
import org.apache.http.util.EntityUtils;

import java.io.IOException;
import java.net.URI;
import java.util.ArrayList;
import java.util.List;
import java.util.Map;

/**
 * Http工具类
 */
public class HttpClientUtil {

    static final  int TIMEOUT_MSEC = 5 * 1000;

    /**
     * 发送GET方式请求
     * @param url
     * @param paramMap
     * @return
     */
    public static String doGet(String url,Map<String,String> paramMap){
        // 创建Httpclient对象
        CloseableHttpClient httpClient = HttpClients.createDefault();

        String result = "";
        CloseableHttpResponse response = null;

        try{
            URIBuilder builder = new URIBuilder(url);
            if(paramMap != null){
                for (String key : paramMap.keySet()) {
                    builder.addParameter(key,paramMap.get(key));
                }
            }
            URI uri = builder.build();

            //创建GET请求
            HttpGet httpGet = new HttpGet(uri);

            //发送请求
            response = httpClient.execute(httpGet);

            //判断响应状态
            if(response.getStatusLine().getStatusCode() == 200){
                result = EntityUtils.toString(response.getEntity(),"UTF-8");
            }
        }catch (Exception e){
            e.printStackTrace();
        }finally {
            try {
                response.close();
                httpClient.close();
            } catch (IOException e) {
                e.printStackTrace();
            }
        }

        return result;
    }

    /**
     * 发送POST方式请求
     * @param url
     * @param paramMap
     * @return
     * @throws IOException
     */
    public static String doPost(String url, Map<String, String> paramMap) throws IOException {
        // 创建Httpclient对象
        CloseableHttpClient httpClient = HttpClients.createDefault();
        CloseableHttpResponse response = null;
        String resultString = "";

        try {
            // 创建Http Post请求
            HttpPost httpPost = new HttpPost(url);

            // 创建参数列表
            if (paramMap != null) {
                List<NameValuePair> paramList = new ArrayList();
                for (Map.Entry<String, String> param : paramMap.entrySet()) {
                    paramList.add(new BasicNameValuePair(param.getKey(), param.getValue()));
                }
                // 模拟表单
                UrlEncodedFormEntity entity = new UrlEncodedFormEntity(paramList);
                httpPost.setEntity(entity);
            }

            httpPost.setConfig(builderRequestConfig());

            // 执行http请求
            response = httpClient.execute(httpPost);

            resultString = EntityUtils.toString(response.getEntity(), "UTF-8");
        } catch (Exception e) {
            throw e;
        } finally {
            try {
                response.close();
            } catch (IOException e) {
                e.printStackTrace();
            }
        }

        return resultString;
    }

    /**
     * 发送POST方式请求
     * @param url
     * @param paramMap
     * @return
     * @throws IOException
     */
    public static String doPost4Json(String url, Map<String, String> paramMap) throws IOException {
        // 创建Httpclient对象
        CloseableHttpClient httpClient = HttpClients.createDefault();
        CloseableHttpResponse response = null;
        String resultString = "";

        try {
            // 创建Http Post请求
            HttpPost httpPost = new HttpPost(url);

            if (paramMap != null) {
                //构造json格式数据
                JSONObject jsonObject = new JSONObject();
                for (Map.Entry<String, String> param : paramMap.entrySet()) {
                    jsonObject.put(param.getKey(),param.getValue());
                }
                StringEntity entity = new StringEntity(jsonObject.toString(),"utf-8");
                //设置请求编码
                entity.setContentEncoding("utf-8");
                //设置数据类型
                entity.setContentType("application/json");
                httpPost.setEntity(entity);
            }

            httpPost.setConfig(builderRequestConfig());

            // 执行http请求
            response = httpClient.execute(httpPost);

            resultString = EntityUtils.toString(response.getEntity(), "UTF-8");
        } catch (Exception e) {
            throw e;
        } finally {
            try {
                response.close();
            } catch (IOException e) {
                e.printStackTrace();
            }
        }

        return resultString;
    }
    private static RequestConfig builderRequestConfig() {
        return RequestConfig.custom()
                .setConnectTimeout(TIMEOUT_MSEC)
                .setConnectionRequestTimeout(TIMEOUT_MSEC)
                .setSocketTimeout(TIMEOUT_MSEC).build();
    }

}
实际在代码中提前封装好了一个工具类HttpClientUtil
3. GET和POST请求
- GET 请求:本质是 “获取资源”,客户端向服务器请求已存在的资源(如网页、图片、接口数据),请求参数会附加在 URL 中。
例:访问https://example.com/search?keyword=cpp&page=1,其中keyword=cpp和page=1就是 GET 请求的参数。 - POST 请求:本质是 “提交数据”,客户端向服务器发送新数据(如表单提交、注册信息、文件上传),请求参数会放在请求体(Request Body)中,不暴露在 URL 里。
例:用户填写注册表单(用户名、密码)后点击提交,数据会通过 POST 的请求体发送到服务器,URL 仍为https://example.com/register。
| 对比维度 | GET 请求 | POST 请求 |
|---|---|---|
| 数据传递位置 | 附加在 URL 后,格式为 URL?参数1=值1&参数2=值2 | 放在请求体(Request Body)中,URL 不可见 |
| 数据可见性 | 可见(URL 会被浏览器记录、服务器日志保存) | 不可见(需通过抓包工具查看,普通用户无法直接看到) |
| 数据类型限制 | 仅支持 ASCII 字符(如字母、数字、常见符号) | 无限制,可传递二进制数据(如图片、文件)、特殊字符 |
| 数据大小限制 | 受 URL 长度限制(不同浏览器 / 服务器有差异,通常 2KB~8KB) | 理论无限制,实际由服务器配置(如 Tomcat 默认限制 2MB,可修改) |
| 缓存支持 | 支持(浏览器会缓存 GET 请求的结果,下次相同请求直接用缓存) | 不支持(默认不缓存,需手动配置特殊响应头才可能缓存) |
| 历史记录 | 会被浏览器历史记录保存(URL 含参数) | 不会保存请求体数据,历史记录仅显示 URL |
| 幂等性 | 幂等(多次请求结果一致,不会改变服务器状态) | 非幂等(多次请求可能改变服务器状态,如重复提交订单) |
| 安全性 | 低(参数暴露,不适合传递敏感数据) | 较高(参数隐藏,适合传递敏感数据,但需配合 HTTPS 加密) |
| 主要用途 | 查询、获取资源(如搜索、分页、查看详情) | 提交、修改数据(如注册、登录、上传文件、提交订单) |
JWT组成部分
JWT(JSON Web Token)由三部分组成,用英文句号(.)分隔,整体格式为 Header.Payload.Signature。这三部分分别承担不同功能,共同保障令牌的可识别性、数据传递和安全性。
1. Header(头部)
-
作用:描述 JWT 的元数据,包括令牌类型(默认是
JWT)和使用的签名算法。 -
格式:JSON 格式,经过 Base64 编码后作为 JWT 的第一部分。
-
常见字段:
alg:指定签名算法(如HS256(HMAC SHA-256)、RS256(RSA SHA-256)等);typ:令牌类型,固定为JWT。
-
编码后:Base64 编码后得到字符串(如
eyJhbGciOiJIUzI1NiIsInR5cCI6IkpXVCJ9),这部分是 JWT 的第一部分。
2. Payload(负载 / 声明)
-
作用:存储需要传递的核心数据(如用户信息、令牌有效期等),是 JWT 的主体内容。
-
格式:JSON 格式,经过 Base64 编码后作为 JWT 的第二部分。
-
内容分类(详见前文 “负载信息”):
- 注册声明(如
exp过期时间、iat签发时间); - 公共声明(自定义公开信息,如用户角色);
- 私有声明(业务自定义信息,如用户 ID)。
- 注册声明(如
-
编码后:Base64 编码后得到字符串(如
eyJzdWIiOiIxMjM0NTYiLCJuYW1lIjoiem9leSIsImV4cCI6MTY5MDAwMDAwMCwicm9sZSI6InVzZXIifQ),作为 JWT 的第二部分。 -
注意:Base64 编码是可逆的(可直接解码查看内容),因此 Payload 不能存储敏感信息(如密码、密钥)。
3. Signature(签名)
-
作用:对 Header 和 Payload 进行签名,用于验证令牌的完整性(防止被篡改)和真实性(确认来自合法签发者)。
-
生成方式:
- 用 Header 中指定的算法(如
HS256); - 结合服务器端的密钥(Secret);
- 对 “Base64 编码的 Header +
.+ Base64 编码的 Payload” 进行签名计算。
- 用 Header 中指定的算法(如
-
示例:
假设 Header 和 Payload 编码后为eyJhbGciOiJIUzI1NiIsInR5cCI6IkpXVCJ9.eyJzdWIiOiIxMjM0NTYiLCJuYW1lIjoiem9leSIsImV4cCI6MTY5MDAwMDAwMCwicm9sZSI6InVzZXIifQ,使用密钥mySecretKey签名后,得到签名字符串(如SflKxwRJSMeKKF2QT4fwpMeJf36POk6yJV_adQssw5c),作为 JWT 的第三部分。
将三部分用 . 连接,最终得到完整的 JWT 令牌
核心作用总结
- Header:告诉接收方 “用什么算法验证签名”;
- Payload:传递 “用户身份、权限、有效期” 等核心数据;
- Signature:通过签名确保 “令牌未被篡改” 且 “来自合法服务器”。
当客户端携带 JWT 访问服务器时,服务器会重新计算签名并与令牌中的 Signature 比对,若一致则认为令牌有效,否则拒绝请求。这一机制实现了无状态的身份验证,适合分布式系统(如微信小程序后端)。
微信小程序开发
1. 介绍
个人权限没有支付功能
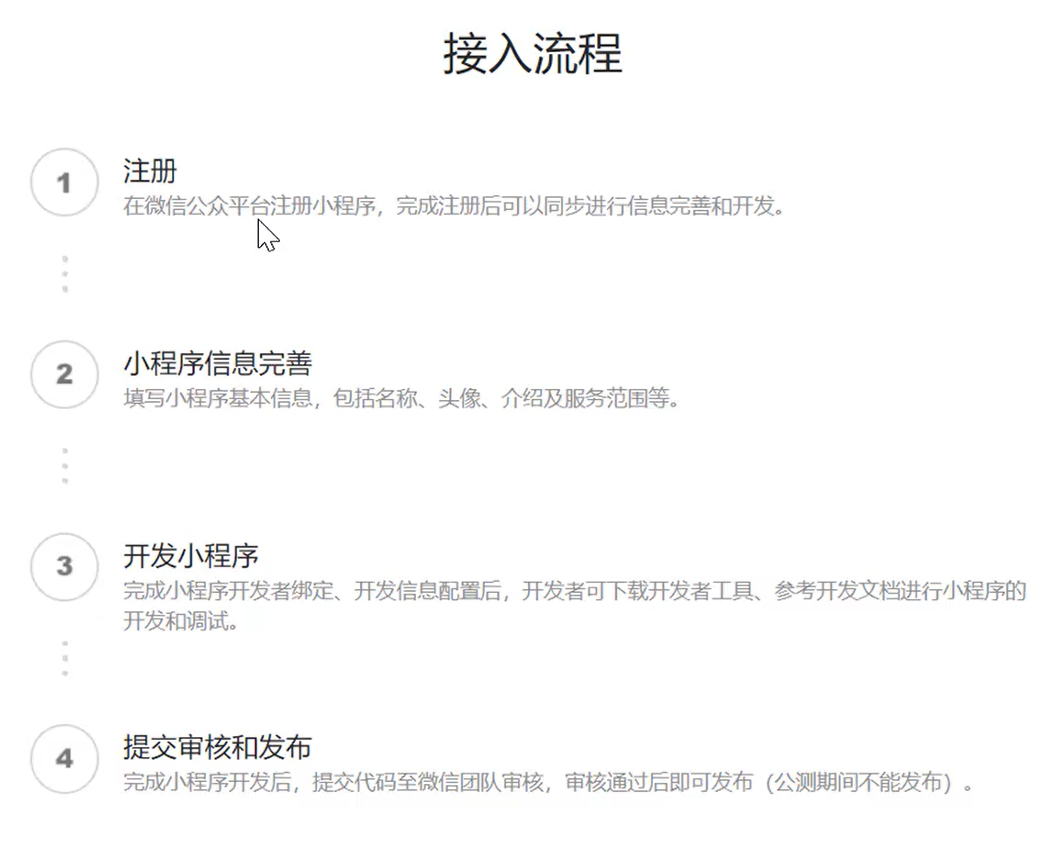
2. 准备工作
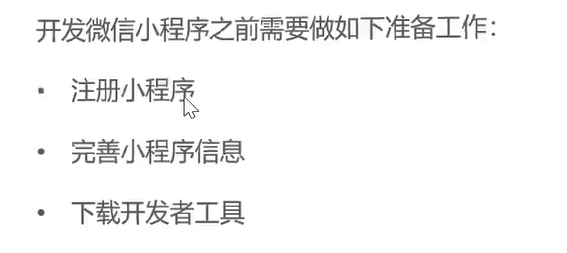
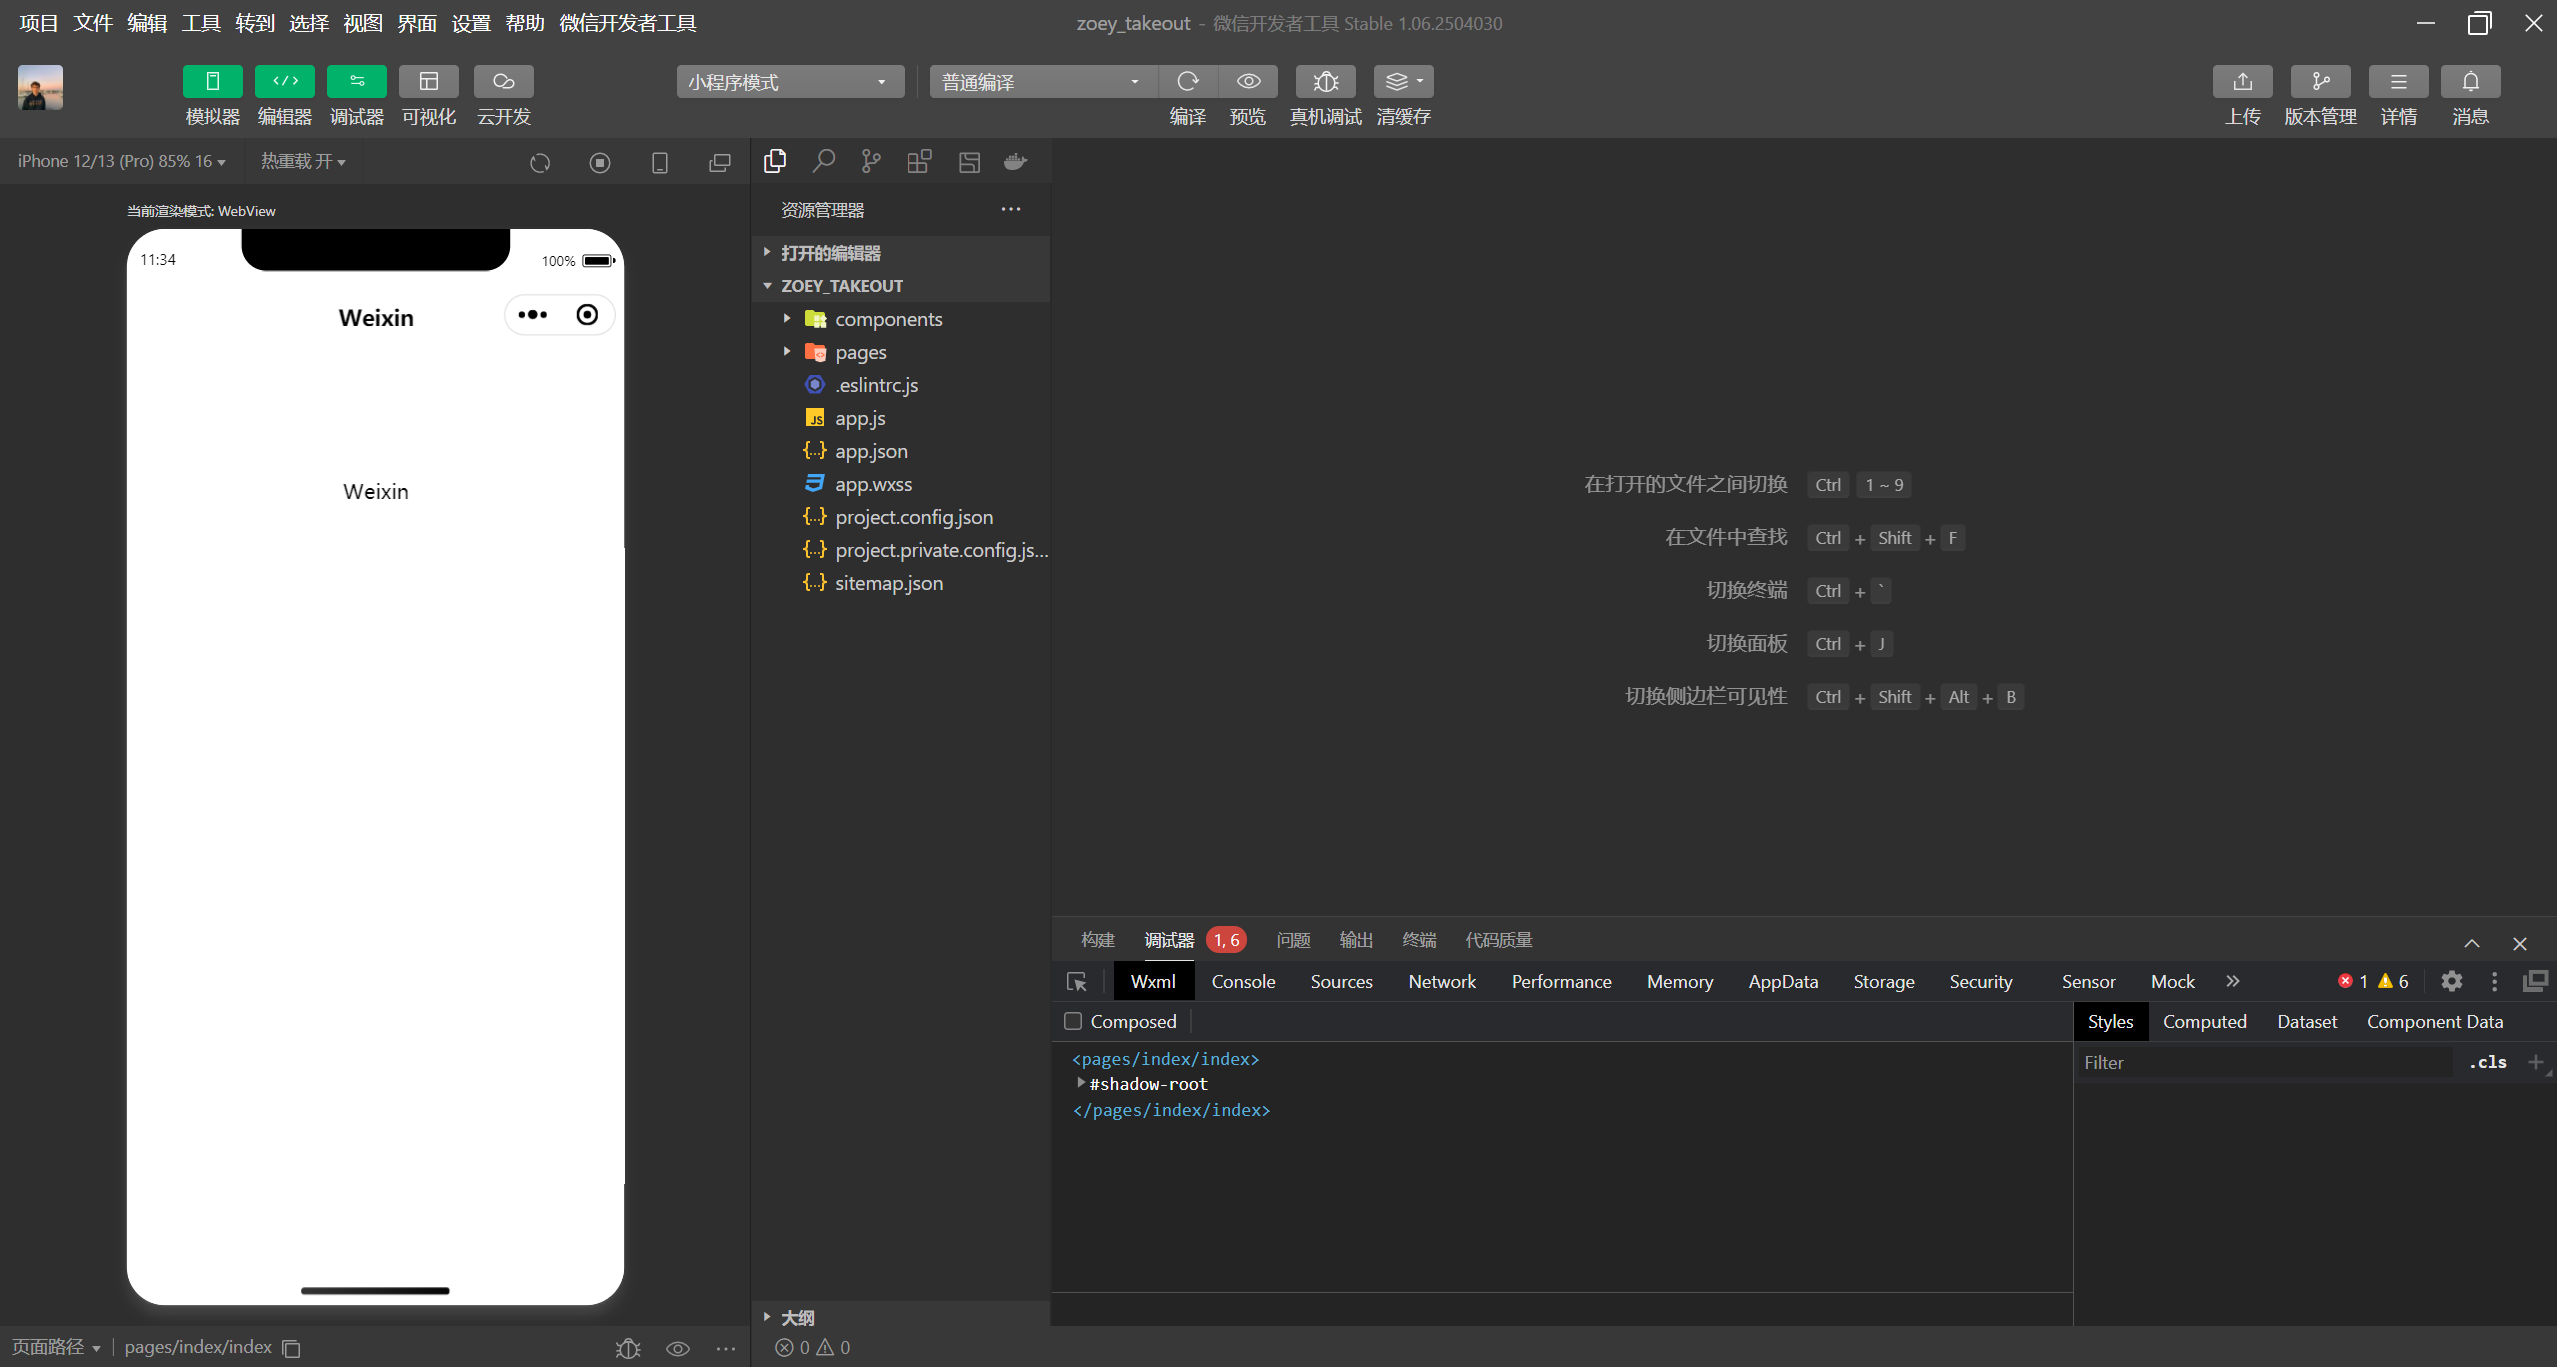
开发者工具:模拟器、编辑器、调试器
JavaScript 是一种轻量级的、解释型的编程语言,主要用于为网页添加交互功能,是前端开发的核心技术之一(与 HTML、CSS 并称前端三要素)。但如今它的应用早已超越网页,可用于服务器端开发、移动应用开发、桌面应用开发等多个领域。
主要特点
- 跨平台性:依托浏览器运行,不受操作系统限制(Windows、macOS、Linux 等都支持)。
- 弱类型语言:变量类型无需提前声明,可动态改变(如一个变量先存储数字,后存储字符串)。
- 单线程:同一时间只能执行一个任务,通过异步编程(如回调函数、Promise)处理并发操作。
- 多范式:支持面向对象编程(OOP)、函数式编程等多种编程范式。
- 解释执行:无需编译,由浏览器的 JavaScript 引擎(如 V8 引擎)直接解析执行。
3. 入门案例
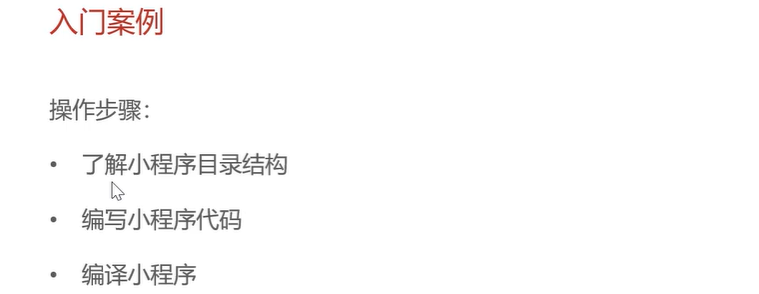
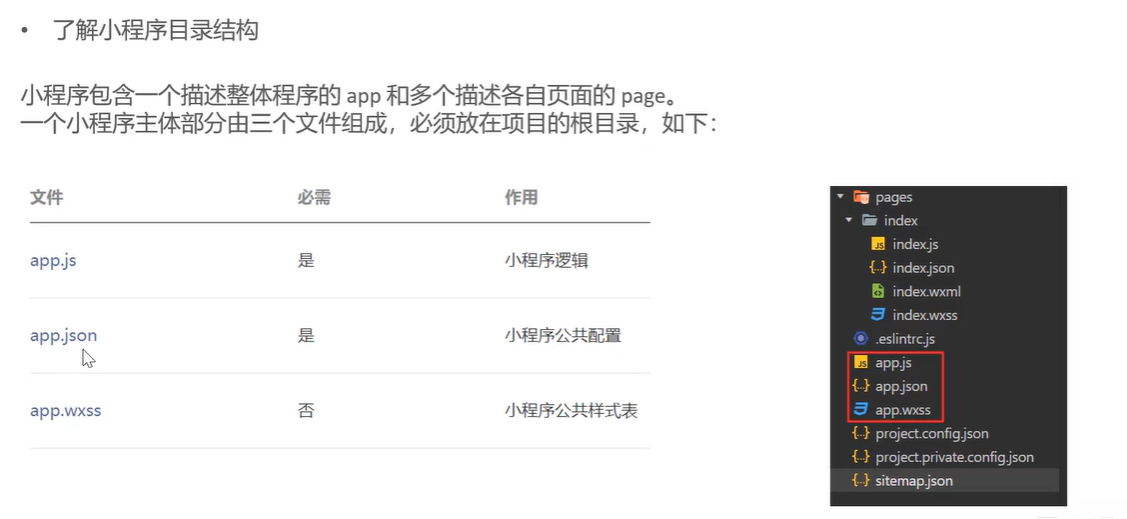
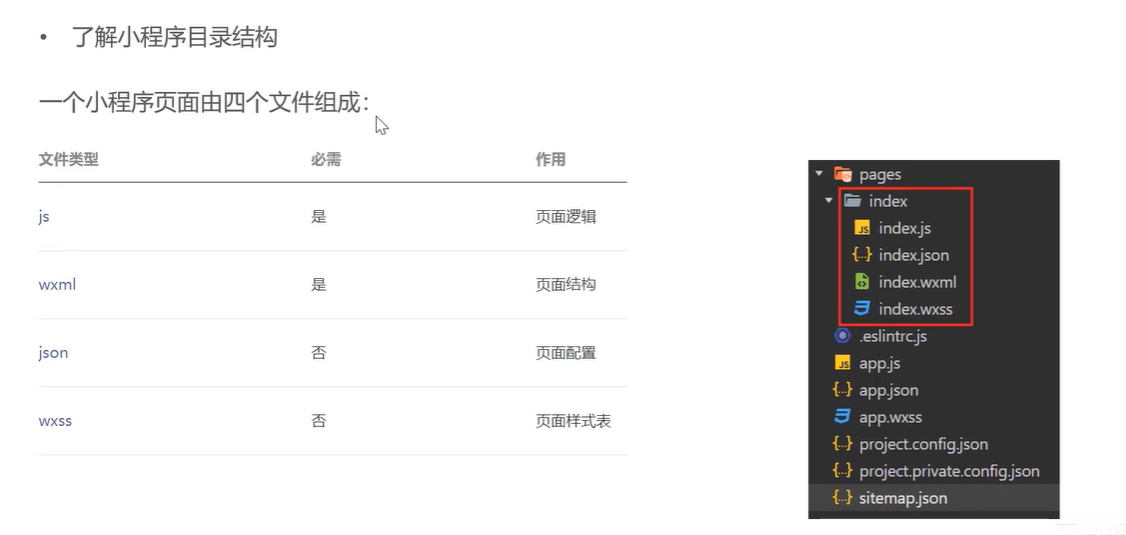
wxss类似于前端css
微信登录需要获取微信用户的授权码
时效性
- 短期有效:授权码仅在较短的时间内有效,一般有效期为 5 分钟左右。如果在有效时间内没有使用该授权码去换取用户的访问令牌(access_token) 等信息,那么该授权码就会失效,无法再用于后续的操作。这样的设计是为了保障安全性,防止授权码被他人截获后长时间利用。
- 一次性使用:一旦授权码被成功使用来换取用户的访问令牌等信息后,无论操作是否成功,该授权码都会立即失效,不能再次使用,进一步提升了安全性。
唯一性
- 每个会话唯一:对于每一次微信登录请求,微信服务器都会生成一个独一无二的授权码。即使是同一个用户在短时间内多次发起微信登录,每次获取到的授权码也是不同的。这可以有效避免授权码被猜测或复用,保证每个登录操作的独立性和安全性。
保密性
- 不公开传输:授权码是由微信官方服务器生成后,通过安全的通道返回给应用方的服务器,不会在客户端(如小程序、APP)与应用服务器之间的普通通信过程中公开传输,减少了被中间人攻击截获的风险。
- 不可预测性:授权码是微信服务器按照复杂的算法随机生成的,其值没有明显规律,无法被轻易猜测或伪造,从而保护用户的登录过程和隐私安全。
与用户绑定
- 特定用户关联:授权码是与发起登录请求的微信用户账号紧密关联的。通过该授权码换取的用户信息,也只对应特定的微信用户,不同用户的授权码不能交叉使用,确保获取到的用户身份信息准确且与发起登录的用户匹配。

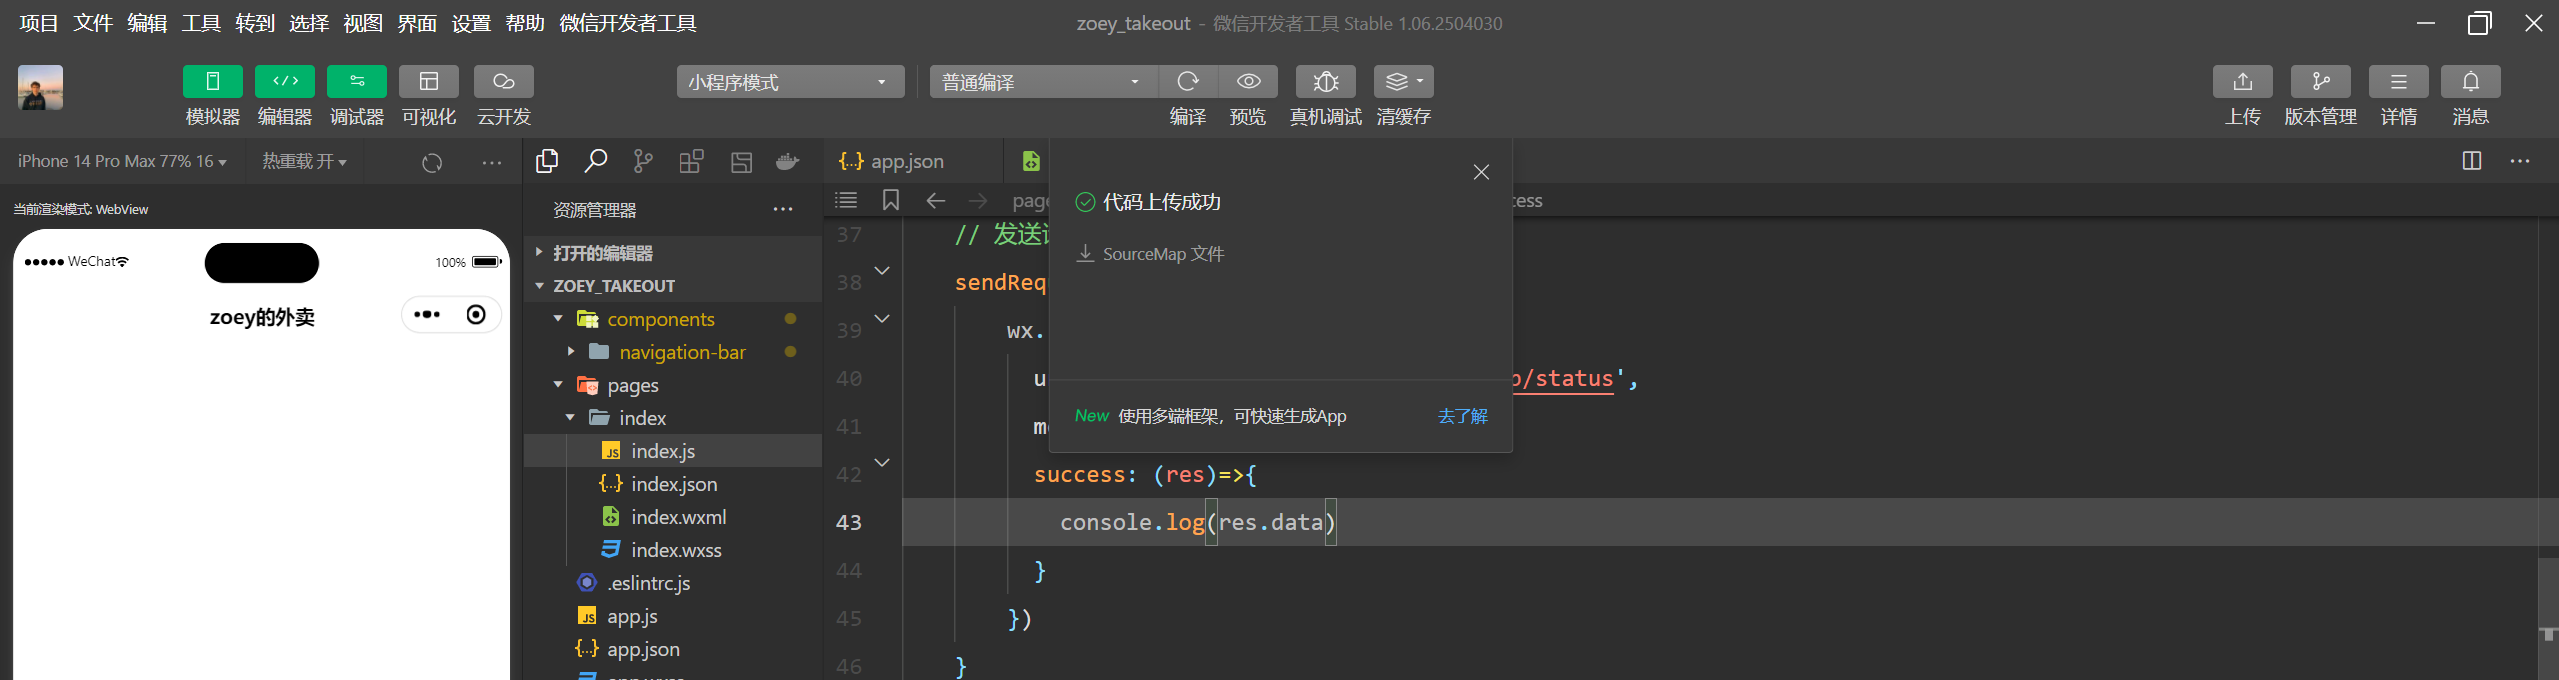
上传代码后需要提交审核
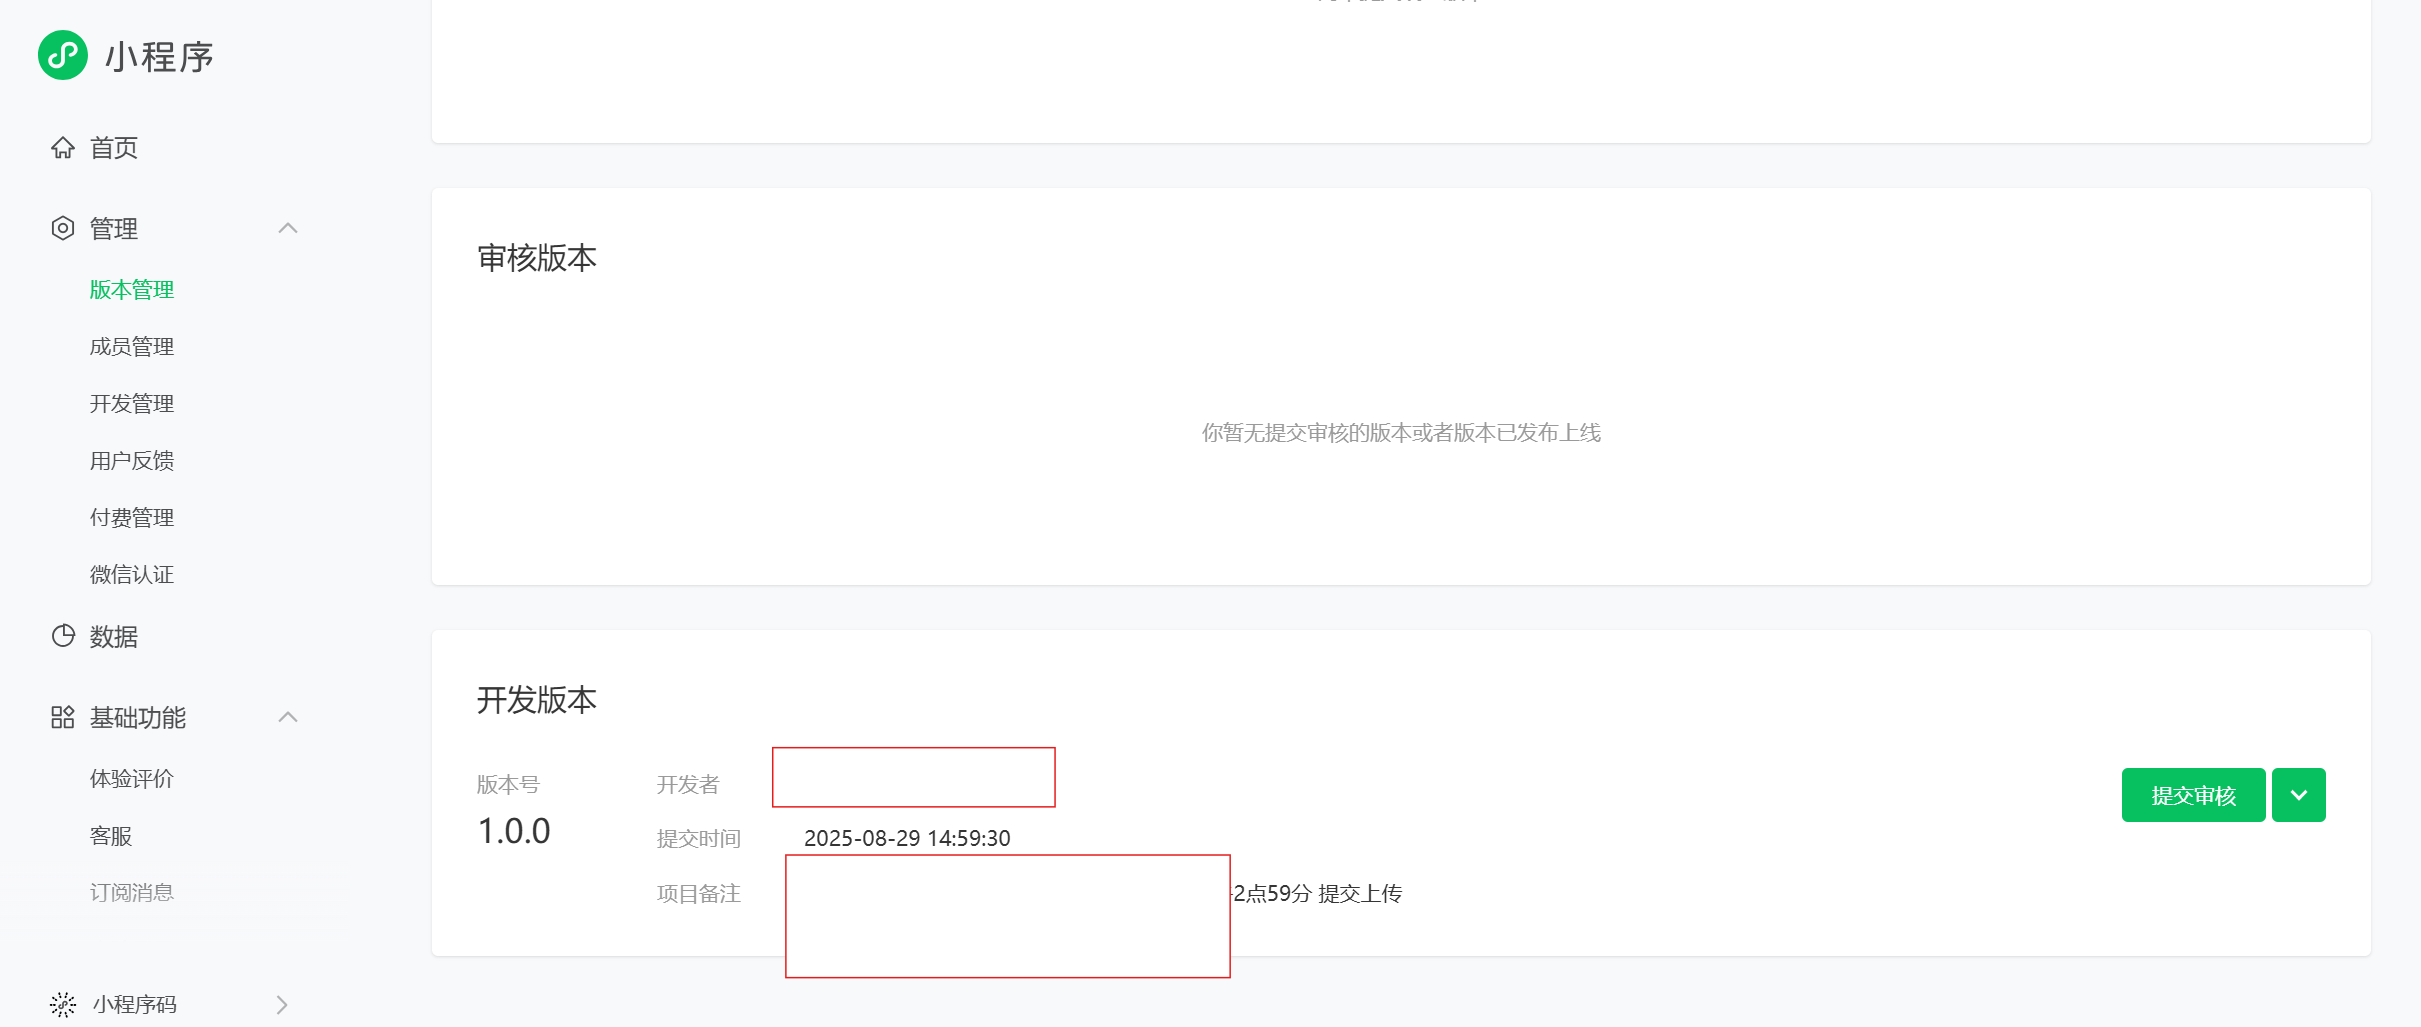
在管理--版本管理里面可以看到开发的版本
index.js里面是逻辑
// index.js
Page({
    data:{
        msg:'hello world',
        nickName:'',
        url:'',
        code:''
    },

    // 获取微信用户的头像和昵称
    getUserInfo(){
        wx.getUserProfile({
          desc: '获取用户信息',
          success: (res) =>{
              console.log(res.userInfo)
              //为数据赋值
              this.setData({
                  nickName: res.userInfo.nickName,
                  url: res.userInfo.avatarUrl
              })
          }
        })
    },

    // 微信登录,获取微信用户的授权码
    wxLogin(){
        wx.login({
          success: (res) => {
            console.log(res.code)
            this.setData({
                code: res.code
            })
          },
        })
    },

    // 发送请求
    sendRequest(){
        wx.request({
          url: 'http://localhost:8080/user/shop/status',
          method:'GET',
          success: (res)=>{
            console.log(res.data)
          }
        })
    }
})
index.wxml类似于html,是页面结构
<!--index.wxml-->
<navigation-bar title="zoey的外卖" back="{{false}}" color="black" background="#FFF"></navigation-bar>
<scroll-view class="scrollarea" scroll-y type="list">
  <view class="container">
    {{msg}}
  </view>

  <view>
    <button bindtap="getUserInfo" type="primary">获取用户信息</button>
    昵称:{{nickName}}
    <image style="width: 100px;height: 100px;" src="{{url}}"></image>
  </view>

  <view>
      <button bindtap="wxLogin" type="warn">微信登录</button>
      授权码:{{code}}
  </view>

  <view>
      <button bindtap="sendRequest" type="default">发送请求</button>
  </view>
</scroll-view>
微信登录
1. 导入小程序代码
导入mp-weixin
2. 微信登录流程
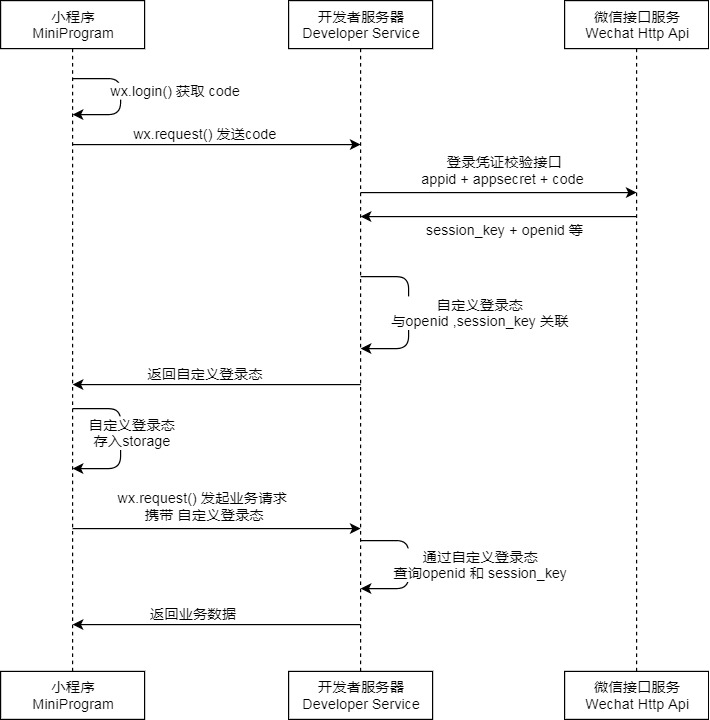
- 调用 wx.login() 获取 临时登录凭证code ,并回传到开发者服务器。
- 调用 auth.code2Session 接口,换取 用户唯一标识 OpenID 、 用户在微信开放平台账号下的唯一标识UnionID(若当前小程序已绑定到微信开放平台账号) 和 会话密钥 session_key。
对于第二个接口
HTTPS 调用
GET https://api.weixin.qq.com/sns/jscode2session
请求参数
| 属性 | 类型 | 必填 | 说明 |
|---|---|---|---|
| appid | string | 是 | 小程序 appId |
| secret | string | 是 | 小程序 appSecret |
| js_code | string | 是 | 登录时获取的 code,可通过wx.login获取 |
| grant_type | string | 是 | 授权类型,此处只需填写 authorization_code |
返回参数
| 属性 | 类型 | 说明 |
|---|---|---|
| session_key | string | 会话密钥 |
| unionid | string | 用户在开放平台的唯一标识符,若当前小程序已绑定到微信开放平台帐号下会返回,详见 UnionID 机制说明。 |
| errmsg | string | 错误信息,请求失败时返回 |
| openid | string | 用户唯一标识 |
| errcode | int32 | 错误码,请求失败时返回 |
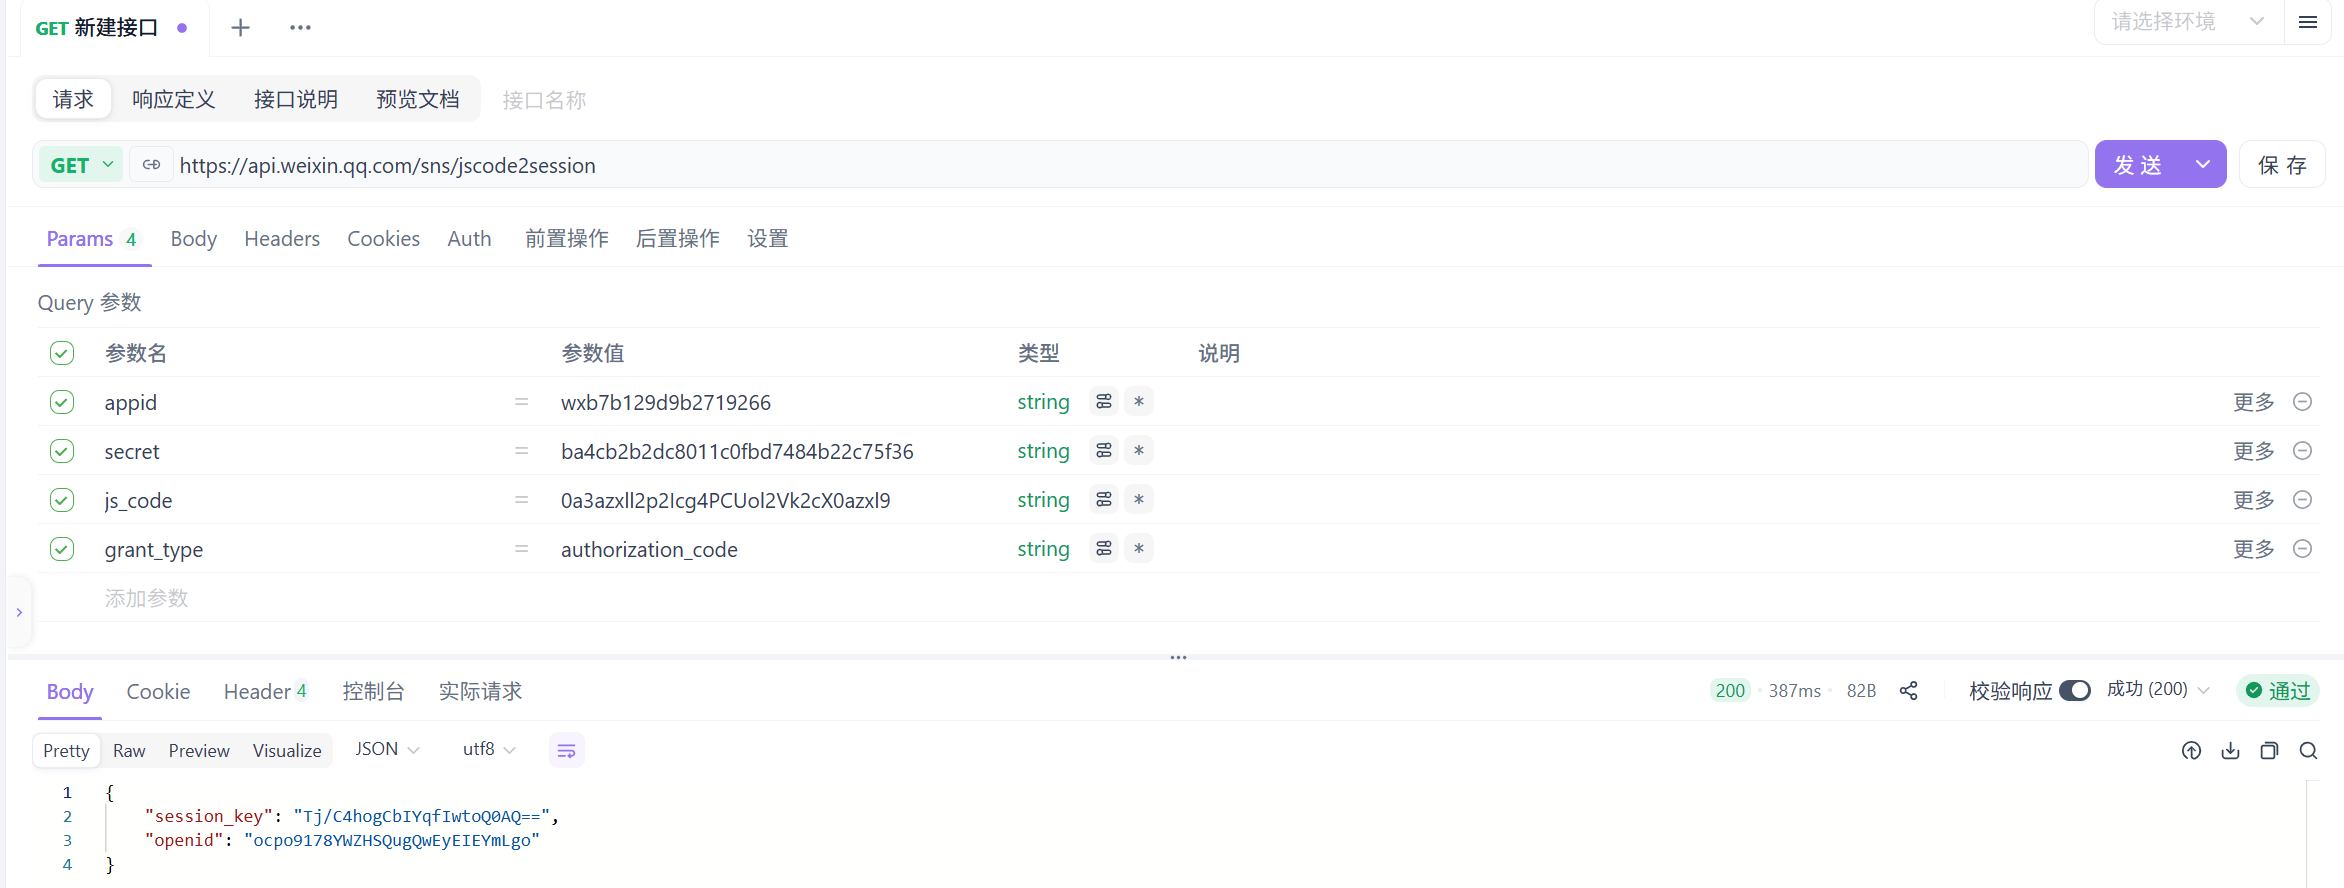
下面使用Postman测试这个接口:
首先从app端获得用户code,接着按照要求构造请求,查看返回的信息,有session_key(会话秘钥)和openid(用户唯一标识)
code和openid的区别
| 特性 | code | openid |
|---|---|---|
| 时效性 | 短期有效(通常 5 分钟),过期失效 | 长期有效(用户在当前小程序中唯一且永久不变) |
| 复用性 | 一次性使用,兑换 openid 后立即失效 | 可重复使用(只要用户未删除小程序,始终有效) |
| 安全性 | 允许前端临时持有,泄露风险低 | 属于敏感信息,禁止前端存储,需由后端保管 |
| 唯一性 | 每次调用 wx.login() 生成新 code | 同一用户在同一小程序中 openid 唯一,不同小程序中 openid 不同 |
3. 需求分析和设计
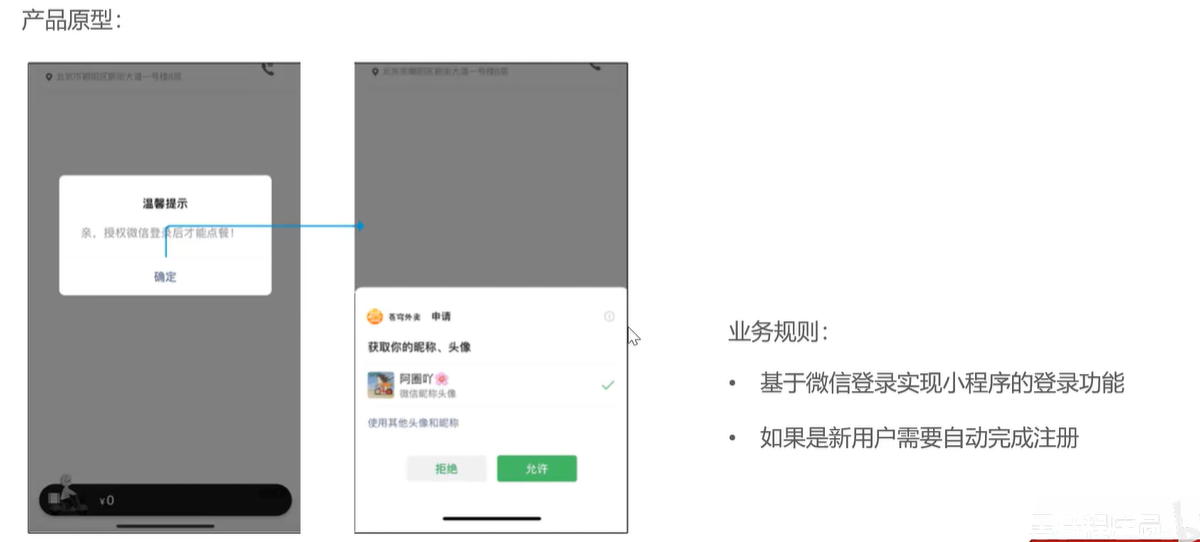
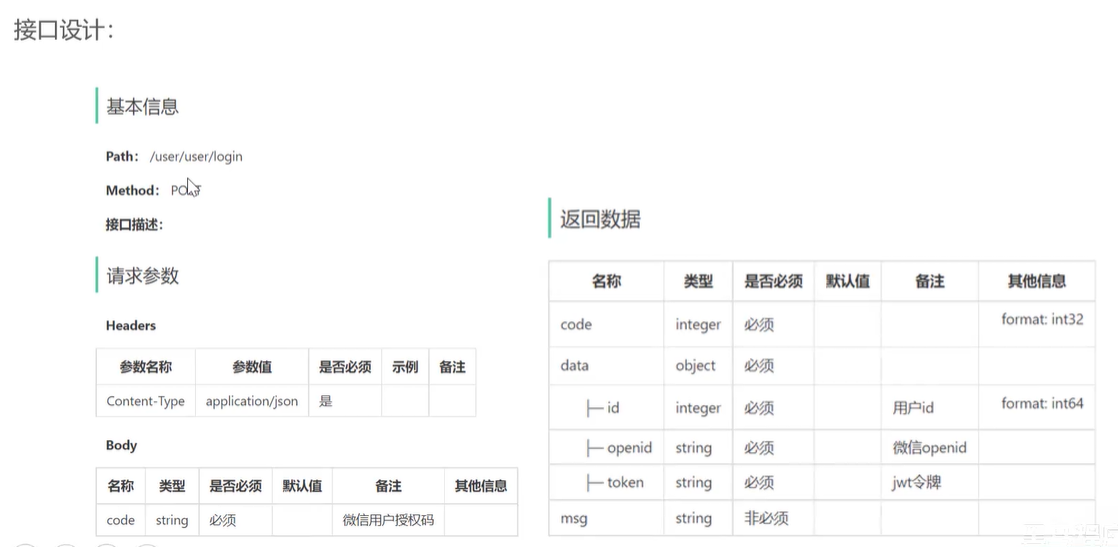
Path:/user/user/login
第一个user是因为用户端(与之相对的是管理端),路径约定以user为前缀
第二个user代表的是用户模块
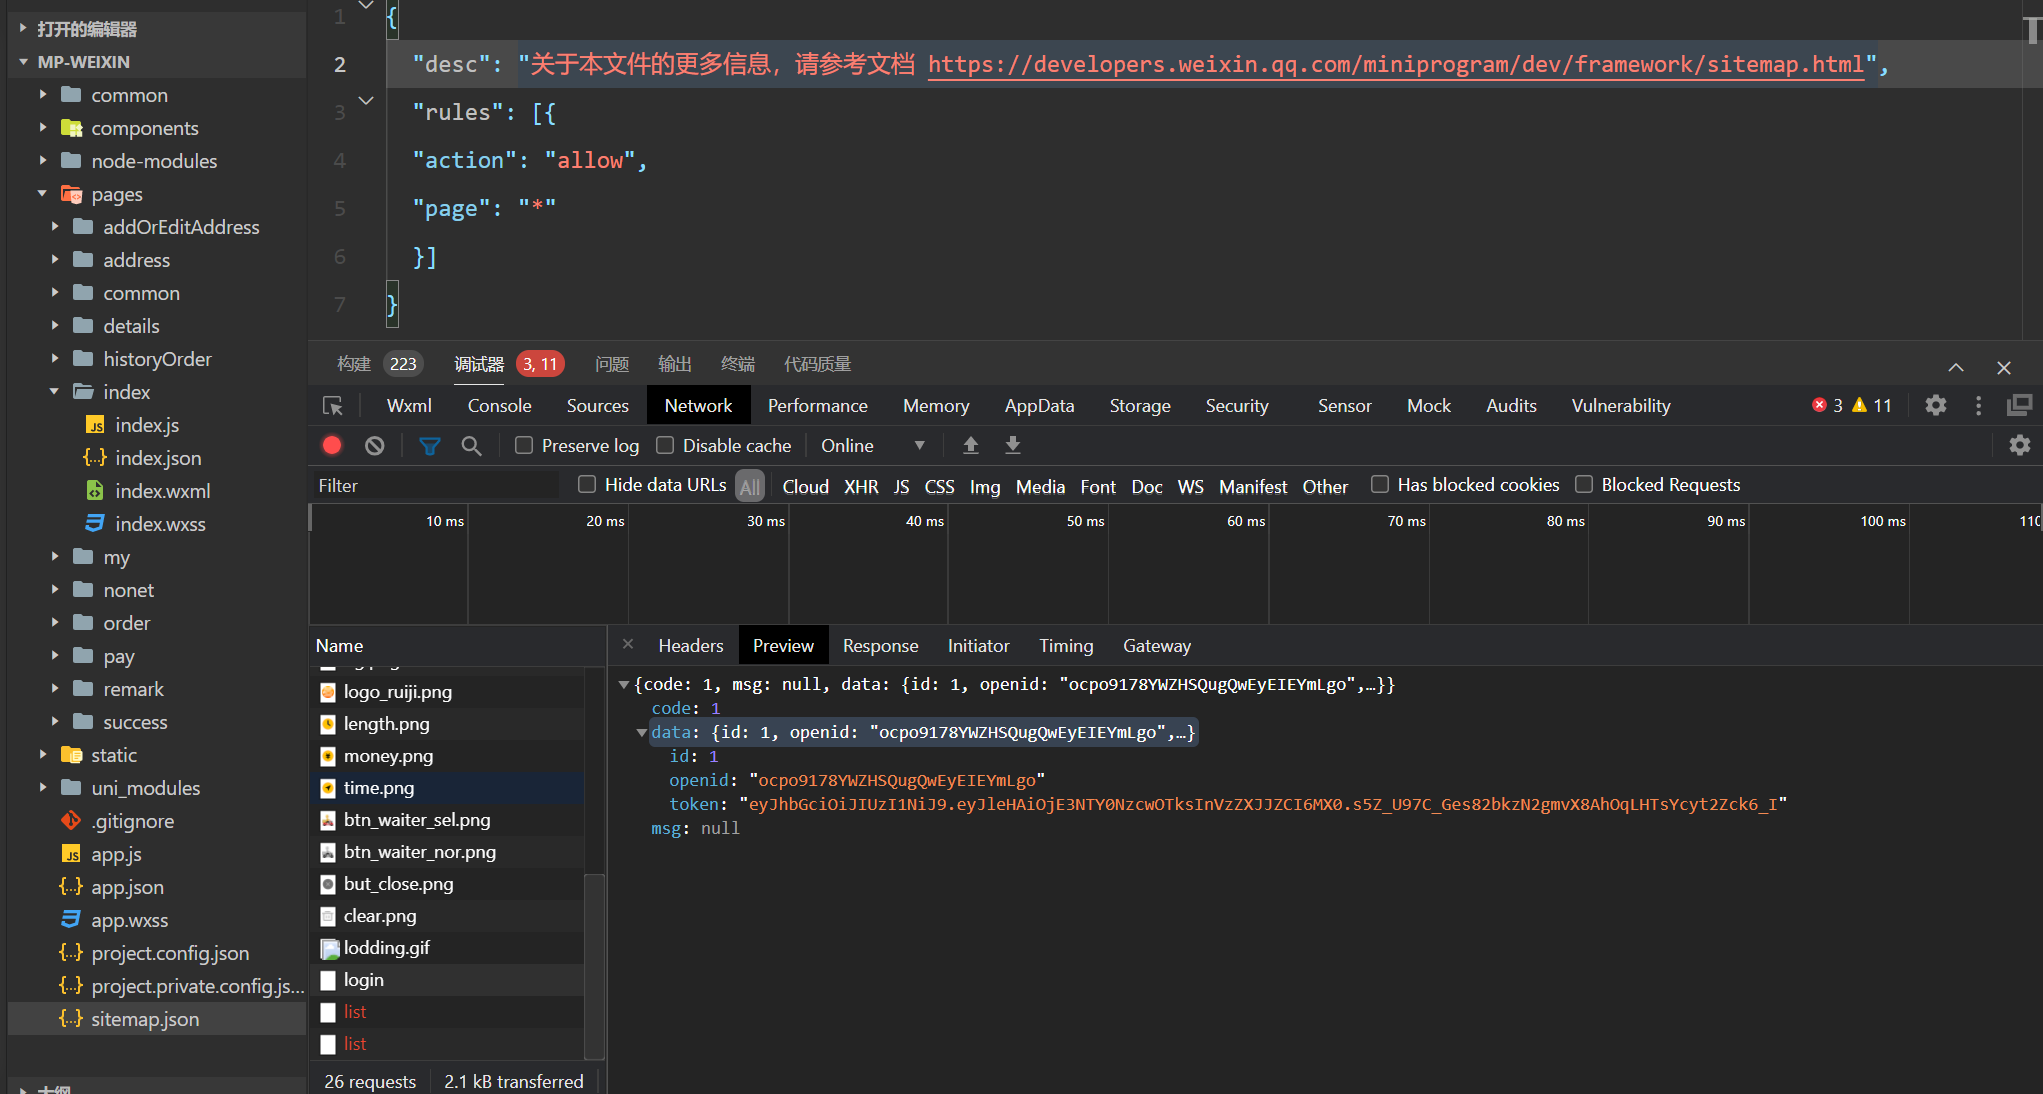
返回数据data中的id是指当前用户在我们系统数据库的主键值,openid是微信用户在微信中的唯一标识
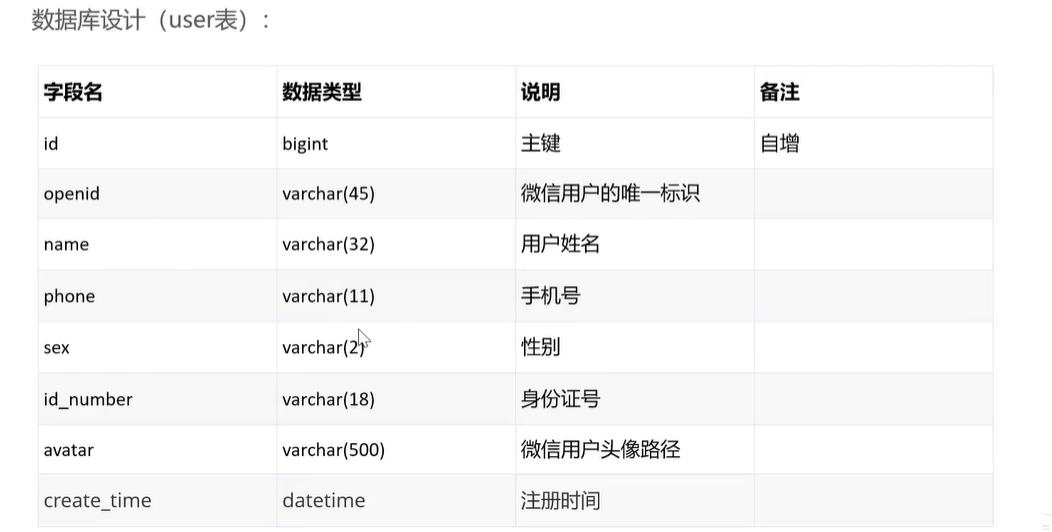
4. 代码开发
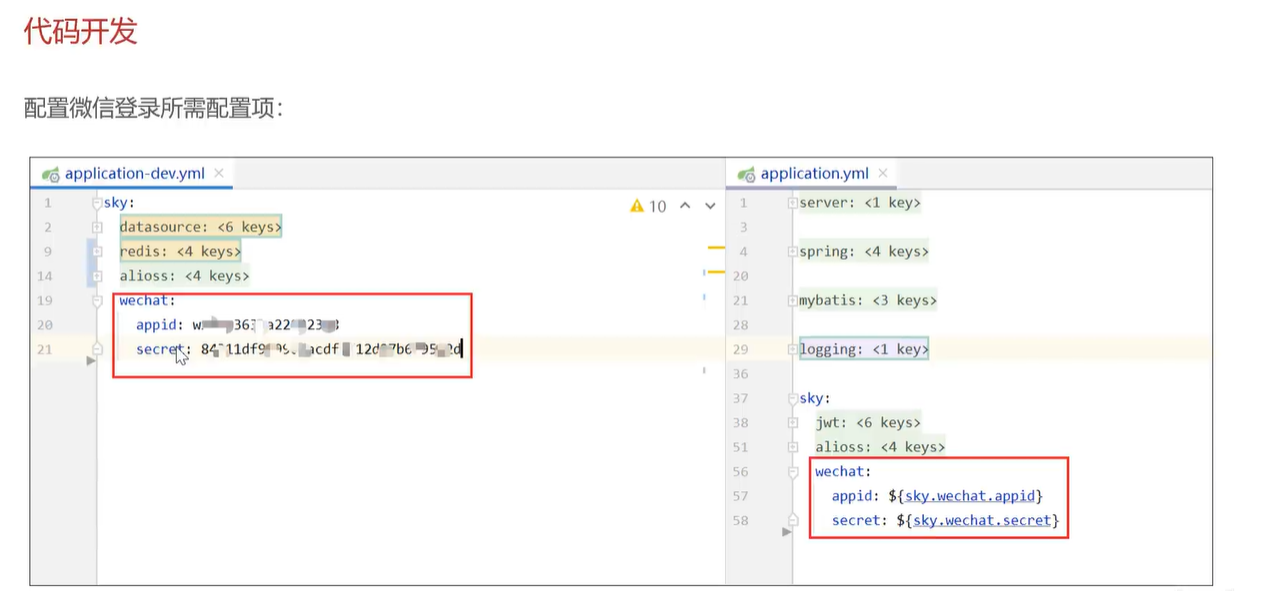
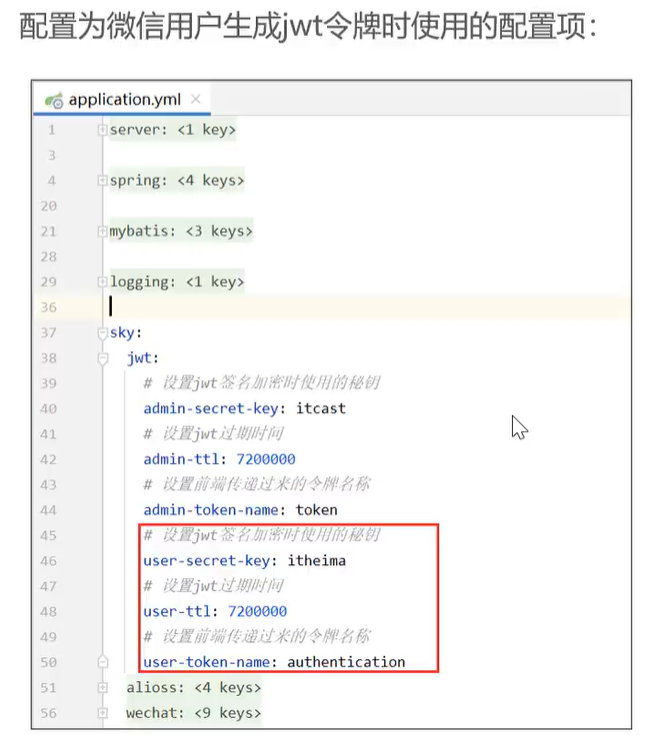
管理端和用户端使用的jwt配置不同,其中第三项是和前端沟通好的、前端传过来的令牌名称
因为需要后端接受传过来的code,虽然参数只有一个很少,但是还是建议使用DTO
package com.sky.dto;

import lombok.Data;

import java.io.Serializable;

/**
 * C端用户登录
 */
@Data
public class UserLoginDTO implements Serializable {

    private String code;

}
传输返回的数据使用VO
package com.sky.vo;

import lombok.AllArgsConstructor;
import lombok.Builder;
import lombok.Data;
import lombok.NoArgsConstructor;

import java.io.Serializable;

@Data
@Builder
@NoArgsConstructor
@AllArgsConstructor
public class UserLoginVO implements Serializable {

    private Long id;
    private String openid;
    private String token;

}
实际后端代码开发:
controller-user-新建UserController
@RestController
@RequestMapping("/user/user")
@Api(tags = "C端用户相关接口")
@Slf4j
public class UserController {

    @Autowired
    private UserService userService;
    @Autowired
    private JwtProperties jwtProperties;

    /**
     * 微信登录
     * @param userLoginDTO
     * @return
     */
    @PostMapping("/login")
    @ApiOperation("微信登录")
    public Result<UserLoginVO> login(@RequestBody UserLoginDTO userLoginDTO){
        log.info("微信用户登录:{}", userLoginDTO.getCode());

        // 微信登录
        User user = userService.wxLogin(userLoginDTO);

        //为微信用户生成jwt令牌
        // claims用于存储JWT的负载信息(声明),将用户 ID 存入 JWT 的负载中,以便后续通过令牌识别用户身份
        Map<String, Object> claims = new HashMap<>();
        claims.put(JwtClaimsConstant.USER_ID, user.getId());
        String token = JwtUtil.createJWT(jwtProperties.getUserSecretKey(), jwtProperties.getUserTtl(), claims);

        UserLoginVO userLoginVO = UserLoginVO.builder()
                .id(user.getId())
                .openid(user.getOpenid())
                .token(token)
                .build();

        return Result.success(userLoginVO);
    }
}
service-新建UserService接口
package com.sky.service;

import com.sky.dto.UserLoginDTO;
import com.sky.entity.User;

public interface UserService {

    /**
     * 微信登录
     * @param userLoginDTO
     * @return
     */
    User wxLogin(UserLoginDTO userLoginDTO);
}
Impl--新建UserServiceImpl
package com.sky.service.impl;

import com.alibaba.fastjson.JSON;
import com.alibaba.fastjson.JSONObject;
import com.sky.constant.MessageConstant;
import com.sky.dto.UserLoginDTO;
import com.sky.entity.User;
import com.sky.exception.LoginFailedException;
import com.sky.mapper.UserMapper;
import com.sky.properties.WeChatProperties;
import com.sky.service.UserService;
import com.sky.utils.HttpClientUtil;
import lombok.extern.slf4j.Slf4j;
import org.springframework.beans.factory.annotation.Autowired;
import org.springframework.stereotype.Service;

import java.time.LocalDateTime;
import java.util.HashMap;
import java.util.Map;

@Service
@Slf4j
public class UserServiceImpl implements UserService {

    // 微信服务接口地址
    public static final String WX_LOGIN = "https://api.weixin.qq.com/sns/jscode2session";

    @Autowired
    private WeChatProperties weChatProperties;
    @Autowired
    private UserMapper userMapper;

    /**
     * 微信登录
     * @param userLoginDTO
     * @return
     */
    // 和管理端用户(自己数据库中有用户名密码)登录逻辑不同,这里需要请求微信端口
    public User wxLogin(UserLoginDTO userLoginDTO) {
        // 调用微信接口服务,获得当前微信用户的openid
        String openid = getOpenid(userLoginDTO.getCode());

        // 判断openid是否为空,如果为空表示登录失败,抛出业务异常
        if (openid == null){
            throw new LoginFailedException(MessageConstant.LOGIN_FAILED);
        }

        // 判断当前用户是否为新用户
        User user = userMapper.getByOpenid(openid);

        // 如果是新用户,自动完成注册
        if (user == null){
            user = User.builder()
                    .openid(openid)
                    .createTime(LocalDateTime.now())
                    .build();
            userMapper.insert(user);
        }

        // 返回这个用户对象
        return user;
    }


    /**
     * 调用微信接口服务,获取微信用户的openid
     * @param code
     * @return
     */
    private String getOpenid(String code){
        // 调用微信接口服务,获得当前微信用户的openid
        Map<String, String> map = new HashMap<>();
        map.put("appid", weChatProperties.getAppid());
        map.put("secret", weChatProperties.getSecret());
        map.put("js_code", code);
        map.put("grant_type", "authorization_code");
        String json = HttpClientUtil.doGet(WX_LOGIN, map);

        JSONObject jsonObject = JSON.parseObject(json);
        String openid = jsonObject.getString("openid");
        return openid;
    }
}
mapper--新建UserMapper
UserMapper.java
package com.sky.mapper;

import com.sky.entity.User;
import org.apache.ibatis.annotations.Mapper;
import org.apache.ibatis.annotations.Select;

@Mapper
public interface UserMapper {

    /**
     * 根据openid查询用户
     * @param openid
     * @return
     */
    @Select("select * from user where openid = #{openid}")
    User getByOpenid(String openid);

    /**
     * 插入数据
     * @param user
     */
    void insert(User user);
}
UserMapper.xml
<?xml version="1.0" encoding="UTF-8" ?>
<!DOCTYPE mapper PUBLIC "-//mybatis.org//DTD Mapper 3.0//EN"
        "http://mybatis.org/dtd/mybatis-3-mapper.dtd" >
<mapper namespace="com.sky.mapper.UserMapper">

    <insert id="insert" useGeneratedKeys="true" keyProperty="id">
        insert into user (openid, name, phone, sex, id_number, avatar, create_time)
        values (#{openid}, #{name}, #{phone}, #{sex}, #{idNumber}, #{avatar}, #{createTime})
    </insert>

</mapper>
小程序端可以接收到authentication,需要后端写一个校验,也就是拦截器,直接改造得到JwtTokenUserIterceptor
package com.sky.interceptor;

import com.sky.constant.JwtClaimsConstant;
import com.sky.context.BaseContext;
import com.sky.properties.JwtProperties;
import com.sky.utils.JwtUtil;
import io.jsonwebtoken.Claims;
import lombok.extern.slf4j.Slf4j;
import org.springframework.beans.factory.annotation.Autowired;
import org.springframework.stereotype.Component;
import org.springframework.web.method.HandlerMethod;
import org.springframework.web.servlet.HandlerInterceptor;

import javax.servlet.http.HttpServletRequest;
import javax.servlet.http.HttpServletResponse;

/**
 * jwt令牌校验的拦截器
 */
@Component
@Slf4j
public class JwtTokenUserInterceptor implements HandlerInterceptor {

    @Autowired
    private JwtProperties jwtProperties;

    /**
     * 校验jwt
     *
     * @param request
     * @param response
     * @param handler
     * @return
     * @throws Exception
     */
    public boolean preHandle(HttpServletRequest request, HttpServletResponse response, Object handler) throws Exception {
        //判断当前拦截到的是Controller的方法还是其他资源
        if (!(handler instanceof HandlerMethod)) {
            //当前拦截到的不是动态方法,直接放行
            return true;
        }

        //1、从请求头中获取令牌
        String token = request.getHeader(jwtProperties.getUserTokenName());

        //2、校验令牌
        try {
            log.info("jwt校验:{}", token);
            Claims claims = JwtUtil.parseJWT(jwtProperties.getUserSecretKey(), token);
            Long userId = Long.valueOf(claims.get(JwtClaimsConstant.USER_ID).toString());
            log.info("当前用户id:", userId);

            BaseContext.setCurrentId(userId);
            //3、通过,放行
            return true;
        } catch (Exception ex) {
            //4、不通过,响应401状态码
            response.setStatus(401);
            return false;
        }
    }
}
5. 功能测试
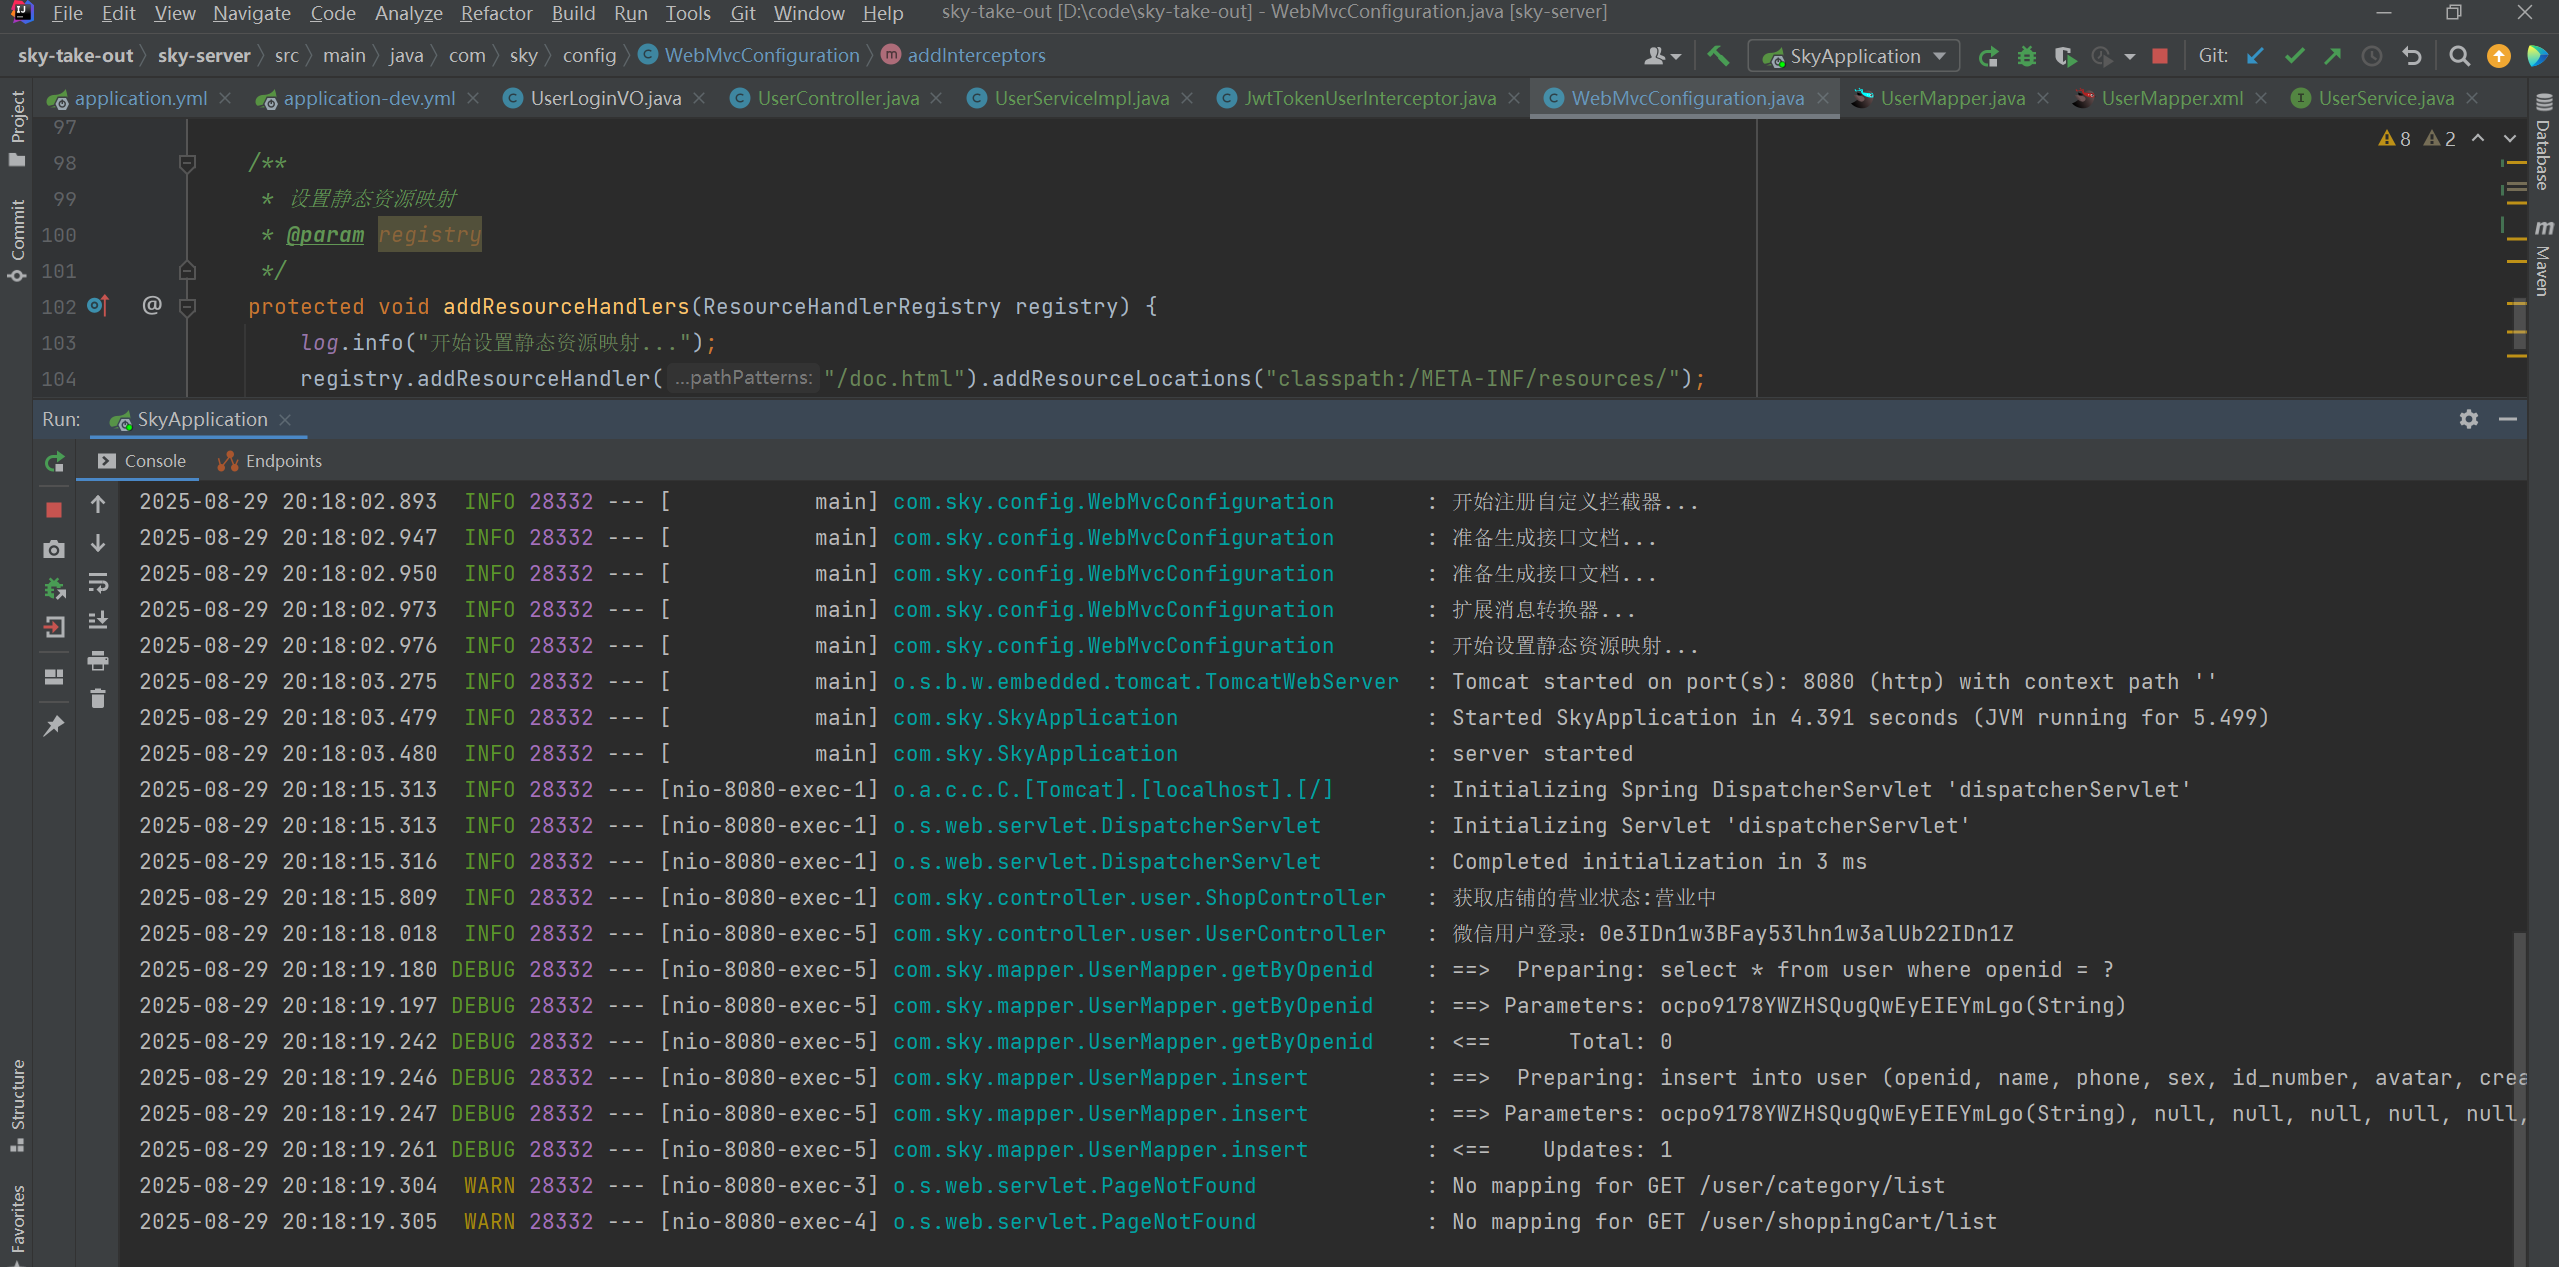
导入商品浏览功能代码
1. 需求分析和设计
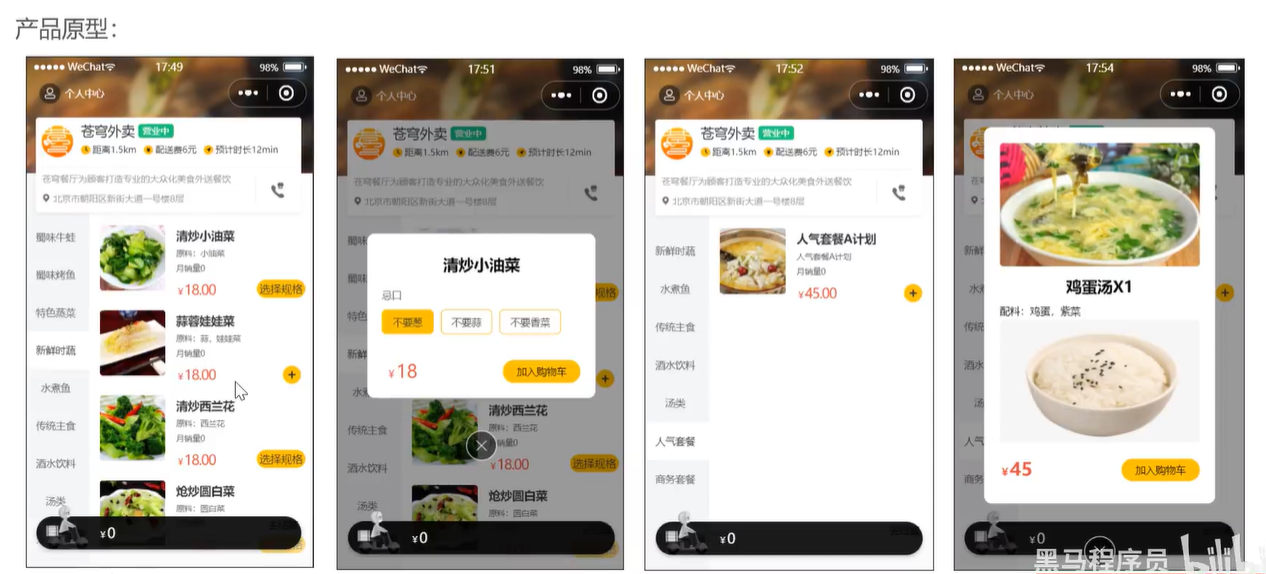
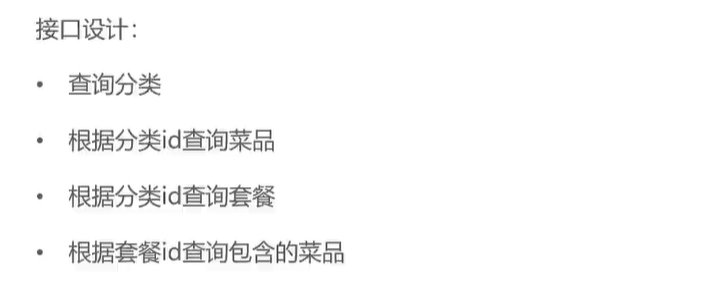
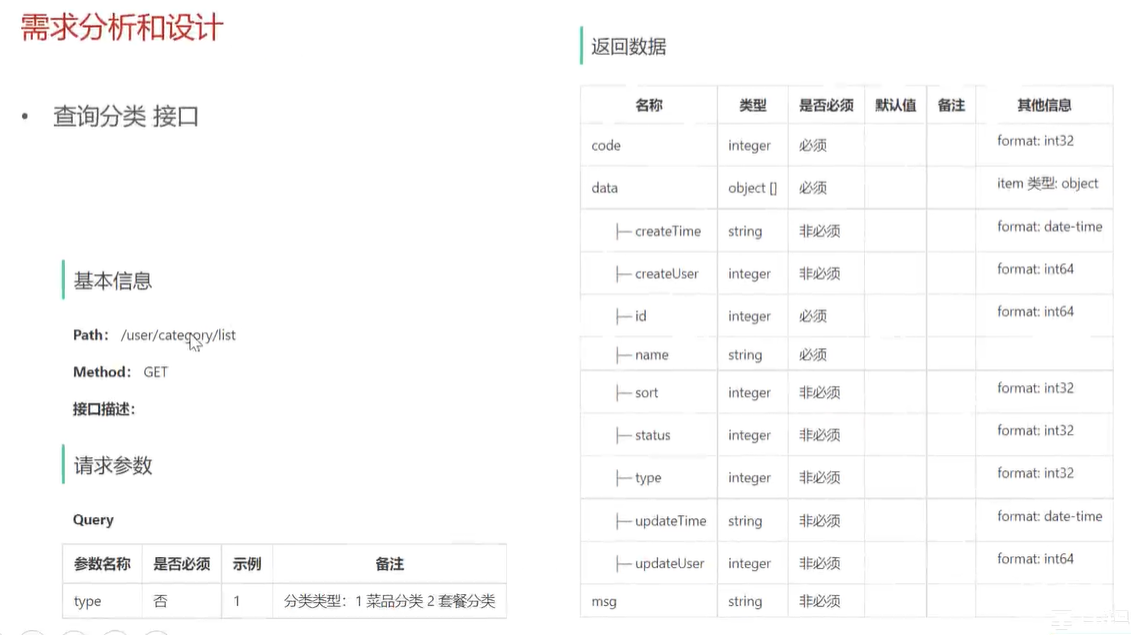
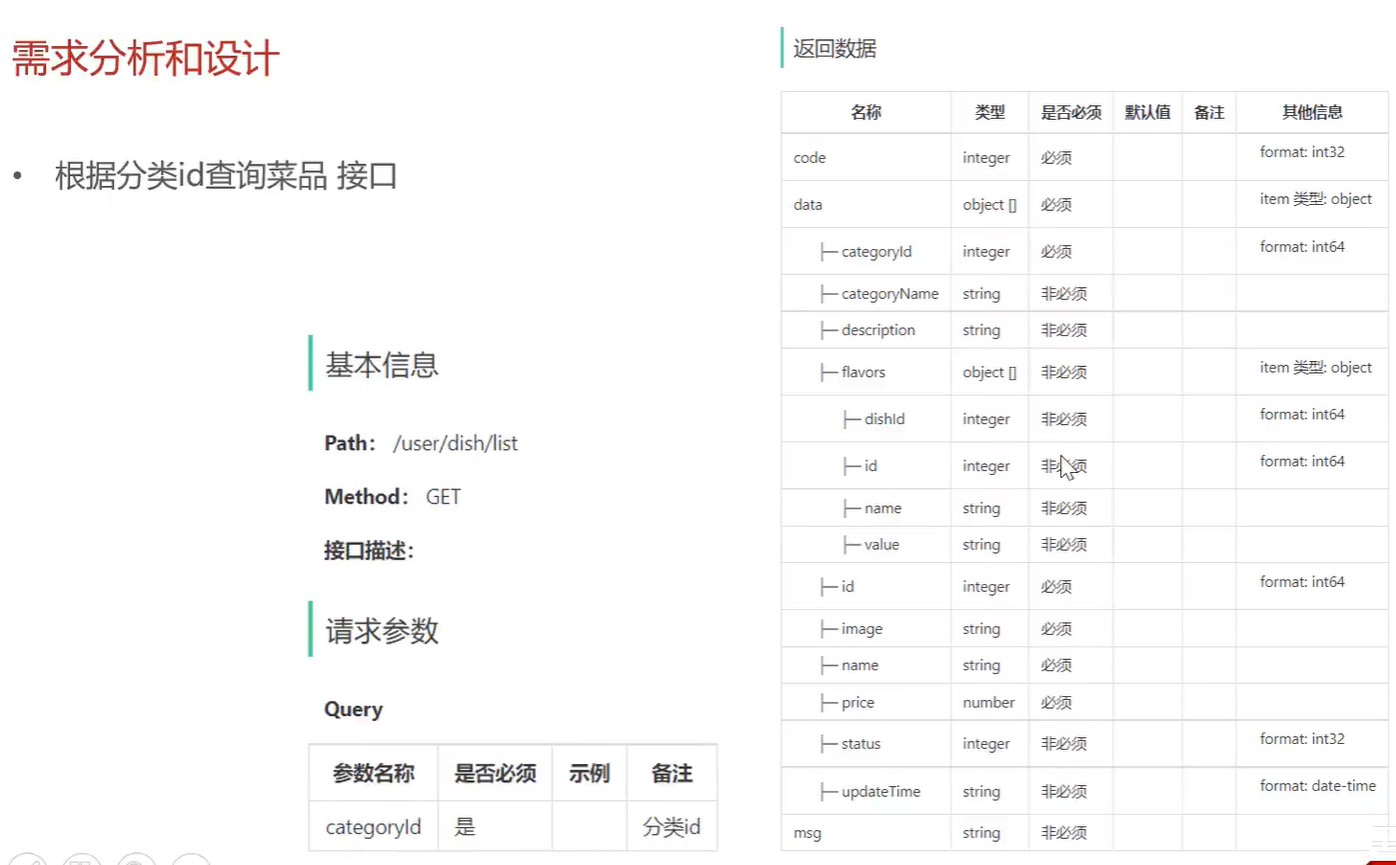
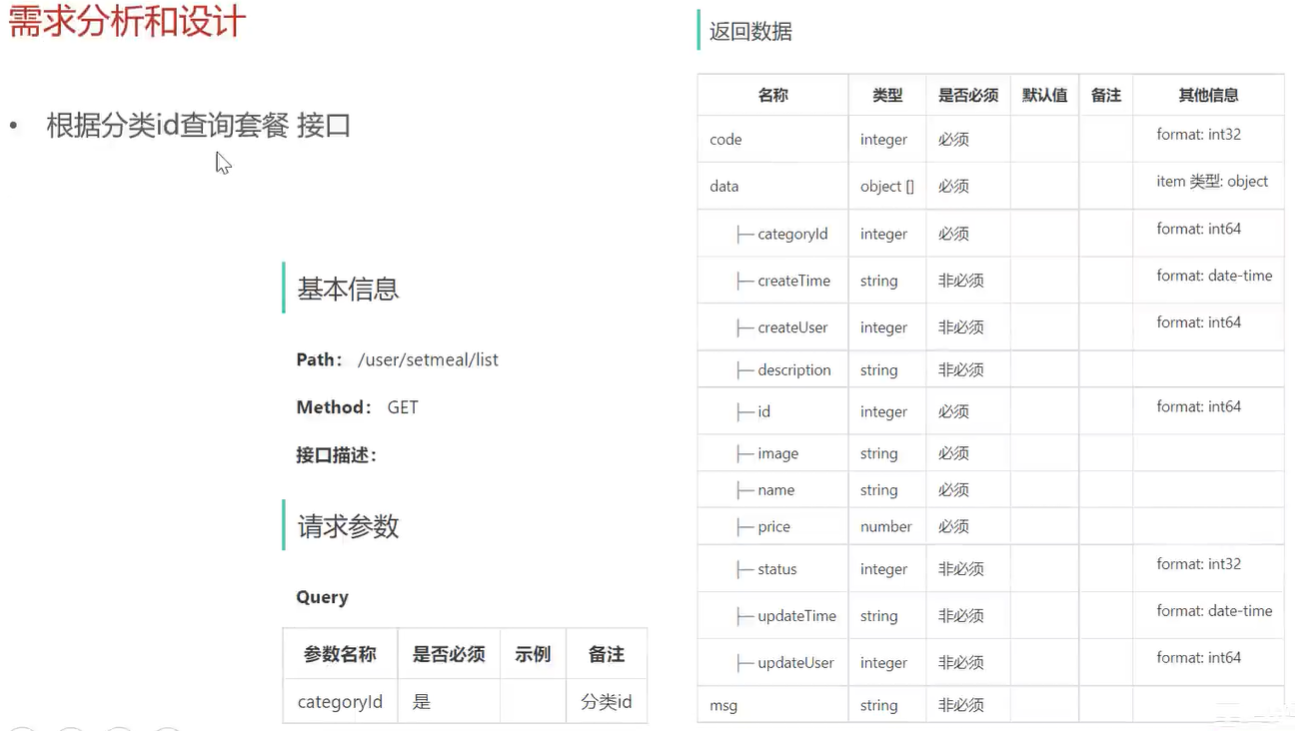
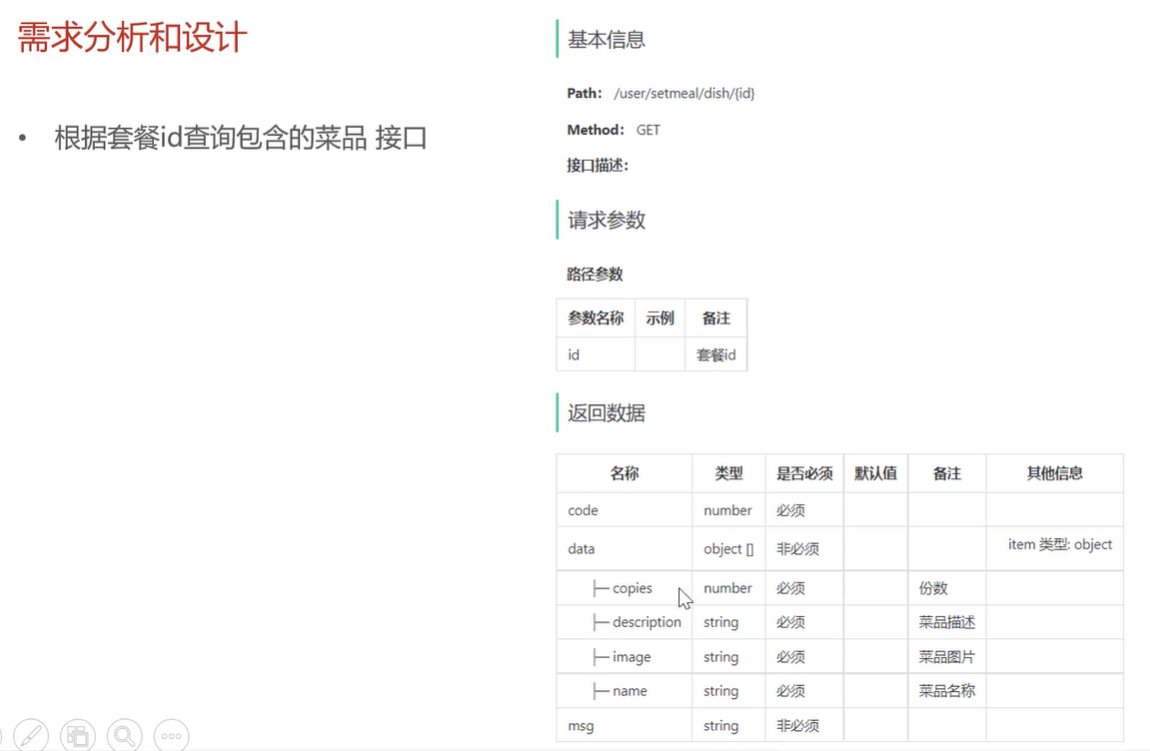
2. 代码导入
遗漏了Day4的代码,导入后跟着今天的视频继续导入。
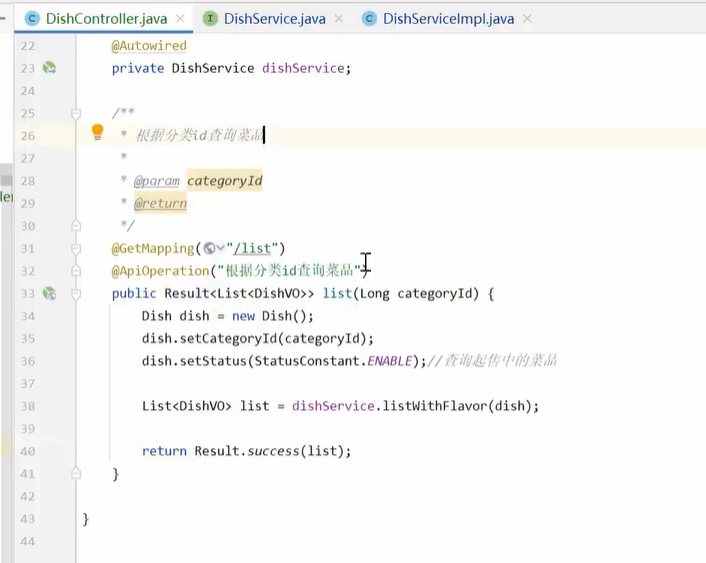
资料里的代码有一处问题,导致一开始测试的时候后端没有办法查出每个菜品的flavor,应将user/DishController中的代码按照视频中写。
3. 功能测试
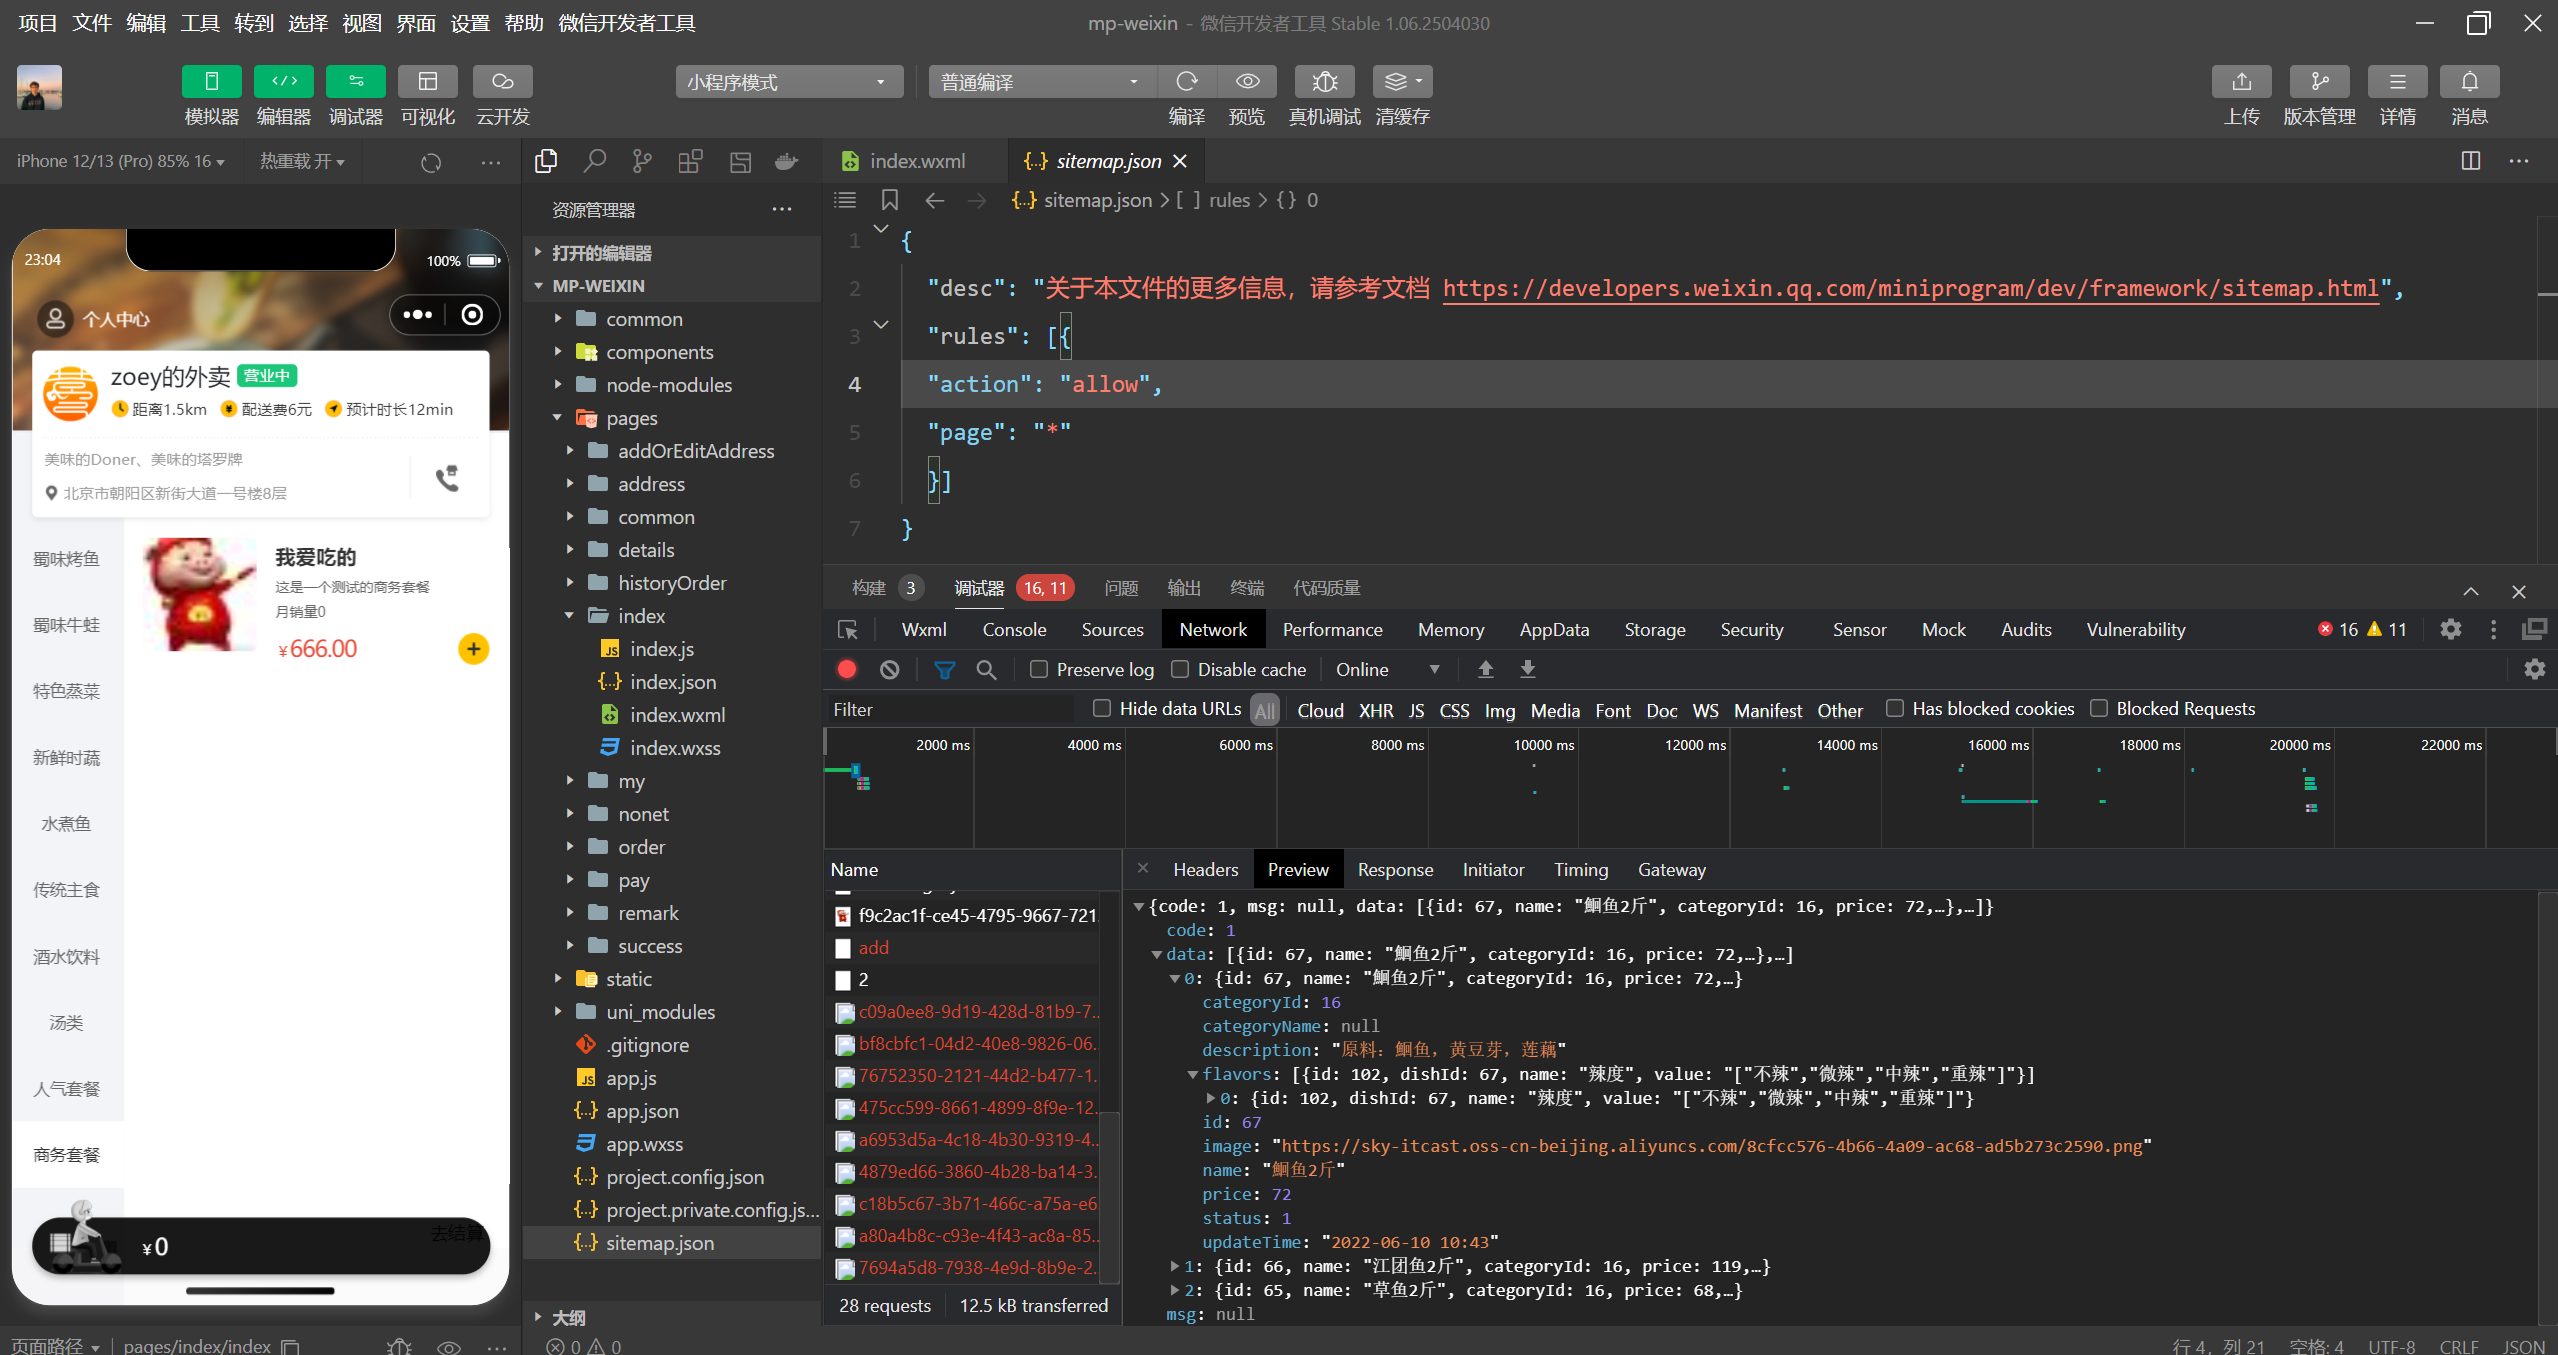
可以成功查看相关套餐信息、每个菜品的口味数据
加油!!通过困难可以获得正反馈!很有成就感
更多推荐

 12
12 0
0- 0


 已为社区贡献2条内容

所有评论(0)