
遥感卫星地面目标识别检测数据集 1500张 yolo数据集 遥感地面目标检测数据集 20类
·
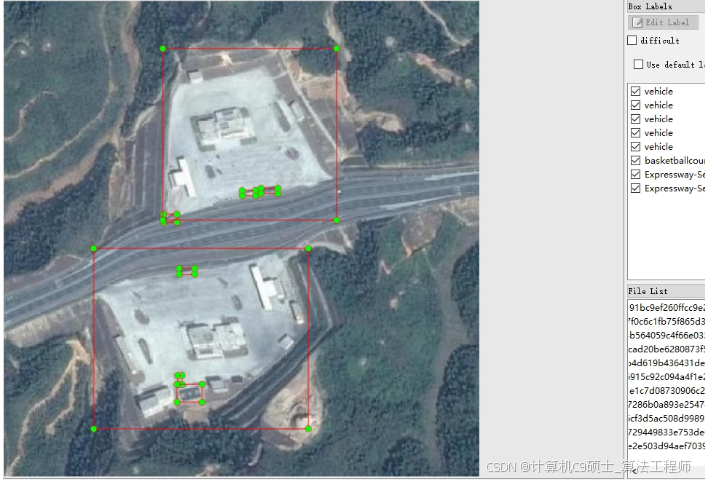
如何使用YOLOv8模型训练卫星图片地面目标识别检测数据集。我们将从数据集的准备、模型的加载、训练配置和训练过程等方面进行详细说明。
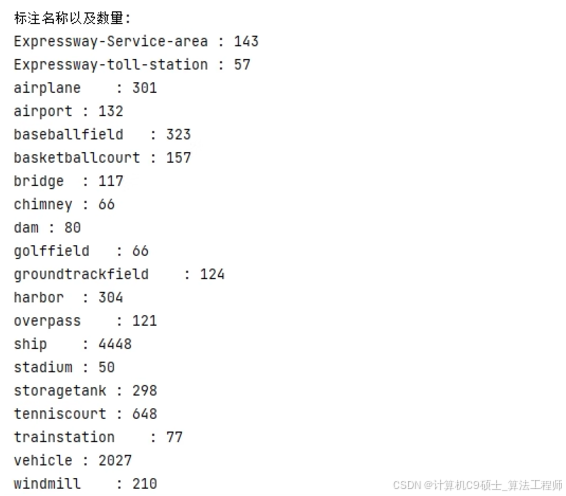
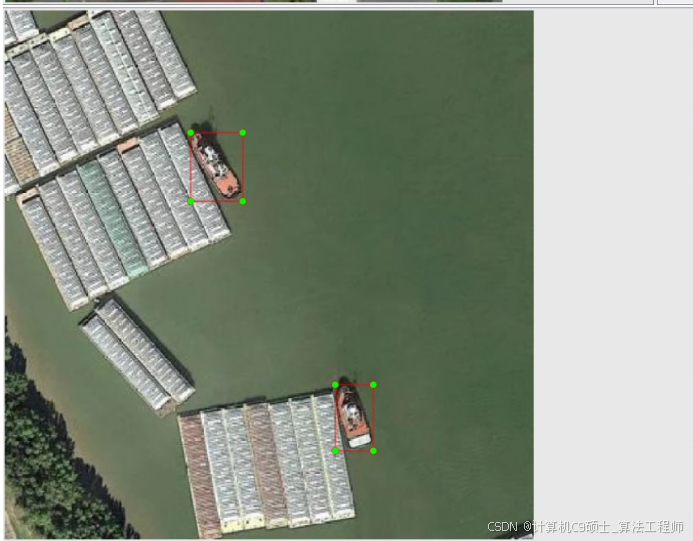
✌欢迎大家点赞、收藏、关注,有感兴趣的选题可以发在评论区~~~✌
🍅点击查看项目演示 效果演示👇🏻🍅
1. 数据集准备
数据集概述
数据集目录结构
Satellite-Ground-Target-Detection-Dataset/
├── images/
│   ├── train/
│   │   ├── image1.jpg
│   │   ├── image2.jpg
│   │   └── ...
│   ├── val/
│   │   ├── image1.jpg
│   │   ├── image2.jpg
│   │   └── ...
│   └── test/
│       ├── image1.jpg
│       ├── image2.jpg
│       └── ...
└── labels/
    ├── train/
    │   ├── image1.txt
    │   ├── image2.txt
    │   └── ...
    ├── val/
    │   ├── image1.txt
    │   ├── image2.txt
    │   └── ...
    └── test/
        ├── image1.txt
        ├── image2.txt
        └── ...
2. 数据集配置文件
创建一个data.yaml文件,配置数据集路径和类别信息。
# data.yaml
train: Satellite-Ground-Target-Detection-Dataset/images/train
val: Satellite-Ground-Target-Detection-Dataset/images/val
test: Satellite-Ground-Target-Detection-Dataset/images/test

nc: 15  # 类别数量
names: [
    'Expressway-Service-area',
    'Expressway-toll-station',
    'airplane',
    'airport',
    'baseballfield',
    'basketballcourt',
    'bridge',
    'chimney',
    'dam',
    'golffield',
    'groundtrackfield',
    'harbor',
    'overpass',
    'ship',
    'stadium',
    'storagetank',
    'tenniscourt',
    'trainstation',
    'vehicle',
    'windmill'
]  # 类别名称
3. 划分数据集
如果你需要自己划分数据集,可以使用以下Python代码:
import os
import random
import shutil

# 数据集路径
dataset_path = 'Satellite-Ground-Target-Detection-Dataset'
images_path = os.path.join(dataset_path, 'images')
labels_path = os.path.join(dataset_path, 'labels')

# 创建目录
os.makedirs(os.path.join(images_path, 'train'), exist_ok=True)
os.makedirs(os.path.join(images_path, 'val'), exist_ok=True)
os.makedirs(os.path.join(images_path, 'test'), exist_ok=True)
os.makedirs(os.path.join(labels_path, 'train'), exist_ok=True)
os.makedirs(os.path.join(labels_path, 'val'), exist_ok=True)
os.makedirs(os.path.join(labels_path, 'test'), exist_ok=True)

# 获取所有图像和标签文件
all_images = [f for f in os.listdir(images_path) if f.endswith('.jpg')]
all_labels = [f for f in os.listdir(labels_path) if f.endswith('.txt')]

# 打乱顺序
random.shuffle(all_images)

# 划分数据集
train_ratio = 0.8
val_ratio = 0.1
test_ratio = 0.1

train_split = int(len(all_images) * train_ratio)
val_split = int(len(all_images) * (train_ratio + val_ratio))

train_images = all_images[:train_split]
val_images = all_images[train_split:val_split]
test_images = all_images[val_split:]

# 移动文件
for img in train_images:
    label = img.replace('.jpg', '.txt')
    shutil.move(os.path.join(images_path, img), os.path.join(images_path, 'train', img))
    shutil.move(os.path.join(labels_path, label), os.path.join(labels_path, 'train', label))

for img in val_images:
    label = img.replace('.jpg', '.txt')
    shutil.move(os.path.join(images_path, img), os.path.join(images_path, 'val', img))
    shutil.move(os.path.join(labels_path, label), os.path.join(labels_path, 'val', label))

for img in test_images:
    label = img.replace('.jpg', '.txt')
    shutil.move(os.path.join(images_path, img), os.path.join(images_path, 'test', img))
    shutil.move(os.path.join(labels_path, label), os.path.join(labels_path, 'test', label))
4. 训练脚本
创建一个训练脚本train_yolov8.py,包含数据集加载、模型加载、训练配置和训练过程。
# train_yolov8.py
import torch
from ultralytics import YOLO

def train_model(data_yaml_path, model_config, epochs, batch_size, img_size, device):
    # 选择设备
    device = device

    # 加载预训练的YOLOv8模型
    model = YOLO(model_config)

    # 设置数据集路径
    data_path = data_yaml_path

    # 开始训练
    results = model.train(
        data=data_path,
        epochs=epochs,  # 训练周期数
        batch=batch_size,  # 每批样本数量
        imgsz=img_size,  # 输入图像尺寸
        name="yolov8_satellite_ground_target_detection",  # 输出模型的名字
        patience=10,  # 提早停止的耐心参数
        workers=4,  # 工作线程数
        device=device  # 设备(CPU或GPU)
    )

    # 保存最佳模型
    best_model_path = f"runs/detect/yolov8_satellite_ground_target_detection/weights/best.pt"
    print(f"Best model saved to {best_model_path}")

if __name__ == "__main__":
    data_yaml_path = 'data.yaml'
    model_config = 'yolov8n.pt'  # 你可以选择其他预训练模型,如'yolov8s.pt', 'yolov8m.pt'等
    epochs = 100
    batch_size = 16
    img_size = 640  # 根据实际需求调整输入图像尺寸
    device = '0'  # 使用GPU,如果需要使用CPU,可以改为'cpu'

    train_model(data_yaml_path, model_config, epochs, batch_size, img_size, device)
5. 关键代码解释
选择设备
device = device
加载预训练模型
model = YOLO(model_config)
开始训练
results = model.train(
    data=data_path,
    epochs=epochs,  # 训练周期数
    batch=batch_size,  # 每批样本数量
    imgsz=img_size,  # 输入图像尺寸
    name="yolov8_satellite_ground_target_detection",  # 输出模型的名字
    patience=10,  # 提早停止的耐心参数
    workers=4,  # 工作线程数
    device=device  # 设备(CPU或GPU)
)
保存最佳模型
best_model_path = f"runs/detect/yolov8_satellite_ground_target_detection/weights/best.pt"
print(f"Best model saved to {best_model_path}")
6. 运行训练脚本
确保你的数据集路径和类别信息正确无误后,运行训练脚本:
python train_yolov8.py
7. 注意事项
- 数据集路径:确保数据集路径正确,特别是
data.yaml文件中的路径。1. 模型配置:确保模型配置文件路径正确。1. 图像大小:img_size可以根据实际需求调整,通常使用640或1280。1. 设备:确保设备(CPU或GPU)可用。1. 超参数调整:根据实际情况调整训练参数,如学习率、批量大小等,以获得最佳训练效果。1. 小目标检测:如果某些目标在卫星图片中是小目标,可能需要调整一些特定的超参数,例如锚框大小、损失函数权重等,以提高小目标的检测性能。
8. 总结
通过以上步骤,你可以使用YOLOv8训练一个针对卫星图片地面目标识别检测数据集的高精度模型。
✌欢迎大家点赞、收藏、关注,有感兴趣的选题可以发在评论区~~~✌
🍅点击查看项目演示 效果演示👇🏻🍅
更多推荐



 5
5 0
0- 0


 已为社区贡献1条内容

所有评论(0)