
pytest使用指南与allure美化报告
pytest使用指南与allure美化报告
参考:
一文详解Pytest单元测试【保姆级教程】
Python测试框架 pytest : 从零开始的完全指南
1、pytest基础使用
1.1 pytest安装
使用命令安装下面三个包,其中第一个pytest为主体,pytest-html用于生成html格式的报告,allure-pytest用于和allure进行交互生成html(美化版本)。
pip install pytest
pip install pytest-html
pip install allure-pytest
还有其他的一些插件:
pytest-html # (生成html格式的自动化测试报告)

pytest-xdist # (测试用例分布式执行,多CPU分发)

pytest-ordering # (用于改变测试用例的执行顺序)

pytest-rerunfailures # (用例失败后重跑)

allure-pytest # (用于生成美观的测试报告)
1.2 基础的使用
1.2.1 pytest约束
在pytest框架中,有如下约束(可以参考官方文档):
- 所有的单测文件名都需要满足test_.py格式或_test.py格式。
- 在单测文件中,测试类以Test开头,并且不能带有 init方法(注意:定义class时,需要以T开头,不然pytest是不会去运行该class的)
- 在单测类中,可以包含一个或多个test_开头的函数。
- 此时,在执行pytest命令时,会自动从当前目录及子目录中寻找符合上述约束的测试函数来执行。
当然,如果想要自定义规则,需要手动在工程目录下添加并设置pytest.ini配置文件,此处暂不讨论。
1.2.2 基础测试案例
建立如下的简单目录,主要函数放在工程根目录下,命名为my_fun.py;
在根目录下新建一个文件夹,命名为my_pytest;
在文件夹新建pytest的运行文件,命名为test_run.py:
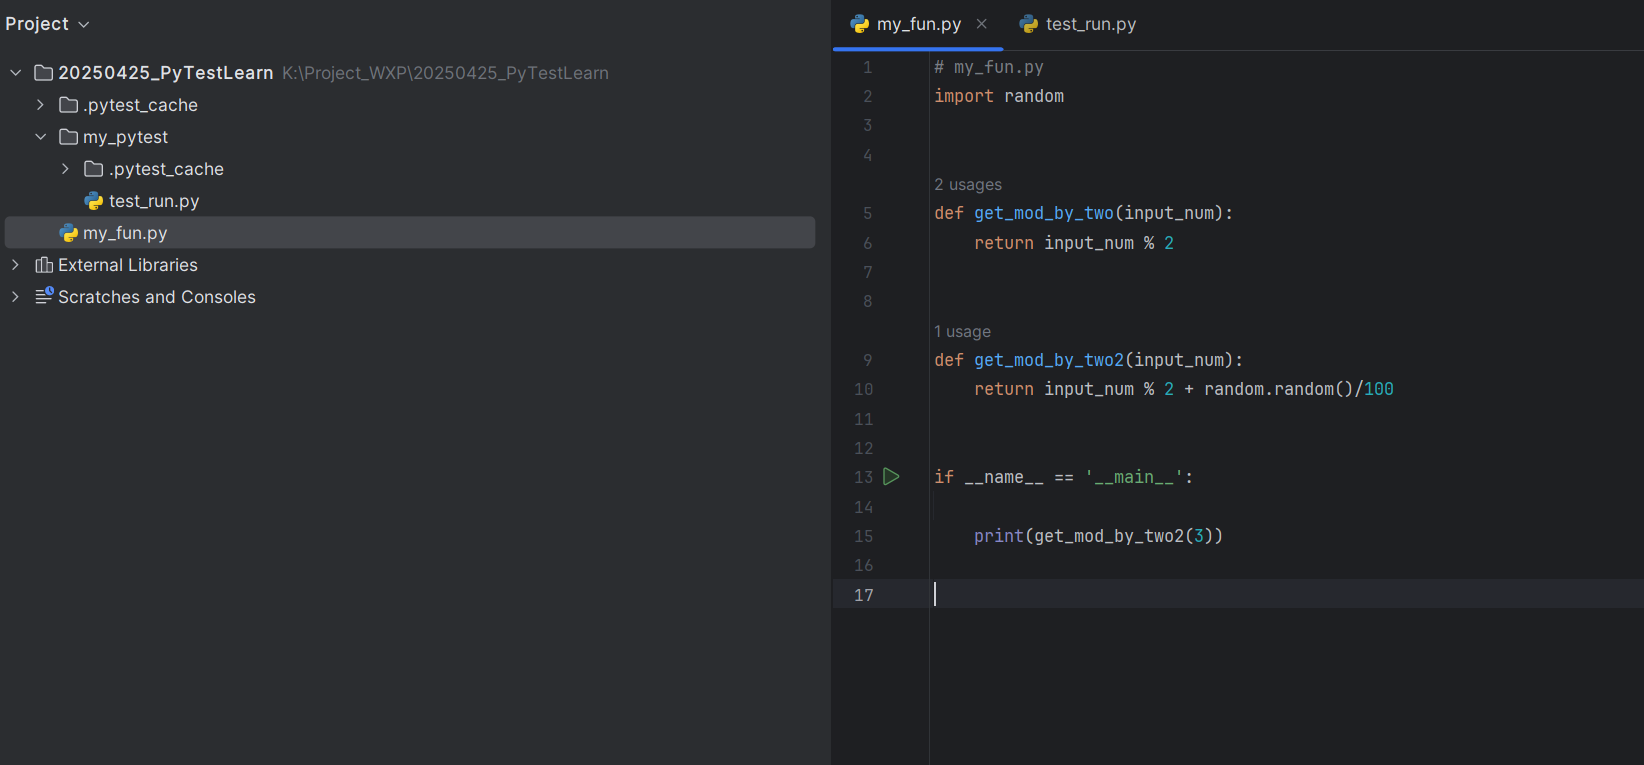
在pytest运行文件test_run.py中,调用my_fun中的函数进行测试,
# test_run.py

import pytest
from my_fun import get_mod_by_two


def test_fun_01():
    get_mod_by_two(1)


if __name__ == '__main__':
    pytest.main()
运行这个py文件(可以点击Run按钮或者在命令行运行,参考Python测试框架 pytest : 从零开始的完全指南),可以得到如下的打印,但是当前显示的各种信息较少,只能看出来运行通过了:
============================= test session starts =============================
platform win32 -- Python 3.9.21, pytest-8.3.5, pluggy-1.5.0
rootdir: K:\Project_WXP\20250425_PyTestLearn\my_pytest
collected 1 item

test_run.py .                                                            [100%]

============================== 1 passed in 0.01s ==============================

Process finished with exit code 0
1.3 生成html
修改test_run.py,在pytest.main运行时添加额外命令行(pytest.main([‘–html=report.html’])):
# test_run.py

import pytest
from my_fun import get_mod_by_two


def test_fun_01():
    get_mod_by_two(1)


def test_fun_02():
    get_mod_by_two(2)


if __name__ == '__main__':
    pytest.main(['--html=report.html'])
值得注意的是,生成的html或者pytest的寻找目录都在test_run.py的运行目录:
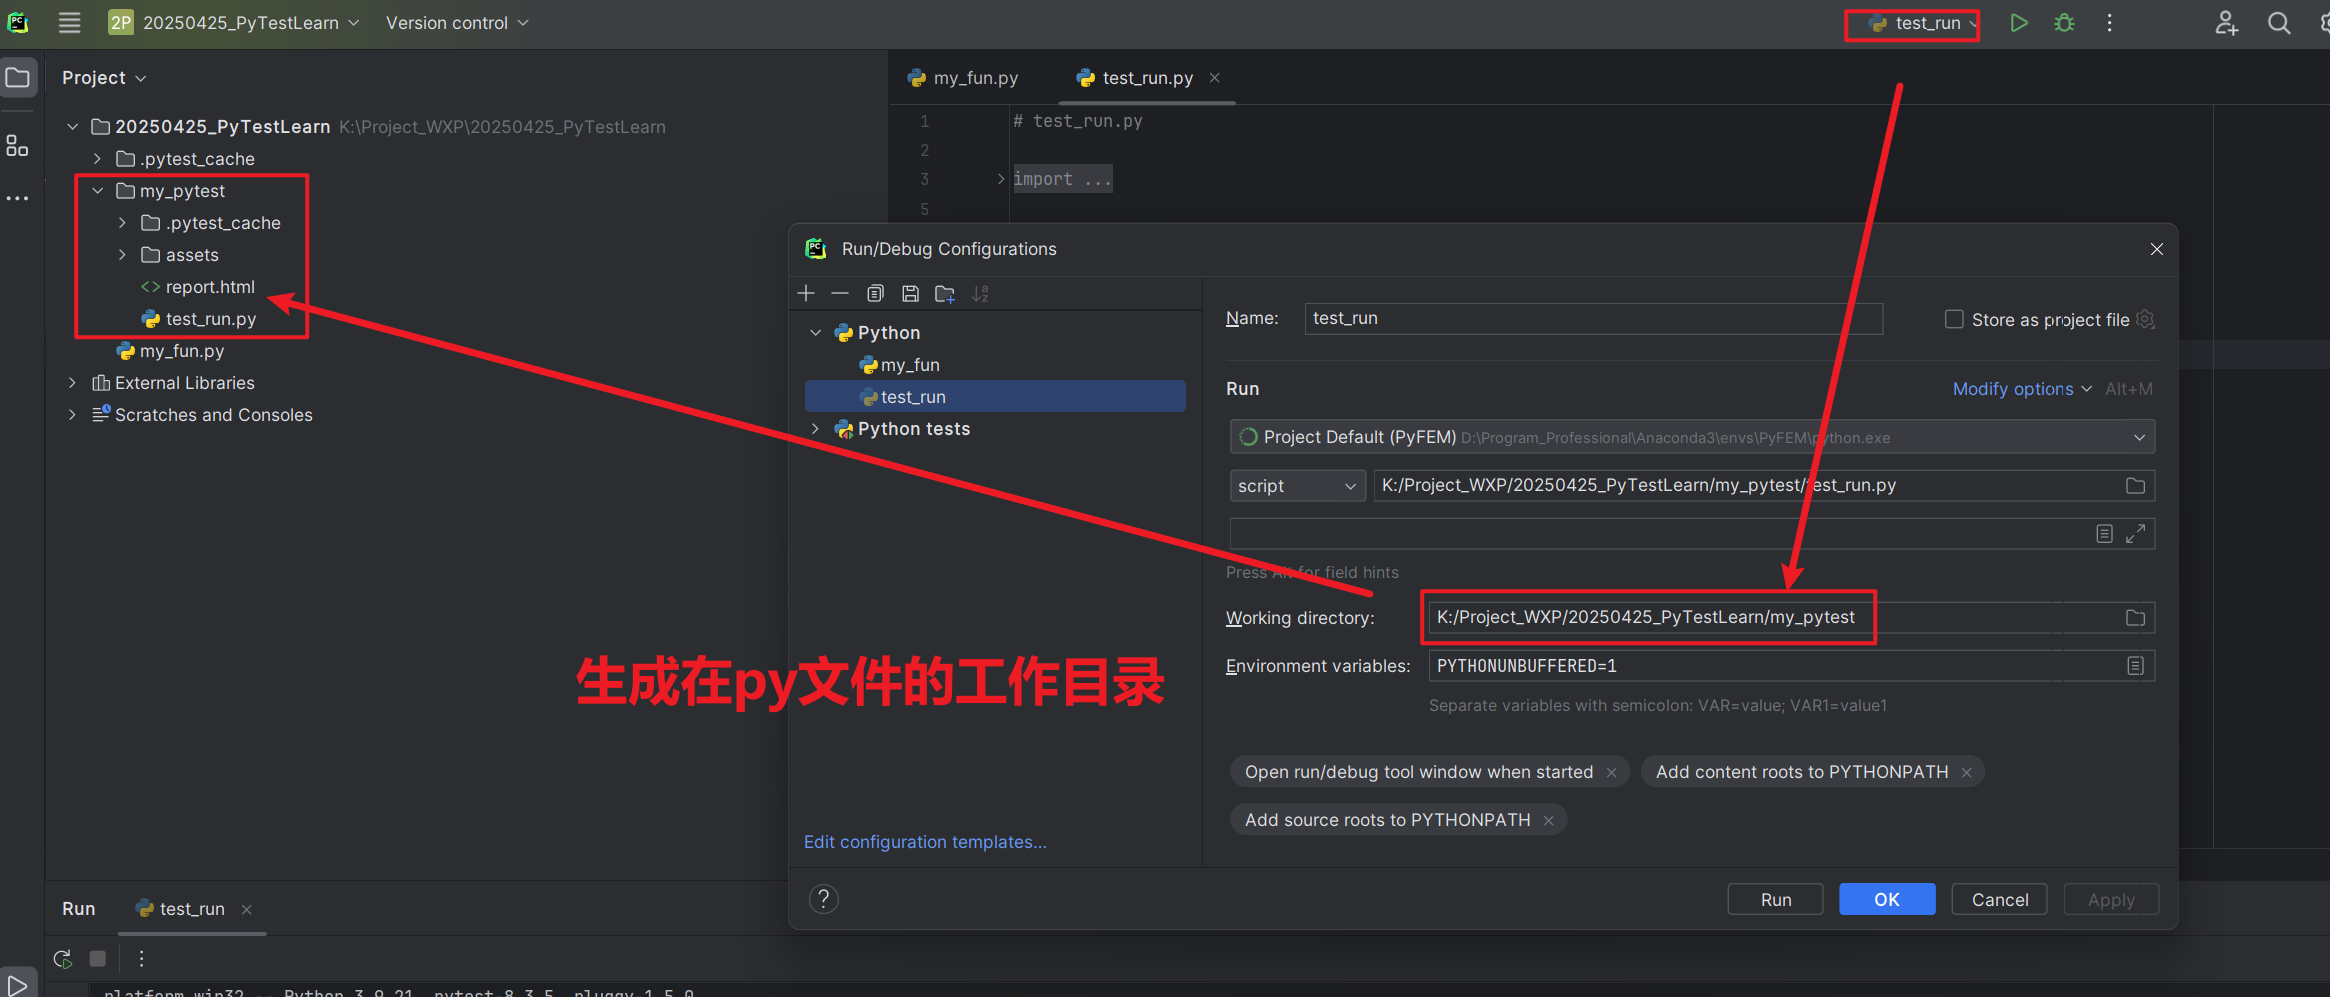
运行后打印的信息如下,可以看到成功生成了html:
============================= test session starts =============================
platform win32 -- Python 3.9.21, pytest-8.3.5, pluggy-1.5.0
rootdir: K:\Project_WXP\20250425_PyTestLearn\my_pytest
plugins: html-4.1.1, metadata-3.1.1
collected 2 items

test_run.py ..                                                           [100%]

- Generated html report: file:///K:/Project_WXP/20250425_PyTestLearn/my_pytest/report.html -
============================== 2 passed in 0.11s ==============================

Process finished with exit code 0
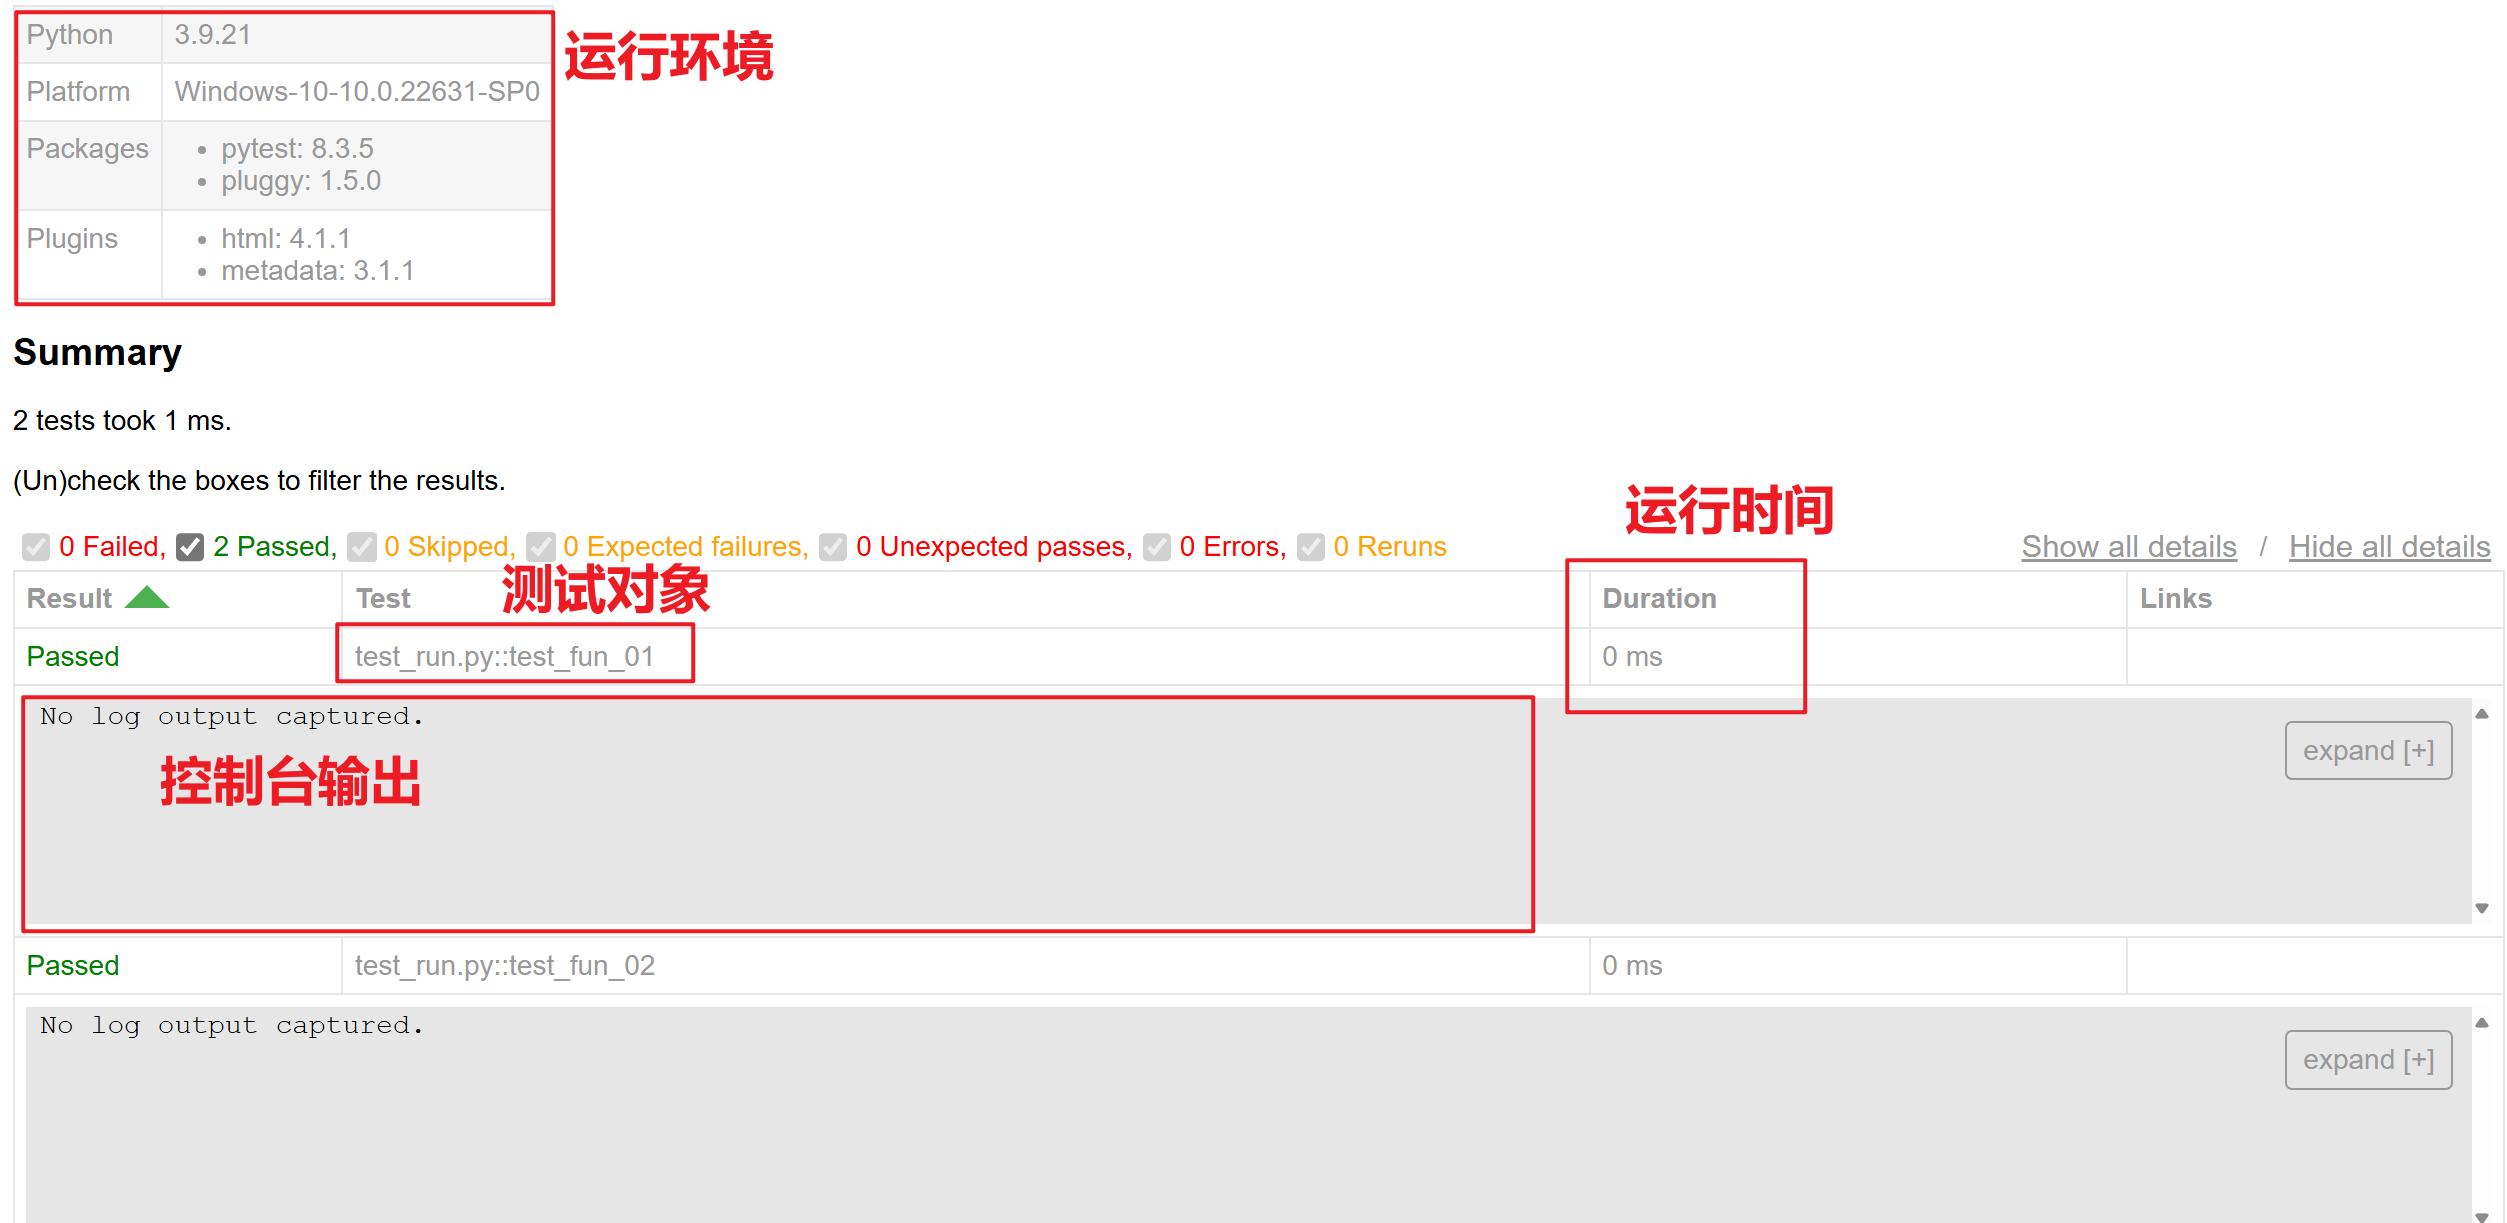
可以看到生成的html里面有运行时间、打印的信息等等:
1.4 编写多个文件进行测试
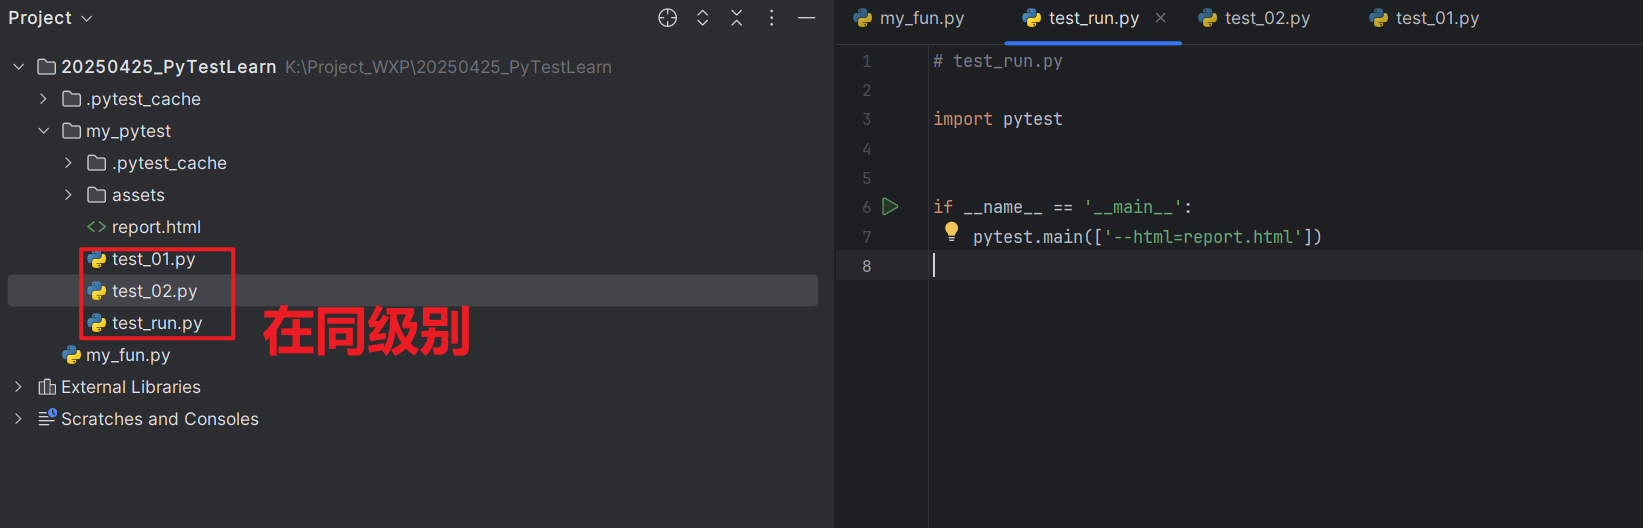
为了美观,咋不在test_run.py中编写测试用例,在其他py文件中编写:
# test_run.py

import pytest


if __name__ == '__main__':
    pytest.main(['--html=report.html'])
# test_01.py
from my_fun import get_mod_by_two


def test_fun_01():
    get_mod_by_two(1)


def test_fun_02():
    get_mod_by_two(2)
# test_02.py
from my_fun import get_mod_by_two


def test_fun_01():
    get_mod_by_two(1)


def test_fun_02():
    get_mod_by_two(2)
这样在执行test_run.py时,会自动索引同级别目录下以test_开头的文件进行测试,运行打印如下:
============================= test session starts =============================
platform win32 -- Python 3.9.21, pytest-8.3.5, pluggy-1.5.0
rootdir: K:\Project_WXP\20250425_PyTestLearn\my_pytest
plugins: html-4.1.1, metadata-3.1.1
collected 4 items

test_01.py ..                                                            [ 50%]
test_02.py ..                                                            [100%]

- Generated html report: file:///K:/Project_WXP/20250425_PyTestLearn/my_pytest/report.html -
============================== 4 passed in 0.02s ==============================

Process finished with exit code 0
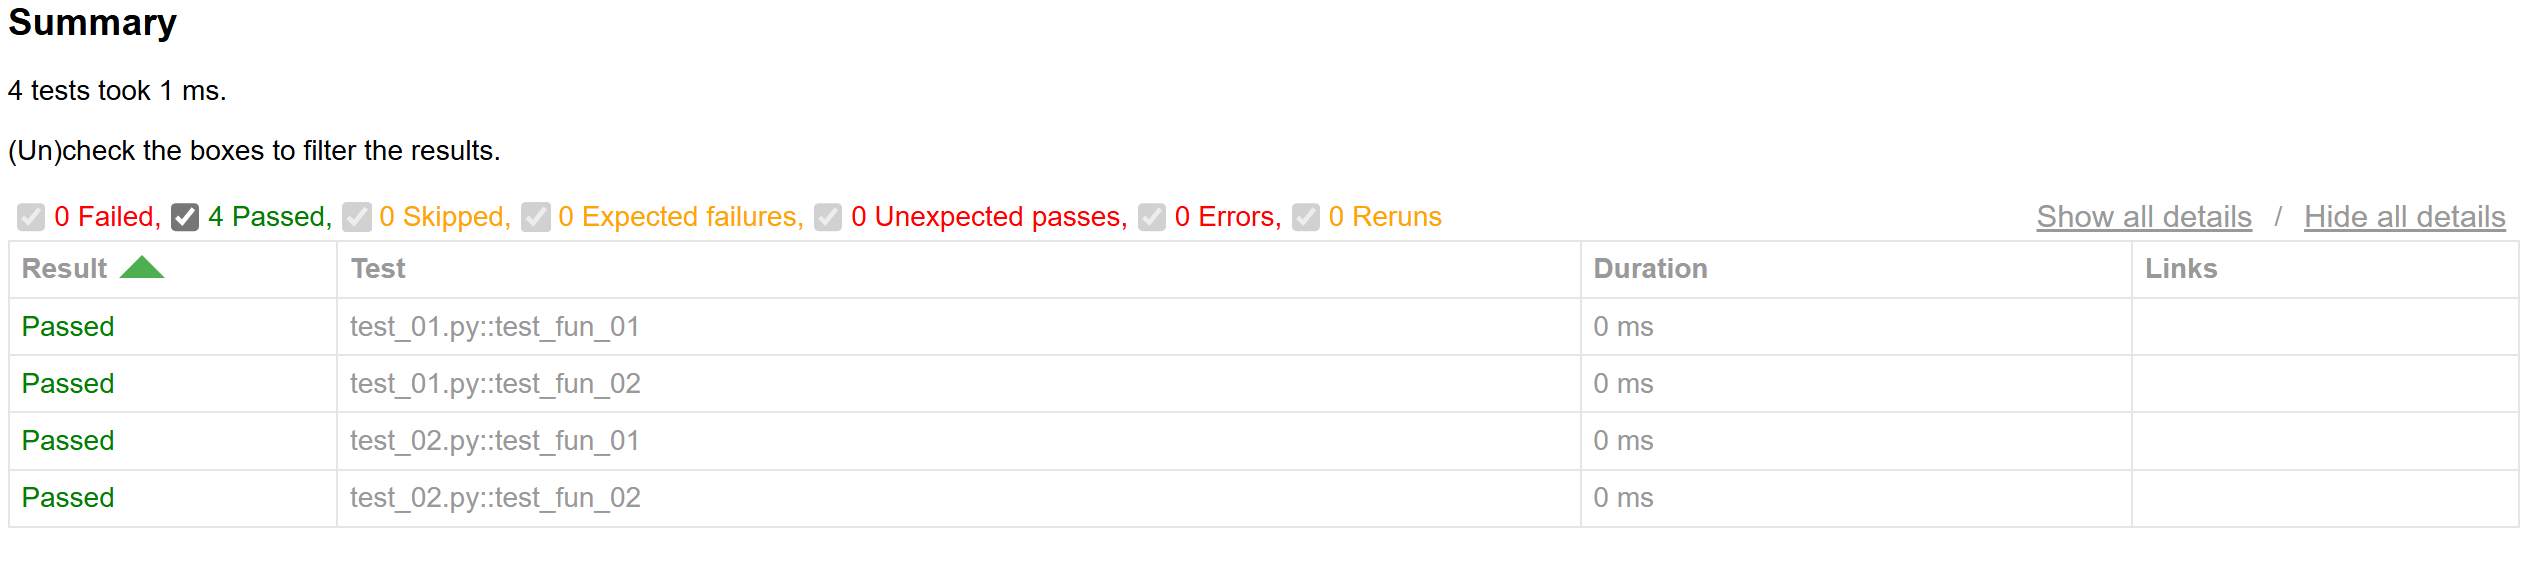
1.5 定义测试类
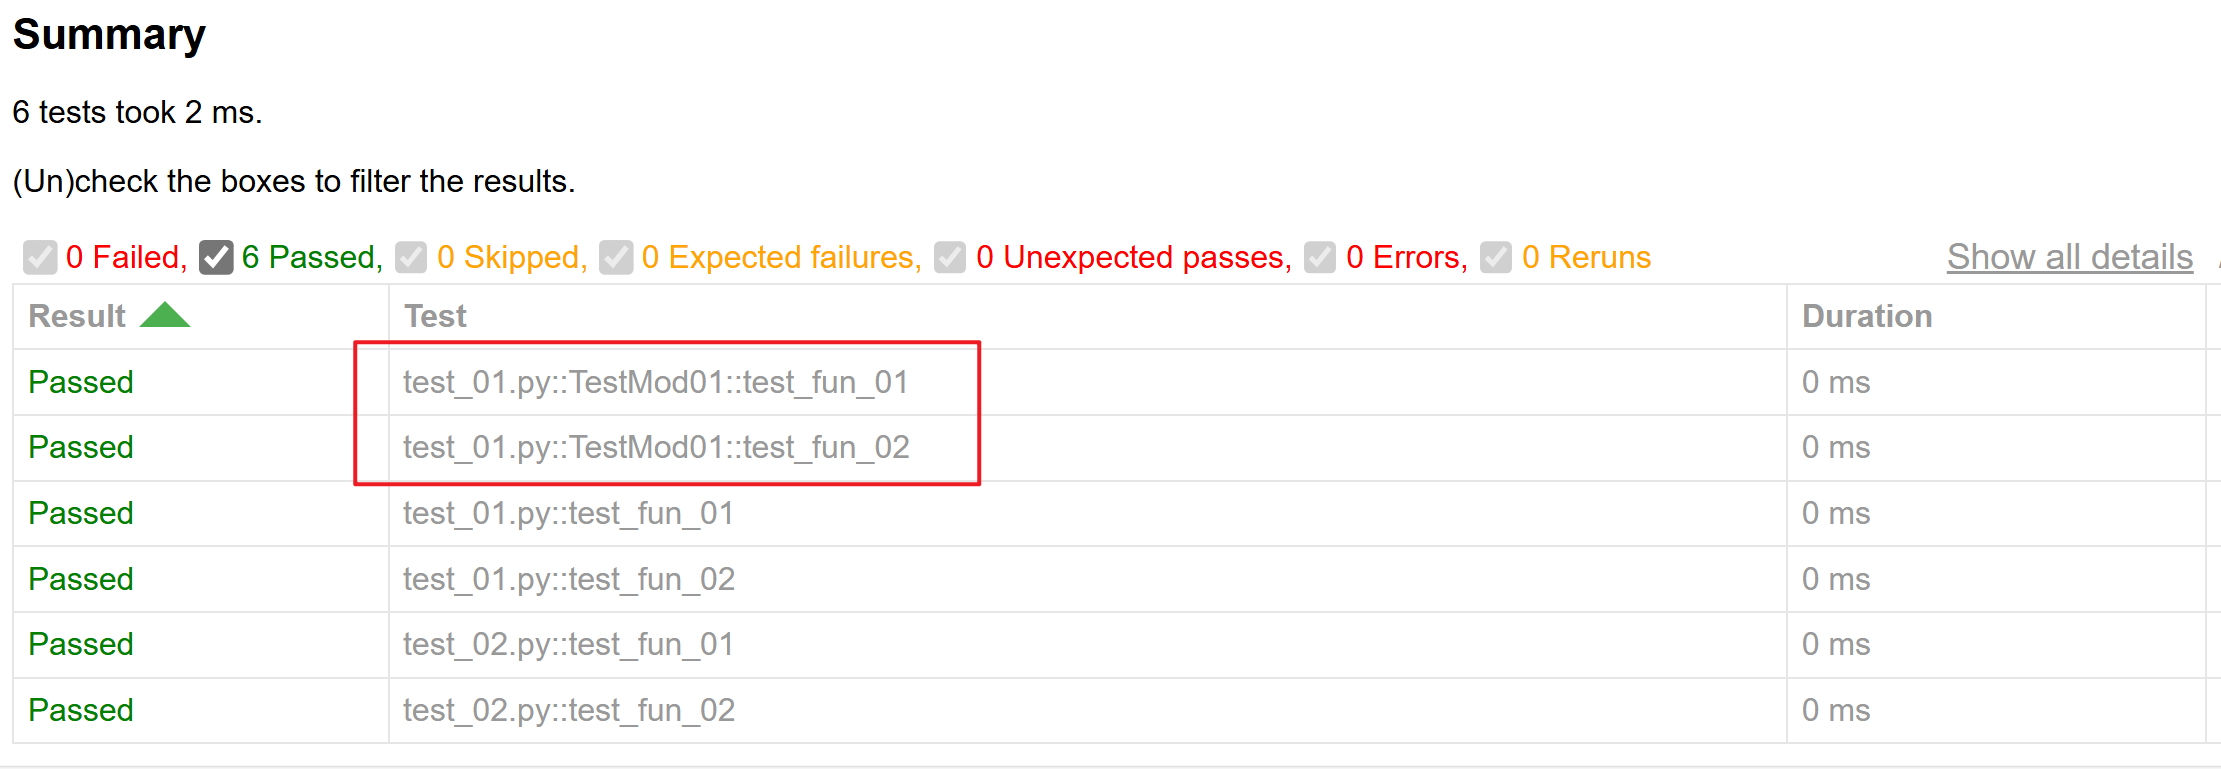
在单测文件中,测试类以Test开头,并且不能带有 init方法(注意:定义class时,需要以T开头,不然pytest是不会去运行该class的);在单测类中,可以包含一个或多个test_开头的函数。案例如下:
# test_01.py
from my_fun import get_mod_by_two


class TestMod01:
    def test_fun_01(self):
        get_mod_by_two(1)

    def test_fun_02(self):
        get_mod_by_two(2)


def test_fun_01():
    get_mod_by_two(1)


def test_fun_02():
    get_mod_by_two(2)
2、pytest高级使用
2.1、conftest.py全局初始化(全局变量、初始化环境等等)
可以在pytest目录下建立conftest.py文件来进行高级的管理。例如,在测试时可能会得到一些数据,需要将这些数据汇总为全局统一处理,这样的数据可以放在conftest.py文件的pytest_configure(config)函数中,该函数会在全部测试启动前先执行,可以用来初始化测试时的全局变量:
# conftest.py
import pytest
from collections import defaultdict


def pytest_configure(config):
    """初始化全局数据存储"""
    config._test_errors = {}  # 存储所有测试数据
2.2、conftest.py结束测试时打印与后处理
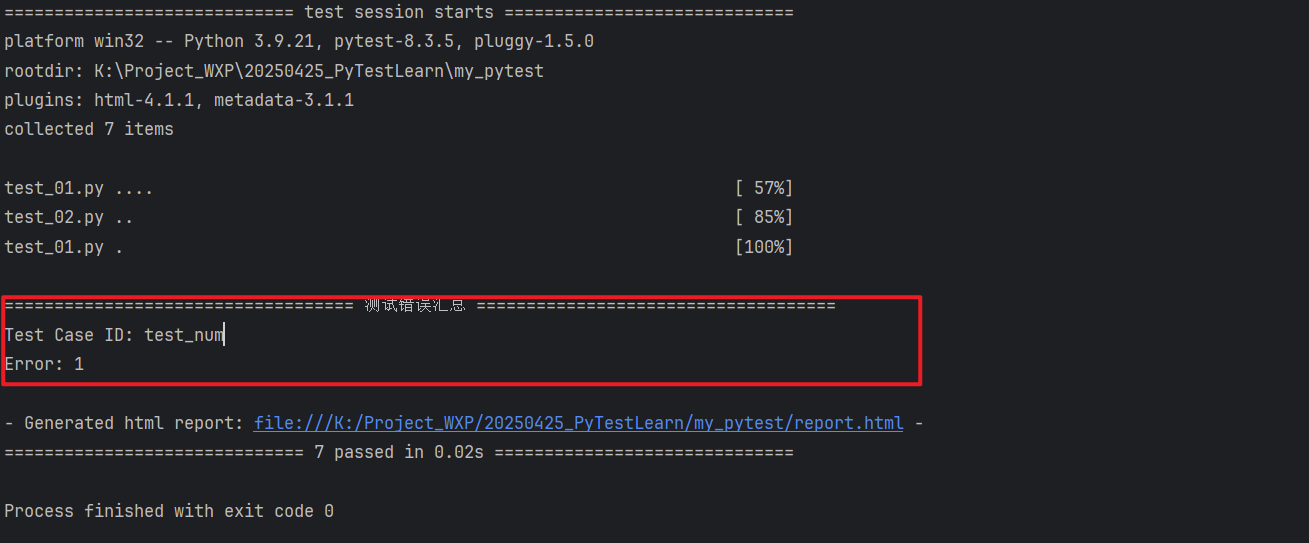
conftest.py文件中可以编写特定函数以在全部测试结束后进行额外的操作,例如关闭测试环境、处理打印最终数据等等。此处以上面初始化的变量为例,假设其在测试时被赋值,在结束测试时可以通过pytest_terminal_summary进行最终数据打印:
# test_01.py
def test_fun_01(pytestconfig):
    get_mod_by_two(1)
    pytestconfig._test_errors['test_num'] = 1
# conftest.py
def pytest_terminal_summary(terminalreporter, exitstatus, config):
    """在测试结束后打印自定义数据到控制台"""
    if hasattr(config, '_test_errors') and config._test_errors:
        # 添加分隔线
        terminalreporter.write_sep('=', "测试错误汇总", red=True)
        # 遍历并打印所有错误信息
        for test_id, error_info in config._test_errors.items():
            terminalreporter.write_line(f"Test Case ID: {test_id}\nError: {error_info}\n")
打印信息为:
2.3、conftest.py通过定义marker调整测试顺序
conftest.py中可以将定义pytest_collection_modifyitems函数,以在测试例子的收集阶段调整测试顺序,这样可以在最后的测试时执行一些数据汇总的操作。例如,此处需要定义marker来将含finalize_report标记的测试最后执行,主体函数位于pytest_collection_modifyitems,在pytest_configure函数中进行注册:
# conftest.py
def pytest_configure(config):
    """初始化全局数据存储"""
    config._test_errors = {}  # 存储所有测试数据
    # 注册 finalize_report 标记
    config.addinivalue_line(
        "markers",
        "finalize_report: mark a test to run last for generating final report"
    )

def pytest_collection_modifyitems(items):
    """强制指定某个测试函数最后执行"""
    # 查找标记为 'finalize_report' 的测试函数
    final_item = None
    for item in items:
        if item.get_closest_marker("finalize_report"):
            final_item = item
            break

    # 如果找到,将其移动到测试列表末尾
    if final_item:
        items.remove(final_item)
        items.append(final_item)
对于要最后执行的测试项目,使用如下方法进行标记:
@pytest.mark.finalize_report
def test_generate_allure_report(pytestconfig):
    """最后一个执行的测试函数"""
    # 获取全局数据
    data_collections = pytestconfig._test_errors
2.4、使用fixture控制函数在测试前自动执行
使用类似于如下的标记对函数进行控制,autouse=True表示自动执行,scope表示在哪个范围自动执行:
@pytest.fixture(scope="session", autouse=True)
通过 scope 参数控制函数的执行频率:
- scope=“function”:默认,每个测试用例运行前执行。
- scope=“class”:每个测试类运行前执行。
- scope=“module”:每个模块(文件)运行前执行。
- scope=“session”:整个测试会话(所有用例)前执行。
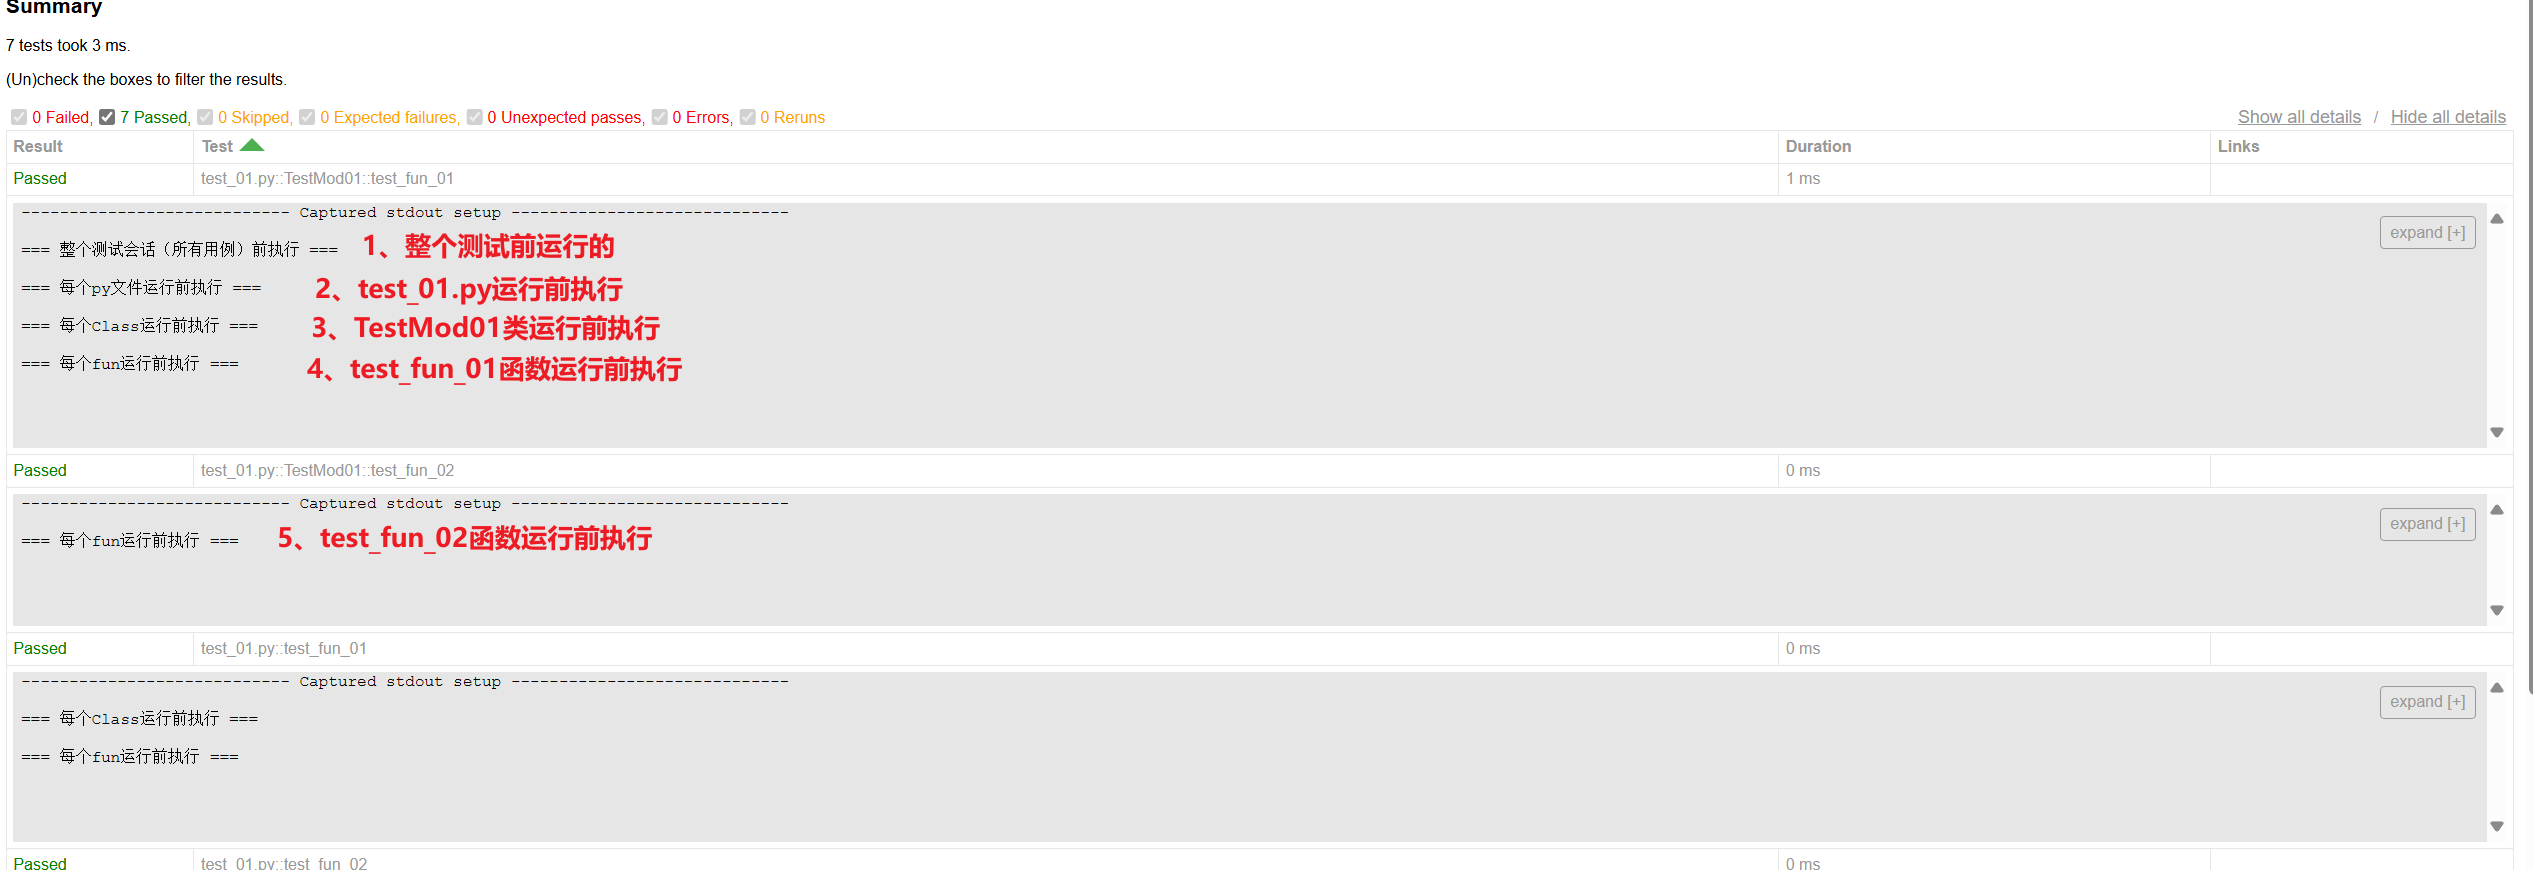
例如,有如下的控制代码:
@pytest.fixture(scope="session", autouse=True)
def module_setup1():
    print("\n=== 整个测试会话(所有用例)前执行 ===")


@pytest.fixture(scope="module", autouse=True)
def module_setup2():
    print("\n=== 每个py文件运行前执行 ===")


@pytest.fixture(scope="class", autouse=True)
def module_setup3():
    print("\n=== 每个Class运行前执行 ===")


@pytest.fixture(scope="function", autouse=True)
def module_setup4():
    print("\n=== 每个fun运行前执行 ===")
生成的html如下:
3、allure美化报告
3.1 allure的安装与配置
操作步骤可以参考:Allure安装与环境部署
注意:allure需要依赖java jdk环境,我当时安装找的教程没有说要安装,导致一开始运行不起来
3.2 allure运行的基础设置
3.2.1 设置alluredir与启动allure服务
如果需要在pytest运行时生成allure报告,需要在运行时添加alluredir路径,以在目录下生成文件夹与数据:
# test_run.py
if __name__ == '__main__':
    pytest.main(['--html=report.html', '--alluredir=allure-results'])
在运行后,会在目录生成allure-results文件夹,这里存储报告的数据,可以使用下面的命令启动服务,来查看报告:
allure serve my_pytest/allure-results
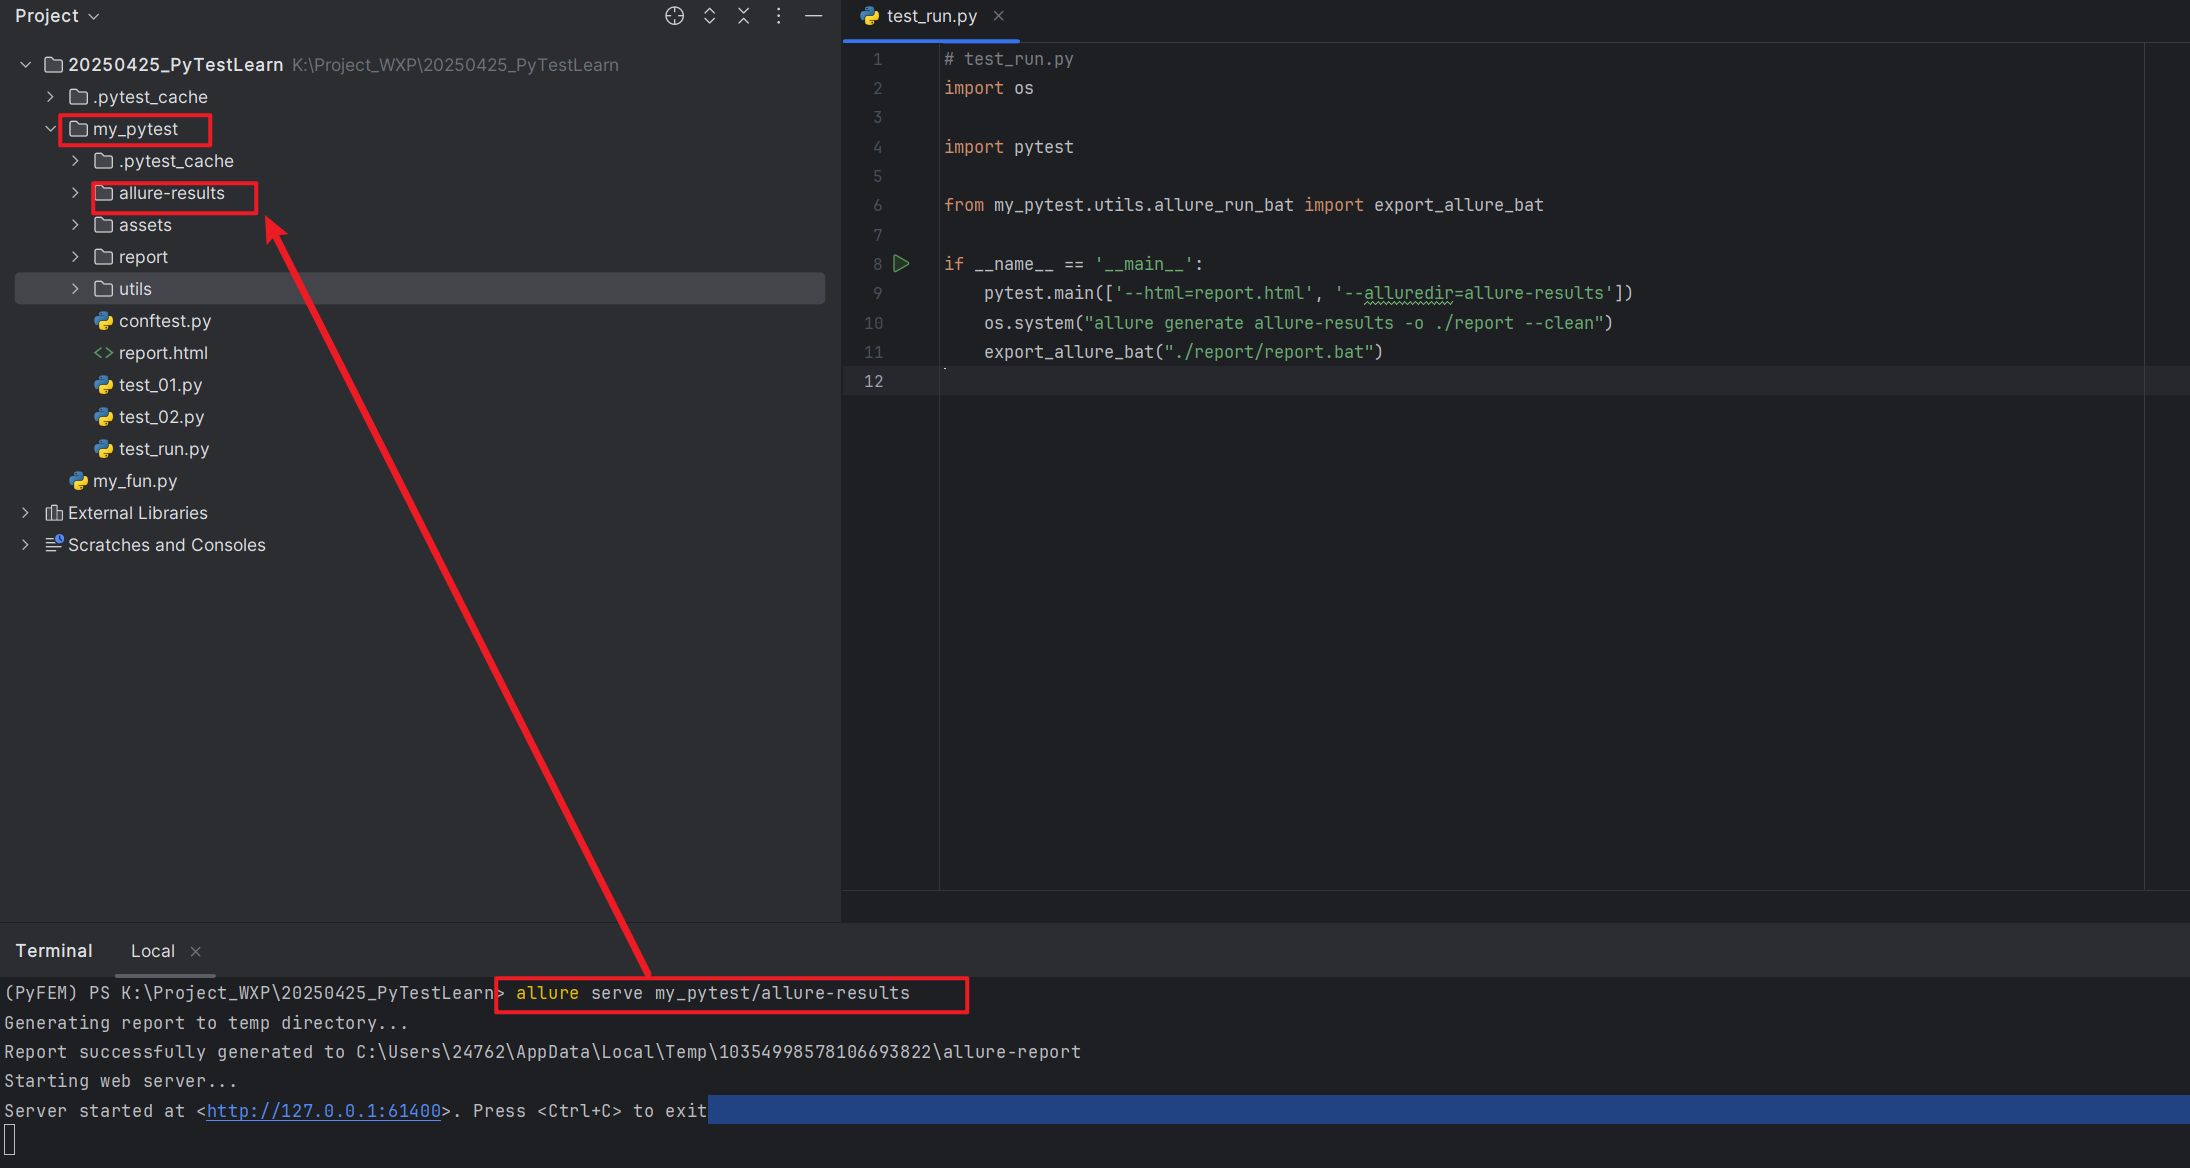
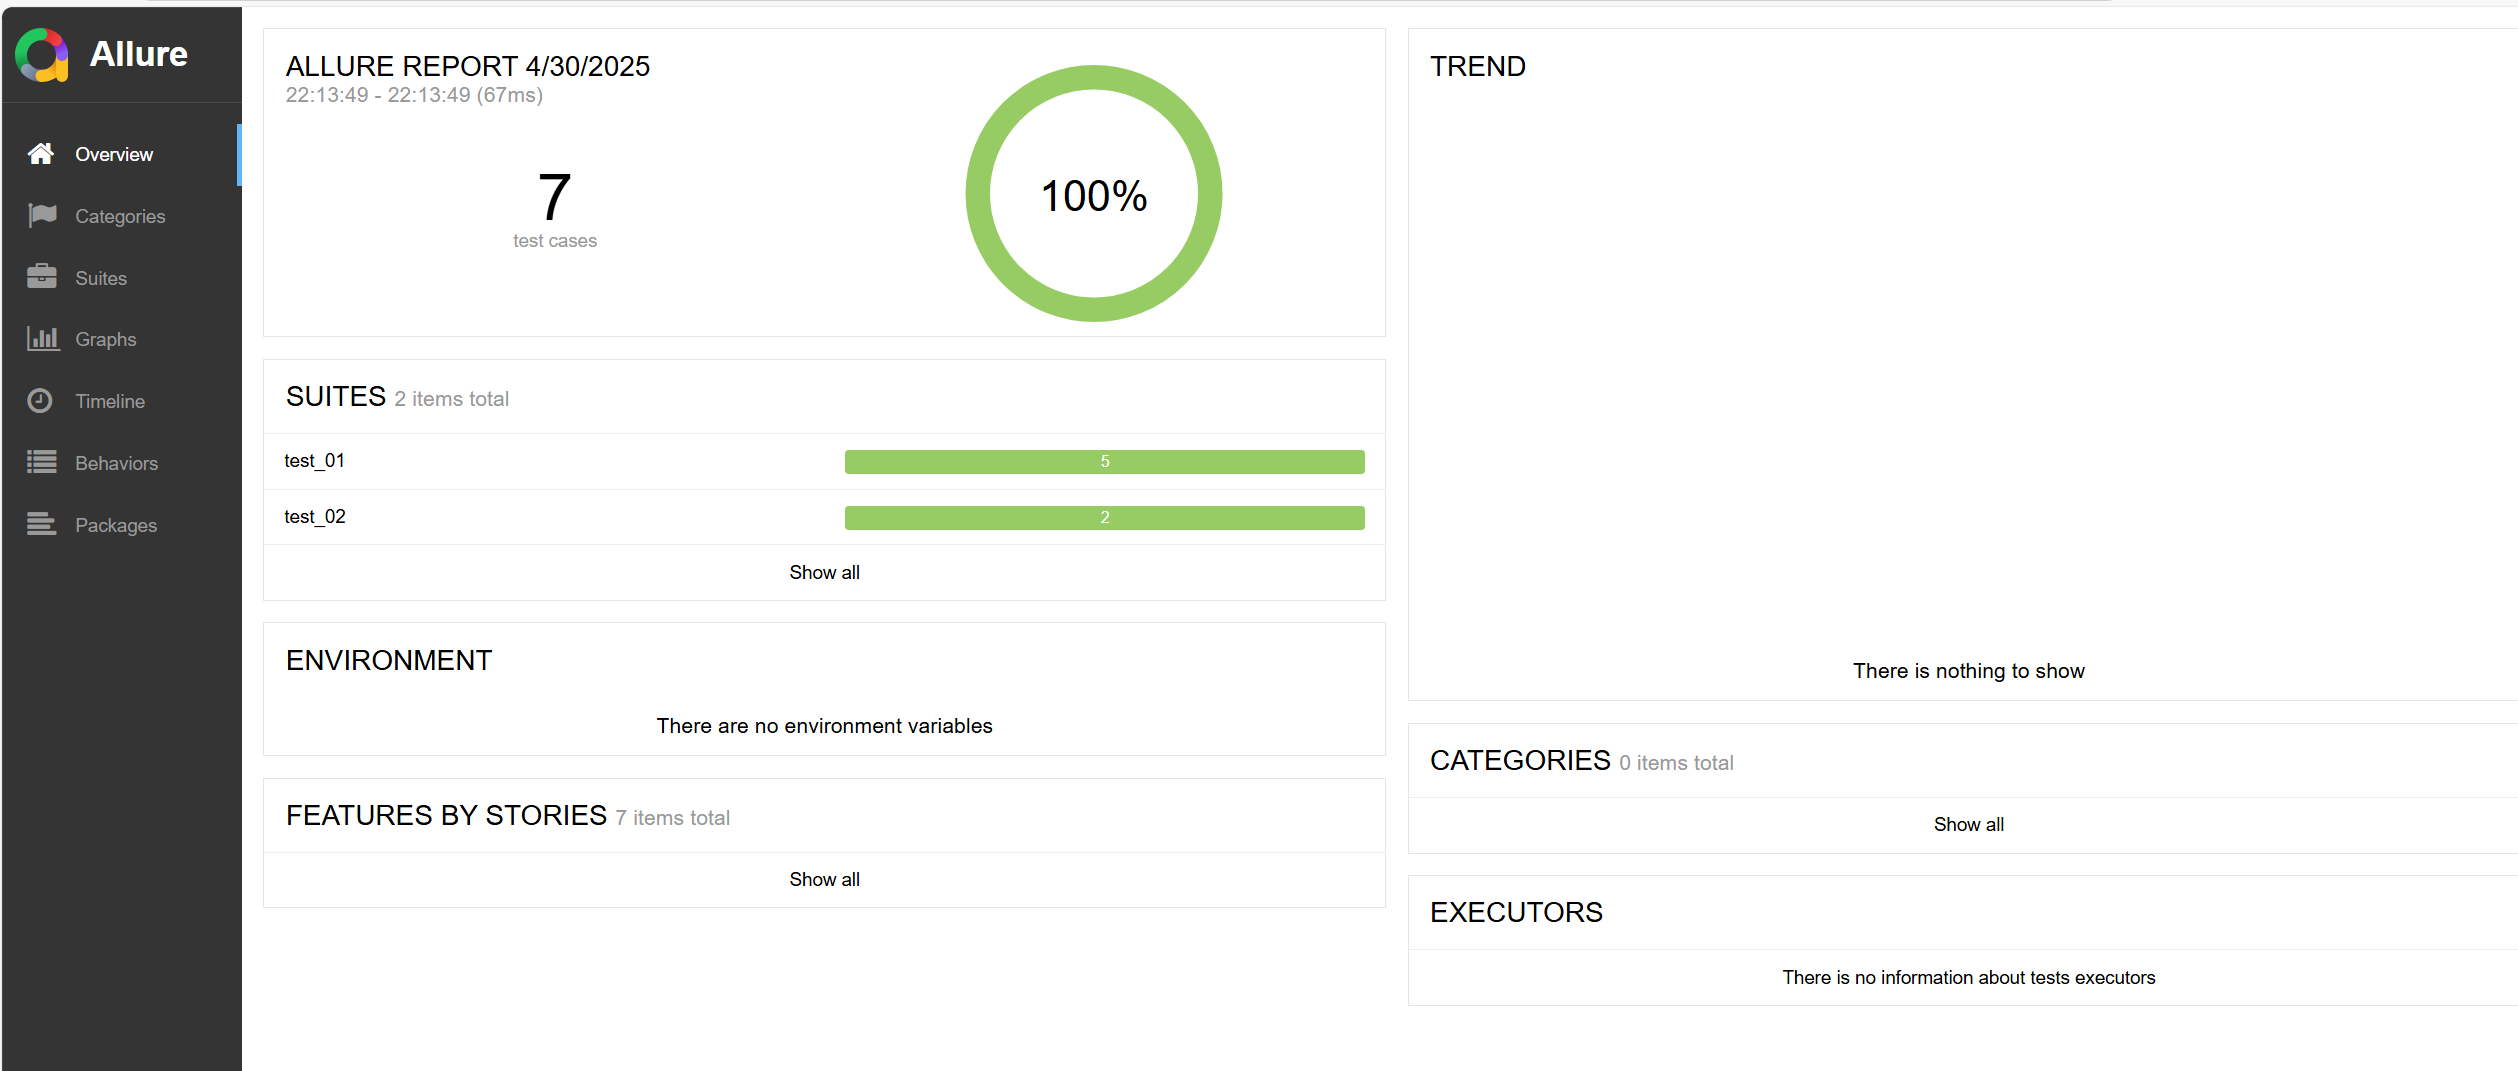
服务启动后会在默认浏览器打开html界面:
3.2.2 导出allure报告为html与无allure环境查看报告
通过执行下面命令可以将alluredir路径中的零时零散文件导出为可直接打开观看的html文件,其中allure-results指向导出的alluredir路径,./report为导出报告的文件夹路径:
allure generate allure-results -o ./report --clean
导出后如下所示:
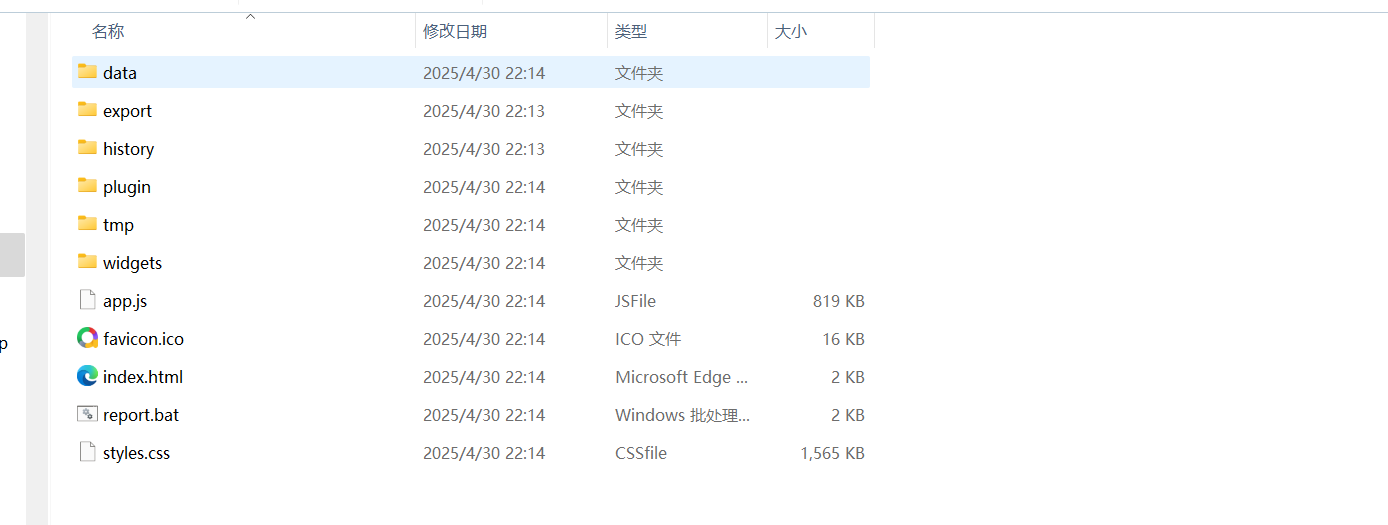
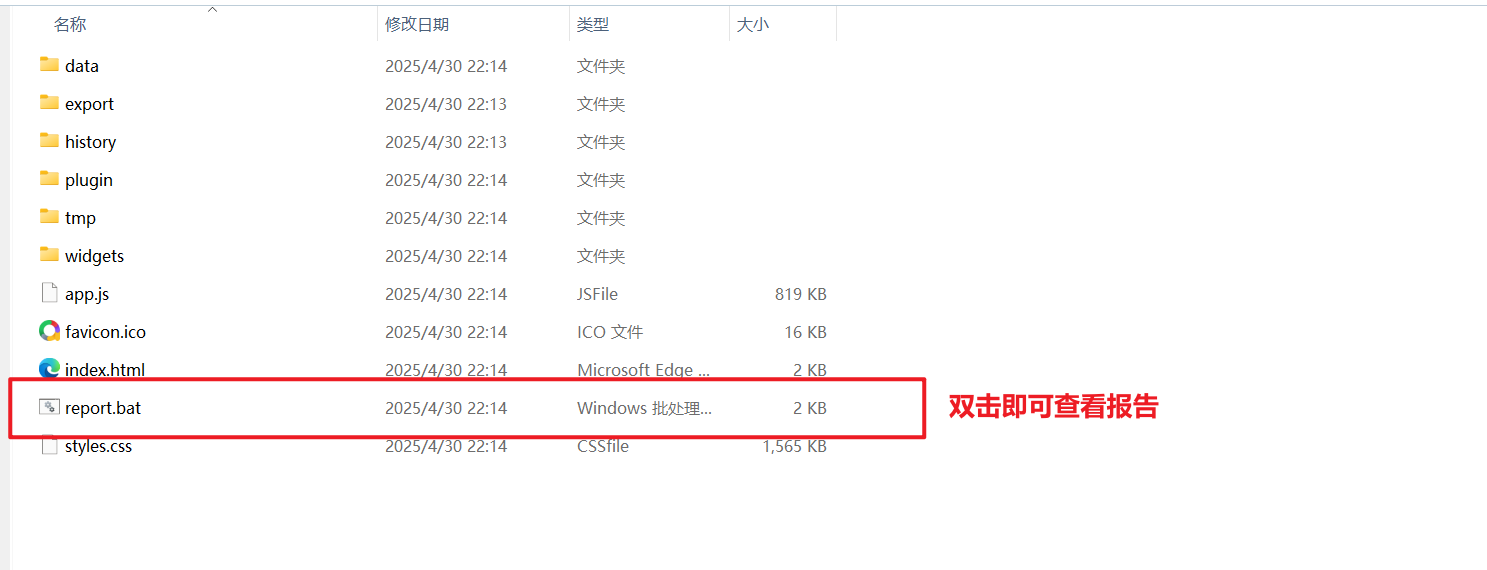
此时直接打开index.html是不行的,如果想要查看报告,需要参考这篇博客的方法设置bat文件:Allure在本地不安装allure服务的情况下打开Allure Html报告
如果想要在python运行后自动进行html报告的导出和bat文件的生成,可以使用如下的方式自动化执行:
# test_run.py
import os

import pytest

from my_pytest.utils.allure_run_bat import export_allure_bat

if __name__ == '__main__':
    pytest.main(['--html=report.html', '--alluredir=allure-results'])
    os.system("allure generate allure-results -o ./report --clean")
    export_allure_bat("./report/report.bat")
export_allure_bat函数如下所示,就是Allure在本地不安装allure服务的情况下打开Allure Html报告中说明的bat文件,指定目录导出了而已:
# allure_run_bat.py
def export_allure_bat(path):
    bat_content = r'''
    @echo off
    setlocal enabledelayedexpansion

    set "chrome_path="
    ::从注册表查找谷歌浏览器路径
    set reg_query_command=reg query "HKEY_LOCAL_MACHINE\SOFTWARE\Microsoft\Windows\CurrentVersion\App Paths\chrome.exe" /ve

    ::遍历注册表查询结果
    for /f "tokens=2*" %%A in ('%reg_query_command%') do (
        ::如果有REG_SZ,则证明找到了谷歌浏览器
        if "%%A"=="REG_SZ" (
            ::如果路径存在,则设置谷歌浏览器绝对路径到变量chrome_path
            set "tmp_chrome_path=%%B"
            if exist "!tmp_chrome_path!" (
                set "chrome_path=%%B"
            )
        )
    )

    ::如果上面找到了谷歌浏览器的路径
    if defined chrome_path (
        ::打印找到了谷歌浏览器的文件地址
        echo Chrome found at: "%chrome_path%"
        ::带参启动谷歌浏览器,使其不校验跨域问题
        "%chrome_path%" --disable-web-security --user-data-dir="%~dp0/tmp" "%~dp0/index.html"
    ) else (
        ::如果没找到,打印没找到
        echo Chrome not found.
        ::打印启动web信息
        echo start a webserver ...
        ::启动一个web服务监听5001端口,在后台运行。默认用当前文件夹的index.html作为首页
        start /b http_server.exe -port 5001
        ::使用Edge浏览器打开web服务的地址并等待浏览器关闭
        start /WAIT msedge.exe http://127.0.0.1:5001
    )
    '''

    with open(path, 'w', newline='\r\n', encoding='gbk') as f:
        f.write(bat_content)
由此生成报告时会额外生成bat文件,打开即可直接查看报告,(可以无allure环境):
3.3 allure标记
| 使用方法 | 参数值 | 参数说明 |
|---|---|---|
| @allure.epic() | epic描述 | 最高层级分类,表示业务目标或大型需求(如“用户认证系统”) |
| @allure.feature() | feature描述 | 模块/功能分类,隶属于某个 Epic(如“登录功能”)。 |
| @allure.story() | story描述 | 更细粒度的需求/场景,隶属于某个 Feature(如“通过邮箱登录”)。 |
| @allure.title() | 自定义标题 | 自定义测试用例的标题(若未填写,默认使用测试方法名)。 |
| @allure.testcase() | 测试用例URL | 关联到第三方系统的测试用例链接(如 Jira、TestRail)。 |
| @allure.issue() | 缺陷ID/URL | 关联缺陷管理系统中的问题链接(如 Bug ID PROJ-123) |
| @allure.description() | 文本描述 | 添加测试的详细说明,支持多行文本或使用 @allure.description 装饰器。 |
| @allure.step() | 步骤名称 | 定义测试步骤,可通过参数 parameters=True 捕获参数值。 |
| @allure.serverity() | severity级别 | 设置用例优先级(可选:blocker/critical/normal/minor/trivial)。 |
| @allure.link() | URL | 添加自定义外部链接(如文档、需求描述页)。 |
| @allure.attachment() | content, name, attachment_type | 在报告中附加文件或内容(如截图、日志)。 |
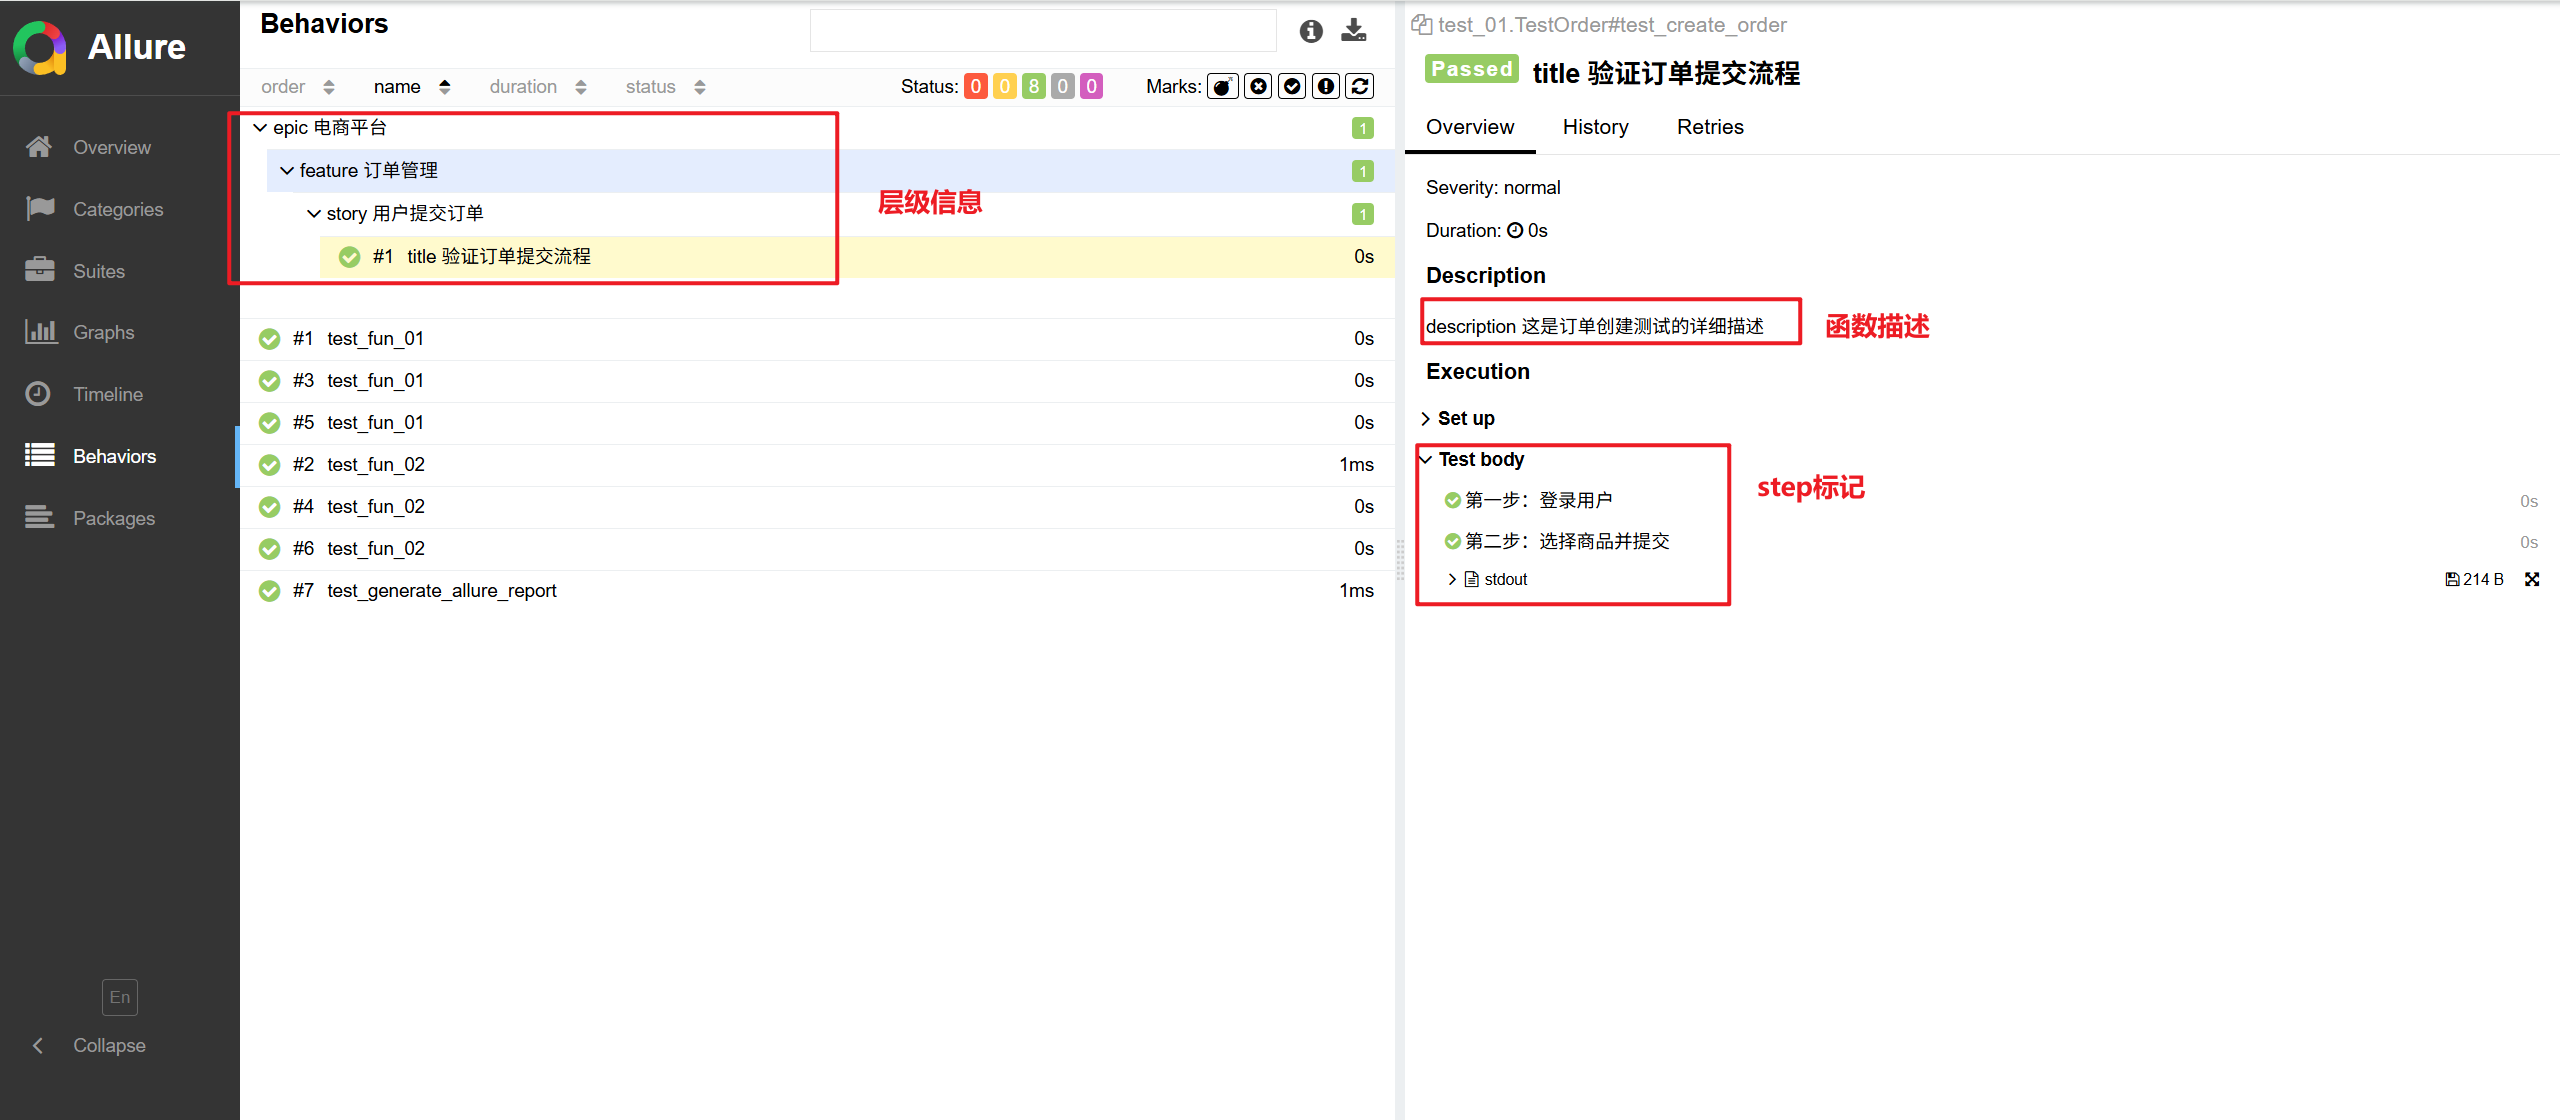
3.3.1 使用allure标记定义层级和描述
一下标记用于定义层级和描述,使得报告更加美观直接:
- @allure.epic()
- @allure.feature()
- @allure.story()
- @allure.title()
- @allure.description()
- @allure.step()
使用下面的代码案例:
# test_01.py
import allure
import pytest

@allure.epic("epic 电商平台")
@allure.feature("feature 订单管理")
class TestOrder:
    @allure.story("story 用户提交订单")
    @allure.title("title 验证订单提交流程")
    def test_create_order(self):
        """
        这是订单创建测试的详细描述
        """
        with allure.step("第一步:登录用户"):
            print("模拟登录步骤...")

        with allure.step("第二步:选择商品并提交"):
            print("模拟订单提交步骤...")
3.3.2 使用allure标记链接
| 使用方法 | 参数值 | 参数说明 |
|---|---|---|
| @allure.testcase() | 测试用例URL | 关联到第三方系统的测试用例链接(如 Jira、TestRail)。 |
| @allure.issue() | 缺陷ID/URL | 关联缺陷管理系统中的问题链接(如 Bug ID PROJ-123) |
| @allure.link() | URL | 添加自定义外部链接(如文档、需求描述页)。 |
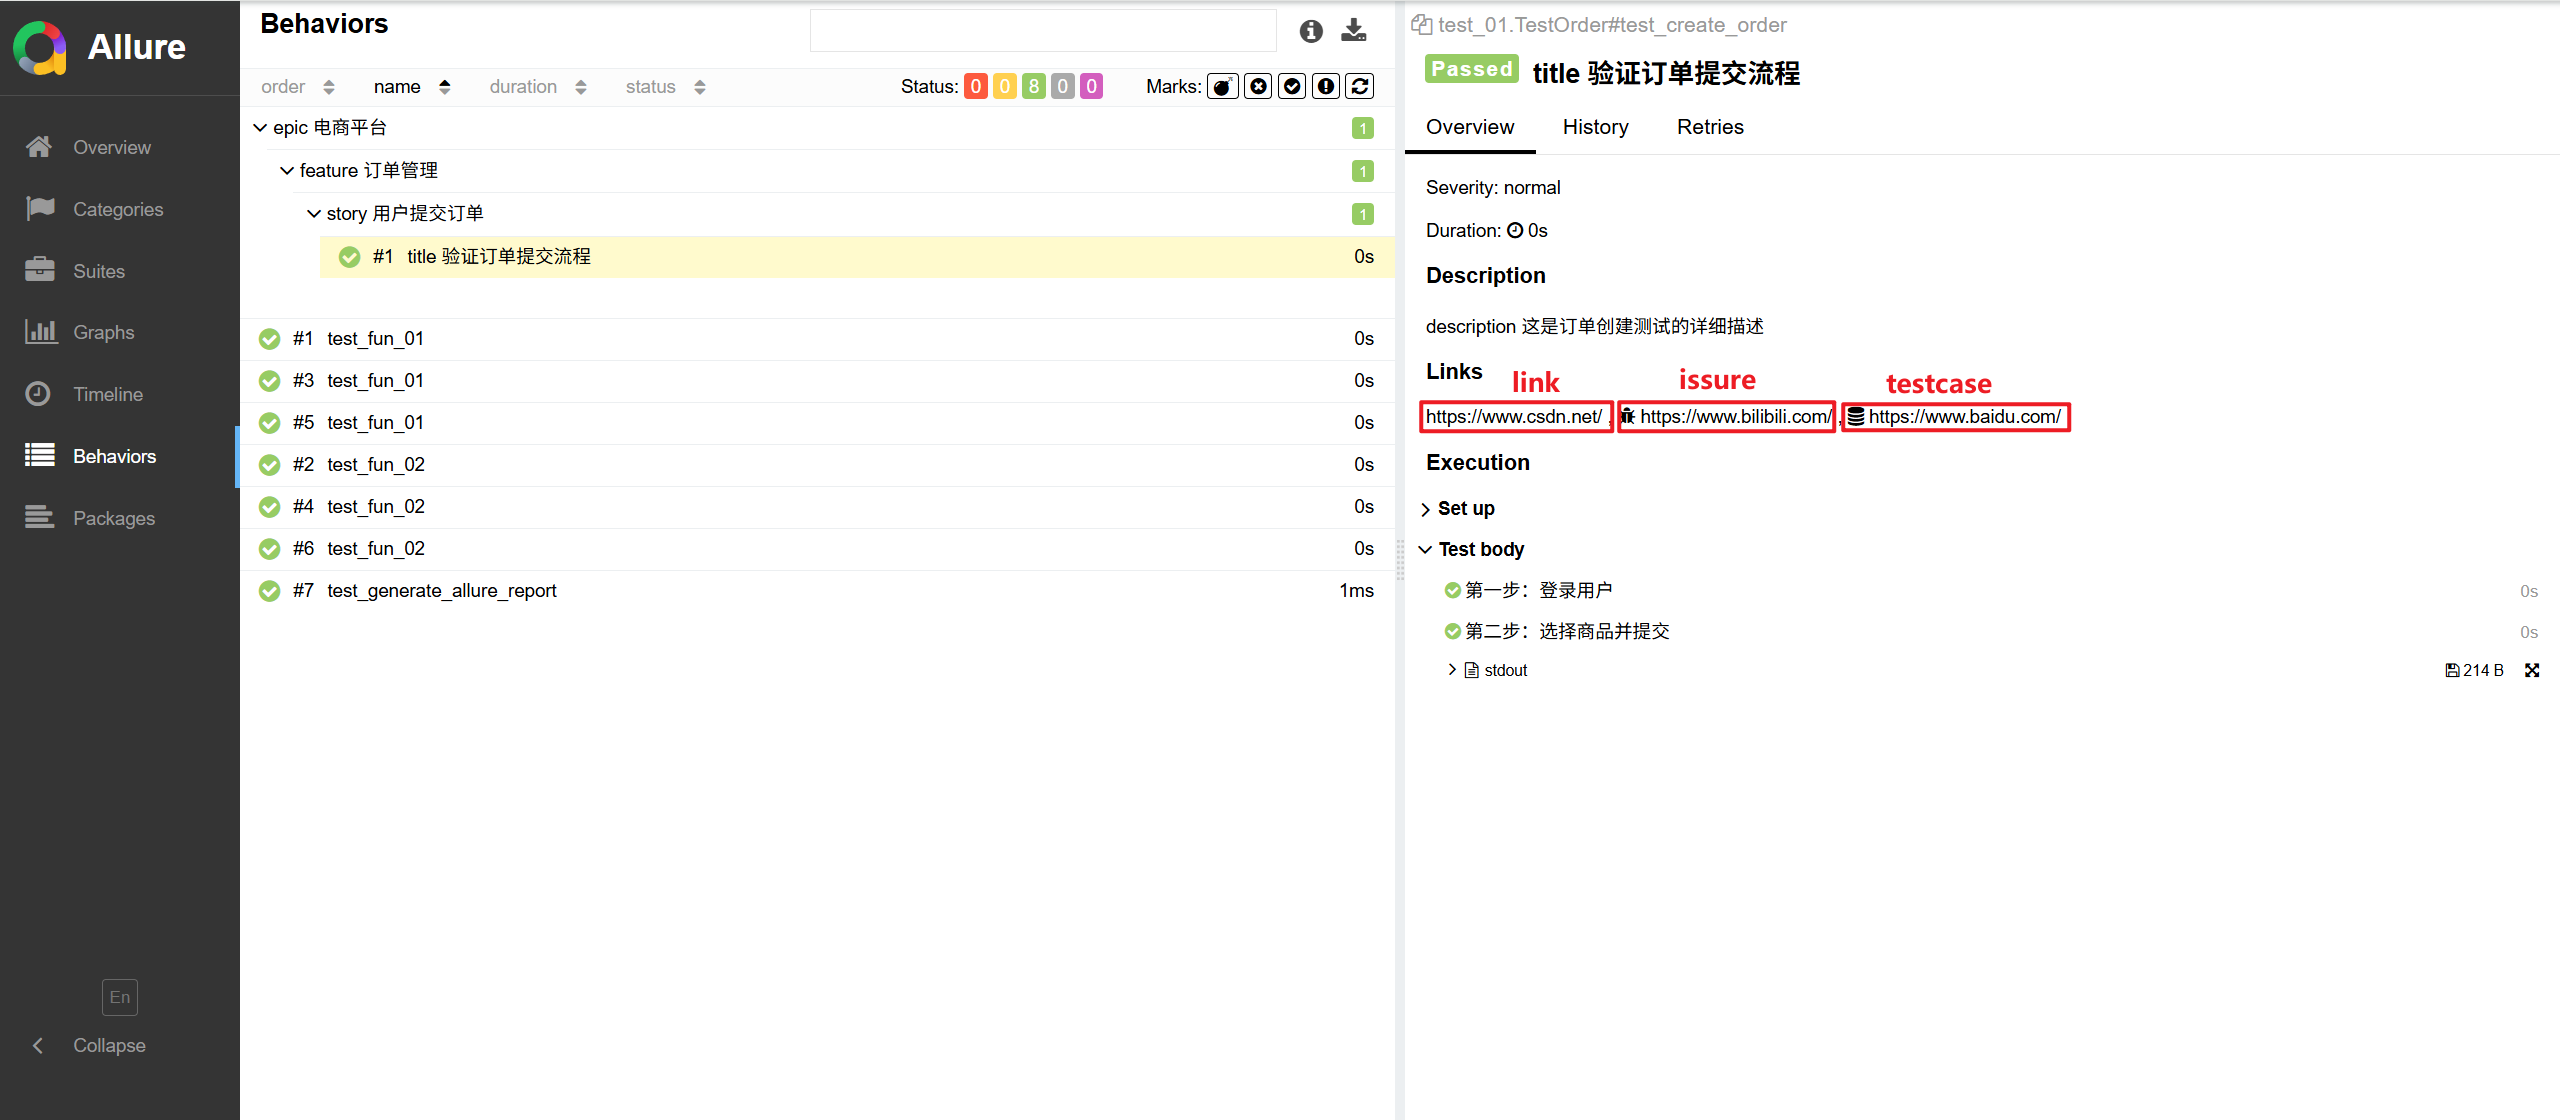
修改3.3.1的代码,加上链接:
@allure.testcase("https://www.bilibili.com/")
@allure.issue("issue")
变为:
# test_01.py
import allure
import pytest

@allure.epic("epic 电商平台")
@allure.feature("feature 订单管理")
class TestOrder:
    @allure.story("story 用户提交订单")
    @allure.title("title 验证订单提交流程")
    @allure.link("https://www.csdn.net/")
    @allure.issue("https://www.bilibili.com/")
    @allure.testcase("https://www.baidu.com/")
    @allure.description("description 这是订单创建测试的详细描述")
    def test_create_order(self):
        with allure.step("第一步:登录用户"):
            print("模拟登录步骤...")

        with allure.step("第二步:选择商品并提交"):
            print("模拟订单提交步骤...")
可以看到issue的图标是个爬虫,而testcase的图标是个数据库:
3.3.3 使用allure标记严重程度
| 使用方法 | 参数值 | 参数说明 |
|---|---|---|
| @allure.serverity() | severity级别 | 设置用例优先级(可选:blocker/critical/normal/minor/trivial)。 |
实际用法为:
@allure.severity(allure.severity_level.BLOCKER)
使用如下方法进行标记,没有标记的优先级默认为normal:
# test_01.py
import allure
import pytest


@allure.severity(allure.severity_level.BLOCKER)
def test_core_function():
    """验证核心业务流程"""
    assert True


@allure.severity(allure.severity_level.BLOCKER)
class TestUserProfile:
    @allure.severity(allure.severity_level.CRITICAL)  # 覆盖类的默认级别
    def test_update_username(self):
        assert True

    @allure.severity(allure.severity_level.BLOCKER)  # 覆盖类的默认级别
    def test_update_avatar(self):
        assert True


@allure.epic("epic 电商平台")
@allure.feature("feature 订单管理")
class TestOrder:
    @allure.story("story 用户提交订单")
    @allure.title("title 验证订单提交流程")
    @allure.testcase("https://www.baidu.com/")
    @allure.issue("https://www.bilibili.com/")
    @allure.link("https://www.csdn.net/")
    @allure.description("description 这是订单创建测试的详细描述")
    def test_create_order(self):
        with allure.step("第一步:登录用户"):
            print("模拟登录步骤...")

        with allure.step("第二步:选择商品并提交"):
            print("模拟订单提交步骤...")


from my_fun import get_mod_by_two


@pytest.fixture(scope="session", autouse=True)
def module_setup1():
    print("\n=== 整个测试会话(所有用例)前执行 ===")


@pytest.fixture(scope="module", autouse=True)
def module_setup2():
    print("\n=== 每个py文件运行前执行 ===")


@pytest.fixture(scope="class", autouse=True)
def module_setup3():
    print("\n=== 每个Class运行前执行 ===")


@pytest.fixture(scope="function", autouse=True)
def module_setup4():
    print("\n=== 每个fun运行前执行 ===")


class TestMod01:
    def test_fun_01(self):
        get_mod_by_two(1)

    def test_fun_02(self):
        get_mod_by_two(2)


def test_fun_01(pytestconfig):
    get_mod_by_two(1)
    pytestconfig._test_errors['test_num'] = 1


def test_fun_02():
    get_mod_by_two(2)


@pytest.mark.finalize_report
def test_generate_allure_report(pytestconfig):
    """最后一个执行的测试函数,生成 Allure 报告"""
    # 获取全局数据
    data_collections = pytestconfig._test_errors
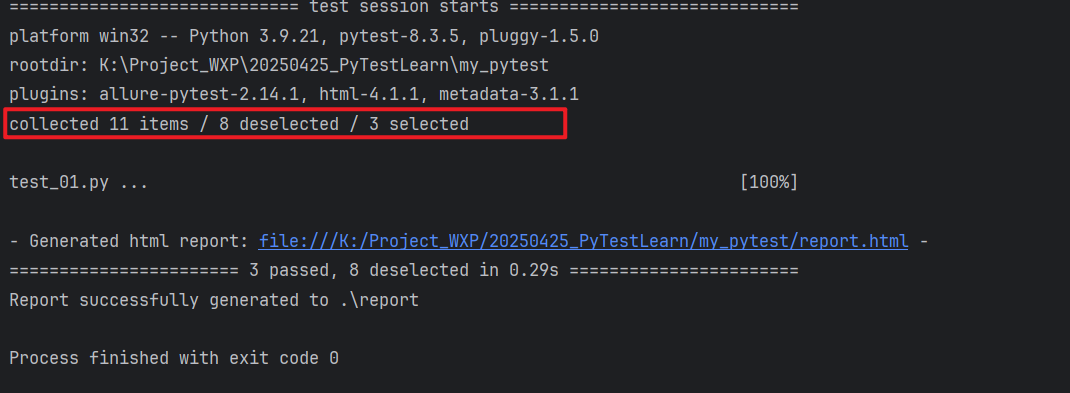
在运行整个测试时,可以指定严重度标记进行运行,例如下面只运行 BLOCKER 和 CRITICAL 级别的用例:
# 只运行 BLOCKER 和 CRITICAL 级别的用例
pytest --alluredir=allure-results --allure-severities=blocker,critical
在py代码里面如下实现:
# test_run.py
import os

import pytest

from my_pytest.utils.allure_run_bat import export_allure_bat

if __name__ == '__main__':
    pytest.main(['--html=report.html', '--alluredir=allure-results', '--allure-severities=blocker,critical'])
    os.system("allure generate allure-results -o ./report --clean")
    export_allure_bat("./report/report.bat")
实际运行结果如下,可以看到虽然有许多测试项目,但是只有三个标记为blocker或者critical的案例被运行了:
3.3.4 使用allure附加文字说明、图片、表格等等
这主要是基于allure.attach函数,其用法解释如下:
| 参数名 | 说明 |
|---|---|
| content | 要附加的内容(文本/二进制数据) |
| name | 附件在报告中显示的名称 |
| attachment_type | 附件类型 |
支持的文件类型包括:
| 数据类型 | 参数 |
|---|---|
| 文本 | allure.attachment_type.TEXT |
| CSV | allure.attachment_type.CSV |
| HTML | allure.attachment_type.HTML |
| JSON | allure.attachment_type.JSON |
| XML | allure.attachment_type.XML |
| 图片 | allure.attachment_type.PNG或者llure.attachment_type.JPEG |
| 视频 | allure.attachment_type.WEBM或者allure.attachment_type.MP4 |
| 二进制 | allure.attachment_type.BINARY |
3.3.4.1附加TXT文本
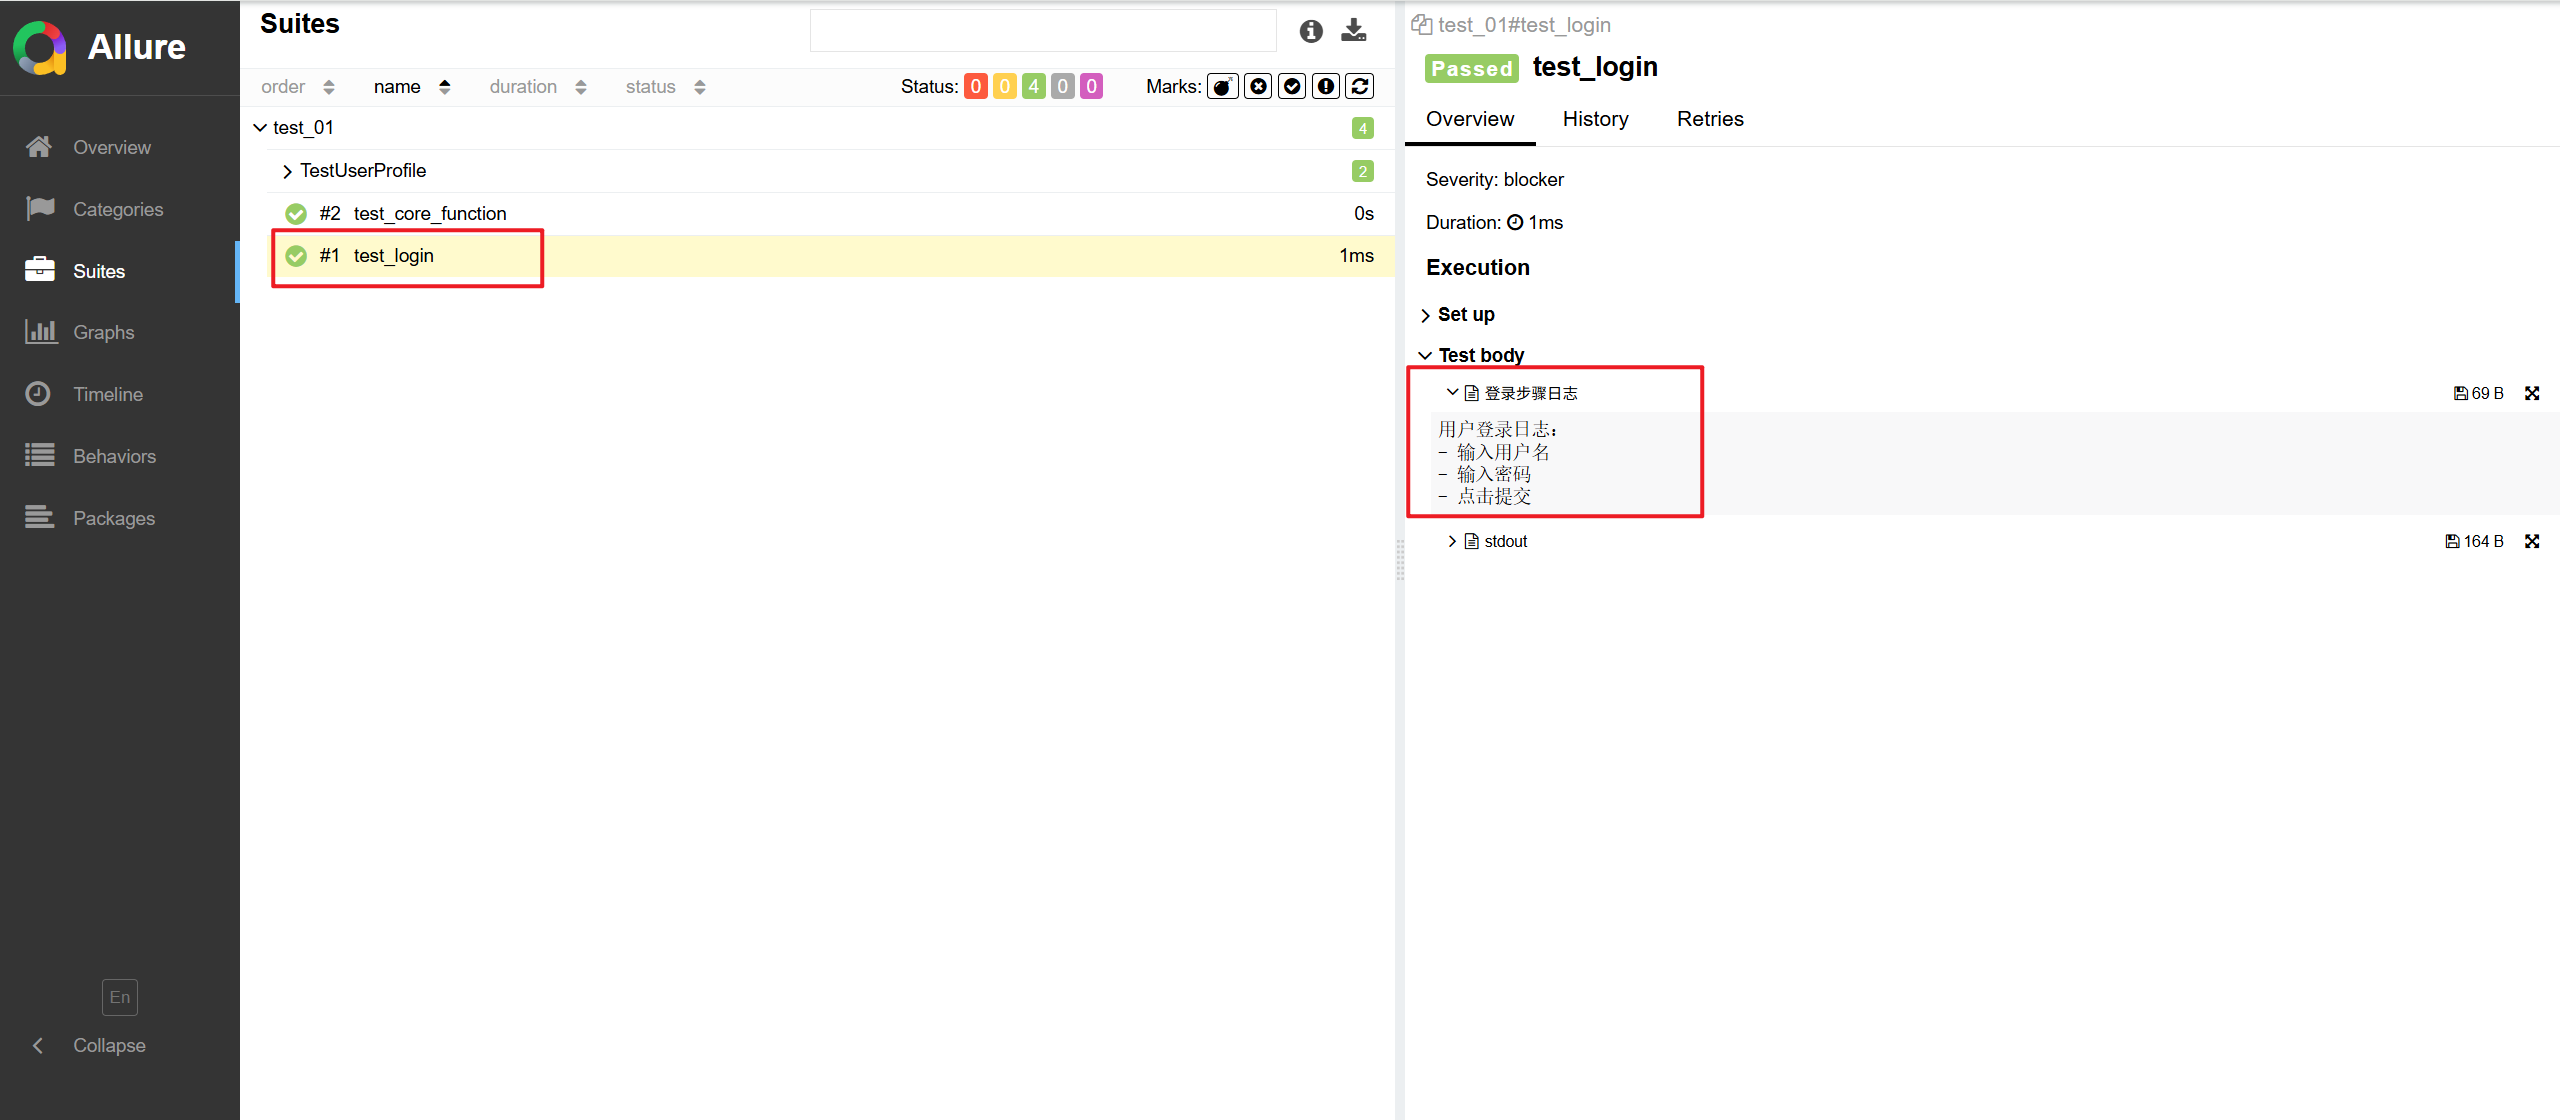
以最简单的附加文本为例:
@allure.severity(allure.severity_level.BLOCKER)
def test_login():
    log_data = "用户登录日志:\n- 输入用户名\n- 输入密码\n- 点击提交"
    allure.attach(log_data, name="登录步骤日志", attachment_type=allure.attachment_type.TEXT)
结果为:
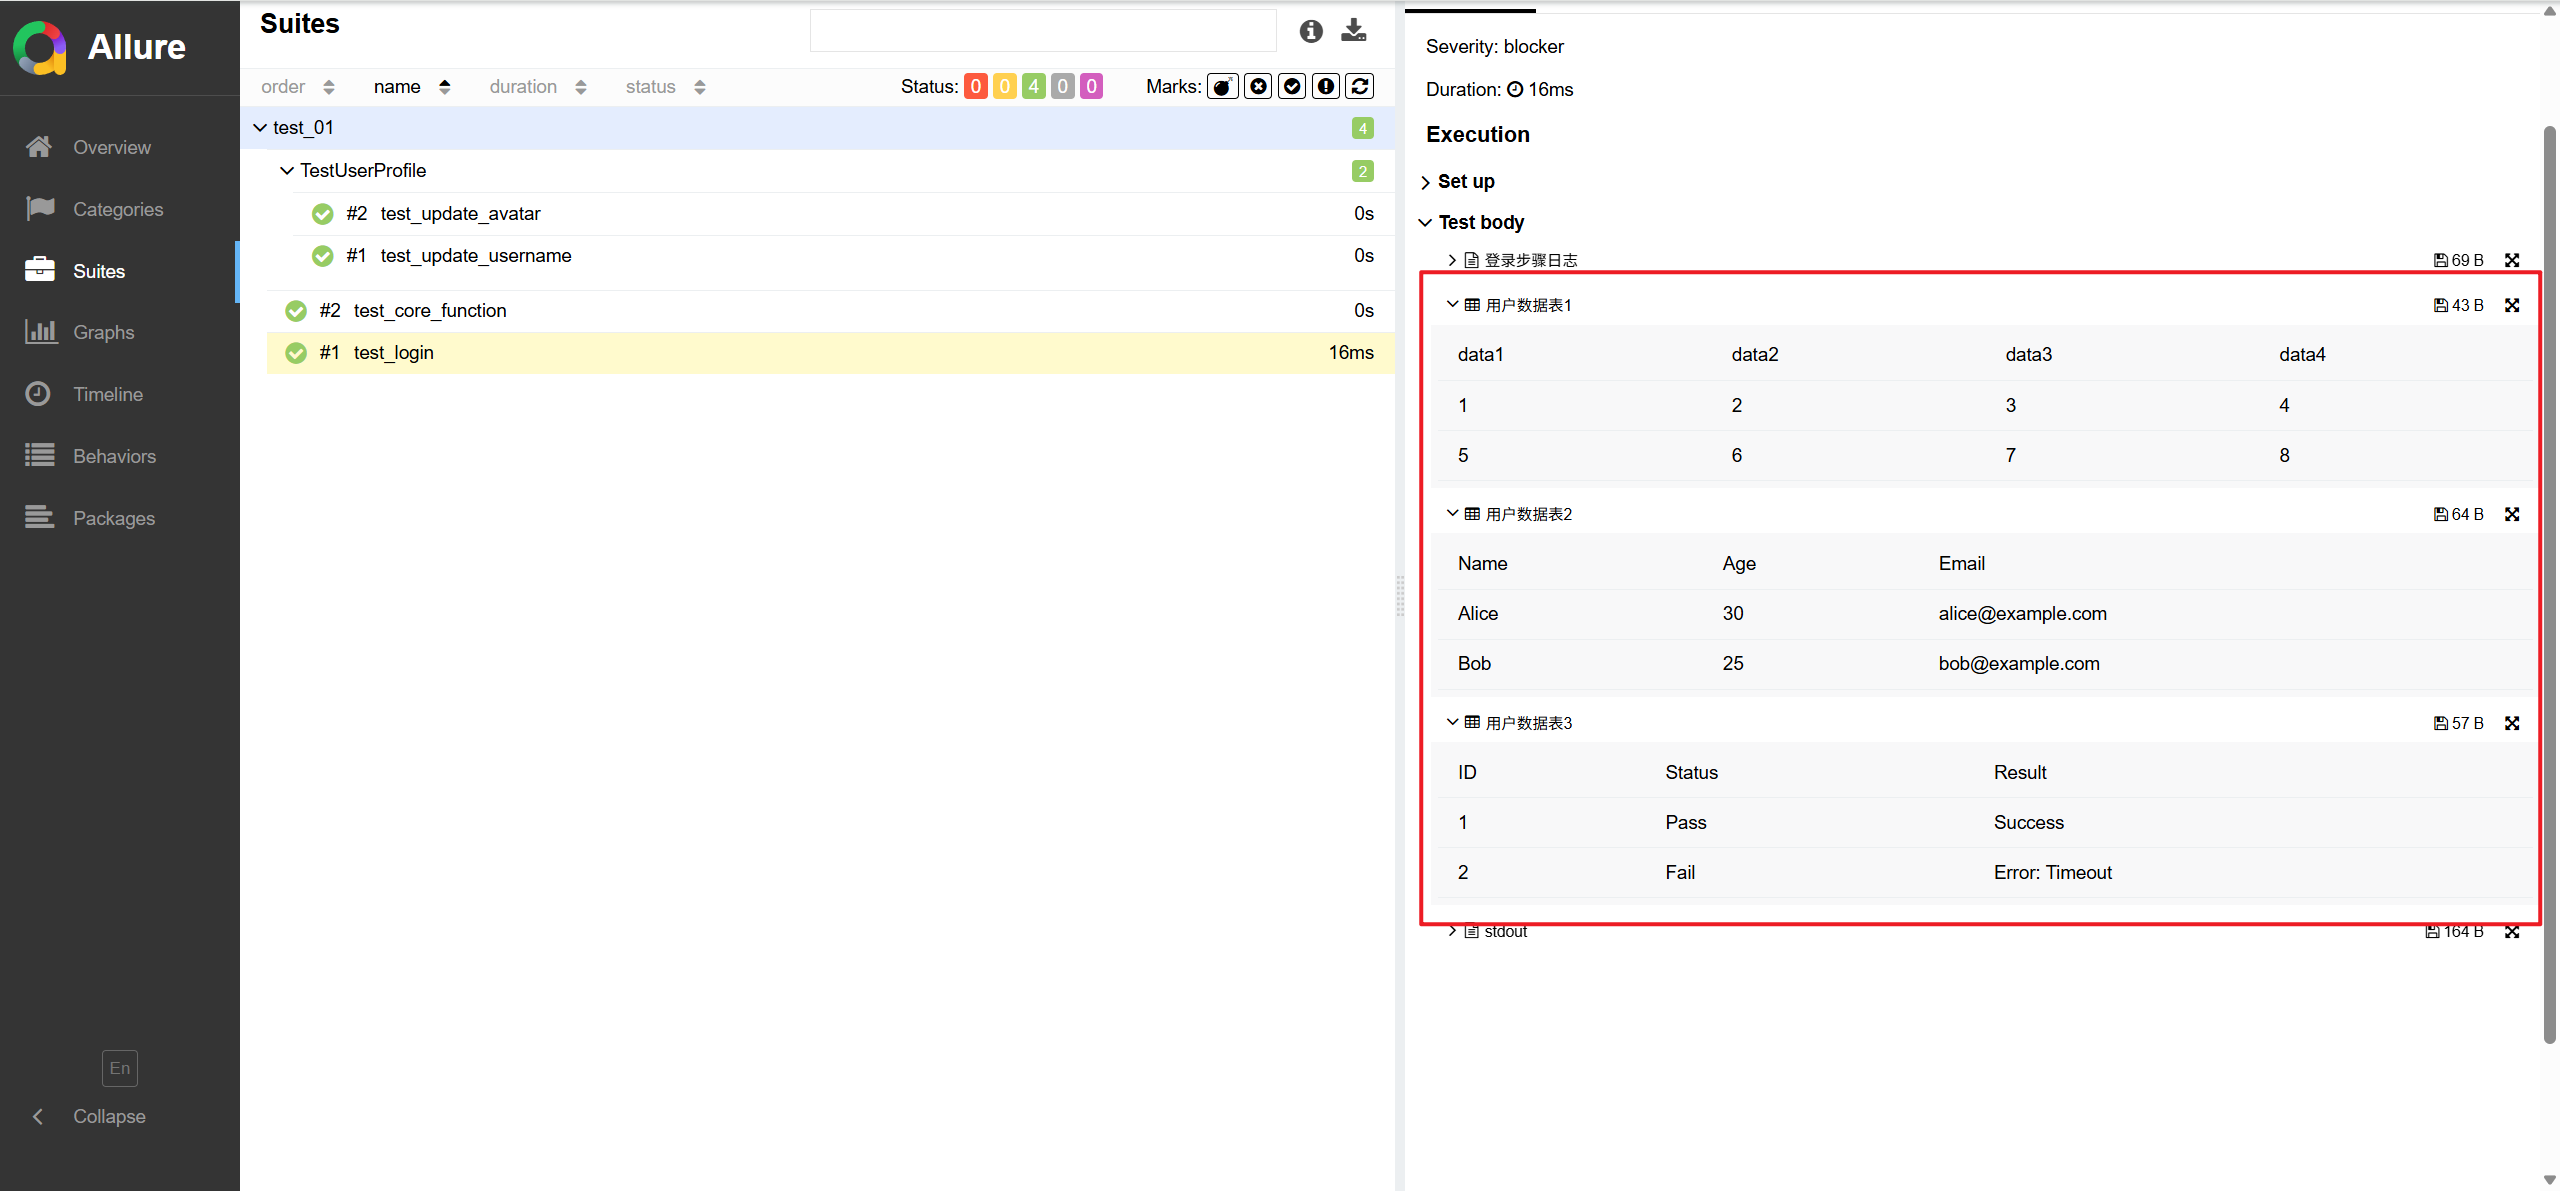
3.3.4.2附加CSV文件
基本语法为(其中csv_data可以是直接构造 的CSV 字符串、Python csv 模块生成的对象、本地的csv导入的文件):
allure.attach(
    csv_data,
    name="本地数据表",
    attachment_type=allure.attachment_type.CSV
)
案例代码如下:
@allure.severity(allure.severity_level.BLOCKER)
def test_login():
    # 附加文本信息
    log_data = "用户登录日志:\n- 输入用户名\n- 输入密码\n- 点击提交"
    allure.attach(log_data, name="登录步骤日志", attachment_type=allure.attachment_type.TEXT)

    # 本地的csv导入的文件
    with open("data.csv", "r", encoding="utf-8") as file:
        csv_data = file.read()
    allure.attach(
        csv_data,
        name="用户数据表1",
        attachment_type=allure.attachment_type.CSV
    )
    # 直接构造 的CSV 字符串
    csv_content = "Name,Age,Email\nAlice,30,alice@example.com\nBob,25,bob@example.com"
    allure.attach(
        csv_content,
        name="用户数据表2",
        attachment_type=allure.attachment_type.CSV
    )

    # Python csv 模块生成
    output = io.StringIO()
    writer = csv.writer(output)
    writer.writerow(["ID", "Status", "Result"])
    writer.writerow([1, "Pass", "Success"])
    writer.writerow([2, "Fail", "Error: Timeout"])
    allure.attach(
        output.getvalue(),
        name="用户数据表3",
        attachment_type=allure.attachment_type.CSV
    )
3.3.4.3附加图片
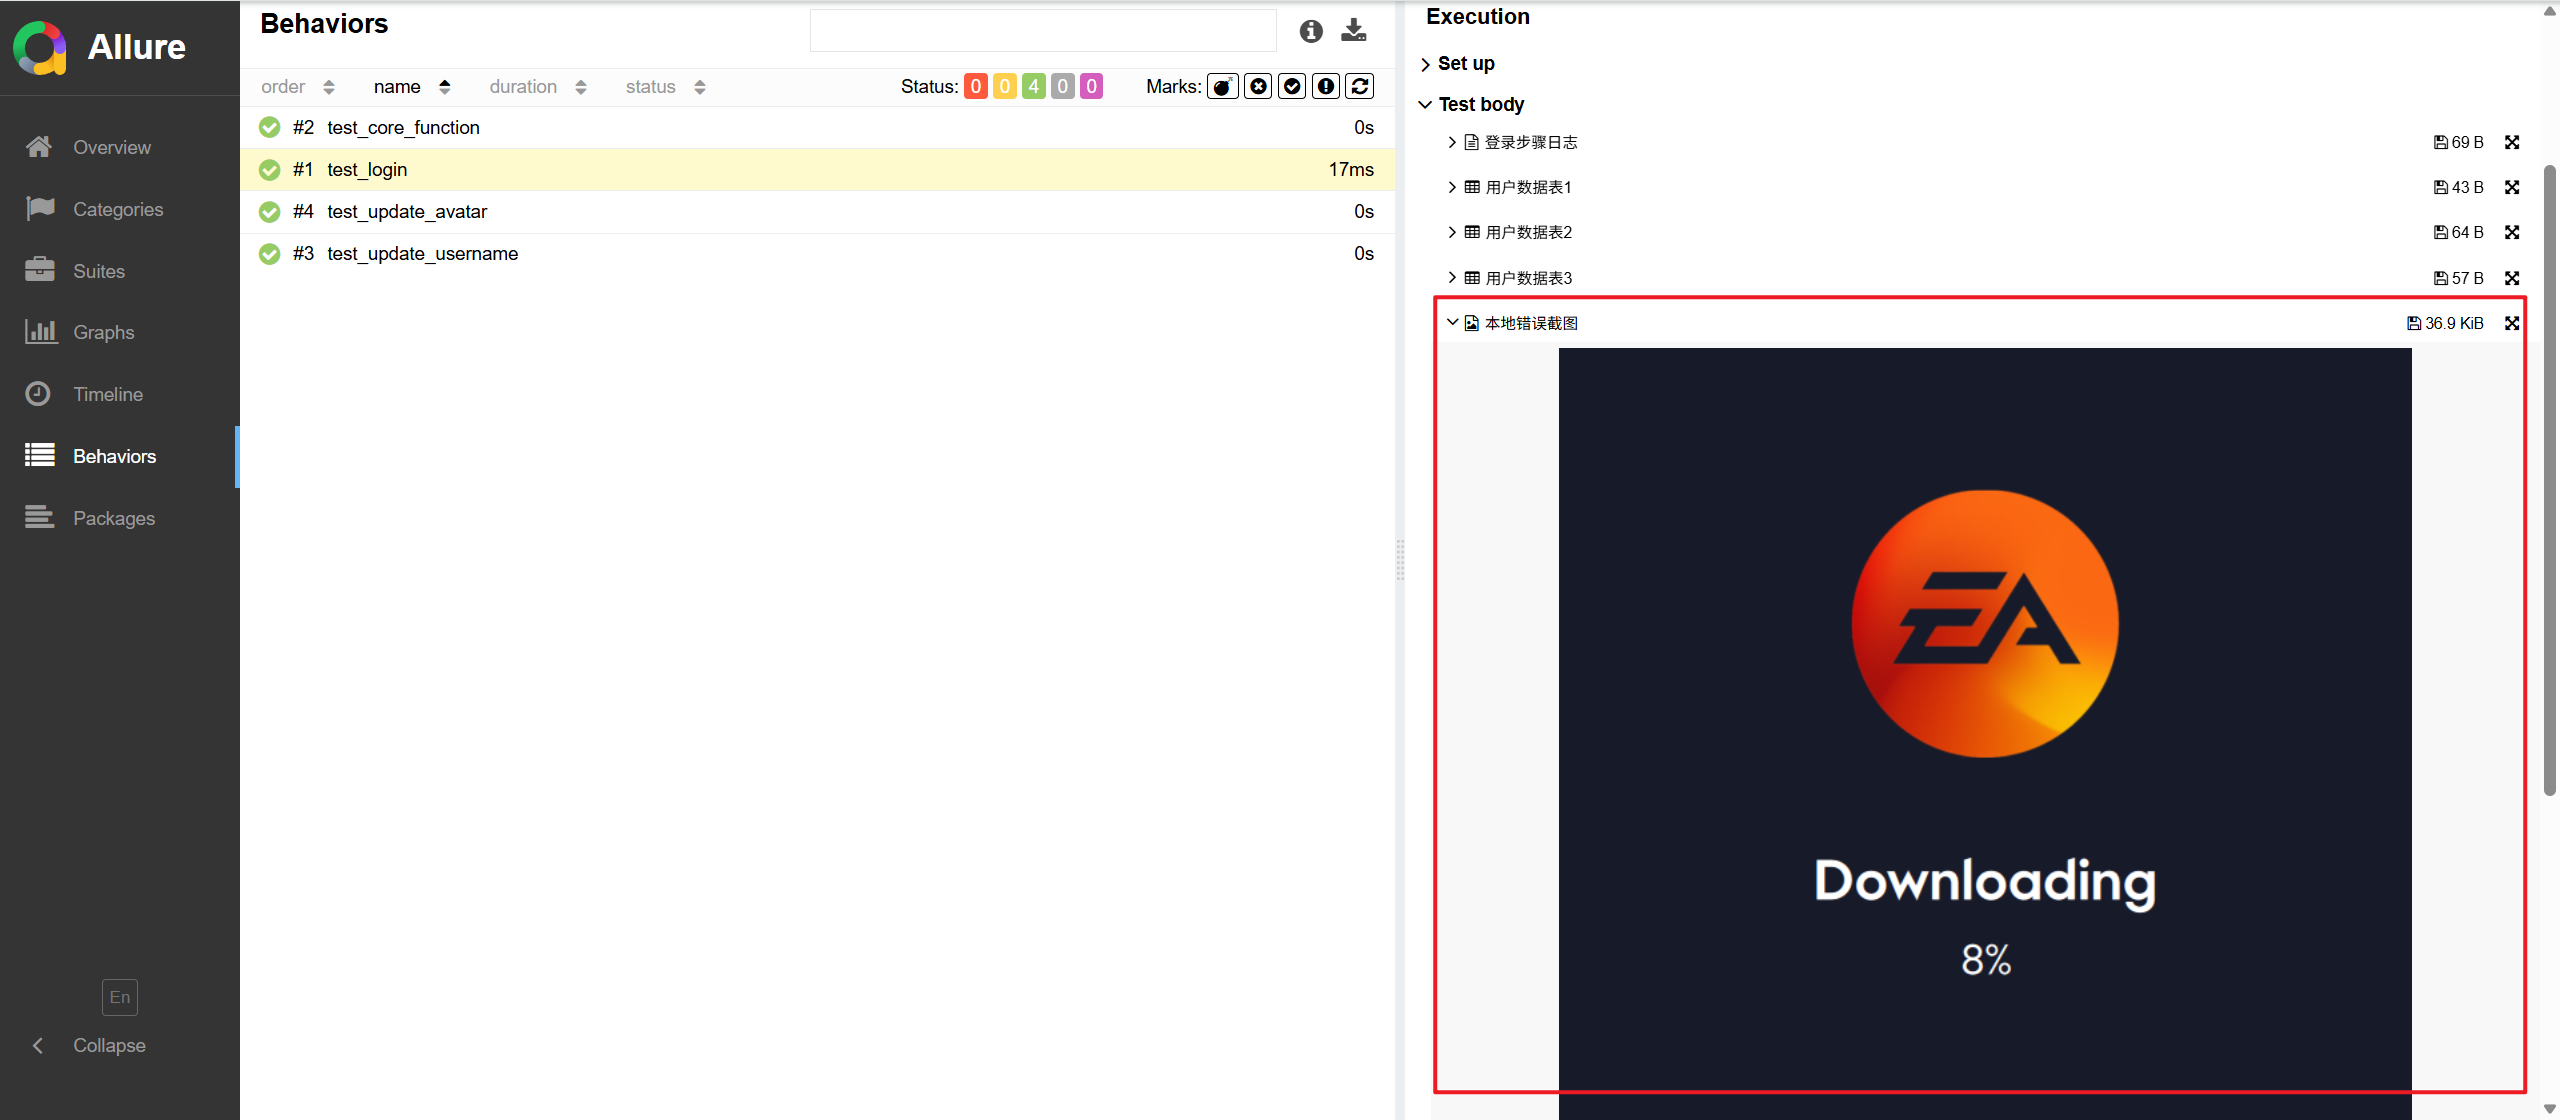
使用语法如下:
with open("figure.png", "rb") as file:
    image_data = file.read()

allure.attach(
    image_data,
    name="本地错误截图",
    attachment_type=allure.attachment_type.PNG
)
更多推荐


 27
27 0
0- 0


 已为社区贡献2条内容

所有评论(0)