
uniapp 微信小程序使用第三方插件导致包体积变大的解决方法
·
1. 涉及相关知识:
注意,分包异步化只是在微信小程序的领域内有效(uniapp文档没有找到相关内容——最起码在2025-1-20之前没有),也就是uniapp编译成微信小程序之后的代码进行分包异步化才有效;
2. 涉及到的关键步骤:
将插件在分包中引入,防止在主包中引入,会导致包体积变大。
注意useingComponents字段;
// pages.json文件
"subPackages": [
      {
         "root": "pages/subPlugin",
         "pages": [
            {
               "path": "occupy/index",
               "style": {
                  "navigationBarTitleText": "占位"
               }
            }
         ],
         // 使用一些插件
         "plugins": {
            "QIYUSDK": {
               "version": "1.15.0",
               "provider": "wxae5e29812005203f"
            },
            "captcha": {
               "version": "1.4.1",
               "provider": "wxb7c8f9ea9ceb4663",
               // TODO 分包异步化使用插件时,这部分是必不可少的,不然不生效;
               "usingComponents": {
                  "ne-captcha": "plugin://captcha/ne-captcha"
               }
            }
         }
      },
      {
         "root": "packages",
         "pages": [
            {
               "path": "pages/index/index"
            }
         ]
      }
],因为分包异步化只能在编译后的小程序代码中使用,那么只能在编译时进行操作;
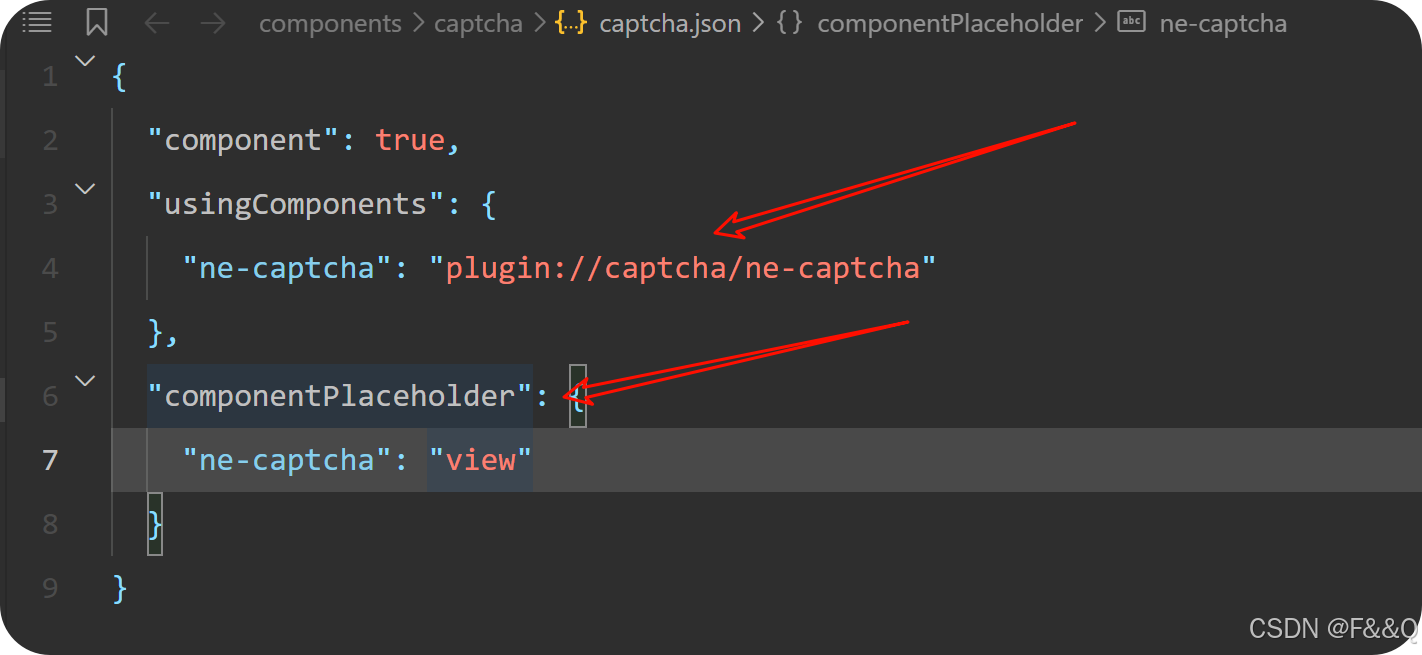
要操作的就是在编译时,将引入使用插件的页面或者组件的json文件内容变成这样的格式--componentPlaceholder:
// 使用插件的页面或者组件的json组件
{
  "usingComponents": {
    "button": "../../commonPackage/components/button",
    "list": "../../subPackageB/components/full-list",
    "simple-list": "../components/simple-list",
    "plugin-comp": "plugin://pluginInSubPackageB/comp"
  },
  "componentPlaceholder": {
    "button": "view",
    "list": "simple-list",
    "plugin-comp": "view"
  }
}
又因为我们是hbuilderx创建的项目,vue2语法,所以就通过编写webpack插件来操作;
首先就是插件内容:
// 自定义插件的定义文件,比如 modify-json-plugin.js

class ModifyJsonPlugin {
    constructor(options) {
        this.options = options;
    }

    apply(compiler) {
        compiler.hooks.emit.tapAsync('ModifyJsonPlugin', (compilation, callback) => {
            const filePath = this.options.filePath
            if (compilation.assets[filePath]) {
                const source = compilation.assets[filePath].source();
                try {
                    const json = JSON.parse(source);
                    const newJson = {
                        "component": true,
                        "usingComponents": {
                            "ne-captcha": "plugin://captcha/ne-captcha"
                        },
                        "componentPlaceholder": {
                            "ne-captcha": "view"
                        }
                    };
                    compilation.assets[filePath] = {
                        source: () => JSON.stringify(newJson, null, 2),
                        size: () => JSON.stringify(newJson, null, 2).length,
                    };
                    console.log('json修改成功')
                } catch (err) {
                    console.error('json 修改失败', err)
                }
            } else {
                console.log('没有此文件', filePath)
            }
            callback();
        });
    }
}
module.exports = ModifyJsonPlugin
再就是在项目根目录下创建vue.config.js文件:
下面(编译后的)代码中用到的文件目录路径,
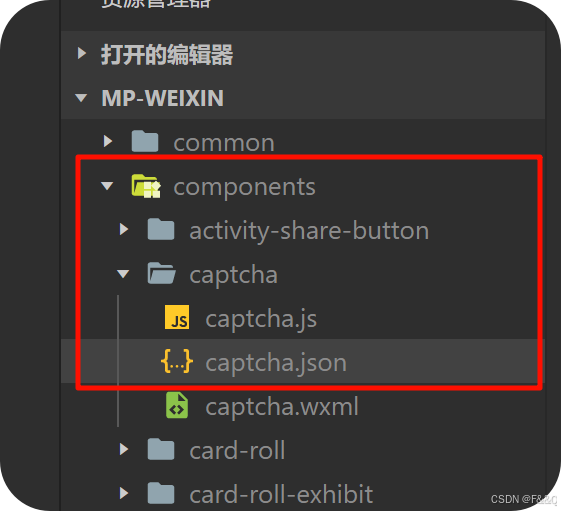
const path = require('path')
const ModifyJsonPlugin = require('./webpackPlugins/modifyJson'); // 引入自定义插件

module.exports = {
    configureWebpack: {
        plugins: [
            new ModifyJsonPlugin({
                // 这里是使用异步插件的文件的位置components(根目录下)的captcha目录下的captcha.json文件
                filePath:  path.join('components','captcha','captcha.json').replace(/\\/g,'/')
            })
        ]
    }
}
到这里就可以了,可以试着运行项目,查看编译后的代码:
更多推荐
 5
5 0
0- 0


 已为社区贡献2条内容

所有评论(0)