
Linux AXI-DMA 驱动开发笔记
概要
DMA Engine、DMA AXI TEST
使用正点原子的AXI DMA LOOP架构,完成对应的嵌入式Linux 开发。使用 DMA Engine 完成AXI DMA LOOP 的开发,进而完成PL 到 Linux 的大量数据搬运工作。
整体流程
使用正点原子的AXI DMA 架构
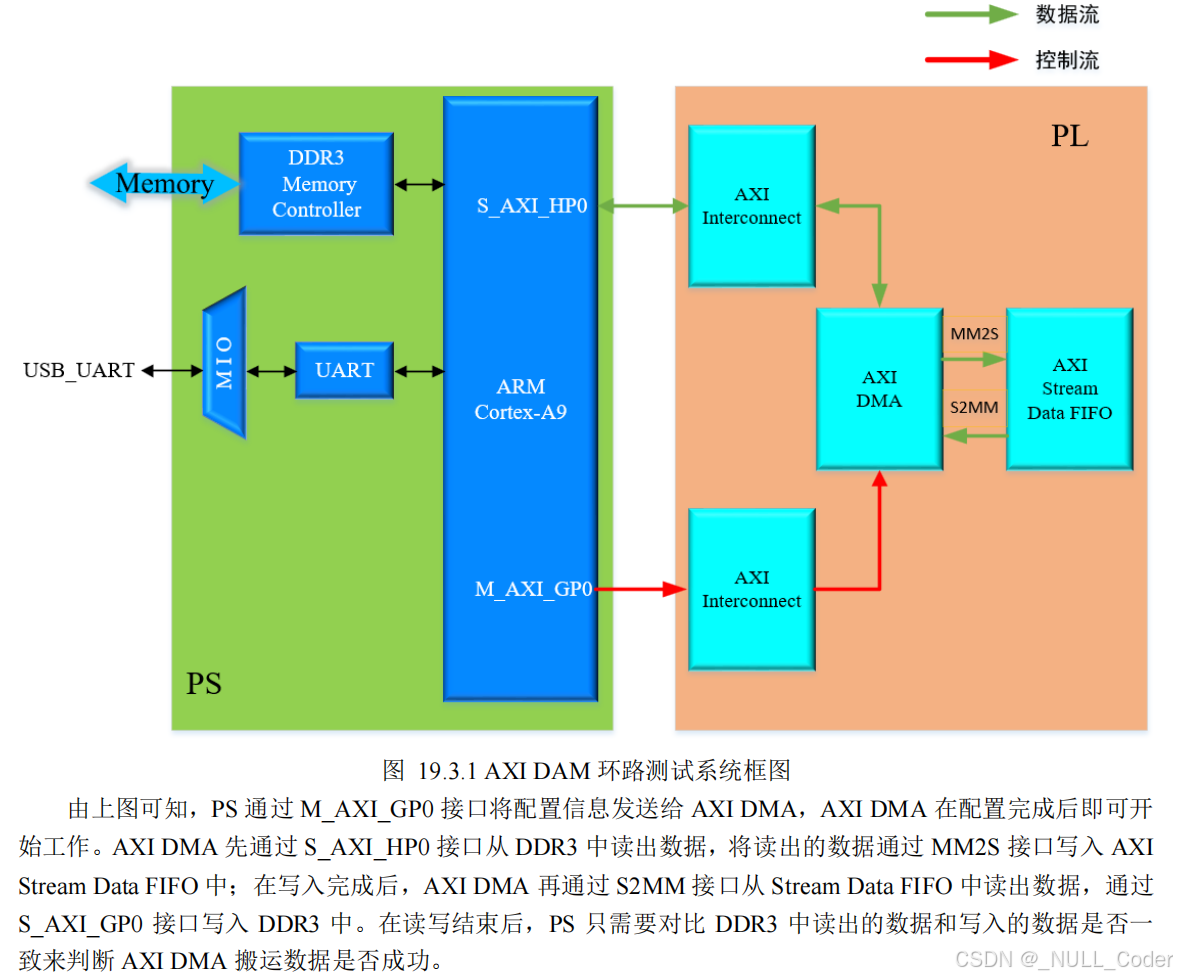
PL端架构
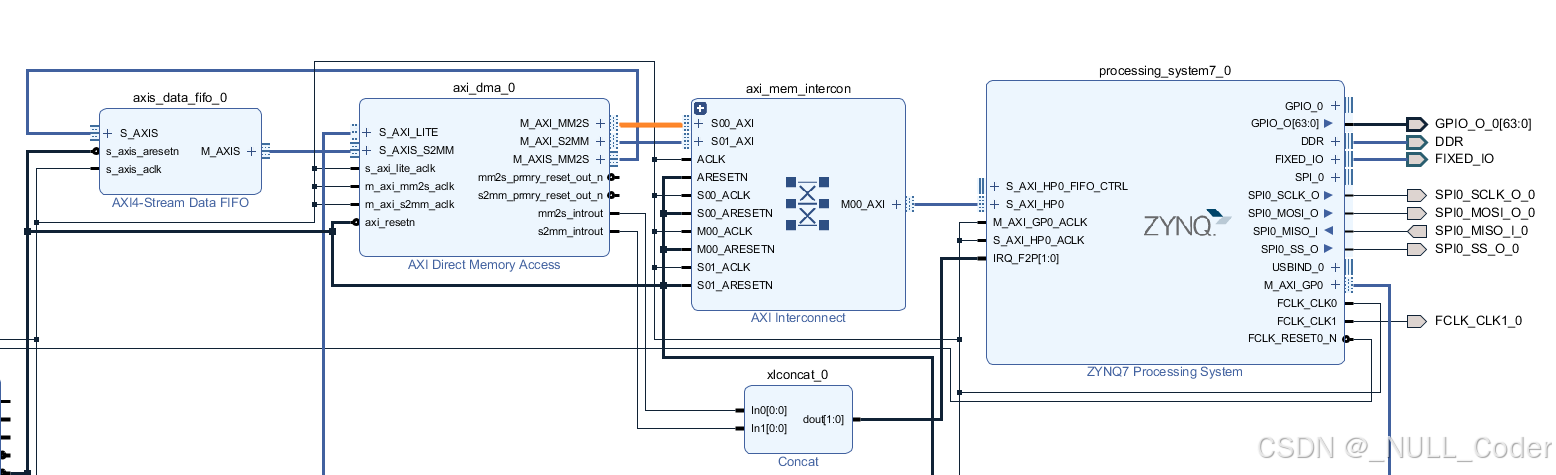
采用正点原子教程进行使用,DMA 成功工作,可将DDR 的数据传输到DMA FIFO中,然后DMA FIFO 将数据回传到DDR 其他位置,从而完成一次回环测试,经检验,DMA 工作正常,请参考 正点原子19.2领航者ZYNQ之嵌入式Vitis开发指南.pdf。
在此基础上,将生成的XSA或者HDF资源和BIT文件导入到Petalinux 中生成对应引导程序BOOT.bin和设备树文件。具体流程请参考:
3_领航者ZYNQ之嵌入式Linux开发指南_V2.2.pdf 。
我们需要对应pcw.dtsi 、pl.dtsi 、system-top.dts 以及 zynq-7000.dtsi 四个文件(Petalinux 工程的 components/plnx_workspace/device-tree/device-tree/ 目 录 下)直接拷贝到内核源码目录下的 arch/arm/boot/dts 目录中。
内核可去github中下载官方历程,petalinux 19.2 推荐 linux-adi-4.19.0 工程。
对应pl.dtsi 的描述为:
/*
 * CAUTION: This file is automatically generated by Xilinx.
 * Version:
 * Today is: Tue Dec 10 07:42:11 2024
 */


/ {
	amba_pl: amba_pl {
		#address-cells = <1>;
		#size-cells = <1>;
		compatible = "simple-bus";
		ranges ;
		ad9361_cfg_0: ad9361_cfg@43c00000 {
			clock-names = "s00_axi_aclk";
			clocks = <&clkc 15>;
			compatible = "xlnx,ad9361-cfg-1.0";
			reg = <0x43c00000 0x10000>;
			xlnx,s00-axi-addr-width = <0x6>;
			xlnx,s00-axi-data-width = <0x20>;
		};
		axi_dma_0: dma@40400000 {
			#dma-cells = <1>;  // DMA 控制器的单元数,这里是 1,表示单个 DMA 通道
			clock-names = "s_axi_lite_aclk", "m_axi_mm2s_aclk", "m_axi_s2mm_aclk";  // 时钟名称,用于标识不同的时钟
			clocks = <&clkc 15>, <&clkc 15>, <&clkc 15>;  // 每个时钟的引用,这里表示使用相同的时钟源(&clkc 15)
			compatible = "xlnx,axi-dma-1.00.a";  // 兼容性字符串,用于与驱动匹配
			interrupt-names = "mm2s_introut", "s2mm_introut";  // 中断的名称,分别为 mm2s 和 s2mm 完成中断
			interrupt-parent = <&intc>;  // 中断控制器的引用(`&intc`),表示 DMA 中断由哪个中断控制器管理
			interrupts = <0 29 4 0 30 4>;  // 中断配置,0 29 4 和 0 30 4 表示中断号、触发方式和优先级
			reg = <0x40400000 0x10000>;  // DMA 控制器的寄存器基地址和大小,这里是 0x40400000,大小为 0x10000
			xlnx,addrwidth = <0x20>;  // 地址宽度(0x20 = 32 位)
			xlnx,sg-length-width = <0xe>;  // 段长度宽度配置(0xe = 14 位)

			// MM2S DMA 通道配置
			dma-channel@40400000 {
				compatible = "xlnx,axi-dma-mm2s-channel";  // 兼容性字符串,表示该节点是 MM2S(内存到流)通道
				dma-channels = <0x1>;  // DMA 通道的数量,这里是 1 个通道
				interrupts = <0 29 4>;  // 中断配置,用于 MM2S 通道完成时触发
				xlnx,datawidth = <0x20>;  // 数据宽度配置,0x20 表示 32 位数据宽度
				xlnx,device-id = <0x0>;  // 设备 ID,通常用于标识设备
			};

			// S2MM DMA 通道配置
			dma-channel@40400030 {
				compatible = "xlnx,axi-dma-s2mm-channel";  // 兼容性字符串,表示该节点是 S2MM(流到内存)通道
				dma-channels = <0x1>;  // DMA 通道的数量,这里是 1 个通道
				interrupts = <0 30 4>;  // 中断配置,用于 S2MM 通道完成时触发
				xlnx,datawidth = <0x20>;  // 数据宽度配置,0x20 表示 32 位数据宽度
				xlnx,device-id = <0x0>;  // 设备 ID,通常用于标识设备
			};
		};

	};
};
可以看到设备树里的dma读写通道,mm2s 意为 memory to stream ,即DDR 到 FIFO,s2mm 意为 stream to memory, 即FIFO 到 DDR。
这个描述对应的是控制器驱动xilinx_dma.c,有这个描述xilinx_dma.c这个驱动才会加载。xilinx_dma.c 的位置在内核linux-adi-4.19.0/drivers/dma/xilinx/xilinx_dma.c 。 其中,XILINX DMA 设备的匹配属性(compatible) 要与你的设备树匹配属性相符(compatible)。
其中XILINX DMA 的匹配列表如下:
static const struct of_device_id xilinx_dma_of_ids[] = {
	{ .compatible = "xlnx,axi-dma-1.00.a", .data = &axidma_config },
	{ .compatible = "xlnx,axi-cdma-1.00.a", .data = &axicdma_config },
	{ .compatible = "xlnx,axi-vdma-1.00.a", .data = &axivdma_config },
	{}
};
MODULE_DEVICE_TABLE(of, xilinx_dma_of_ids);
# 部分代码省略
# ......
static struct platform_driver xilinx_vdma_driver = {
	.driver = {
		.name = "xilinx-vdma",
		.of_match_table = xilinx_dma_of_ids,
	},
	.probe = xilinx_dma_probe,
	.remove = xilinx_dma_remove,
};
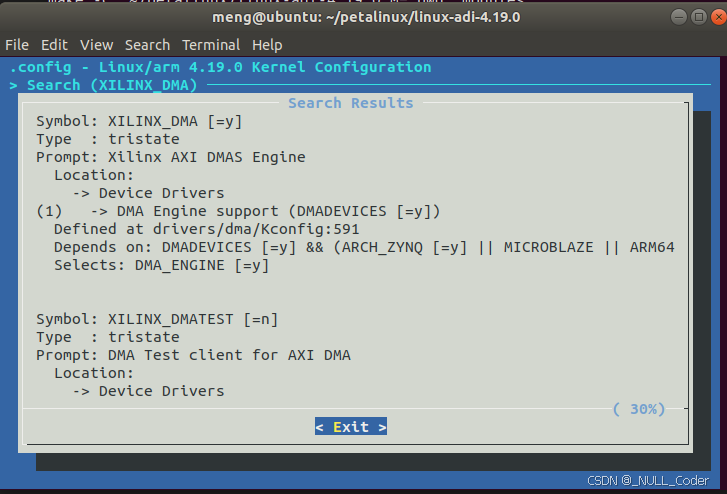
可以看到与PL 的DMA设备匹配,另外要确保你的内核开启了DMA功能(make menuconfig)。
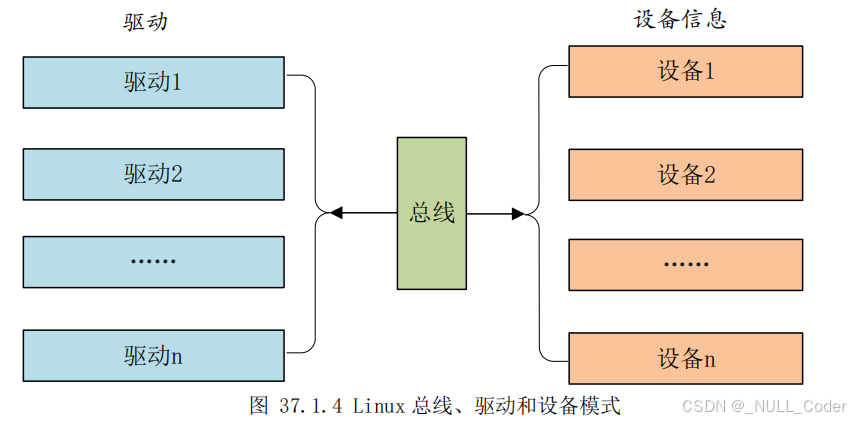
Linux 系统要考虑到驱动的可重用性,因此提出了驱动的分离与分层这样的软件思路,一般像spi、 i2c、 dma这类的驱动都是分控制器驱动,也叫做平台设备驱动。我的理解是,驱动分两层,左边那层叫实际的驱动,是真实与实际硬件打交道的驱动,一般由硬件厂商提供。然后右边那层是抽象的驱动层,负责与用户打交道,是需要我们按需求修改的。当我们向系统注册一个驱动的时候,总线就会在右侧的设备中查找,看看有没有与之匹配的设备,如果有的话就将两者联系起来。同样的,当向系统中注册一个设备的时候,总线就会在左侧的驱动中查找看有没有与之匹配的设备,有的话也联系起来。
在撰写用户DMA驱动前,可以先打开axidmatest.c linux-adi-4.19.0/drivers/dma/xilinx/axidmatest.c 文件,查看官方的AXI DMA 用户驱动模板的书写方法,然后依照此模板进行个性化定制操作。
当然,也可以直接配置内核,打开XILINX DMATEST 配置。
在此之前,你需要为你的用户驱动配置设备树,我选择在system top 的设备树中添加节点。
/*
 * CAUTION: This file is automatically generated by Xilinx.
 * Version:
 * Today is: Tue Aug  6 03:12:54 2024
 */


/dts-v1/;
#define fmc_spi spi0
#include "zynq-7000.dtsi"
#include "pl.dtsi"
#include "pcw.dtsi"
#include "adi-fmcomms2.dtsi"

/ {
	model = "Alientek ZYNQ Development Board";
	chosen {
		bootargs = "console=ttyPS0,115200 earlyprintk root=/dev/mmcblk0p2 rw rootwait";
		stdout-path = "serial0:115200n8";
	};
	aliases {
		ethernet0 = &gem0;
		serial0 = &uart1;
		spi0 = &qspi;
		spi1 = &spi0;
	};
	memory {
		device_type = "memory";
		reg = <0x0 0x40000000>;
	};
	axidma_meng: axidma_meng { // 逻辑设备,不需要实际地址
		compatible ="xlnx,axi-dma-test-1.00.a";
		dmas = <&axi_dma_0 0
				&axi_dma_0 1>;
		dma-names = "axidma0", "axidma1";
	};
};
&gem0{
	local-mac-address = [ca 0a 35 00 1e 53];
};
其中,我添加了一个DMA 用户设备,它使用DMA 硬件设备的axi_dma_0 中的通道0和通道1,他的适配属性为xlnx,axi-dma-test-1.00.a,而axidmatest的适配属性为xlnx,axi-dma-test-1.00.a,因此可以正常加载。如下所示:
tatic const struct of_device_id xilinx_axidmatest_of_ids[] = {
	{ .compatible = "xlnx,axi-dma-test-1.00.a",},
	{}
};

static struct platform_driver xilinx_axidmatest_driver = {
	.driver = {
		// .name = "xilinx_axidmatest",
		.name = "axidma_meng",
		.of_match_table = xilinx_axidmatest_of_ids,
	},
	.probe = xilinx_axidmatest_probe,
	.remove = xilinx_axidmatest_remove,
};

static int __init axidma_init(void)
{
	return platform_driver_register(&xilinx_axidmatest_driver);

}
late_initcall(axidma_init);

static void __exit axidma_exit(void)
{
	platform_driver_unregister(&xilinx_axidmatest_driver);
}
module_exit(axidma_exit)

MODULE_AUTHOR("Xilinx, Inc.");
MODULE_DESCRIPTION("Xilinx AXI DMA Test Client");
MODULE_LICENSE("GPL v2");
我选择将该文件做成驱动,制作MakeFile文件如下:
KERN_DIR := path/linux-adi-4.19.0

obj-m += DMA_Driver_drv.o

DMA_Driver_drv-y := path/linux-adi-4.19.0/drivers/dma/xilinx/axidmatest.o

all:
	make -C  $(KERN_DIR) M=`pwd` modules
clean:
	make -C $(KERN_DIR) M=`pwd` clean
然后使用depmod 和 modprobe DMA_Driver_drv.ko 进行加载,可以看到,DMA 有正常工作,但是数据匹配结果不正确,如下所示:
root@BOB:/lib/modules/4.19.0-meng# modprobe DMA_Driver_drv.ko
DMA_Driver_drv: loading out-of-tree module taints kernel.
dmatest: Started 1 threads using dma1chan0 dma1chan1
xilinx-vdma 40400000.dma: Channel 9b80676c has errors 40, cdr 0 tdr 0
dma1chan0-dma1c: dstbuf[0x3f0] not copied! Expected c3, got 2f
dma1chan0-dma1c: dstbuf[0x3f1] not copied! Expected c2, got 2e
dma1chan0-dma1c: dstbuf[0x3f2] not copied! Expected c1, got 2d
dma1chan0-dma1c: dstbuf[0x3f3] not copied! Expected c0, got 2c
dma1chan0-dma1c: dstbuf[0x3f4] not copied! Expected df, got 2b
dma1chan0-dma1c: dstbuf[0x3f5] not copied! Expected de, got 2a
dma1chan0-dma1c: dstbuf[0x3f6] not copied! Expected dd, got 29
dma1chan0-dma1c: dstbuf[0x3f7] not copied! Expected dc, got 28
dma1chan0-dma1c: dstbuf[0x3f8] not copied! Expected db, got 27
dma1chan0-dma1c: dstbuf[0x3f9] not copied! Expected da, got 26
dma1chan0-dma1c: dstbuf[0x3fa] not copied! Expected d9, got 25
dma1chan0-dma1c: dstbuf[0x3fb] not copied! Expected d8, got 24
dma1chan0-dma1c: dstbuf[0x3fc] not copied! Expected d7, got 23
dma1chan0-dma1c: dstbuf[0x3fd] not copied! Expected d6, got 22
dma1chan0-dma1c: dstbuf[0x3fe] not copied! Expected d5, got 21
dma1chan0-dma1c: dstbuf[0x3ff] not copied! Expected d4, got 20
dma1chan0-dma1c: dstbuf[0x400] not copied! Expected d3, got 3f
dma1chan0-dma1c: dstbuf[0x401] not copied! Expected d2, got 3e
dma1chan0-dma1c: dstbuf[0x402] not copied! Expected d1, got 3d
dma1chan0-dma1c: dstbuf[0x403] not copied! Expected d0, got 3c
dma1chan0-dma1c: dstbuf[0x404] not copied! Expected cf, got 3b
dma1chan0-dma1c: dstbuf[0x405] not copied! Expected ce, got 3a
dma1chan0-dma1c: dstbuf[0x406] not copied! Expected cd, got 39
dma1chan0-dma1c: dstbuf[0x407] not copied! Expected cc, got 38
dma1chan0-dma1c: dstbuf[0x408] not copied! Expected cb, got 37
dma1chan0-dma1c: dstbuf[0x409] not copied! Expected ca, got 36
dma1chan0-dma1c: dstbuf[0x40a] not copied! Expected c9, got 35
dma1chan0-dma1c: dstbuf[0x40b] not copied! Expected c8, got 34
dma1chan0-dma1c: dstbuf[0x40c] not copied! Expected c7, got 33
dma1chan0-dma1c: dstbuf[0x40d] not copied! Expected c6, got 32
dma1chan0-dma1c: dstbuf[0x40e] not copied! Expected c5, got 31
dma1chan0-dma1c: dstbuf[0x40f] not copied! Expected c4, got 30
dma1chan0-dma1c: 105700 errors suppressed
dma1chan0-dma1c: #0: 105732 errors with
src_off=0x53c dst_off=0x3f0 len=0x258c
xilinx-vdma 40400000.dma: Channel 9b80676c has errors 40, cdr 0 tdr 0
看起来像是传输错误,需要检查是全部传输错误还是部分传输错误,因此,添加log打印并且调整test_buf_size的长度为4096,如下所示:
static unsigned int dmatest_verify(u8 **bufs, unsigned int start,
		unsigned int end, unsigned int counter, u8 pattern,
		bool is_srcbuf)
{
	unsigned int i;
	unsigned int error_count = 0;
	u8 actual;
	u8 expected;
	u8 *buf;
	unsigned int counter_orig = counter;

	for (; (buf = *bufs); bufs++) {
		counter = counter_orig;
		for (i = start; i < end; i++) {
			actual = buf[i];
			expected = pattern | (~counter & PATTERN_COUNT_MASK);
			if (actual != expected) {
				if (error_count < 32)
					dmatest_mismatch(actual, pattern, i,
							counter, is_srcbuf);
				error_count++;
			}
			if((counter+1)%128==0)
				printk("check %s data[%x]: now error rate is %d/%d\n",is_srcbuf?"srcbuf":"dstbuf", counter, error_count, counter);

			counter++;
		}
	}

	if (error_count > 32)
		pr_warn("%s: %u errors suppressed\n",
			current->comm, error_count - 32);

	return error_count;
}
LOG 输出如下:
......
check dstbuf data[ff]: now error rate is 0/255
check dstbuf data[17f]: now error rate is 0/383
check dstbuf data[1ff]: now error rate is 0/511
check dstbuf data[27f]: now error rate is 0/639
check dstbuf data[2ff]: now error rate is 0/767
check dstbuf data[37f]: now error rate is 0/895
check dstbuf data[3ff]: now error rate is 0/1023
check dstbuf data[47f]: now error rate is 0/1151
check dstbuf data[4ff]: now error rate is 0/1279
check dstbuf data[57f]: now error rate is 0/1407
dma1chan0-dma1c: dstbuf[0x59c] not copied! Expected c7, got 23
dma1chan0-dma1c: dstbuf[0x59d] not copied! Expected c6, got 22
dma1chan0-dma1c: dstbuf[0x59e] not copied! Expected c5, got 21
dma1chan0-dma1c: dstbuf[0x59f] not copied! Expected c4, got 20
dma1chan0-dma1c: dstbuf[0x5a0] not copied! Expected c3, got 3f
dma1chan0-dma1c: dstbuf[0x5a1] not copied! Expected c2, got 3e
dma1chan0-dma1c: dstbuf[0x5a2] not copied! Expected c1, got 3d
dma1chan0-dma1c: dstbuf[0x5a3] not copied! Expected c0, got 3c
check dstbuf data[aff]: now error rate is 8/2815
......
可以看出来,源数据传输的DDR是正确的,但是从目的地址读出的数据不对。现在测试数据分三个区域,每个缓冲区在不同区域内填充不同的模式。通过LOG可以判断出是目的数据的第二个缓冲区没有数据。即数据是PATTERN_OVERWRITE,而不是PATTERN_COPY。
static void dmatest_init_srcs(u8 **bufs, unsigned int start, unsigned int len)
{
    unsigned int i;
    u8 *buf;

    // 遍历每个缓冲区
    for (; (buf = *bufs); bufs++) {
        // 在 start 之前的区域填充为 PATTERN_SRC 与计数器结合的模式
        for (i = 0; i < start; i++)
            buf[i] = PATTERN_SRC | (~i & PATTERN_COUNT_MASK);

        // 从 start 到 start + len 的区域填充为 PATTERN_SRC | PATTERN_COPY,表示数据需要被复制
        for ( ; i < start + len; i++)
            buf[i] = PATTERN_SRC | PATTERN_COPY
                     | (~i & PATTERN_COUNT_MASK);

        // 在剩余部分填充为 PATTERN_SRC 与计数器结合的模式
        for ( ; i < test_buf_size; i++)
            buf[i] = PATTERN_SRC | (~i & PATTERN_COUNT_MASK);

        buf++;  // 转到下一个缓冲区
    }
}

static void dmatest_init_dsts(u8 **bufs, unsigned int start, unsigned int len)
{
    unsigned int i;
    u8 *buf;

    // 遍历每个缓冲区
    for (; (buf = *bufs); bufs++) {
        // 在 start 之前的区域填充为 PATTERN_DST 与计数器结合的模式
        for (i = 0; i < start; i++)
            buf[i] = PATTERN_DST | (~i & PATTERN_COUNT_MASK);

        // 从 start 到 start + len 的区域填充为 PATTERN_DST | PATTERN_OVERWRITE,表示数据需要被覆盖
        for ( ; i < start + len; i++)
            buf[i] = PATTERN_DST | PATTERN_OVERWRITE
                     | (~i & PATTERN_COUNT_MASK);

        // 在剩余部分填充为 PATTERN_DST 与计数器结合的模式
        for ( ; i < test_buf_size; i++)
            buf[i] = PATTERN_DST | (~i & PATTERN_COUNT_MASK);
    }
}
经过分析,可能是未采用Scatter/Gather导致的,当前使用的是Direct Register。之后再更新后续处理。
AXI DMA 项目配置
调试AXI DMA TEST 无果,决定采用成熟的AXI DMA 框架进行测试,项目来源:Xilinx AXI DMA Driver
参考博客:
linux系统移植及AXI DMA配置
ZYNQ系列(十二)linux的DMA使用
zynq操作系统: Linux驱动开发AXIDMA篇
配置CMA
按照博主配置流程,先行配置CMA, github 教程也有提为何要配置CMA了,因为默认的内存池太小了。
The contiguous memory allocator works by reserving a pool of memory for contiguous memory allocations that it uses when requested. By default this size is too small for typical uses with this driver. The size can be changed by appending cma=M to the kernel command line arguments. This sets the pool’s size to size MBs.
The kernel command line can be updated by changing the device tree or from the U-Boot console. For example, to set the CMA’s pool size to 25 MB from the U-Boot console:
setenv bootargs "${bootargs} cma=25M"
NOTE: In the future, specifying the CMA region size will be moved into the device tree, so this will not be necessary.
实际上,如果按默认教程去设置u-boot会使系统崩溃,如图所示:
Kernel panic - not syncing: VFS: Unable to mount root fs on unknown-block(0,0)
CPU1: stopping
CPU: 1 PID: 0 Comm: swapper/1 Not tainted 4.19.0-meng #54
Hardware name: Xilinx Zynq Platform
[<c010f0f8>] (unwind_backtrace) from [<c010b08c>] (show_stack+0x10/0x14)
[<c010b08c>] (show_stack) from [<c06853e8>] (dump_stack+0x80/0xa0)
[<c06853e8>] (dump_stack) from [<c010d6d8>] (ipi_cpu_stop+0x3c/0x70)
[<c010d6d8>] (ipi_cpu_stop) from [<c010df1c>] (handle_IPI+0x6c/0x90)
[<c010df1c>] (handle_IPI) from [<c0327348>] (gic_handle_irq+0x84/0x90)
[<c0327348>] (gic_handle_irq) from [<c0101a0c>] (__irq_svc+0x6c/0xa8)
Exception stack(0xef085f30 to 0xef085f78)
5f20:                                     00000000 00000000 2eea0000 00000000
5f40: ef7e5478 ffffe000 ef7e5478 00000000 50fae29e 510cc6b1 00000000 00000000
5f60: fffffff5 ef085f80 c050b2f8 c050b320 60000113 ffffffff
[<c0101a0c>] (__irq_svc) from [<c050b320>] (cpuidle_enter_state+0xf8/0x1d8)
[<c050b320>] (cpuidle_enter_state) from [<c013f5d0>] (do_idle+0x1ac/0x23c)
[<c013f5d0>] (do_idle) from [<c013f7bc>] (cpu_startup_entry+0x18/0x1c)
[<c013f7bc>] (cpu_startup_entry) from [<001023ac>] (0x1023ac)
---[ end Kernel panic - not syncing: VFS: Unable to mount root fs on unknown-block(0,0) ]---
配置内核
采用其他博主的配置方法,在内核中进行配置,如图所示:
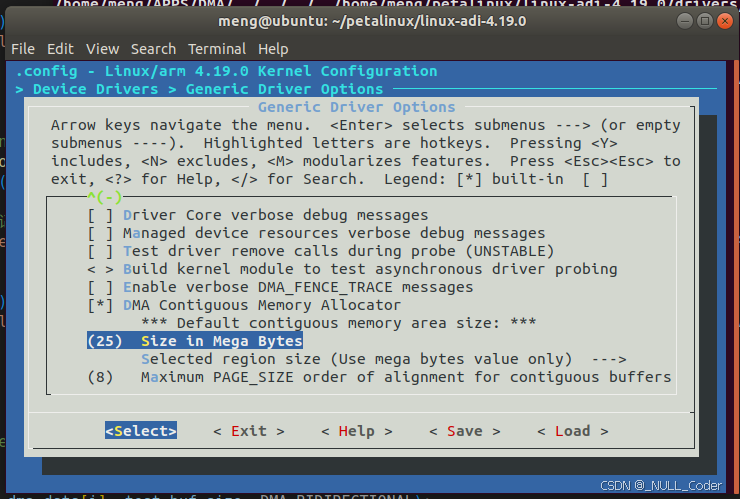
然后检查github的其他项目是否已经启用,据其他博主所写,某些项没有是正常的,毕竟这个项目很老了…
按照github上的要求检查以下项目是否选y了(删除线的不需要检查,这个库是17年写的,但是现在xilinx的linux代码分支已经使用到2018,这些相关配置项已经不在了)
CONFIG_CMA=y
CONFIG_DMA_CMA=y
CONFIG_XILINX_DMAENGINES=y
CONFIG_XILINX_AXIDMA=y
CONFIG_XILINX_AXIVDMA=y
CONFIG_DMA_SHARED_BUFFER=y
修改PL Block Design
修改PL 的AXI DMA配置如下:
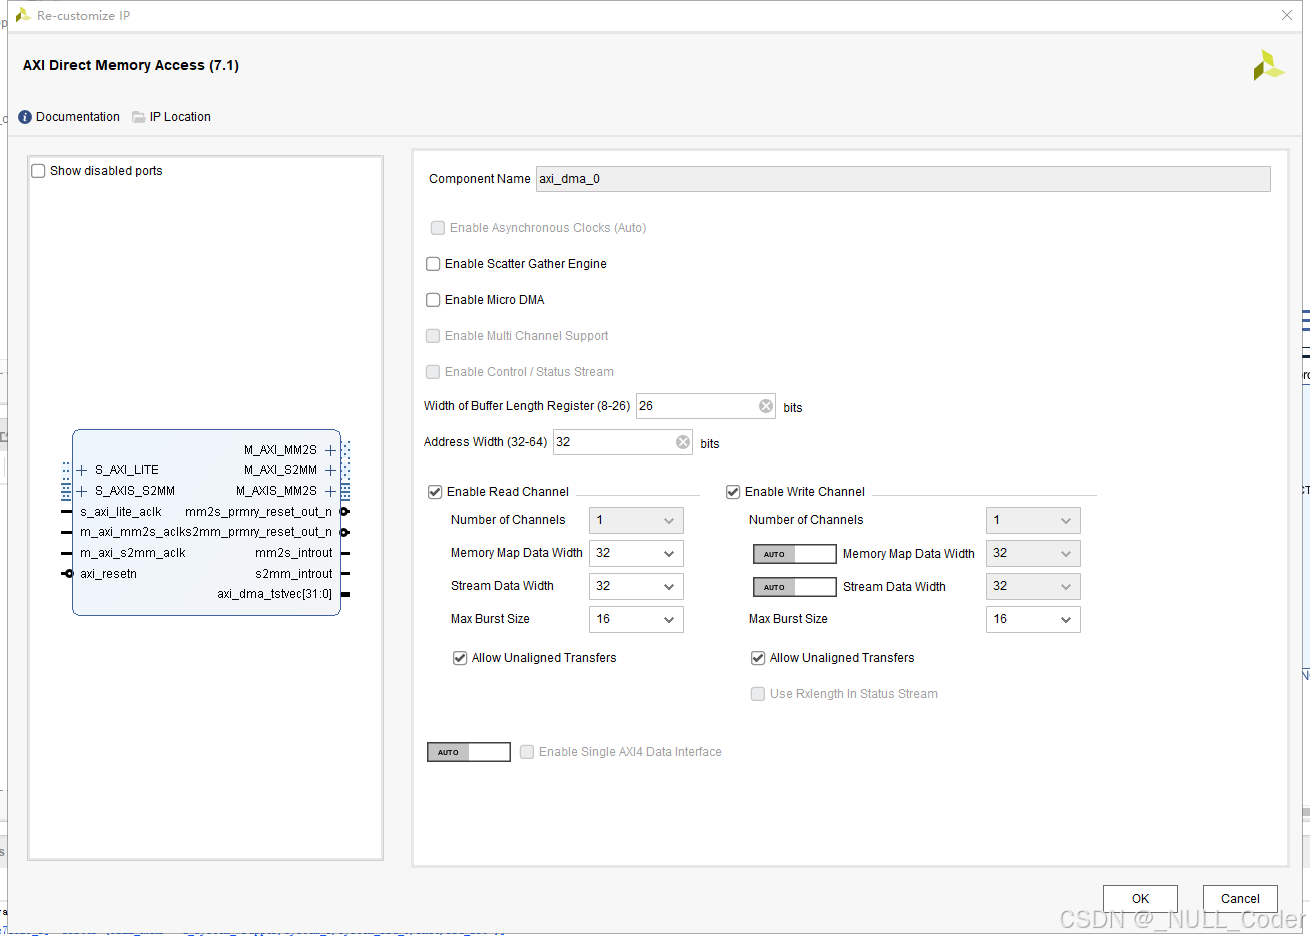
修改设备树
不需要重新引入XSA,直接修改设备树文件也是一样的,分别修改pl.dtsi (修改xlnx,device-id ), 和system-top.dts(添加axidma_chrdev 节点),如下所示:
-----------------------------------------------pl.dtsi-----------------------------------------------------------
/*
 * CAUTION: This file is automatically generated by Xilinx.
 * Version:
 * Today is: Tue Dec 10 07:42:11 2024
 */


/ {
	amba_pl: amba_pl {
		#address-cells = <1>;
		#size-cells = <1>;
		compatible = "simple-bus";
		ranges ;
		ad9361_cfg_0: ad9361_cfg@43c00000 {
			clock-names = "s00_axi_aclk";
			clocks = <&clkc 15>;
			compatible = "xlnx,ad9361-cfg-1.0";
			reg = <0x43c00000 0x10000>;
			xlnx,s00-axi-addr-width = <0x6>;
			xlnx,s00-axi-data-width = <0x20>;
		};
		axi_dma_0: dma@40400000 {
			status = "okay";
			#dma-cells = <1>;  // DMA 控制器的单元数,这里是 1,表示单个 DMA 通道
			clock-names = "s_axi_lite_aclk", "m_axi_mm2s_aclk", "m_axi_s2mm_aclk";  // 时钟名称,用于标识不同的时钟
			clocks = <&clkc 15>, <&clkc 15>, <&clkc 15>;  // 每个时钟的引用,这里表示使用相同的时钟源(&clkc 15)
			compatible = "xlnx,axi-dma-1.00.a";  // 兼容性字符串,用于与驱动匹配
			interrupt-names = "mm2s_introut", "s2mm_introut";  // 中断的名称,分别为 mm2s 和 s2mm 完成中断
			interrupt-parent = <&intc>;  // 中断控制器的引用(`&intc`),表示 DMA 中断由哪个中断控制器管理
			interrupts = <0 29 4 0 30 4>;  // 中断配置,0 29 4 和 0 30 4 表示中断号、触发方式和优先级
			reg = <0x40400000 0x10000>;  // DMA 控制器的寄存器基地址和大小,这里是 0x40400000,大小为 0x10000
			xlnx,addrwidth = <0x20>;  // 地址宽度(0x20 = 32 位)
			xlnx,sg-length-width = <0x1a>;  // 段长度宽度配置(0xe = 14 位)
			//xlnx,include-sg ;

			// MM2S DMA 通道配置
			dma-channel@40400000 {
				compatible = "xlnx,axi-dma-mm2s-channel";  // 兼容性字符串,表示该节点是 MM2S(内存到流)通道
				dma-channels = <0x1>;  // DMA 通道的数量,这里是 1 个通道
				interrupts = <0 29 4>;  // 中断配置,用于 MM2S 通道完成时触发
				xlnx,datawidth = <0x20>;  // 数据宽度配置,0x20 表示 32 位数据宽度
				xlnx,device-id = <0x0>;  // 设备 ID,通常用于标识设备
				xlnx,include-dre ;
			};

			// S2MM DMA 通道配置
			dma-channel@40400030 {
				compatible = "xlnx,axi-dma-s2mm-channel";  // 兼容性字符串,表示该节点是 S2MM(流到内存)通道
				dma-channels = <0x1>;  // DMA 通道的数量,这里是 1 个通道
				interrupts = <0 30 4>;  // 中断配置,用于 S2MM 通道完成时触发
				xlnx,datawidth = <0x20>;  // 数据宽度配置,0x20 表示 32 位数据宽度
				xlnx,device-id = <0x1>;  // 设备 ID,通常用于标识设备
				xlnx,include-dre ;
			};
		};

	};

};
-----------------------------------------------system-top.dts-----------------------------------------------------------
/*
 * CAUTION: This file is automatically generated by Xilinx.
 * Version:
 * Today is: Tue Aug  6 03:12:54 2024
 */


/dts-v1/;
#define fmc_spi spi0
#include "zynq-7000.dtsi"
#include "pl.dtsi"
#include "pcw.dtsi"
#include "adi-fmcomms2.dtsi"

/ {
	model = "Alientek ZYNQ Development Board";
	chosen {
		bootargs = "console=ttyPS0,115200 earlyprintk root=/dev/mmcblk0p2 rw rootwait";
		stdout-path = "serial0:115200n8";
	};
	aliases {
		ethernet0 = &gem0;
		serial0 = &uart1;
		spi0 = &qspi;
		spi1 = &spi0;
	};
	memory {
		device_type = "memory";
		reg = <0x0 0x40000000>;
	};
	axidma_meng: axidma_meng@0 {
		compatible ="xlnx,axi-dma-test-1.00.a";
		dmas = <&axi_dma_0 0
				&axi_dma_0 1>;
		dma-names = "axidma0", "axidma1";
	};
	axidma_chrdev: axidma_chrdev@0 {
		status = "okay";
		compatible = "xlnx,axidma-chrdev";
		dmas = <&axi_dma_0 0 &axi_dma_0 1>;
		dma-names = "tx_channel", "rx_channel";
	};


};

&gem0{
	local-mac-address = [ca 0a 35 00 1e 53];
};

&axi_dma_0 {
	dma-coherent;
	status = "okay";
};
重新生成设备树文件,并添加到引导盘中。
编译工程
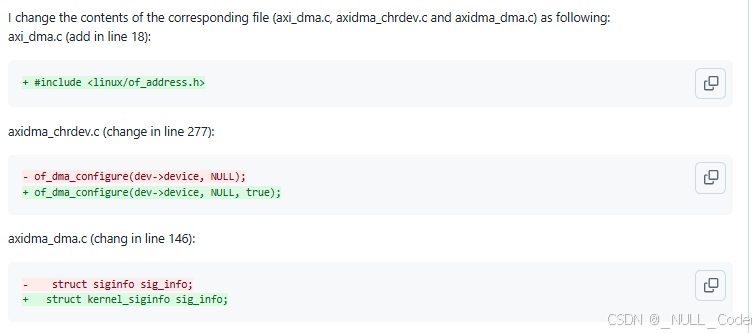
首先按照xilinx_axidma/issues中的patch修改工程,这是由于不同版本的内核对某些函数的接口有所变化导致的,笔者使用的是4.19版本的内核。所幸,变化不大:
然后修改config_template.mk, 将config_template.mk 名字改为config.mk,里面内容修改如下:
# Makefile Configuration Template
#
# This file is a template for the 'config.mk' file, which stores the
# values of variables used in the Makefile. This can be used instead of
# specifying the variables on the command line, which can quickly become
# cumbersome.
#
# To make use of this functionality, copy this file to 'config.mk', and then
# fill in the values as desired. Any of these variables can be overridden from
# the command line, so the variables are not permanent.

# TODO: Copy this file to 'config.mk' and uncomment and assign the variables

################################################################################
# Cross Compilation Options
################################################################################

# This controls the cross compiler that is used to compile all of the code. This
# should be a compiler prefix (e.g. `arm-linux-gnueabihf-`). The code will be
# compiled with the program `$(CROSS_COMPILE)gcc`
CROSS_COMPILE = arm-linux-gnueabihf-

# This variable informs the kernel Makefile what architecture you're targeting.
# This is required when building the driver, if CROSS_COMPILE is defined.
ARCH = arm

################################################################################
# Build Options
################################################################################

# The path to the top-level directory of kernel source tree that you want to
# compile the driver against. If unspecified, the system default
# `/lib/modules/$(uname -r)/build` is used. If CROSS_COMPILE is defined, then
# this variable must also be defined. This path can be absolute, or relative.
KBUILD_DIR = /home/meng/petalinux/linux-adi-4.19.0

# The path to the output directory, where all of the compiled files, the
# driver's kernel object, the example executables, and the AXI DMA shared
# library file are placed. If unspecified, the files are stored in `outputs` in
# the top level of the repository. This path can either be relative or absolute.
OUTPUT_DIR = outputs

# This specifies to fixup the path that the file `xilinx_dma.h` is located at in
# the kernel that you're compiling against. The location of this header file was
# changed between the 3.x and 4.x Xilinx kernel versions. However, some 4.x
# kernels still have the file at the old location. This variable specifies the
# Makefile to define a macro that fixes this issue. Uncomment this (no value is
# required), if the driver fails to compile with an error like:
#     `fatal error: linux/dma/xilinx_dma.h: No such file or directory`
#XILINX_DMA_INCLUDE_PATH_FIXUP = yes
当然,也可以用make CROSS_COMPILE=arm-linux-gnueabihf- ARCH=arm KBUILD_DIR=/home/meng/petalinux/linux-adi-4.19.0 driver 命令来代替。
然后分别执行命令:make driver和make examples即可,最终结果在outputs中,如图所示:
meng@ubuntu:~/xilinx_axidma$ make driver
meng@ubuntu:~/xilinx_axidma$ make examples
meng@ubuntu:~/xilinx_axidma$ ls outputs/
axidma_benchmark  axidma_display_image  axidma.ko  axidma_transfer  libaxidma.so  loopback_data  loopback_txt
然后将output文件夹上传到嵌入式系统中,如下所示:
meng@ubuntu:~/xilinx_axidma$ scp outputs/* root@192.168.1.110:~/meng/outputs/
axidma_benchmark                                                                  100%   29KB   4.2MB/s   00:00
axidma_display_image                                                              100%   26KB   1.3MB/s   00:00
axidma.ko                                                                         100%   33KB   4.6MB/s   00:00
axidma_transfer                                                                   100%   25KB   4.4MB/s   00:00
libaxidma.so                                                                      100%   27KB   4.4MB/s   00:00
loopback_data                                                                     100%   19KB   3.8MB/s   00:00
loopback_txt                                                                      100%   20KB   4.2MB/s   00:00
meng@ubuntu:~/xilinx_axidma$
检查是否上传成功。
root@BOB:~/meng/outputs# ls
axidma.ko             axidma_display_image  libaxidma.so          loopback_txt
axidma_benchmark      axidma_transfer       loopback_data
加载AXI DMA 模块
进入文件夹,执行insmod(或者modprobe【需要到指定目录下执行depmod】),如下所示:
root@BOB:~/meng/outputs# insmod axidma.ko
axidma: loading out-of-tree module taints kernel.
axidma: axidma_dma.c: axidma_dma_init: 713: DMA: Found 1 transmit channels and 1 receive channels.
axidma: axidma_dma.c: axidma_dma_init: 715: VDMA: Found 0 transmit channels and 0 receive channels.
运行axidma_benchmark,查看dma速率,结果报错,命运多舛 。
root@BOB:~/meng/outputs# ./axidma_benchmark
-sh: ./axidma_benchmark: cannot execute binary file: Exec format error
据我的经验,这应该是没有使用交叉编译导致的问题,用file 目录检查可得:
meng@ubuntu:~/xilinx_axidma$ file outputs/axidma_benchmark
outputs/axidma_benchmark: ELF 64-bit LSB shared object, x86-64, version 1 (SYSV), dynamically linked, interpreter /lib64/ld-linux-x86-64.so.2, for GNU/Linux 3.2.0, BuildID[sha1]=72b5f2069aea6a7d84eabedbb57d0181aa9d6f02, with debug_info, not stripped
meng@ubuntu:~/xilinx_axidma$ file outputs/axidma.ko
outputs/axidma.ko: ELF 32-bit LSB relocatable, ARM, EABI5 version 1 (SYSV), BuildID[sha1]=b6ea545da8084ca500f8f544b873a6045d958a1c, not stripped
即,例程并没有使用交叉编译工具。
使用命令make CROSS_COMPILE=arm-linux-gnueabihf- ARCH=arm examples 强制使用教程编译,结果如下:
meng@ubuntu:~/xilinx_axidma$ make CROSS_COMPILE=arm-linux-gnueabihf- ARCH=arm examples
arm-linux-gnueabihf-gcc -Wall -Wextra -Werror -std=gnu99 -g -O0 -I include examples/axidma_benchmark.c examples/util.c -o examples/axidma_benchmark \
	-L outputs -l axidma -Wl,-rpath,'$ORIGIN'
outputs/libaxidma.so: file not recognized: File format not recognized
collect2: error: ld returned 1 exit status
examples/examples.mk:64: recipe for target 'examples/axidma_benchmark' failed
make: *** [examples/axidma_benchmark] Error 1
原因是libaxidma.so 也是x86 编译的…
meng@ubuntu:~/xilinx_axidma$ file outputs/libaxidma.so
outputs/libaxidma.so: ELF 64-bit LSB shared object, x86-64, version 1 (SYSV), dynamically linked, BuildID[sha1]=1d59a2b644dfd2d40f7c50b398d0b9188bc34d28, with debug_info, not stripped
重新执行make library即可
meng@ubuntu:~/xilinx_axidma$ make library
arm-linux-gnueabihf-gcc -Wall -Wextra -Werror -std=gnu99 -g -O0 -fPIC -shared -Wno-missing-field-initializers -I include library/libaxidma.c -o library/libaxidma.so
meng@ubuntu:~/xilinx_axidma$ file outputs/libaxidma.so
outputs/libaxidma.so: ELF 32-bit LSB shared object, ARM, EABI5 version 1 (SYSV), dynamically linked, BuildID[sha1]=130d46a30d9ae5630a9f2cc3d0b50955b10f096b, with debug_info, not stripped
meng@ubuntu:~/xilinx_axidma$ make
arm-linux-gnueabihf-gcc -Wall -Wextra -Werror -std=gnu99 -g -O0 -I include examples/axidma_benchmark.c examples/util.c -o examples/axidma_benchmark \
	-L outputs -l axidma -Wl,-rpath,'$ORIGIN'
arm-linux-gnueabihf-gcc -Wall -Wextra -Werror -std=gnu99 -g -O0 -I include examples/axidma_display_image.c examples/util.c -o examples/axidma_display_image \
	-L outputs -l axidma -Wl,-rpath,'$ORIGIN'
arm-linux-gnueabihf-gcc -Wall -Wextra -Werror -std=gnu99 -g -O0 -I include examples/axidma_transfer.c examples/util.c -o examples/axidma_transfer \
	-L outputs -l axidma -Wl,-rpath,'$ORIGIN'
arm-linux-gnueabihf-gcc -Wall -Wextra -Werror -std=gnu99 -g -O0 -I include examples/loopback_txt.c examples/util.c -o examples/loopback_txt \
	-L outputs -l axidma -Wl,-rpath,'$ORIGIN'
arm-linux-gnueabihf-gcc -Wall -Wextra -Werror -std=gnu99 -g -O0 -I include examples/loopback_data.c examples/util.c -o examples/loopback_data \
	-L outputs -l axidma -Wl,-rpath,'$ORIGIN'
meng@ubuntu:~/xilinx_axidma$ file outputs/axidma_benchmark
outputs/axidma_benchmark: ELF 32-bit LSB shared object, ARM, EABI5 version 1 (SYSV), dynamically linked, interpreter /lib/ld-linux-armhf.so.3, for GNU/Linux 3.2.0, BuildID[sha1]=5921046517d11036c153add51d527a2b4339253a, with debug_info, not stripped
meng@ubuntu:~/xilinx_axidma$ scp outputs/* root@192.168.1.110:~/meng/outputs/
axidma_benchmark                                                                  100%   25KB   3.7MB/s   00:00
axidma_display_image                                                              100%   22KB   3.9MB/s   00:00
axidma.ko                                                                         100%   33KB   3.5MB/s   00:00
axidma_transfer                                                                   100%   21KB   3.7MB/s   00:00
libaxidma.so                                                                      100%   23KB   1.3MB/s   00:00
loopback_data                                                                     100%   19KB   3.9MB/s   00:00
loopback_txt                                                                      100%   20KB   4.0MB/s   00:00
再次进入板卡即可执行,依然有报错,看起来是CMA依然不够的问题,增加到64MB试试.明明其他博主都很顺利 。
root@BOB:~/meng/outputs# ./axidma_benchmark
AXI DMA Benchmark Parameters:
        Transmit Buffer Size: 7.91 Mb
        Reaxidma axidma: DMA mask not set
ceive Buffer Size: 7.91 Mb
        Number of DMA Transfers: 1000 transaxidma axidma: coherent DMA mask is unset
fers

axidma: axidma_chrdev.c: axidma_mmap: 286: Unable to allocate contiguous DMA memory region of size 8294400.
axidma: axidma_chrdev.c: axidma_mmap: 288: Please make sure that you specified cma=<size> on the kernel command line, and the si                                                                                                                                                              ze is large enough.
Unable to allocate transmit buffer from the AXI DMA device.: Cannot allocate memory
检查是否成功分配内存:
root@BOB:~# dmesg | grep cma
cma: Reserved 64 MiB at 0x3c000000
Memory: 963804K/1048576K available (6144K kernel code, 205K rwdata, 1612K rodata, 1024K init, 133K bss, 19236K reserved, 65536K cma-reserved, 196608K highmem)
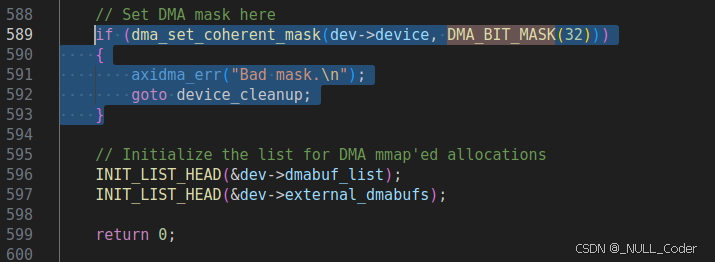
然后运行程序,依然无法运行,注意到Number of DMA Transfers: 1000 transaxidma axidma: coherent DMA mask is unset,看上去是DMA 掩码的问题,因此,检查为何掩码没有设置,我在issue#58中找到相关问题,因此,只需在 axidma_chrdev.c 中588行左右添加如下代码即可:
再次编译运行有:
root@BOB:~/meng/outputs# ./axidma_benchmark
AXI DMA Benchmark Parameters:
        Transmit Buffer Size: 7.91 Mb
        Recaxidma axidma: DMA mask not set
eive Buffer Size: 7.91 Mb
        Number of DMA Transfers: 1000 transfers

Using transmit channel 0 and receive channel 1.
xilinx-vdma 40400000.dma: Channel fa335ee4 has errors 40, cdr 0 tdr 0
Test Failed! The receive buffer was not updated.
又出现Test Failed! The receive buffer was not updated.错误,唉~
根据博客axi dma 常见的中断报错源码, 寻找40 的报错码。
在文件linux-adi-4.19.0/drivers/dma/xilinx/xilinx_dma.c中,检查xilinx_dma_irq_handler函数,确认0x40是BIT(7)错误,即XILINX_DMA_DMASR_SOF_EARLY_ERR 错误
#define XILINX_DMA_DMASR_SOF_EARLY_ERR		BIT(7)
......
if (!chan->flush_on_fsync ||
    (errors & ~XILINX_DMA_DMASR_ERR_RECOVER_MASK)) {
	dev_err(chan->dev,
		"Channel %p has errors %x, cdr %x tdr %x\n",
		chan, errors,
		dma_ctrl_read(chan, XILINX_DMA_REG_CURDESC),
		dma_ctrl_read(chan, XILINX_DMA_REG_TAILDESC));
	chan->err = true;
}
查阅手册得知:
| 错误码 | 描述 | 可能原因 |
|---|---|---|
| 0x40 | Decode Erro | DMA 访问的物理地址不正确,未在设备树或 CMA 中指定。 |
| 0x10 | SG End Early Error | SG 传输早结束,通常是数据不足或数据描述符错误。 |
| 0x08 | SLV Error | AXI 读/写事务出错,通常是 AXI 传输失败。 |
看到有博主提供了测试demo, 下载进行测试。依然报0x40错误,然后怀疑可能是自己的工程有问题,重新进行工程搭建后DMA正常工作。。。
root@BOB:~/meng# ./DMA_Driver
Hello World! - Running DMA transfer test application.
Opening a character device file of the Arty's DDR memeory...
Memory map the address of the DMA AXI IP via its AXI lite control interface register block.
Memory map the MM2S source address register block.
Memory map the S2MM destination address register block.
Writing random data to source register block...
Clearing the destination register block...
Source memory block data:      DEADBEEF 44332211 ABABABAB CDCDCDCD 11110000 33332222 55554444 77776666
Destination memory block data: 00000000 00000000 00000000 00000000 00000000 00000000 00000000 00000000
Reset the DMA.
Stream to memory-mapped status (0x00000001@0x34): Halted.
Memory-mapped to stream status (0x00000001@0x04): Halted.
Halt the DMA.
Stream to memory-mapped status (0x00000001@0x34): Halted.
Memory-mapped to stream status (0x00000001@0x04): Halted.
Enable all interrupts.
Stream to memory-mapped status (0x00000001@0x34): Halted.
Memory-mapped to stream status (0x00000001@0x04): Halted.
Writing source address of the data from MM2S in DDR...
Memory-mapped to stream status (0x00000001@0x04): Halted.
Writing the destination address for the data from S2MM in DDR...
Stream to memory-mapped status (0x00000001@0x34): Halted.
Run the MM2S channel.
Memory-mapped to stream status (0x00000000@0x04): Running.
Run the S2MM channel.
Stream to memory-mapped status (0x00000000@0x34): Running.
Writing MM2S transfer length of 32 bytes...
Memory-mapped to stream status (0x00000000@0x04): Running.
Writing S2MM transfer length of 32 bytes...
Stream to memory-mapped status (0x00000000@0x34): Running.
Waiting for MM2S synchronization...
Waiting for S2MM sychronization...
Stream to memory-mapped status (0x00001002@0x34): Running.
 Idle.
 IOC interrupt occurred.
Memory-mapped to stream status (0x00001002@0x04): Running.
 Idle.
 IOC interrupt occurred.
Destination memory block: DEADBEEF 44332211 ABABABAB CDCDCDCD 11110000 33332222 55554444 77776666
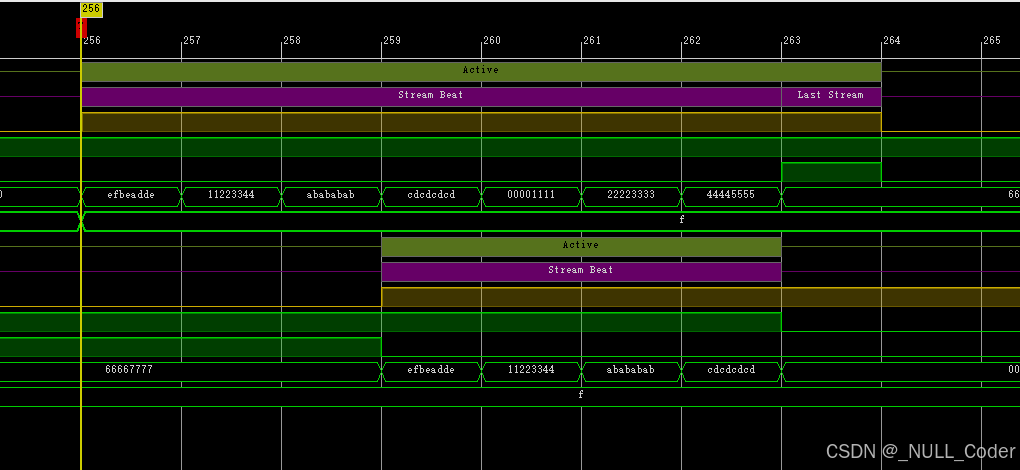
附上测试代码:
/*
* Copyright (C) 2013 - 2016  Xilinx, Inc.  All rights reserved.
*
* Permission is hereby granted, free of charge, to any person
* obtaining a copy of this software and associated documentation
* files (the "Software"), to deal in the Software without restriction,
* including without limitation the rights to use, copy, modify, merge,
* publish, distribute, sublicense, and/or sell copies of the Software,
* and to permit persons to whom the Software is furnished to do so,
* subject to the following conditions:
*
* The above copyright notice and this permission notice shall be included
* in all copies or substantial portions of the Software.
*
* THE SOFTWARE IS PROVIDED "AS IS", WITHOUT WARRANTY OF ANY KIND, EXPRESS OR
* IMPLIED, INCLUDING BUT NOT LIMITED TO THE WARRANTIES OF MERCHANTABILITY,
* FITNESS FOR A PARTICULAR PURPOSE AND NONINFRINGEMENT.
* IN NO EVENT SHALL XILINX  BE LIABLE FOR ANY CLAIM, DAMAGES OR OTHER LIABILITY,
* WHETHER IN AN ACTION OF CONTRACT, TORT OR OTHERWISE, ARISING FROM, OUT OF OR IN
* CONNECTION WITH THE SOFTWARE OR THE USE OR OTHER DEALINGS IN THE SOFTWARE.
*
* Except as contained in this notice, the name of the Xilinx shall not be used
* in advertising or otherwise to promote the sale, use or other dealings in this
* Software without prior written authorization from Xilinx.
*
*/

#include <stdio.h>
#include <fcntl.h>
#include <unistd.h>
#include <string.h>
#include <termios.h>
#include <sys/mman.h>

#define MM2S_CONTROL_REGISTER       0x00
#define MM2S_STATUS_REGISTER        0x04
#define MM2S_SRC_ADDRESS_REGISTER   0x18
#define MM2S_TRNSFR_LENGTH_REGISTER 0x28

#define S2MM_CONTROL_REGISTER       0x30
#define S2MM_STATUS_REGISTER        0x34
#define S2MM_DST_ADDRESS_REGISTER   0x48
#define S2MM_BUFF_LENGTH_REGISTER   0x58

#define IOC_IRQ_FLAG                1<<12
#define IDLE_FLAG                   1<<1

#define STATUS_HALTED               0x00000001
#define STATUS_IDLE                 0x00000002
#define STATUS_SG_INCLDED           0x00000008
#define STATUS_DMA_INTERNAL_ERR     0x00000010
#define STATUS_DMA_SLAVE_ERR        0x00000020
#define STATUS_DMA_DECODE_ERR       0x00000040
#define STATUS_SG_INTERNAL_ERR      0x00000100
#define STATUS_SG_SLAVE_ERR         0x00000200
#define STATUS_SG_DECODE_ERR        0x00000400
#define STATUS_IOC_IRQ              0x00001000
#define STATUS_DELAY_IRQ            0x00002000
#define STATUS_ERR_IRQ              0x00004000

#define HALT_DMA                    0x00000000
#define RUN_DMA                     0x00000001
#define RESET_DMA                   0x00000004
#define ENABLE_IOC_IRQ              0x00001000
#define ENABLE_DELAY_IRQ            0x00002000
#define ENABLE_ERR_IRQ              0x00004000
#define ENABLE_ALL_IRQ              0x00007000

unsigned int write_dma(unsigned int *virtual_addr, int offset, unsigned int value)
{
    virtual_addr[offset>>2] = value;

    return 0;
}

unsigned int read_dma(unsigned int *virtual_addr, int offset)
{
    return virtual_addr[offset>>2];
}

void dma_s2mm_status(unsigned int *virtual_addr)
{
    unsigned int status = read_dma(virtual_addr, S2MM_STATUS_REGISTER);

    printf("Stream to memory-mapped status (0x%08x@0x%02x):", status, S2MM_STATUS_REGISTER);

    if (status & STATUS_HALTED) {
		printf(" Halted.\n");
	} else {
		printf(" Running.\n");
	}

    if (status & STATUS_IDLE) {
		printf(" Idle.\n");
	}

    if (status & STATUS_SG_INCLDED) {
		printf(" SG is included.\n");
	}

    if (status & STATUS_DMA_INTERNAL_ERR) {
		printf(" DMA internal error.\n");
	}

    if (status & STATUS_DMA_SLAVE_ERR) {
		printf(" DMA slave error.\n");
	}

    if (status & STATUS_DMA_DECODE_ERR) {
		printf(" DMA decode error.\n");
	}

    if (status & STATUS_SG_INTERNAL_ERR) {
		printf(" SG internal error.\n");
	}

    if (status & STATUS_SG_SLAVE_ERR) {
		printf(" SG slave error.\n");
	}

    if (status & STATUS_SG_DECODE_ERR) {
		printf(" SG decode error.\n");
	}

    if (status & STATUS_IOC_IRQ) {
		printf(" IOC interrupt occurred.\n");
	}

    if (status & STATUS_DELAY_IRQ) {
		printf(" Interrupt on delay occurred.\n");
	}

    if (status & STATUS_ERR_IRQ) {
		printf(" Error interrupt occurred.\n");
	}
}

void dma_mm2s_status(unsigned int *virtual_addr)
{
    unsigned int status = read_dma(virtual_addr, MM2S_STATUS_REGISTER);

    printf("Memory-mapped to stream status (0x%08x@0x%02x):", status, MM2S_STATUS_REGISTER);

    if (status & STATUS_HALTED) {
		printf(" Halted.\n");
	} else {
		printf(" Running.\n");
	}

    if (status & STATUS_IDLE) {
		printf(" Idle.\n");
	}

    if (status & STATUS_SG_INCLDED) {
		printf(" SG is included.\n");
	}

    if (status & STATUS_DMA_INTERNAL_ERR) {
		printf(" DMA internal error.\n");
	}

    if (status & STATUS_DMA_SLAVE_ERR) {
		printf(" DMA slave error.\n");
	}

    if (status & STATUS_DMA_DECODE_ERR) {
		printf(" DMA decode error.\n");
	}

    if (status & STATUS_SG_INTERNAL_ERR) {
		printf(" SG internal error.\n");
	}

    if (status & STATUS_SG_SLAVE_ERR) {
		printf(" SG slave error.\n");
	}

    if (status & STATUS_SG_DECODE_ERR) {
		printf(" SG decode error.\n");
	}

    if (status & STATUS_IOC_IRQ) {
		printf(" IOC interrupt occurred.\n");
	}

    if (status & STATUS_DELAY_IRQ) {
		printf(" Interrupt on delay occurred.\n");
	}

    if (status & STATUS_ERR_IRQ) {
		printf(" Error interrupt occurred.\n");
	}
}

int dma_mm2s_sync(unsigned int *virtual_addr)
{
    unsigned int mm2s_status =  read_dma(virtual_addr, MM2S_STATUS_REGISTER);

	// sit in this while loop as long as the status does not read back 0x00001002 (4098)
	// 0x00001002 = IOC interrupt has occured and DMA is idle
	while(!(mm2s_status & IOC_IRQ_FLAG) || !(mm2s_status & IDLE_FLAG))
	{
        dma_s2mm_status(virtual_addr);
        dma_mm2s_status(virtual_addr);

        mm2s_status =  read_dma(virtual_addr, MM2S_STATUS_REGISTER);
    }

	return 0;
}

int dma_s2mm_sync(unsigned int *virtual_addr)
{
    unsigned int s2mm_status = read_dma(virtual_addr, S2MM_STATUS_REGISTER);

	// sit in this while loop as long as the status does not read back 0x00001002 (4098)
	// 0x00001002 = IOC interrupt has occured and DMA is idle
	while(!(s2mm_status & IOC_IRQ_FLAG) || !(s2mm_status & IDLE_FLAG))
	{
        dma_s2mm_status(virtual_addr);
        dma_mm2s_status(virtual_addr);

        s2mm_status = read_dma(virtual_addr, S2MM_STATUS_REGISTER);
    }

	return 0;
}

void print_mem(void *virtual_address, int byte_count)
{
	char *data_ptr = virtual_address;

	for(int i=0;i<byte_count;i++){
		printf("%02X", data_ptr[i]);

		// print a space every 4 bytes (0 indexed)
		if(i%4==3){
			printf(" ");
		}
	}

	printf("\n");
}

int main()
{
    printf("Hello World! - Running DMA transfer test application.\n");

	printf("Opening a character device file of the Arty's DDR memeory...\n");
	int ddr_memory = open("/dev/mem", O_RDWR | O_SYNC);

	printf("Memory map the address of the DMA AXI IP via its AXI lite control interface register block.\n");
    unsigned int *dma_virtual_addr = mmap(NULL, 65535, PROT_READ | PROT_WRITE, MAP_SHARED, ddr_memory, 0x40400000);

	printf("Memory map the MM2S source address register block.\n");
    unsigned int *virtual_src_addr  = mmap(NULL, 65535, PROT_READ | PROT_WRITE, MAP_SHARED, ddr_memory, 0x0e000000);

	printf("Memory map the S2MM destination address register block.\n");
    unsigned int *virtual_dst_addr = mmap(NULL, 65535, PROT_READ | PROT_WRITE, MAP_SHARED, ddr_memory, 0x0f000000);

	printf("Writing random data to source register block...\n");
	virtual_src_addr[0]= 0xEFBEADDE;
	virtual_src_addr[1]= 0x11223344;
	virtual_src_addr[2]= 0xABABABAB;
	virtual_src_addr[3]= 0xCDCDCDCD;
	virtual_src_addr[4]= 0x00001111;
	virtual_src_addr[5]= 0x22223333;
	virtual_src_addr[6]= 0x44445555;
	virtual_src_addr[7]= 0x66667777;

	printf("Clearing the destination register block...\n");
    memset(virtual_dst_addr, 0, 32);

    printf("Source memory block data:      ");
	print_mem(virtual_src_addr, 32);

    printf("Destination memory block data: ");
	print_mem(virtual_dst_addr, 32);

    printf("Reset the DMA.\n");
    write_dma(dma_virtual_addr, S2MM_CONTROL_REGISTER, RESET_DMA);
    write_dma(dma_virtual_addr, MM2S_CONTROL_REGISTER, RESET_DMA);
    dma_s2mm_status(dma_virtual_addr);
    dma_mm2s_status(dma_virtual_addr);

	printf("Halt the DMA.\n");
    write_dma(dma_virtual_addr, S2MM_CONTROL_REGISTER, HALT_DMA);
    write_dma(dma_virtual_addr, MM2S_CONTROL_REGISTER, HALT_DMA);
    dma_s2mm_status(dma_virtual_addr);
    dma_mm2s_status(dma_virtual_addr);

	printf("Enable all interrupts.\n");
    write_dma(dma_virtual_addr, S2MM_CONTROL_REGISTER, ENABLE_ALL_IRQ);
    write_dma(dma_virtual_addr, MM2S_CONTROL_REGISTER, ENABLE_ALL_IRQ);
    dma_s2mm_status(dma_virtual_addr);
    dma_mm2s_status(dma_virtual_addr);

    printf("Writing source address of the data from MM2S in DDR...\n");
    write_dma(dma_virtual_addr, MM2S_SRC_ADDRESS_REGISTER, 0x0e000000);
    dma_mm2s_status(dma_virtual_addr);

    printf("Writing the destination address for the data from S2MM in DDR...\n");
    write_dma(dma_virtual_addr, S2MM_DST_ADDRESS_REGISTER, 0x0f000000);
    dma_s2mm_status(dma_virtual_addr);

	printf("Run the MM2S channel.\n");
    write_dma(dma_virtual_addr, MM2S_CONTROL_REGISTER, RUN_DMA);
    dma_mm2s_status(dma_virtual_addr);

	printf("Run the S2MM channel.\n");
    write_dma(dma_virtual_addr, S2MM_CONTROL_REGISTER, RUN_DMA);
    dma_s2mm_status(dma_virtual_addr);

    printf("Writing MM2S transfer length of 32 bytes...\n");
    write_dma(dma_virtual_addr, MM2S_TRNSFR_LENGTH_REGISTER, 32);
    dma_mm2s_status(dma_virtual_addr);

    printf("Writing S2MM transfer length of 32 bytes...\n");
    write_dma(dma_virtual_addr, S2MM_BUFF_LENGTH_REGISTER, 32);
    dma_s2mm_status(dma_virtual_addr);

    printf("Waiting for MM2S synchronization...\n");
    dma_mm2s_sync(dma_virtual_addr);

    printf("Waiting for S2MM sychronization...\n");
    dma_s2mm_sync(dma_virtual_addr);

    dma_s2mm_status(dma_virtual_addr);
    dma_mm2s_status(dma_virtual_addr);

    printf("Destination memory block: ");
	print_mem(virtual_dst_addr, 32);

	printf("\n");

    return 0;
}
最后定位原因是板卡版型选错了,我使用的zynq7020板卡,却错误选择了xc7z020clg400-1 型号,实际上应当选择xc7z020clg400-2 (active) 型号。
另外,需要注意,DMA 的读写地址应当在mm2s 和s2mm的地址范围内:
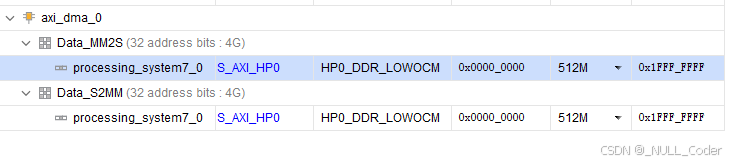
如果超过这个地址,就会报0x40 错误。
能使用地址范围按照ug585 地址起始应当是:0x01200000。
更多推荐

 17
17 0
0- 0


 已为社区贡献1条内容

所有评论(0)