
skywalking9集群部署
·
集群配置:这里使用 nacos 来做集群管理
// 大概在 16 行
cluster:
  # 这里改成使用 nacos
  selector: ${SW_CLUSTER:standalone}
  standalone:
  nacos:
  	# Skywalking 在 nacos server 的服务名称
    serviceName: ${SW_SERVICE_NAME:"SkyWalking_OAP_Cluster"}
  	# nacos server 的地址
    hostPort: ${SW_CLUSTER_NACOS_HOST_PORT:localhost:8848}
    # Nacos Configuration namespace
    namespace: ${SW_CLUSTER_NACOS_NAMESPACE:"public"}
    # Nacos auth username
    username: ${SW_CLUSTER_NACOS_USERNAME:""}
    password: ${SW_CLUSTER_NACOS_PASSWORD:""}
    # Nacos auth accessKey
    accessKey: ${SW_CLUSTER_NACOS_ACCESSKEY:""}
    secretKey: ${SW_CLUSTER_NACOS_SECRETKEY:""}

nacos:
    serviceName: ${SW_SERVICE_NAME:"SkyWalking_OAP_Cluster"}
    hostPort: ${SW_CLUSTER_NACOS_HOST_PORT:192.168.1.193:18848}
    # Nacos Configuration namespace
    namespace: ${SW_CLUSTER_NACOS_NAMESPACE:"Skywalking"}
    # Nacos auth username
    username: ${SW_CLUSTER_NACOS_USERNAME:"nacos"}
    password: ${SW_CLUSTER_NACOS_PASSWORD:"Hn@coll2022"}
    # Nacos auth accessKey
    accessKey: ${SW_CLUSTER_NACOS_ACCESSKEY:""}
    secretKey: ${SW_CLUSTER_NACOS_SECRETKEY:""}


Elasticsearch 存储配置:

storage:
	# 这里选择使用 elasticsearch
  selector: ${SW_STORAGE:h2}
  elasticsearch:
    namespace: ${SW_NAMESPACE:""}
  	# 集群地址,多个地址使用逗号分隔,比如 192.168.3.162:9200,192.168.3.162:9300
    clusterNodes: ${SW_STORAGE_ES_CLUSTER_NODES:localhost:9200}
    protocol: ${SW_STORAGE_ES_HTTP_PROTOCOL:"http"}
    connectTimeout: ${SW_STORAGE_ES_CONNECT_TIMEOUT:500}
    socketTimeout: ${SW_STORAGE_ES_SOCKET_TIMEOUT:30000}
    numHttpClientThread: ${SW_STORAGE_ES_NUM_HTTP_CLIENT_THREAD:0}
    user: ${SW_ES_USER:""}
    password: ${SW_ES_PASSWORD:""}
    trustStorePath: ${SW_STORAGE_ES_SSL_JKS_PATH:""}
    trustStorePass: ${SW_STORAGE_ES_SSL_JKS_PASS:""}
    secretsManagementFile: ${SW_ES_SECRETS_MANAGEMENT_FILE:""} # Secrets management file in the properties format includes the username, password, which are managed by 3rd party tool.
    dayStep: ${SW_STORAGE_DAY_STEP:1} # Represent the number of days in the one minute/hour/day index.
    indexShardsNumber: ${SW_STORAGE_ES_INDEX_SHARDS_NUMBER:1} # Shard number of new indexes
    indexReplicasNumber: ${SW_STORAGE_ES_INDEX_REPLICAS_NUMBER:1} # Replicas number of new indexes


storage:
  selector: ${SW_STORAGE:elasticsearch7}
  elasticsearch7:
    nameSpace: ${SW_NAMESPACE:"es-cluster"}
    clusterNodes: ${SW_STORAGE_ES_CLUSTER_NODES:192.168.1.160:19200,192.168.1:19200,192.168.1:19200}
    protocol: ${SW_STORAGE_ES_HTTP_PROTOCOL:"http"}
    trustStorePath: ${SW_STORAGE_ES_SSL_JKS_PATH:""}
    trustStorePass: ${SW_STORAGE_ES_SSL_JKS_PASS:""}
    dayStep: ${SW_STORAGE_DAY_STEP:1} # Represent the number of days in the one minute/hour/day index.
    indexShardsNumber: ${SW_STORAGE_ES_INDEX_SHARDS_NUMBER:1} # Shard number of new indexes
    indexReplicasNumber: ${SW_STORAGE_ES_INDEX_REPLICAS_NUMBER:1} # Replicas number of new indexes
    # Super data set has been defined in the codes, such as trace segments.The following 3 config would be improve es performance when storage super size data in es.
    superDatasetDayStep: ${SW_SUPERDATASET_STORAGE_DAY_STEP:-1} # Represent the number of days in the super size dataset record index, the default value is the same as dayStep when the value is less than 0
    superDatasetIndexShardsFactor: ${SW_STORAGE_ES_SUPER_DATASET_INDEX_SHARDS_FACTOR:5} #  This factor provides more shards for the super data set, shards number = indexShardsNumber * superDatasetIndexShardsFactor. Also, this factor effects Zipkin and Jaeger traces.
    superDatasetIndexReplicasNumber: ${SW_STORAGE_ES_SUPER_DATASET_INDEX_REPLICAS_NUMBER:0} # Represent the replicas number in the super size dataset record index, the default value is 0.
    user: ${SW_ES_USER:"elastic"}
    password: ${SW_ES_PASSWORD:"******"}


server:
  port: 18589

collector:
  path: /graphql
  ribbon:
    ReadTimeout: 10000
    # Point to all backend's restHost:restPort, split by ,
    listOfServers: 192.168.1.146:12800,192.168.1.147:12800


UI 相关配置

# 就在配置文件开头
server:
  port: 8080

spring:
  cloud:
    gateway:
      routes:
        - id: oap-route
          uri: lb://oap-service
          predicates:
            - Path=/graphql/**
    discovery:
      client:
        simple:
          instances:
            oap-service:
              - uri: http://127.0.0.1:12800
            # - uri: http://<oap-host-1>:<oap-port1>
            # - uri: http://<oap-host-2>:<oap-port2>


启动
启动两个后端(多个实例)
1
sh bin/oapService.sh
启动 UI(1 个实例)
1
sh bin/webappService.sh
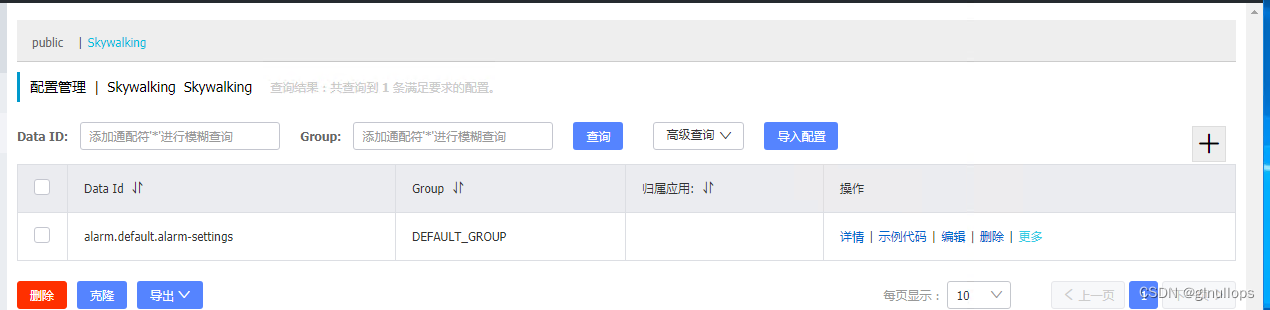
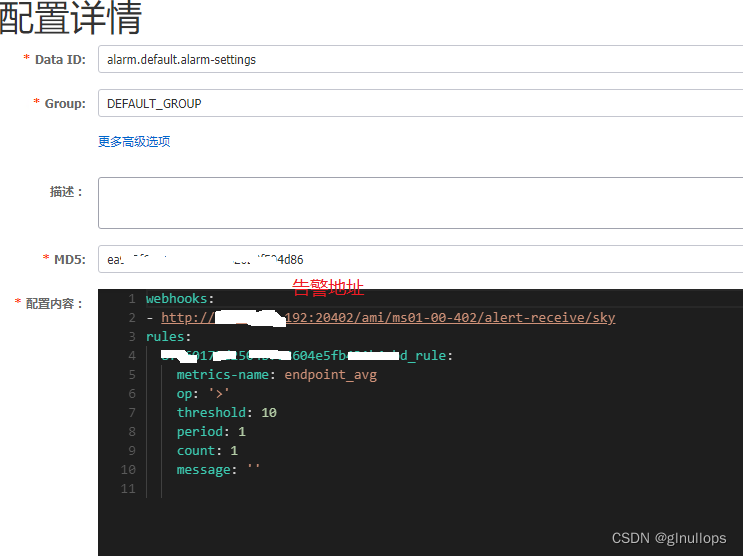
告警动态配置
Skywalking 配置 nacos

configuration:
  selector: nacos
  nacos:
    # Nacos 服务器地址
    serverAddr: 192.168.3.162
    # Nacos 服务器端口
    port: ${SW_CONFIG_NACOS_SERVER_PORT:8848}
    # Nacos Configuration Group
    group: ${SW_CONFIG_NACOS_SERVER_GROUP:skywalking}
    # Nacos Configuration namespace
    namespace: ${SW_CONFIG_NACOS_SERVER_NAMESPACE:}
    # 多久从 nasocs server 上同步一次配置,单位秒
    period: ${SW_CONFIG_NACOS_PERIOD:60}
    # Nacos auth username
    username: ${SW_CONFIG_NACOS_USERNAME:""}
    password: ${SW_CONFIG_NACOS_PASSWORD:""}
    # Nacos auth accessKey
    accessKey: ${SW_CONFIG_NACOS_ACCESSKEY:""}
    secretKey: ${SW_CONFIG_NACOS_SECRETKEY:""}
更多推荐


 0
0 0
0- 0


 已为社区贡献1条内容

所有评论(0)