
使用Ribbon和Feign实现客户端负载均衡
目录
认识负载均衡
负载均衡通常指的是服务器端的负载均衡,比如架设多个服务器来响应用户请求,多个服务器通过一定的管理规则来处理请求的转发。例如,在线看视频时有线路的选择,从多个服务器中手动选择线路,用户充当了“负载均衡选择器”的角色。
服务器端负载均衡
服务器端负载均衡是应对高并发和进行服务器端扩容的重要手段。常见的服务端负载均衡架构如下:
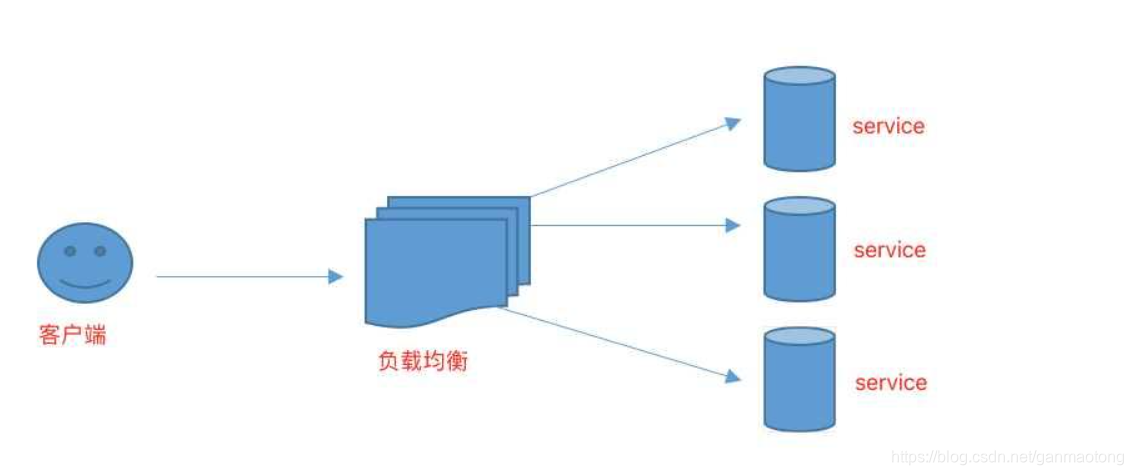
服务器端的负载均衡,主要通过在客户端和服务器端之间增加负载均衡器来实现。而负载均衡器又分为硬件负载均衡器和软件负载均衡器。
- 硬件负载均衡器主要采用F5、Radware、Array、A10等硬件设备
- 软件负载均衡器是在普通的服务器(硬件)上安装具有负载均衡功能的软件,以完成请求分发进而实现负载均衡。常见的负载均衡软件有Nginx、LVS、Haproxy等。
不管是通过硬件还是软件实现负载均衡,它们都维护着一罐正常服务清单,通过心跳禁止来删除出现故障的服务节点或追加恢复服务的节点,来保证清单的有效性。当客户端的请求到达服务器端的负载均衡器时,负载均衡器按照某种配置好的规则从可用服务器清单中选出一台服务器去处理客户端请求。这就是服务器端的负载均衡。
客户端负载均衡
在客户端负载均衡中,所有的客户端节点都管理着一份自己要访问的服务提供者清单,这些清单都是从“服务中心”(Euraka、Consul等)获取的,在每次请求之前通过一定的策略,从服务列表中选择一个服务,发送给服务器端来处理本次请求。常见的客户端负载均衡SpringCloud的Ribbon与Feign实现。
客户端负载均衡跟服务端负载均衡的区别在于:客户端本身拥有“服务提供者”清单,而服务器负载均衡的“服务提供者”清单是存储在负载均衡器中的。
Ribbon及其应用
Ribbon是Netflix公司的开源项目,是一款基于http和TCP的客户端负载均衡组件,它无法独立部署,一般以Spring Cloud Ribbon实现,基于轮询、随机、加权、地址hash等规则自动获取和调用服务,也可以根据需要自定义负载均衡算法。
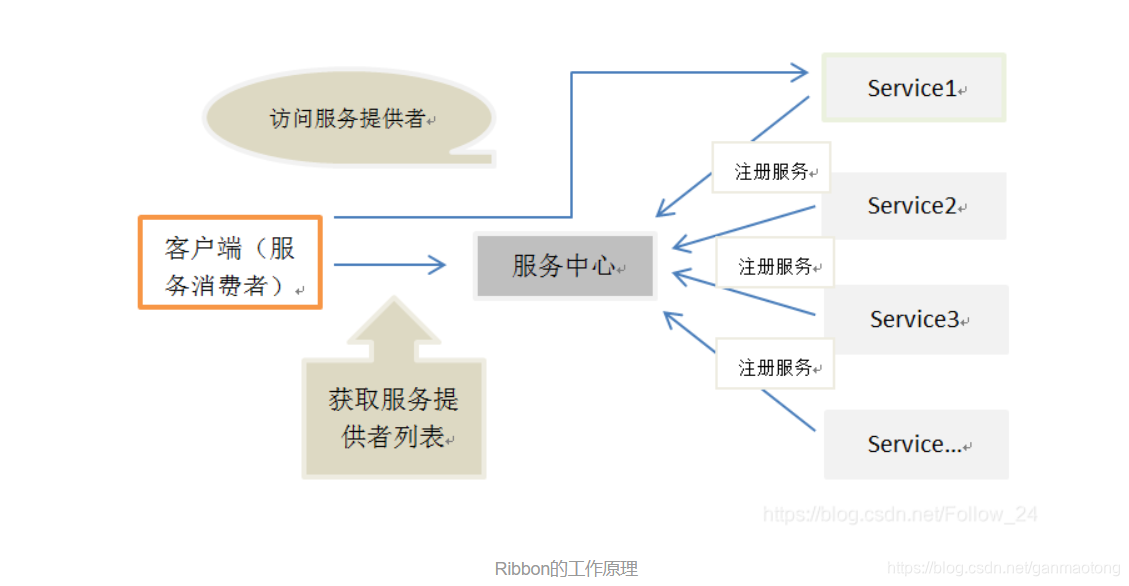
Ribbon在发起请求前,会从“服务中心”获取服务列表(清单),然后按照一定的负载均衡策略去发起请求,从而实现客户端的负载均衡。Ribbon本身也维护着“服务提供者”清单的有效性。如果它发现“服务提供者”不可用,则会重新从“服务中心”获取有效的“服务提供者”清单来及时更新。
在Spring Cloud中使用Ribbon非常简单,只要开启注解@LoadBalanced即可,这样客户端在发起请求时将自行选择一个“服务提供者”,从而实现负载均衡。
Spring Cloud Ribbon一般和Feign一起使用。
一个简单的Ribbon实例
服务提供者集群
服务中心集群:10.1.12.22:8500, 10.1.12.166:8500, 10.1.12.58:8500
服务提供者集群:10.1.12.211:8503, 10.1.12.213:8504
Ribbon负载均衡器实现
新建一个Spring Cloud工程。
1、pom文件中引入ribbon依赖
		<dependency>
			<groupId>org.springframework.boot</groupId>
			<artifactId>spring-boot-starter-web</artifactId>
		</dependency>

		<!-- Ribbon依赖-->
		<dependency>
			<groupId>org.springframework.cloud</groupId>
			<artifactId>spring-cloud-starter-netflix-ribbon</artifactId>
			<version>2.2.6.RELEASE</version>
		</dependency>
2、启动类RibbonRuleApplication:
package com.example.demo.ribbon.rule;

import org.springframework.boot.SpringApplication;
import org.springframework.boot.autoconfigure.SpringBootApplication;
import org.springframework.cloud.client.loadbalancer.LoadBalanced;
import org.springframework.context.annotation.Bean;
import org.springframework.web.client.RestTemplate;

@SpringBootApplication
public class RibbonRuleApplication {

	public static void main(String[] args) {
		SpringApplication.run(RibbonRuleApplication.class, args);
	}

	/**
	 * @LoadBalanced注解,表示开启客户端负载均衡
	 */
	@LoadBalanced
	/**
	 * 实例化RestTemplate
	 */
	@Bean
	RestTemplate restTemplate() {
		return new RestTemplate();
	}

}
在启动类中使用@LoadBalanced注解开启客户端负载均衡, 然后初始化RestTemplate,用来发起REST请求。
3、在配置文件中配置服务列表
spring.application.name=Ribbon Rule
server.port=9003
#logging.level.ROOT=DEBUG
provider.ribbon.listOfServers=10.1.12.211:8503,10.1.12.213:8504

spring.cloud.consul.host=10.1.12.22
spring.cloud.consul.port=8500
#配置consul注册中心
spring.cloud.consul.discovery.instance-id=${spring.application.name}:${server.port}
#因为只是消费者,不提供服务,所以设不注册到Consul 中
spring.cloud.consul.discovery.register=false
provider.ribbon.listOfServers这个配置是针对具体服务的,前缀就是服务名称,配置完之后就可以和之前一样使用服务名称来调用接口了。provider.ribbon.listOfServers=10.1.12.211:8503,10.1.12.213:8504 配置的是服务提供者列表,前缀provider作为serviceId使用。
4、配置类,配置负载均衡规则
package com.example.demo.ribbon.rule.config;

import com.netflix.loadbalancer.IRule;
import com.netflix.loadbalancer.RandomRule;
import org.springframework.cloud.netflix.ribbon.RibbonClient;
import org.springframework.cloud.netflix.ribbon.RibbonClientConfiguration;
import org.springframework.context.annotation.Bean;
import org.springframework.context.annotation.Configuration;

@Configuration
@RibbonClient(name = "randomRule", configuration = RibbonClientConfiguration.class)
public class RibbonConfig {

    /*
     *Ribbon的规则
     */
    @Bean
    public IRule iRule() {
        // 随机策略
        return new RandomRule();
    }
}
这里使用的是随机策略,随机访问服务。
5、测试控制器
package com.example.demo.ribbon.rule.controller;

import org.springframework.beans.factory.annotation.Autowired;
import org.springframework.cloud.client.ServiceInstance;
import org.springframework.cloud.client.loadbalancer.LoadBalancerClient;
import org.springframework.web.bind.annotation.GetMapping;
import org.springframework.web.bind.annotation.RestController;

import java.text.SimpleDateFormat;
import java.util.Date;

@RestController
public class TestController {

    @Autowired
    private LoadBalancerClient loadBalancerClient;

    Date date=new Date();
    SimpleDateFormat sdf=new SimpleDateFormat("yyy-MM-dd hh:mm:ss");

    @GetMapping("/test")
    public void test() {
        // 这里的serviceId是根据配置文件里的属性provider.ribbon.listOfServers填写的,即
        // .ribbon.listOfServers的前缀
        ServiceInstance serviceInstance = loadBalancerClient.choose("provider");
        System.out.println(serviceInstance.getHost() + ":" + serviceInstance.getPort()+" "+sdf.format(date));
    }

    @Autowired
    private RestTemplate restTemplate;

    @GetMapping("/test2")
    public void test2() {
        //访问路径直接添加服务名称即可provider
        String url = "http://provider/hello";
        System.out.println(url);
        String res = restTemplate.getForObject(url, String.class);
        System.out.println(res);
    }
}
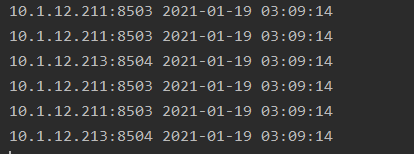
在浏览器中多次访问 http://localhost:9003/test,控制台输出如下信息:
在浏览器中多次访问 http://localhost:9003/test2,控制台输出如下信息:
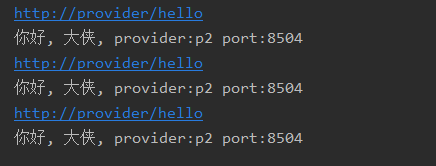
说明客户端已经实现了负载均衡。
使用Feign
Spring Cloud的“服务发现”功能除了可以用RestTemplate客户端实现之外,还可以使用Feign客户端实现。
Feign是一个声明式的Web Service客户端,它使得编写Web Service客户端变得更加容易。Feign 供了 HTTP 请求的模板,通过编写简单的接口和插入注解,就可以定义好 HTTP 请求的参数、格式、地址等信息。Feign客户端可以使用Feign持有的注解或JAX-RS注解,还支持热插拔的编码器和解码器。Spring Cloud 对 Feign 进行了封装,使其支持 SpringMVC 标准注解和 HttpMessageConverters。Feign的工作原理如下:
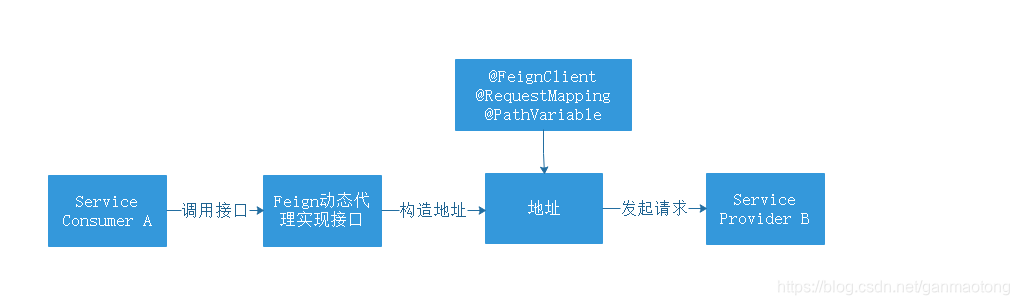
Feign已经集成了Ribbon,默认使用的是轮询规则。
一个简单的Feign例子
1、pom文件
		<dependency>
			<groupId>org.springframework.cloud</groupId>
			<artifactId>spring-cloud-starter-openfeign</artifactId>
			<version>2.2.6.RELEASE</version>
		</dependency>

		<!-- web依赖性,提供服务-->
		<dependency>
			<groupId>org.springframework.boot</groupId>
			<artifactId>spring-boot-starter-web</artifactId>
		</dependency>
2、启动类
package com.example.demo.feign;

import org.springframework.boot.SpringApplication;
import org.springframework.boot.autoconfigure.SpringBootApplication;
import org.springframework.cloud.client.discovery.EnableDiscoveryClient;
import org.springframework.cloud.openfeign.EnableFeignClients;

@EnableDiscoveryClient
@EnableFeignClients
@SpringBootApplication
public class FeignApplication {

	public static void main(String[] args) {
		SpringApplication.run(FeignApplication.class, args);
	}

}
@EnableFeignClients开启Feign功能
3、Feign接口类
package com.example.demo.feign.client;

import com.example.demo.feign.config.FeignConfiguration;
import feign.Param;
import feign.RequestLine;
import org.springframework.cloud.openfeign.FeignClient;

@FeignClient(contextId = "feignClient", name = "service-provider", configuration = FeignConfiguration.class)
public interface MyFeignClient {

    /**
     * Spring MVC注解修改为Feign自带的注解;
     * 使用feign自带的注解@RequestLine;
     */
    @RequestLine("GET /hello?name={name}")
    public String hello(@Param("name")String name);
}
开启Feign功能后,需要在接口类中使用注解@FeignClient编写属性。其中,name代表远程服务名,即“服务提供者”配置文件中配置项 spring.application.name的值。注意,要确保此接口类中的方法名和参数与远程服务中的保持一致。
4、自定义Feign配置
package com.example.demo.feign.config;

import feign.Contract;
import feign.Logger;
import org.springframework.context.annotation.Bean;
import org.springframework.context.annotation.Configuration;

@Configuration
public class FeignConfiguration {

    @Bean
    public Contract feignContract() {
        /*  Spring Cloud Netflix默认的SpringMvcController将替换为feign.Contract.Default。
         *  用feign.Contract.Default将契约改为Feign原生的默认契约,就可以使用feign自带的注解了
         */
        return new feign.Contract.Default();
    }

    @Bean
    Logger.Level feignLoggerLevel() {
        return Logger.Level.FULL;
    }
}
Feign 默认使用的是spring mvc 注解(就是RequestMapping 之类的),所以需要通过新增一个配置类来修改其“契约”。用feign.Contract.Default将契约改为Feign原生的默认契约,就可以使用feign自带的注解@RequestLine了。另外配置了记录日志的等级。
5、调用接口类
package com.example.demo.feign.controller;

import com.example.demo.feign.client.MyFeignClient;
import org.springframework.beans.factory.annotation.Autowired;
import org.springframework.web.bind.annotation.GetMapping;
import org.springframework.web.bind.annotation.RestController;

@RestController
public class HelloController {

    @Autowired
    MyFeignClient myFeignClient;

    @GetMapping("/hello")
    public String index(String name) {
        return myFeignClient.hello(name);
    }

}
接下来就可以访问http://localhost:8700/hello?name=he了,控制台输出如下日志:
2021-01-27 14:25:11.440 DEBUG 23540 --- [nio-8700-exec-1] c.e.demo.feign.client.MyFeignClient      : [MyFeignClient#hello] content-type: text/plain;charset=UTF-8
2021-01-27 14:25:11.440 DEBUG 23540 --- [nio-8700-exec-1] c.e.demo.feign.client.MyFeignClient      : [MyFeignClient#hello] date: Wed, 27 Jan 2021 06:25:09 GMT
2021-01-27 14:25:11.440 DEBUG 23540 --- [nio-8700-exec-1] c.e.demo.feign.client.MyFeignClient      : [MyFeignClient#hello] keep-alive: timeout=60
2021-01-27 14:25:11.441 DEBUG 23540 --- [nio-8700-exec-1] c.e.demo.feign.client.MyFeignClient      : [MyFeignClient#hello]
2021-01-27 14:25:11.442 DEBUG 23540 --- [nio-8700-exec-1] c.e.demo.feign.client.MyFeignClient      : [MyFeignClient#hello] 你好, he, provider:p1 port:8503
2021-01-27 14:25:11.442 DEBUG 23540 --- [nio-8700-exec-1] c.e.demo.feign.client.MyFeignClient      : [MyFeignClient#hello] <--- END HTTP (33-byte body)
反复多次访问,可以看到客户端采用了轮询的机制。
Feign中配置负载均衡策略
负载均衡策略在application.properties中配置即可:
service-provider.ribbon.NFLoadBalancerRuleClassName=com.netflix.loadbalancer.RoundRobinRule以上配置是针对单个服务进行的。
更多推荐



 1
1 0
0- 0


 已为社区贡献1条内容

所有评论(0)