
Java之设计模式(创建型模式)
创建型模式共有5种:工厂方法模式、抽象工厂模式、单例模式、原型模式、建造者模式。
一、工厂方法模式
1、简单工厂模式
又叫静态工厂方法模式,工厂类通过使用静态方法接收不同的参数来返回不同的产品类对象,由3部分组成:
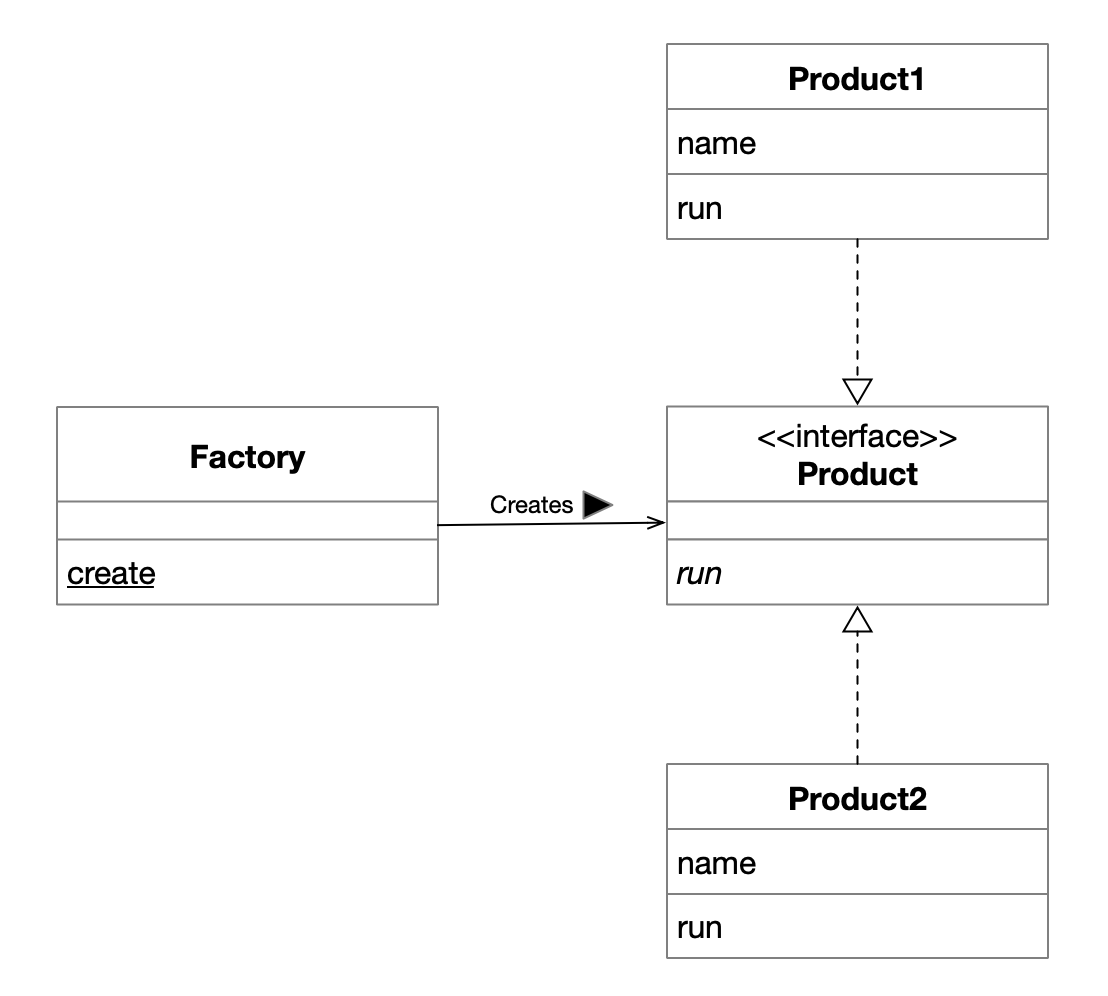
①抽象产品类
public interface Product {
    public abstract void run();
}
②具体产品类
public class Product1 implements Product{
    private String name;
    public Product1(String name) {
        this.name = name;
    }
    @Override
    public void run() {
        System.out.println(this.name + "正在运行");
    }
}
public class Product2 implements Product{
    private String name;
    public Product2(String name) {
        this.name = name;
    }
    @Override
    public void run() {
        System.out.println(this.name + "正在运行");
    }
}
③工厂类
public class Factory {
    public static Product create(int productNo) {
        Product product;
        switch (productNo){
            case 1:
                product = new Product1("产品1");
                break;
            case 2:
                product = new Product2("产品2");
                break;
            default:
                product = null;
                break;
        }
        return product;
    }
}
主入口
public class Main {
    public static void main(String[] args) {
        Product product1 = Factory.create(1);
        product1.run();

        Product product2 = Factory.create(2);
        product2.run();
    }
}
2、工厂方法模式
在简单工厂模式下,如果要新增1种产品类并使用,就必须修改原有的工厂类,在逻辑中新加这种新产品类的处理逻辑。为此对简单工厂模式进行了优化:创建不同产品时都由对应的工厂类实现,而不同产品类的工厂类都属于同一工厂抽象类。此模式由4部分组成:
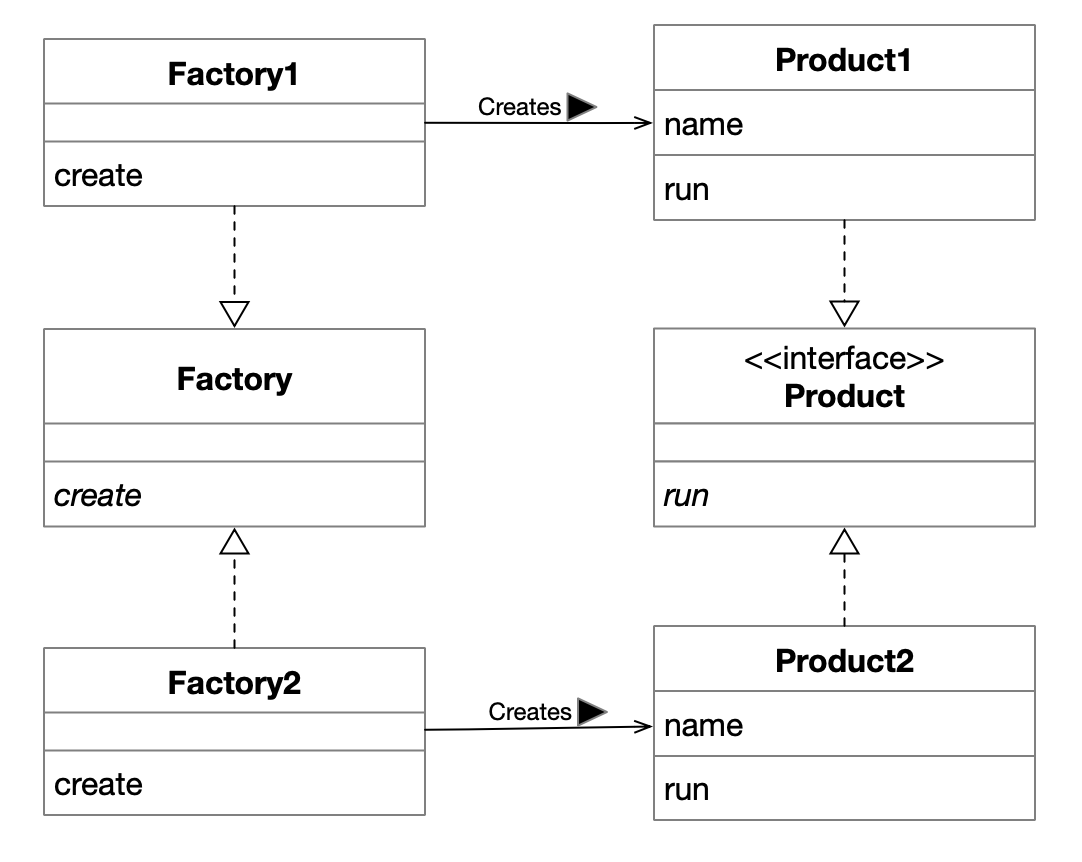
①抽象产品类
public interface Product {
    public abstract void run();
}
②具体产品类
public class Product1 implements Product {
    private String name;
    public Product1(String name) {
        this.name = name;
    }
    @Override
    public void run() {
        System.out.println(this.name + "正在运行");
    }
}
public class Product2 implements Product {
    private String name;
    public Product2(String name) {
        this.name = name;
    }
    @Override
    public void run() {
        System.out.println(this.name + "正在运行");
    }
}
③抽象工厂类
public interface Factory {
    public abstract Product create(String name);
}
④具体工厂类
public class Factory1 implements Factory {
    public Product create(String name) {
        return new Product1(name);
    }
}
public class Factory2 implements Factory {
    public Product create(String name) {
        return new Product2(name);
    }
}
主入口
public class Main {
    public static void main(String[] args) {
        Factory factory1 = new Factory1();
        Product product1 = factory1.create("产品1");
        product1.run();

        Factory factory2 = new Factory2();
        Product product2 = factory2.create("产品2");
        product2.run();
    }
}
二、抽象工厂模式
工厂方法模式下,所有产品都实现了统一的接口,属同一种产品,每种产品对应一个具体的工厂类。如果出现不同种产品,按工厂方法模式,需要定义同等数量的工厂类来生产这些产品。抽象工厂模式则可以使用1个工厂类来生产多种产品,以此减少工厂类的数量,此模式由4部分组成:
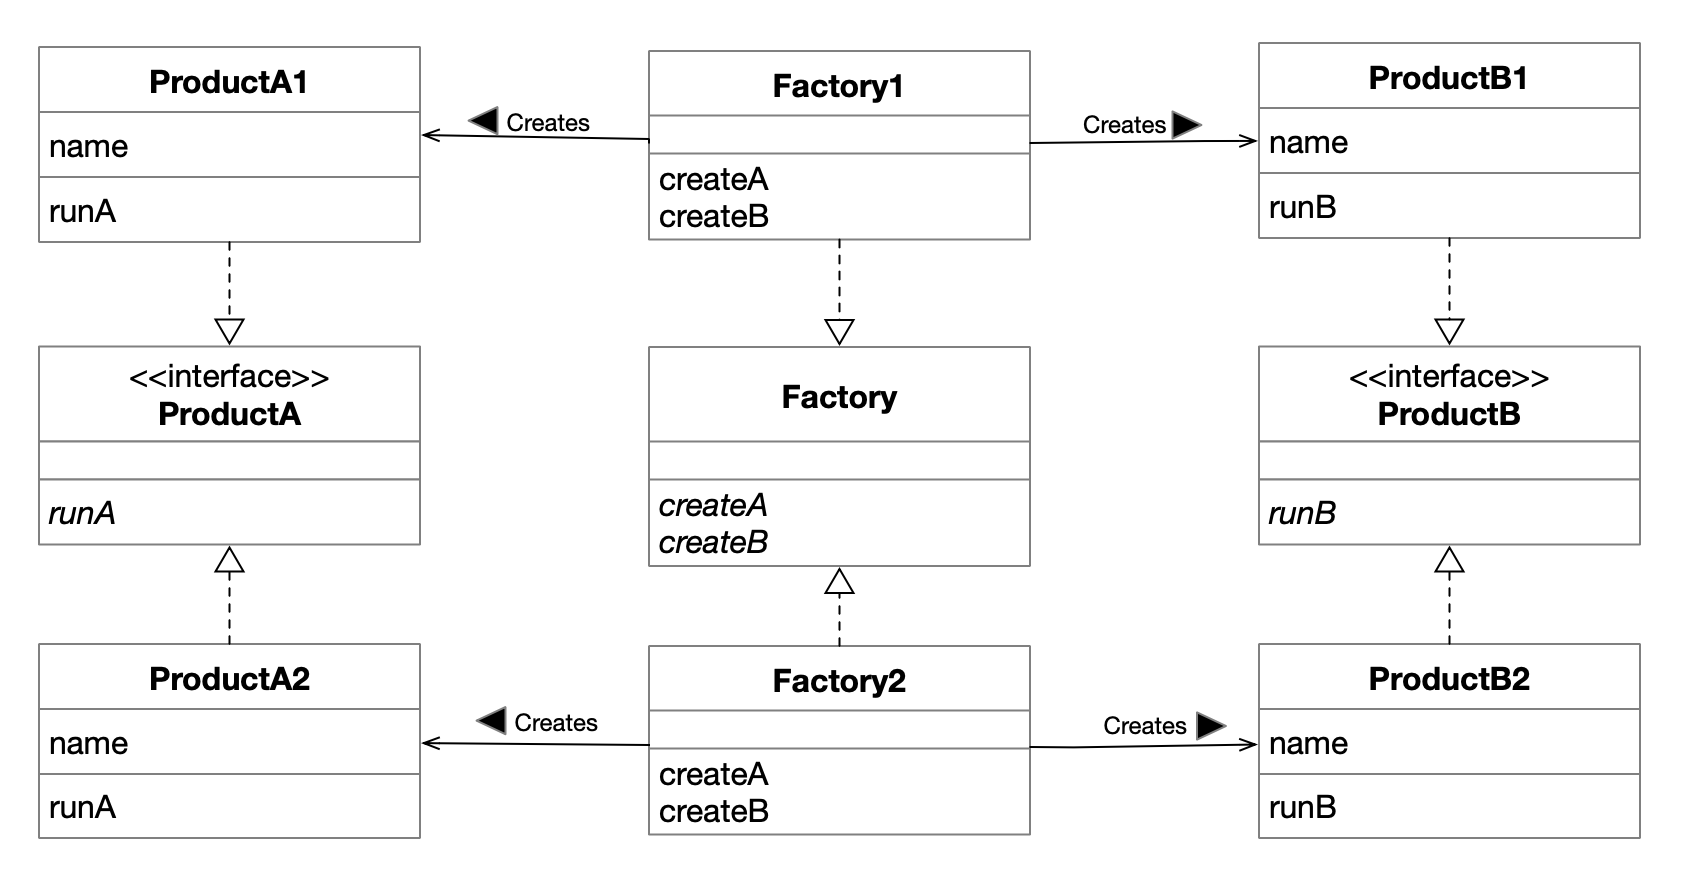
①抽象产品类
public interface ProductA {
    public abstract void runA();
}
public interface ProductB {
    public abstract void runB();
}
②具体产品类
public class ProductA1 implements ProductA {
    private String name;
    public ProductA1(String name) {
        this.name = name;
    }
    @Override
    public void runA() {
        System.out.println("产品A型号1" + this.name + "正在运行");
    }
}
public class ProductA2 implements ProductA {
    private String name;
    public ProductA2(String name) {
        this.name = name;
    }
    @Override
    public void runA() {
        System.out.println("产品A型号2" + this.name + "正在运行");
    }
}
public class ProductB1 implements ProductB {
    private String name;
    public ProductB1(String name) {
        this.name = name;
    }
    @Override
    public void runB() {
        System.out.println("产品B型号1" + this.name + "正在运行");
    }
}
public class ProductB2 implements ProductB {
    private String name;
    public ProductB2(String name) {
        this.name = name;
    }
    @Override
    public void runB() {
        System.out.println("产品B型号2" + this.name + "正在运行");
    }
}
③抽象工厂类
public interface Factory {
    public abstract ProductA createA(String name);
    public abstract ProductB createB(String name);
}
④具体工厂类
public class Factory1 implements Factory {
    @Override
    public ProductA createA(String name) {
        return new ProductA1(name);
    }
    @Override
    public ProductB createB(String name) {
        return new ProductB1(name);
    }
}
public class Factory2 implements Factory {
    @Override
    public ProductA createA(String name) {
        return new ProductA2(name);
    }
    @Override
    public ProductB createB(String name) {
        return new ProductB2(name);
    }
}
主入口
public class Main {
    public static void main(String[] args) {
        Factory factory1 = new Factory1();
        ProductA productA1 = factory1.createA("名称1");
        productA1.runA();
        ProductB productB1 = factory1.createB("名称2");
        productB1.runB();

        Factory factory2 = new Factory2();
        ProductA productA2 = factory2.createA("产品3");
        productA2.runA();
        ProductB productB2 = factory2.createB("产品4");
        productB2.runB();
    }
}
三、单例模式
不管怎么创建类的对象,都永远只会生成同一个对象(内存地址相同),有以下特点:
①必须类内部自行创建这个实例,且这个实例与类关联。也就是说本类对应的自己的对象为本类(或其内部类)的静态成员变量,且不能在类外部使用new构造方法的方式实例化此对象。所以本类的对象作为本类的一个成员变量应该是static的,构造方法必须是private的。
②必须通过类专有的静态方法才可以向使用方提供这个实例,所以对象作为成员变量必须是private的,访问此对象的方法必须是public static的。
根据生成对象时机又分为饿汉模式和懒汉模式:
1、饿汉模式
当类装载的时候就会创建类的静态实例,不管用不用,先创建出来,每次调用时,就不需要再判断,节省运行时间。此模式由1部分组成:
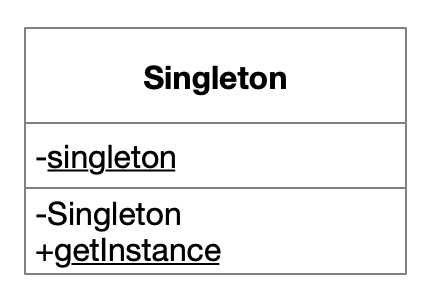
①单例类
public class Singleton {
    private static Singleton singleton = new Singleton();
    private Singleton() {
        System.out.println("生成了一个实例");
    }
    public static Singleton getInstance() {
        return singleton;
    }
}
主入口
public class Main {
    public static void main(String[] args) {
        Singleton singleton1 = Singleton.getInstance();
        Singleton singleton2 = Singleton.getInstance();
        if (singleton1 == singleton2) {
            System.out.println("是同一实例");
        } else {
            System.out.println("是不同实例");
        }
    }
}
2、懒汉模式
只有需要使用此实例时才进行创建,考虑到obj = new Object()语句是分两步执行、synchronized加锁性能低以及volatile对JDK代码优化的屏蔽,所以使用静态内部类维护单例。此模式由1部分组成:
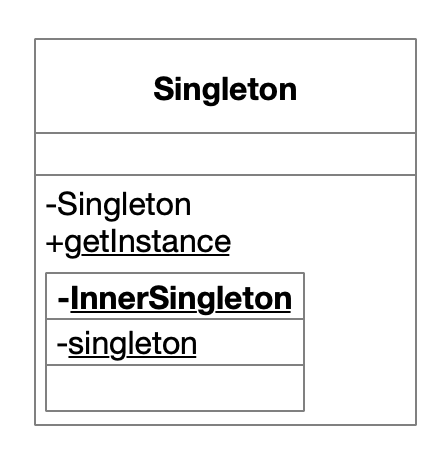
①单例类
public class Singleton {
    private Singleton() {
        System.out.println("生成了一个实例");
    }
    public static Singleton getInstance() {
        return InnerSingleton.singleton;
    }
    private static class InnerSingleton {
        private static final Singleton singleton = new Singleton();
    }
}
主入口
public class Main {
    public static void main(String[] args) {
        Singleton singleton1 = Singleton.getInstance();
        Singleton singleton2 = Singleton.getInstance();
        if (singleton1 == singleton2) {
            System.out.println("是同一实例");
        } else {
            System.out.println("是不同实例");
        }
    }
}
四、原型模式
就是将一个类的对象作为原型,通过处理类对其进行复制、克隆,产生一个和原对象类似的新对象。为避免克隆一个新类的对象时修改处理类,此时就可以使用原型模式。只需要新增一个实现了统一接口的产品类,然后在主方法中创建这个新产品类的对象并传入处理类即可进行克隆(与简单工厂模式原理相同,区别在于简单工厂模式是从零创建,而原型模式用参考原型进行克隆创建)。此模式由3部分组成:
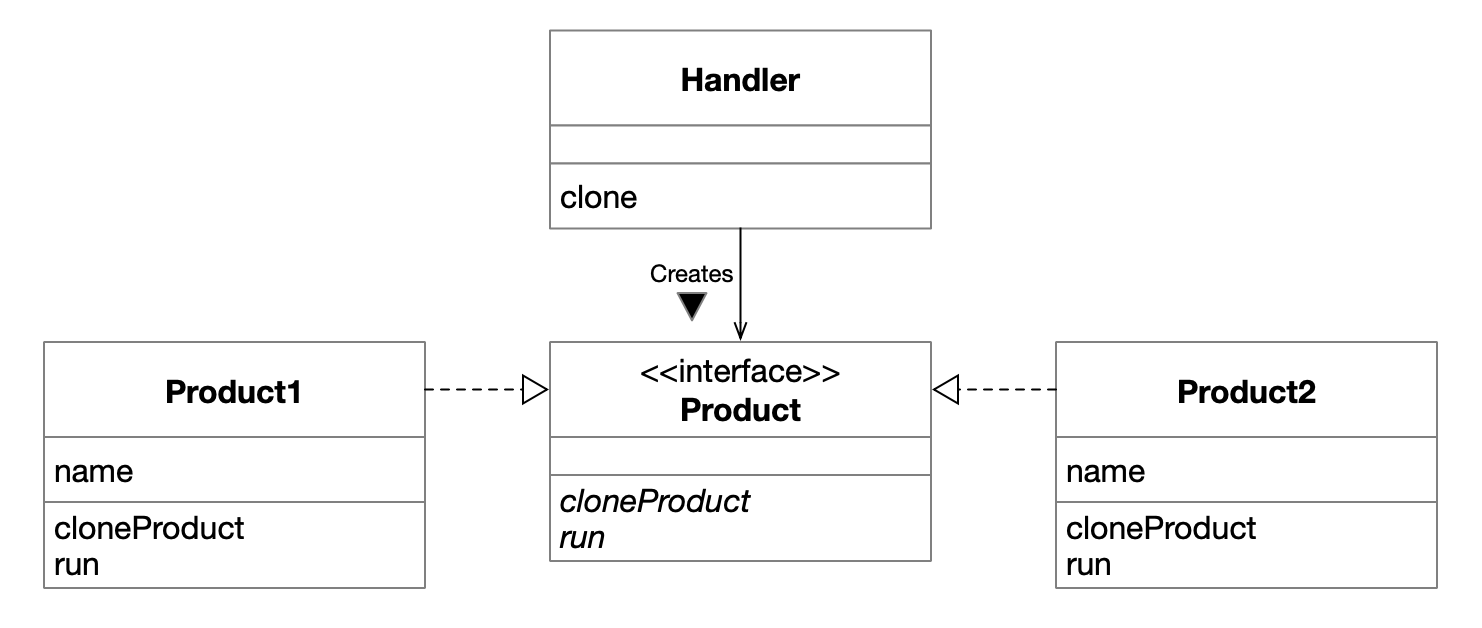
①抽象产品类
public interface Product extends Cloneable{
    public abstract Product cloneProduct();
    public abstract void run();
}
②具体产品类
public class Product1 implements Product {
    private String name;
    public Product1(String name) {
        this.name = name;
    }
    @Override
    public Product cloneProduct() {
        try {
            return (Product1)this.clone();
        } catch (CloneNotSupportedException e) {
            throw new RuntimeException(e);
        }
    }
    @Override
    public void run() {
        System.out.println(this.name + "正在运行");
    }
}
public class Product2 implements Product {
    private String name;
    public Product2(String name) {
        this.name = name;
    }
    @Override
    public Product cloneProduct() {
        try {
            return (Product2)this.clone();
        } catch (CloneNotSupportedException e) {
            throw new RuntimeException(e);
        }
    }
    @Override
    public void run() {
        System.out.println(this.name + "正在运行");
    }
}
③处理类
public class Handler {
    public Product clone(Product product) {
        return product.cloneProduct();
    }
}
主入口
public class Main {
    public static void main(String[] args) {
        Handler handler = new Handler();

        Product product10 = new Product1("产品1");
        Product product11 = handler.clone(product10);
        product11.run();

        Product product20 = new Product2("产品2");
        Product product21 = handler.clone(product20);
        product21.run();
    }
}
原型模式的核心是如何实现克隆的方法,常用方式有2种:
1、通用方式
在类中定义一个克隆方法,在该方法中创建一个该类的实例,然后将调用此克隆方法的对象中的属性赋值到此新创建的实例中,然后返回。
public class Prototype1 {
    private String field;
    public String getField() {
        return field;
    }
    public void setField(String field) {
        this.field = field;
    }
    public Prototype1 clone(){
        Prototype1 prototype = new Prototype1();
        prototype.field = this.field;
        return prototype;
    }
}
2、Cloneable方式
如果一个类没有实现Cloneable接口但是调用了clone()方法,Java编译器将抛出一个CloneNotSupportedException异常。
浅克隆:如果原型对象的成员变量是基本类型,浅克隆时将基本类型的成员变量复制一份给克隆对象;如果原型对象的成员变量是引用类型,浅克隆时将克隆对象的成员变量指向原型对象的引用类型的成员变量,也就是说克隆对象中引用类型的成员变量和原型对象中引用类型的成员变量的内存地址是同一个。
深克隆:对象的成员变量无论是基本类型还是引用类型,成员变量都会复制给克隆对象,也就是说克隆对象中所有的成员变量和原型对象中所有的成员变量的值虽然相同,但属于不同的内存空间。要实现深克隆,通常的做法是使用序列化,也就是将要克隆的对象写到IO流中并从IO流中读出来。要实现序列化,必须实现Serializable标记接口。
public class Prototype2 implements Cloneable, Serializable{
    private String field;
    public String getField() {
        return field;
    }
    public void setField(String field) {
        this.field = field;
    }
    @Override
    protected Prototype2 clone() throws CloneNotSupportedException {
        Prototype2 prototype = (Prototype2) super.clone();
        return prototype;
    }
    //浅克隆
    public Prototype2 shallowClone() throws CloneNotSupportedException {
        return clone();
    }
    //深克隆
    public Prototype2 deepClone() throws IOException, ClassNotFoundException {
        //写入当前对象的二进制流(序列化)
        ByteArrayOutputStream bo = new ByteArrayOutputStream();
        ObjectOutputStream oo = new ObjectOutputStream(bo);
        oo.writeObject(this);

        //读出二进制流产生的新对象(反序列化)
        ByteArrayInputStream bi = new ByteArrayInputStream(bo.toByteArray());
        ObjectInputStream oi = new ObjectInputStream(bi);
        return (Prototype2)oi.readObject();
    }
}
可以看出深克隆出来的对象与原对象中的成员变理field不是同一个(内存地址不同)。
public class Main {
    public static void main(String[] args) {
        Prototype1 prototype10 = new Prototype1();
        prototype10.setField("A");
        Prototype1 prototype11 = prototype10.clone();
        if (prototype11.getField() == prototype10.getField()) {
            System.out.println("Prototype1的field是同一变量");
        } else {
            System.out.println("Prototype1的field是不同变量");
        }

        Prototype2 prototype20 = new Prototype2();
        prototype20.setField("B");
        try {
            Prototype2 prototype21 = prototype20.shallowClone();
            if (prototype21.getField() == prototype20.getField()) {
                System.out.println("Prototype2的field是同一变量");
            } else {
                System.out.println("Prototype2的field是不同变量");
            }
            Prototype2 prototype22 = prototype20.deepClone();
            if (prototype22.getField() == prototype20.getField()) {
                System.out.println("Prototype2的field是同一变量");
            } else {
                System.out.println("Prototype2的field是不同变量");
            }
        } catch (CloneNotSupportedException e) {
            throw new RuntimeException(e);
        } catch (IOException e) {
            throw new RuntimeException(e);
        } catch (ClassNotFoundException e) {
            throw new RuntimeException(e);
        }
    }
}
五、建造者模式
多个建造者类实现了统一的建造者接口,而向指挥类传入不同的建造者对象,就可以任意指挥对应的建造者进行建造。如果要新增一种建造者,不需要修改指挥类,只需要新增一个实现了统一接口的建造者,然后在主方法中创建这个新建造者的对象并传入指挥类即可使用。此模式与简单工厂模式类似,但由工厂类(创建了产品对象)变成了指挥类(未创建产品对象,但对建造者的step进行了顺序控制),此模式由3部分组成:
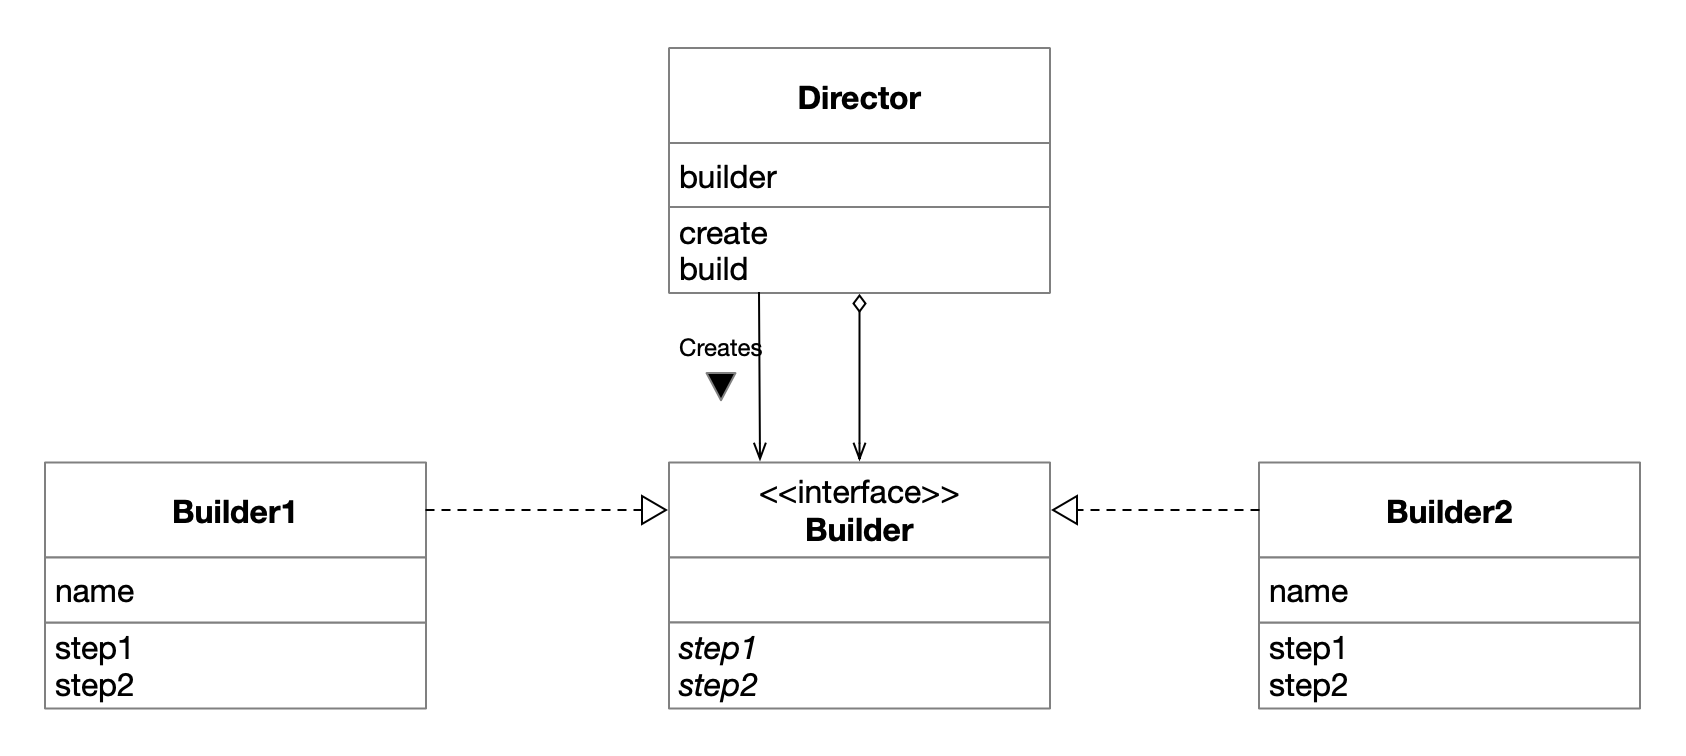
①抽象建造者类
public interface Builder {
    public abstract void step1();
    public abstract void step2();
}
②具体建造者类
public class Builder1 implements Builder {
    private String name;
    public Builder1(String name) {
        this.name = name;
    }
    @Override
    public void step1() {
        System.out.println(this.name + "的step1");
    }
    @Override
    public void step2() {
        System.out.println(this.name + "的step2");
    }
}
public class Builder2 implements Builder {
    private String name;
    public Builder2(String name) {
        this.name = name;
    }
    @Override
    public void step1() {
        System.out.println(this.name + "的step1");
    }
    @Override
    public void step2() {
        System.out.println(this.name + "的step2");
    }
}
③指挥类
public class Director {
    private Builder builder;
    public void create(Builder builder) {
        this.builder = builder;
    }
    public void build() {
        this.builder.step1();
        this.builder.step2();
    }
}
主入口
public class Main {
    public static void main(String[] args) {
        Director director = new Director();

        Builder builder1 = new Builder1("建造者1");
        director.create(builder1);
        director.build();

        Builder builder2 = new Builder2("建造者2");
        director.create(builder2);
        director.build();
    }
}
更多推荐

 1
1 0
0- 0


 已为社区贡献1条内容

所有评论(0)