
如何在本地jeckins上跑pytest测试代码
🛠️ 第一阶段:准备工作(Jenkins 插件安装)
在创建任务之前,我们需要让 Jenkins 具备解析 Git 代码和生成 Allure 报告的能力。
1. 安装必备插件
- 登录 Jenkins 后台,点击 系统管理 (Manage Jenkins) -> 插件管理 (Plugins)。
![![[Pasted image 20260620110253.png]]](https://i-blog.csdnimg.cn/direct/c94b207a85534bdf8ea890969af5223b.png)
![![[Pasted image 20260620110312.png]]](https://i-blog.csdnimg.cn/direct/f34cf060bcd241eab49ed9beebe6b8e3.png)
-
切换到 Available plugins (可选插件) 选项卡,在搜索框中分别搜索并勾选以下插件:
-
Git(通常默认已安装,如果没有请勾选) -
Allure Jenkins Plugin(核心:用于展示漂亮的测试报告)
-
![![[Pasted image 20260620110454.png]]](https://i-blog.csdnimg.cn/direct/86edb5095b6d40f6b9e642a020f79d37.png)
- 勾选后,点击下方的 Install without restart (不重启安装),等待安装完成。
2. 配置 Allure 工具路径
Jenkins 需要知道你本机的 Allure 命令行工具在哪里(如果你本地命令行能直接运行 allure,Jenkins 也需要显式配置一下)。
-
依次点击 系统管理 (Manage Jenkins) -> 全局工具配置 (Tools)。
-
按图片中写的填写, 安装目录是你本机上allure的地址
![![[Pasted image 20260620110713.png]]](https://i-blog.csdnimg.cn/direct/b030cade04ae4e939d88ba4929b14e0b.png)
![![[Pasted image 20260620110742.png]]](https://i-blog.csdnimg.cn/direct/f3ba23fc03124a139dd13264dad18361.png)
🏗️ 第二阶段:创建与配置你的第一个 CI/CD Job
现在,我们来徒手打造这个流水线。
Step 1. 新建任务
-
在 Jenkins 首页点击左上角的 新建任务 (New Item)。
-
输入任务名称:
TruePoint_API_Automation -
选择 Freestyle project (自由风格项目),点击 确定。
![![[Pasted image 20260620111038.png]]](https://i-blog.csdnimg.cn/direct/043b5f17b58745aa9608605b54d19b56.png)
![![[Pasted image 20260620111059.png]]](https://i-blog.csdnimg.cn/direct/e7edb177e1c74d309cc9c53d43d68e4f.png)
Step 2. 源码管理(拉取你的 Pytest 代码)
在 源码管理 (Source Code Management) 模块:
-
选择 Git。
-
Repository URL: 填入你本地项目的 Git 仓库路径(可以是 GitHub/Gitee 的 HTTPS 链接,如果是本地文件夹,甚至可以直接写本地绝对路径如
file:///E:/truepoint_springboot_pytest/truepoint_pytest4)。 -
Credentials: 如果是私有仓库,点击 添加 (Add) 输入你的 Git 账号密码;如果是公开仓库或本地路径,选
- none -。 -
Branch Specifier: 默认
*/master或*/main(根据你的分支决定)。
![![[Pasted image 20260620111204.png]]](https://i-blog.csdnimg.cn/direct/81aa2cd1be394d8cb71d68cbb5e3b57c.png)
![![[Pasted image 20260620111310.png]]](https://i-blog.csdnimg.cn/direct/8a7b067d864045a88bbe9a054865c903.png)
Step 3. 构建触发器(定时执行)
让测试在每天固定时间自动跑,实现真正的“持续集成”。
-
勾选 定时构建 (Build periodically)。
-
在 日程表 (Schedule) 中填入:
Plaintext
H 9 * * *
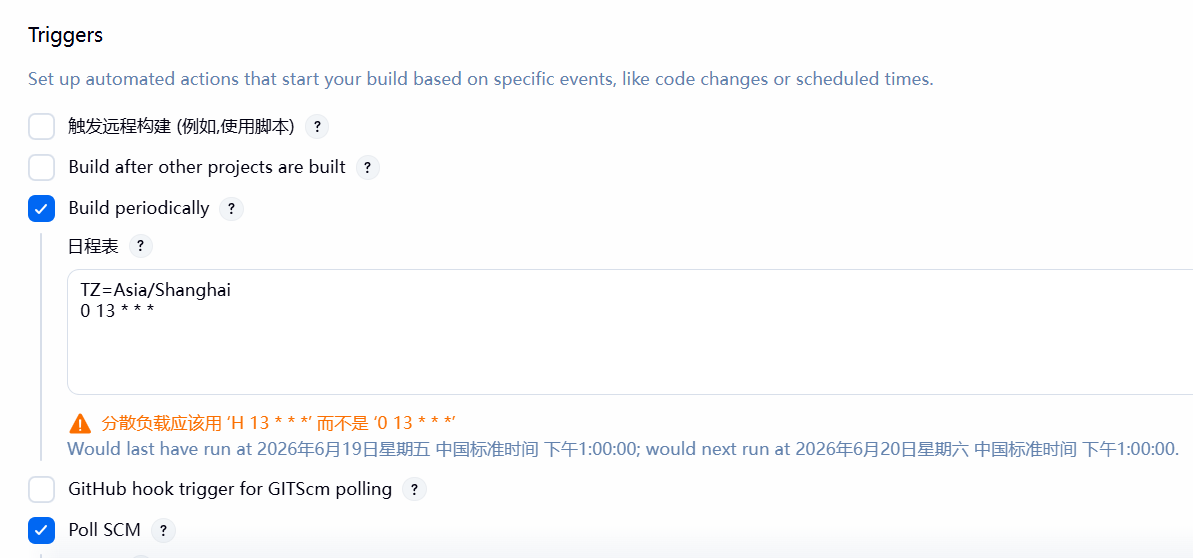
注: 这代表每天早上 9 点到 10 点之间,Jenkins 会自动帮你拉取最新代码并跑一遍自动化测试。
Step 4. 构建步骤(核心执行命令)
这是最关键的一步,决定了 Jenkins 能不能顺利调用你的 Python 虚拟环境。
- 滚动到 构建 (Build Steps) 模块,点击 增加构建步骤 (Add build step)。
- 选择 Execute Windows batch command (执行 Windows 批处理命令)。
- 在输入框中,填入以下企业标准写法(直接指定绝对路径的 python.exe,绝不出错):
@echo off
echo ==========================================
echo [INFO] 开始执行 TruePoint 自动化测试流水线
echo ==========================================

:: 1. 切换到 Jenkins 的工作空间目录
cd /d "%WORKSPACE%"

echo [INFO] 正在分析触发源并匹配自动化分层策略...

:: 兼容性捕获:如果 BUILD_CAUSE 为空,尝试从 Jenkins 内置日志特征抓取
set "ACTUAL_CAUSE=MANUAL"

:: 检查日志大环境,看是不是 Git/SCM 变更拉起来的
if /i "%hudson.version%" NEQ "" (
    :: 通过检查当前构建的特殊标记来反推
    if "%GIT_COMMIT%" NEQ "" set "ACTUAL_CAUSE=SCMTRIGGER"
)

:: 如果是定时器触发,通常你的定时器是按时跑的,为了 100% 准确,我们直接判断
:: 或者是看当前构建是不是没有用户参与
if "%BUILD_CAUSE%"=="TIMERTRIGGER" set "ACTUAL_CAUSE=TIMERTRIGGER"

echo [INFO] 最终判定触发源: %ACTUAL_CAUSE%

:: =========================================================================
:: 策略 1:全量回归 (定时器 或 没传参的自动流程兜底)
:: =========================================================================
if "%ACTUAL_CAUSE%"=="TIMERTRIGGER" (
    echo [INFO] 💥 检测到定时器触发,自动执行 Nightly 全量回归测试...
    "E:\truepoint_springboot_pytest\truepoint_pytest4\.venv\Scripts\python.exe" -m pytest --alluredir=reports/allure-results --clean-alluredir
    goto report_stage
)

:: =========================================================================
:: 策略 2:冒烟测试 (检测到代码有 Commit 提交)
:: =========================================================================
:: 日志显示 "Started by an SCM change",只要存在新提交的 COMMIT 且不是手动,就走冒烟
if "%ACTUAL_CAUSE%"=="SCMTRIGGER" (
    echo [INFO] 🚀 检测到代码 Commit 提交,自动执行冒烟测试...
    "E:\truepoint_springboot_pytest\truepoint_pytest4\.venv\Scripts\python.exe" -m pytest -m smoke --alluredir=reports/allure-results --clean-alluredir
    goto report_stage
)

:: =========================================================================
:: 策略 3:人工手动构建
:: =========================================================================
:: 如果上面由于自动触发导致 TEST_TYPE 为空,给它一个默认值叫 smoke
if "%TEST_TYPE%"=="" set "TEST_TYPE=smoke"

echo [INFO] 👤 执行选择/默认的参数: %TEST_TYPE%

if "%TEST_TYPE%"=="smoke" (
    echo [INFO] 运行参数:冒烟测试 [smoke]
    "E:\truepoint_springboot_pytest\truepoint_pytest4\.venv\Scripts\python.exe" -m pytest -m smoke --alluredir=reports/allure-results --clean-alluredir
)

if "%TEST_TYPE%"=="regression" (
    echo [INFO] 运行参数:回归测试 [regression]
    "E:\truepoint_springboot_pytest\truepoint_pytest4\.venv\Scripts\python.exe" -m pytest -m regression --alluredir=reports/allure-results --clean-alluredir
)

if "%TEST_TYPE%"=="all" (
    echo [INFO] 运行参数:全量测试 [all]
    "E:\truepoint_springboot_pytest\truepoint_pytest4\.venv\Scripts\python.exe" -m pytest --alluredir=reports/allure-results --clean-alluredir
)

:report_stage
echo ==========================================
echo [INFO] 测试执行完毕,等待生成 Allure 报告...
echo ==========================================
Step 5. 构建后操作(发布 Allure 报告)
测试跑完后,我们要把结果复活成可视化的图表。
-
滚动到 构建后操作 (Post-build Actions) 模块,点击 增加构建后操作步骤。
-
选择 Allure Report。
-
Results 处的 Path 填写:
reports/allure-results(必须与上面 pytest 命令里--alluredir指定的相对路径完全一致)。 -
Report path 默认填
allure-report即可。 -
点击页面最下方的 保存 (Save)。
更多推荐
 6
6 0
0- 0


 已为社区贡献2条内容

所有评论(0)