
yudao-boot-mini 开启job模块
·
yudao-boot-mini 项目是在2025年10月20日左右拉下来的,参考此文档请注意版本
项目中提示总是要看官方文档,但是需要199元,不干
在未开启之前,启动项目时会提示 :
[定时任务 - 已禁用][参考 https://doc.iocoder.cn/job/ 开启]
然后开搞
application.yaml
spring:
  application:
    name: jszj-server

  profiles:
    active: local

  main:
    allow-circular-references: true # 允许循环依赖,因为项目是三层架构,无法避免这个情况。

  # Servlet 配置
  servlet:
    # 文件上传相关配置项
    multipart:
      max-file-size: 16MB # 单个文件大小
      max-request-size: 32MB # 设置总上传的文件大小

  # Jackson 配置项
  jackson:
    serialization:
      write-dates-as-timestamps: true # 设置 Date 的格式,使用时间戳
      write-date-timestamps-as-nanoseconds: false # 设置不使用 nanoseconds 的格式。例如说 1611460870.401,而是直接 1611460870401
      write-durations-as-timestamps: true # 设置 Duration 的格式,使用时间戳
      fail-on-empty-beans: false # 允许序列化无属性的 Bean

  # Cache 配置项
  cache:
    type: REDIS
    redis:
      time-to-live: 1h # 设置过期时间为 1 小时

server:
  servlet:
    encoding:
      enabled: true
      charset: UTF-8 # 必须设置 UTF-8,避免 WebFlux 流式返回(AI 场景)会乱码问题
      force: true

--- #################### 接口文档配置 ####################

springdoc:
  api-docs:
    enabled: true
    path: /v3/api-docs
  swagger-ui:
    enabled: true
    path: /swagger-ui
  default-flat-param-object: true # 参见 https://doc.xiaominfo.com/docs/faq/v4/knife4j-parameterobject-flat-param 文档

knife4j:
  enable: true
  setting:
    language: zh_cn

# 工作流 Flowable 配置
flowable:
  # 1. false: 默认值,Flowable 启动时,对比数据库表中保存的版本,如果不匹配。将抛出异常
  # 2. true: 启动时会对数据库中所有表进行更新操作,如果表存在,不做处理,反之,自动创建表
  # 3. create_drop: 启动时自动创建表,关闭时自动删除表
  # 4. drop_create: 启动时,删除旧表,再创建新表
  database-schema-update: true # 设置为 false,可通过 https://github.com/flowable/flowable-sql 初始化
  db-history-used: true # flowable6 默认 true 生成信息表,无需手动设置
  check-process-definitions: false # 设置为 false,禁用 /resources/processes 自动部署 BPMN XML 流程
  history-level: audit # full:保存历史数据的最高级别,可保存全部流程相关细节,包括流程流转各节点参数

# MyBatis Plus 的配置项
mybatis-plus:
  configuration:
    map-underscore-to-camel-case: true # 虽然默认为 true ,但是还是显示去指定下。
  global-config:
    db-config:
      id-type: NONE # “智能”模式,基于 IdTypeEnvironmentPostProcessor + 数据源的类型,自动适配成 AUTO、INPUT 模式。
#      id-type: AUTO # 自增 ID,适合 MySQL 等直接自增的数据库
#      id-type: INPUT # 用户输入 ID,适合 Oracle、PostgreSQL、Kingbase、DB2、H2 数据库
#      id-type: ASSIGN_ID # 分配 ID,默认使用雪花算法。注意,Oracle、PostgreSQL、Kingbase、DB2、H2 数据库时,需要去除实体类上的 @KeySequence 注解
      logic-delete-value: 1 # 逻辑已删除值(默认为 1)
      logic-not-delete-value: 0 # 逻辑未删除值(默认为 0)
    banner: false # 关闭控制台的 Banner 打印
  type-aliases-package: ${jszj.info.base-package}.module.*.dal.dataobject
  encryptor:
    password: XDV71a+xqStEA3WH # 加解密的秘钥,可使用 https://www.imaegoo.com/2020/aes-key-generator/ 网站生成

mybatis-plus-join:
  banner: false # 是否打印 mybatis plus join banner,默认true
  sub-table-logic: true # 全局启用副表逻辑删除,默认true。关闭后关联查询不会加副表逻辑删除
  ms-cache: true # 拦截器MappedStatement缓存,默认 true
  table-alias: t # 表别名(默认 t)
  logic-del-type: on # 副表逻辑删除条件的位置,支持 WHERE、ON,默认 ON

# Spring Data Redis 配置
spring:
  data:
    redis:
      repositories:
        enabled: false # 项目未使用到 Spring Data Redis 的 Repository,所以直接禁用,保证启动速度

# VO 转换(数据翻译)相关
easy-trans:
  is-enable-global: false # 【默认禁用,对性能确认压力大】启用全局翻译(拦截所有 SpringMVC ResponseBody 进行自动翻译 )。如果对于性能要求很高可关闭此配置,或通过 @IgnoreTrans 忽略某个接口

--- #################### 验证码相关配置 ####################

aj:
  captcha:
    jigsaw: classpath:images/jigsaw # 滑动验证,底图路径,不配置将使用默认图片;以 classpath: 开头,取 resource 目录下路径
    pic-click: classpath:images/pic-click # 滑动验证,底图路径,不配置将使用默认图片;以 classpath: 开头,取 resource 目录下路径
    cache-type: redis # 缓存 local/redis...
    cache-number: 1000 # local 缓存的阈值,达到这个值,清除缓存
    timing-clear: 180 # local定时清除过期缓存(单位秒),设置为0代表不执行
    type: blockPuzzle # 验证码类型 default 三种都实例化。blockPuzzle 滑块拼图、clickWord 文字点选、pictureWord 文本输入
    water-mark: 芋道源码 # 右下角水印文字(我的水印),可使用 https://tool.chinaz.com/tools/unicode.aspx 中文转 Unicode,Linux 可能需要转 unicode
    interference-options: 0 # 滑动干扰项(0/1/2)
    req-frequency-limit-enable: false # 接口请求次数一分钟限制是否开启 true|false
    req-get-lock-limit: 5 # 验证失败 5 次,get接口锁定
    req-get-lock-seconds: 10 # 验证失败后,锁定时间间隔
    req-get-minute-limit: 30 # get 接口一分钟内请求数限制
    req-check-minute-limit: 60 # check 接口一分钟内请求数限制
    req-verify-minute-limit: 60 # verify 接口一分钟内请求数限制

--- #################### 消息队列相关 ####################

# rocketmq 配置项,对应 RocketMQProperties 配置类
rocketmq:
  # Producer 配置项
  producer:
    group: ${spring.application.name}_PRODUCER # 生产者分组

spring:
  # Kafka 配置项,对应 KafkaProperties 配置类
  kafka:
    # Kafka Producer 配置项
    producer:
      acks: 1 # 0-不应答。1-leader 应答。all-所有 leader 和 follower 应答。
      retries: 3 # 发送失败时,重试发送的次数
      value-serializer: org.springframework.kafka.support.serializer.JsonSerializer # 消息的 value 的序列化
    # Kafka Consumer 配置项
    consumer:
      auto-offset-reset: earliest # 设置消费者分组最初的消费进度为 earliest 。可参考博客 https://blog.csdn.net/lishuangzhe7047/article/details/74530417 理解
      value-deserializer: org.springframework.kafka.support.serializer.JsonDeserializer
      properties:
        spring.json.trusted.packages: '*'
    # Kafka Consumer Listener 监听器配置
    listener:
      missing-topics-fatal: false # 消费监听接口监听的主题不存在时,默认会报错。所以通过设置为 false ,解决报错

--- #################### AI 相关配置 ####################

spring:
  ai:
    vectorstore: # 向量存储
      redis:
        initialize-schema: true
        index-name: knowledge_index # Redis 中向量索引的名称:用于存储和检索向量数据的索引标识符,所有相关的向量搜索操作都会基于这个索引进行
        prefix: "knowledge_segment:" # Redis 中存储向量数据的键名前缀:这个前缀会添加到每个存储在 Redis 中的向量数据键名前,每个 document 都是一个 hash 结构
      qdrant:
        initialize-schema: true
        collection-name: knowledge_segment # Qdrant 中向量集合的名称:用于存储向量数据的集合标识符,所有相关的向量操作都会在这个集合中进行
        host: 127.0.0.1
        port: 6334
      milvus:
        initialize-schema: true
        database-name: default # Milvus 中数据库的名称
        collection-name: knowledge_segment # Milvus 中集合的名称:用于存储向量数据的集合标识符,所有相关的向量操作都会在这个集合中进行
        client:
          host: 127.0.0.1
          port: 19530
    qianfan: # 文心一言
      api-key: x0cuLZ7XsaTCU08vuJWO87Lg
      secret-key: R9mYF9dl9KASgi5RUq0FQt3wRisSnOcK
    zhipuai: # 智谱 AI
      api-key: 32f84543e54eee31f8d56b2bd6020573.3vh9idLJZ2ZhxDEs
    openai: # OpenAI 官方
      api-key: sk-aN6nWn3fILjrgLFT0fC4Aa60B72e4253826c77B29dC94f17
      base-url: https://api.gptsapi.net
    azure: # OpenAI 微软
      openai:
        endpoint: https://eastusprejade.openai.azure.com
    anthropic: # Anthropic Claude
      api-key: sk-muubv7cXeLw0Etgs743f365cD5Ea44429946Fa7e672d8942
    ollama:
      base-url: http://127.0.0.1:11434
      chat:
        model: llama3
    stabilityai:
      api-key: sk-e53UqbboF8QJCscYvzJscJxJXoFcFg4iJjl1oqgE7baJETmx
    dashscope: # 通义千问
      api-key: sk-47aa124781be4bfb95244cc62f6xxxx
    minimax: # Minimax:https://www.minimaxi.com/
      api-key: xxxx
    moonshot: # 月之暗灭(KIMI)
      api-key: sk-abc
    deepseek: # DeepSeek
      api-key: sk-e94db327cc7d457d99a8de8810fc6b12
      chat:
        options:
          model: deepseek-chat
    model:
      rerank: false # 是否开启“通义千问”的 Rerank 模型,填写 dashscope 开启
    mcp:
      server:
        enabled: false
        name: jszj-mcp-server
        version: 1.0.0
        instructions: 一个 MCP 示例服务
        sse-endpoint: /sse
      client:
        enabled: false
        name: mcp
        sse:
          connections:
            filesystem:
              url: http://127.0.0.1:8089
              sse-endpoint: /sse

jszj:
  ai:
    gemini: # 谷歌 Gemini
      enable: true
      api-key: AIzaSyAVoBxgoFvvte820vEQMma2LKBnC98bqMQ
      model: gemini-2.5-flash
    doubao: # 字节豆包
      enable: true
      api-key: 5c1b5747-26d2-4ebd-a4e0-dd0e8d8b4272
      model: doubao-1-5-lite-32k-250115
    hunyuan: # 腾讯混元
      enable: true
      api-key: sk-abc
      model: hunyuan-turbo
    siliconflow: # 硅基流动
      enable: true
      api-key: sk-epsakfenqnyzoxhmbucsxlhkdqlcbnimslqoivkshalvdozz
      model: deepseek-ai/DeepSeek-R1-Distill-Qwen-7B
    xinghuo: # 讯飞星火
      enable: true
      appKey: 75b161ed2aef4719b275d6e7f2a4d4cd
      secretKey: YWYxYWI2MTA4ODI2NGZlYTQyNjAzZTcz
      model: x1
    baichuan: # 百川智能
      enable: true
      api-key: sk-abc
      model: Baichuan4-Turbo
    midjourney:
      enable: true
  #    base-url: https://api.holdai.top/mj-relax/mj
      base-url: https://api.holdai.top/mj
      api-key: sk-dZEPiVaNcT3FHhef51996bAa0bC74806BeAb620dA5Da10Bf
      notify-url: http://java.nat300.top/admin-api/ai/image/midjourney/notify
    suno:
      enable: true
  #    base-url: https://suno-55ishh05u-status2xxs-projects.vercel.app
      base-url: http://127.0.0.1:3001
    web-search:
      enable: true
      api-key: sk-40500e52840f4d24b956d0b1d80d9abe

--- #################### 芋道相关配置 ####################

jszj:
  info:
    version: 1.0.0
    base-package: com.mmwzcloud.jszj
  web:
    admin-ui:
      url: http://dashboard.jszj.iocoder.cn # Admin 管理后台 UI 的地址
  xss:
    enable: false
    exclude-urls: # 如下两个 url,仅仅是为了演示,去掉配置也没关系
      - ${spring.boot.admin.context-path}/** # 不处理 Spring Boot Admin 的请求
      - ${management.endpoints.web.base-path}/** # 不处理 Actuator 的请求
  security:
    permit-all_urls:
      - /admin-api/mp/open/** # 微信公众号开放平台,微信回调接口,不需要登录
  api-encrypt:
    enable: true # 是否开启 API 加密
    algorithm: AES # 加密算法,支持 AES、RSA 等
    request-key: 52549111389893486934626385991395 # 【AES 案例】请求加密的秘钥,,必须 16、24、32 位
    response-key: 96103715984234343991809655248883 # 【AES 案例】响应加密的秘钥,AES 案例,必须 16、24、32 位
#    request-key: MIICdwIBADANBgkqhkiG9w0BAQEFAASCAmEwggJdAgEAAoGBAKWzasimcZ1icsWDPVdTXcZs1DkOWjI+m9bTQU8aOqflnomkr6QO1WWeSHBHzuJGsTlV/ZY2pFfq/NstKC94hBjx7yioYJvzb2bKN/Uy4j5nM3iCF//u0RiFkkY8j0Bt/EWoFTOb6RHf8cHIAjbYYtP3pYzbpCIwryfe0g//KIuzAgMBAAECgYADDjZrYcpZjR2xr7RbXmGtzYbyUGXwZEAqa3XaWBD51J2iSyOkAlQEDjGmxGQ3vvb4qDHHadWI+3/TKNeDXJUO+xTVJrnismK5BsHyC6dfxlIK/5BAuknryTca/3UoA1yomS9ZlF3Q0wcecaDoEnSmZEaTrp9T3itPAz4KnGjv5QJBAN5mNcfu6iJ5ktNvEdzqcxkKwbXb9Nq1SLnmTvt+d5TPX7eQ9fCwtOfVu5iBLhhZzb5PJ7pSN3Zt6rl5/jPOGv0CQQC+vETX9oe1wbxZSv6/RBGy0Xow6GndbJwvd89PcAJ2h+OJXWtg/rRHB3t9EQm7iis0XbZTapj19E4U6l8EibhvAkEA1CvYpRwmHKu1SqdM+GBnW/2qHlBwwXJvpoK02TOm674HR/4w0+YRQJfkd7LOAgcyxJuJgDTNmtt0MmzS+iNoFQJAMVSUIZ77XoDq69U/qcw7H5qaFcgmiUQr6QL9tTftCyb+LGri+MUnby96OtCLSdvkbLjIDS8GvKYhA7vSM2RDNQJBAKGyVVnFFIrbK3yuwW71yvxQEGoGxlgvZSezZ4vGgqTxrr9HvAtvWLwR6rpe6ybR/x8uUtoW7NRBWgpiIFwjvY4= # 【RSA 案例】请求解密的私钥
#    response-key: MIGfMA0GCSqGSIb3DQEBAQUAA4GNADCBiQKBgQDh/CHyBcS/zEfVyINVA7+c9Xxl0CPdxPMK1OIjxaLy/7BLfbkoEpI8onQtjuzfpuxCraDem9bu3BMF0pMH95HytI3Vi0kGjaV+WLIalwgc2w37oA2sbsmKzQOP7SDLO5s2QJNAD7kVwd+Q5rqaLu2MO0xVv+0IUJhn83hClC0L5wIDAQAB # 【RSA 案例】响应加密的公钥
  websocket:
    enable: true # websocket的开关
    path: /infra/ws # 路径
    sender-type: local # 消息发送的类型,可选值为 local、redis、rocketmq、kafka、rabbitmq
    sender-rocketmq:
      topic: ${spring.application.name}-websocket # 消息发送的 RocketMQ Topic
      consumer-group: ${spring.application.name}-websocket-consumer # 消息发送的 RocketMQ Consumer Group
    sender-rabbitmq:
      exchange: ${spring.application.name}-websocket-exchange # 消息发送的 RabbitMQ Exchange
      queue: ${spring.application.name}-websocket-queue # 消息发送的 RabbitMQ Queue
    sender-kafka:
      topic: ${spring.application.name}-websocket # 消息发送的 Kafka Topic
      consumer-group: ${spring.application.name}-websocket-consumer # 消息发送的 Kafka Consumer Group
  swagger:
    title: 芋道快速开发平台
    description: 提供管理后台、用户 App 的所有功能
    version: ${jszj.info.version}
    url: ${jszj.web.admin-ui.url}
    email: xingyu4j@vip.qq.com
    license: MIT
    license-url: https://gitee.com/zhijiantianya/ruoyi-vue-pro/blob/master/LICENSE
  codegen:
    base-package: ${jszj.info.base-package}
    db-schemas: ${spring.datasource.dynamic.datasource.master.name}
    front-type: 20 # 前端模版的类型,参见 CodegenFrontTypeEnum 枚举类
    vo-type: 10 # VO 的类型,参见 CodegenVOTypeEnum 枚举类
    delete-batch-enable: true # 是否生成批量删除接口
    unit-test-enable: false # 是否生成单元测试
  tenant: # 多租户相关配置项
    enable: true
    ignore-urls:
      - /jmreport/* # 积木报表,无法携带租户编号
    #  - /app-api/member/auth/send-sms-code
    ignore-visit-urls:
      - /admin-api/system/user/profile/**
      - /admin-api/system/auth/**
    ignore-tables:
      - pay_app
      - pay_notify_log
      - pay_order
      - pay_order_extension
      - pay_refund
      - pay_transfer
      - member_address
    ignore-caches:
      - user_role_ids
      - permission_menu_ids
      - oauth_client
      - notify_template
      - mail_account
      - mail_template
      - sms_template
      - iot:device
      - iot:thing_model_list
  sms-code: # 短信验证码相关的配置项
    expire-times: 10m
    send-frequency: 1m
    send-maximum-quantity-per-day: 10
    begin-code: 9999 # 这里配置 9999 的原因是,测试方便。
    end-code: 9999 # 这里配置 9999 的原因是,测试方便。
  trade:
    order:
      pay-expire-time: 2h # 支付的过期时间
      receive-expire-time: 14d # 收货的过期时间
      comment-expire-time: 7d # 评论的过期时间
      status-sync-to-wxa-enable: true # 是否同步订单状态到微信小程序
    express:
      client: kd_100
      kd-niao:
        api-key: cb022f1e-48f1-4c4a-a723-9001ac9676b8
        business-id: 1809751
        request-type: 1002 # 免费版 1002;付费版 8001
      kd100:
        key: pLXUGAwK5305
        customer: E77DF18BE109F454A5CD319E44BF5177
  iot:
    message-bus:
      type: redis # 消息总线的类型
  scheduler:
    enabled: true

debug: false
重点需要
  scheduler:
    enabled: true
application-local.yaml
server:
  port: 48080

--- #################### 数据库相关配置 ####################
spring:
  autoconfigure:
    # noinspection SpringBootApplicationYaml
    exclude:
      - org.springframework.boot.autoconfigure.quartz.QuartzAutoConfiguration # 默认 local 环境,不开启 Quartz 的自动配置
      - org.springframework.ai.vectorstore.qdrant.autoconfigure.QdrantVectorStoreAutoConfiguration # 禁用 AI 模块的 Qdrant,手动创建
      - org.springframework.ai.vectorstore.milvus.autoconfigure.MilvusVectorStoreAutoConfiguration # 禁用 AI 模块的 Milvus,手动创建
  # 数据源配置项
  datasource:
    druid: # Druid 【监控】相关的全局配置
      web-stat-filter:
        enabled: true
      stat-view-servlet:
        enabled: true
        allow: # 设置白名单,不填则允许所有访问
        url-pattern: /druid/*
        login-username: # 控制台管理用户名和密码
        login-password:
      filter:
        stat:
          enabled: true
          log-slow-sql: true # 慢 SQL 记录
          slow-sql-millis: 100
          merge-sql: true
        wall:
          config:
            multi-statement-allow: true
    dynamic: # 多数据源配置
      druid: # Druid 【连接池】相关的全局配置
        initial-size: 1 # 初始连接数
        min-idle: 1 # 最小连接池数量
        max-active: 20 # 最大连接池数量
        max-wait: 60000 # 配置获取连接等待超时的时间,单位:毫秒(1 分钟)
        time-between-eviction-runs-millis: 60000 # 配置间隔多久才进行一次检测,检测需要关闭的空闲连接,单位:毫秒(1 分钟)
        min-evictable-idle-time-millis: 600000 # 配置一个连接在池中最小生存的时间,单位:毫秒(10 分钟)
        max-evictable-idle-time-millis: 1800000 # 配置一个连接在池中最大生存的时间,单位:毫秒(30 分钟)
        validation-query: SELECT 1 FROM DUAL # 配置检测连接是否有效
        test-while-idle: true
        test-on-borrow: false
        test-on-return: false
        pool-prepared-statements: true # 是否开启 PreparedStatement 缓存
        max-pool-prepared-statement-per-connection-size: 20 # 每个连接缓存的 PreparedStatement 数量
      primary: master
      datasource:
        master:
          url: jdbc:mysql://test.app.com:3306/ruoyi-vue-pro-dev?useSSL=false&serverTimezone=Asia/Shanghai&allowPublicKeyRetrieval=true&nullCatalogMeansCurrent=true&rewriteBatchedStatements=true # MySQL Connector/J 8.X 连接的示例
          #          url: jdbc:mysql://127.0.0.1:3306/ruoyi-vue-pro?useSSL=true&allowPublicKeyRetrieval=true&useUnicode=true&characterEncoding=UTF-8&serverTimezone=Asia/Shanghai&rewriteBatchedStatements=true # MySQL Connector/J 5.X 连接的示例
          #          url: jdbc:postgresql://127.0.0.1:5432/ruoyi-vue-pro # PostgreSQL 连接的示例
          #          url: jdbc:oracle:thin:@127.0.0.1:1521:xe # Oracle 连接的示例
          #          url: jdbc:sqlserver://127.0.0.1:1433;DatabaseName=ruoyi-vue-pro;SelectMethod=cursor;encrypt=false;rewriteBatchedStatements=true;useUnicode=true;characterEncoding=utf-8 # SQLServer 连接的示例
          #          url: jdbc:dm://127.0.0.1:5236?schema=RUOYI_VUE_PRO # DM 连接的示例
          #          url: jdbc:kingbase8://127.0.0.1:54321/test  # 人大金仓 KingbaseES 连接的示例
          #          url: jdbc:postgresql://127.0.0.1:5432/postgres # OpenGauss 连接的示例
          username: root
          password: 123456
          #          username: sa # SQL Server 连接的示例
          #          password: Jszj@2024 # SQL Server 连接的示例
          #          username: SYSDBA # DM 连接的示例
          #          password: SYSDBA001 # DM 连接的示例
          #          username: root # OpenGauss 连接的示例
          #          password: Jszj@2024 # OpenGauss 连接的示例
        #slave: # 模拟从库,可根据自己需要修改
          #lazy: true # 开启懒加载,保证启动速度
          #url: jdbc:mysql://127.0.0.1:3306/ruoyi-vue-pro?useSSL=false&serverTimezone=Asia/Shanghai&allowPublicKeyRetrieval=true&rewriteBatchedStatements=true&nullCatalogMeansCurrent=true
          #username: root
          #password: 123456
#        tdengine: # IoT 数据库(需要 IoT 物联网再开启噢!)
#          url: jdbc:TAOS-RS://127.0.0.1:6041/ruoyi_vue_pro
#          driver-class-name: com.taosdata.jdbc.rs.RestfulDriver
#          username: root
#          password: taosdata
#          druid:
#            validation-query: SELECT SERVER_STATUS() # TDengine 数据源的有效性检查 SQL

  # Redis 配置。Redisson 默认的配置足够使用,一般不需要进行调优
  data:
    redis:
      host: 127.0.0.1 # 地址
      port: 6379 # 端口
      database: 2 # 数据库索引
#      password: dev # 密码,建议生产环境开启

--- #################### 定时任务相关配置 ####################

# Quartz 配置项,对应 QuartzProperties 配置类
spring:
  quartz:
    auto-startup: true # 本地开发环境,尽量不要开启 Job
    scheduler-name: schedulerName # Scheduler 名字。默认为 schedulerName
    job-store-type: jdbc # Job 存储器类型。默认为 memory 表示内存,可选 jdbc 使用数据库。
    wait-for-jobs-to-complete-on-shutdown: true # 应用关闭时,是否等待定时任务执行完成。默认为 false ,建议设置为 true
    properties: # 添加 Quartz Scheduler 附加属性,更多可以看 http://www.quartz-scheduler.org/documentation/2.4.0-SNAPSHOT/configuration.html 文档
      org:
        quartz:
          # Scheduler 相关配置
          scheduler:
            instanceName: schedulerName
            instanceId: AUTO # 自动生成 instance ID
          # JobStore 相关配置
          jobStore:
            # JobStore 实现类。可见博客:https://blog.csdn.net/weixin_42458219/article/details/122247162
            class: org.springframework.scheduling.quartz.LocalDataSourceJobStore
            isClustered: true # 是集群模式
            clusterCheckinInterval: 15000 # 集群检查频率,单位:毫秒。默认为 15000,即 15 秒
            misfireThreshold: 60000 # misfire 阀值,单位:毫秒。
          # 线程池相关配置
          threadPool:
            threadCount: 25 # 线程池大小。默认为 10 。
            threadPriority: 5 # 线程优先级
            class: org.quartz.simpl.SimpleThreadPool # 线程池类型
    jdbc: # 使用 JDBC 的 JobStore 的时候,JDBC 的配置
      initialize-schema: NEVER # 是否自动使用 SQL 初始化 Quartz 表结构。这里设置成 never ,我们手动创建表结构。

--- #################### 消息队列相关 ####################

# rocketmq 配置项,对应 RocketMQProperties 配置类
rocketmq:
  name-server: 127.0.0.1:9876 # RocketMQ Namesrv

spring:
  # RabbitMQ 配置项,对应 RabbitProperties 配置类
  rabbitmq:
    host: 127.0.0.1 # RabbitMQ 服务的地址
    port: 5672 # RabbitMQ 服务的端口
    username: rabbit # RabbitMQ 服务的账号
    password: rabbit # RabbitMQ 服务的密码
  # Kafka 配置项,对应 KafkaProperties 配置类
  kafka:
    bootstrap-servers: 127.0.0.1:9092 # 指定 Kafka Broker 地址,可以设置多个,以逗号分隔

--- #################### 服务保障相关配置 ####################

# Lock4j 配置项
lock4j:
  acquire-timeout: 3000 # 获取分布式锁超时时间,默认为 3000 毫秒
  expire: 30000 # 分布式锁的超时时间,默认为 30 毫秒

--- #################### 监控相关配置 ####################

# Actuator 监控端点的配置项
management:
  endpoints:
    web:
      base-path: /actuator # Actuator 提供的 API 接口的根目录。默认为 /actuator
      exposure:
        include: '*' # 需要开放的端点。默认值只打开 health 和 info 两个端点。通过设置 * ,可以开放所有端点。

# Spring Boot Admin 配置项
spring:
  boot:
    admin:
      # Spring Boot Admin Client 客户端的相关配置
      client:
        url: http://127.0.0.1:${server.port}/${spring.boot.admin.context-path} # 设置 Spring Boot Admin Server 地址
        instance:
          service-host-type: IP # 注册实例时,优先使用 IP [IP, HOST_NAME, CANONICAL_HOST_NAME]
      # Spring Boot Admin Server 服务端的相关配置
      context-path: /admin # 配置 Spring

# 日志文件配置
logging:
  file:
    name: ${user.home}/logs/${spring.application.name}.log # 日志文件名,全路径
  level:
    # 配置自己写的 MyBatis Mapper 打印日志
    com.mmwzcloud.jszj.module.bpm.dal.mysql: debug
    com.mmwzcloud.jszj.module.infra.dal.mysql: debug
    com.mmwzcloud.jszj.module.infra.dal.mysql.logger.ApiErrorLogMapper: INFO # 配置 ApiErrorLogMapper 的日志级别为 info,避免和 GlobalExceptionHandler 重复打印
    com.mmwzcloud.jszj.module.infra.dal.mysql.job.JobLogMapper: INFO # 配置 JobLogMapper 的日志级别为 info
    com.mmwzcloud.jszj.module.infra.dal.mysql.file.FileConfigMapper: INFO # 配置 FileConfigMapper 的日志级别为 info
    com.mmwzcloud.jszj.module.pay.dal.mysql: debug
    com.mmwzcloud.jszj.module.pay.dal.mysql.notify.PayNotifyTaskMapper: INFO # 配置 PayNotifyTaskMapper 的日志级别为 info
    com.mmwzcloud.jszj.module.system.dal.mysql: debug
    com.mmwzcloud.jszj.module.system.dal.mysql.sms.SmsChannelMapper: INFO # 配置 SmsChannelMapper 的日志级别为 info
    com.mmwzcloud.jszj.module.tool.dal.mysql: debug
    com.mmwzcloud.jszj.module.member.dal.mysql: debug
    com.mmwzcloud.jszj.module.trade.dal.mysql: debug
    com.mmwzcloud.jszj.module.promotion.dal.mysql: debug
    com.mmwzcloud.jszj.module.statistics.dal.mysql: debug
    com.mmwzcloud.jszj.module.crm.dal.mysql: debug
    com.mmwzcloud.jszj.module.erp.dal.mysql: debug
    com.mmwzcloud.jszj.module.iot.dal.mysql: debug
    com.mmwzcloud.jszj.module.iot.dal.tdengine: DEBUG
    com.mmwzcloud.jszj.module.iot.service.rule: debug
    com.mmwzcloud.jszj.module.ai.dal.mysql: debug
    org.springframework.context.support.PostProcessorRegistrationDelegate: ERROR # TODO 芋艿:先禁用,Spring Boot 3.X 存在部分错误的 WARN 提示
    org.springframework.boot.autoconfigure.quartz: DEBUG
    org.quartz: DEBUG
    org.springframework.scheduling.quartz: DEBUG
    com.mmwzcloud.jszj.framework.quartz.config: DEBUG
debug: false

--- #################### 微信公众号、小程序相关配置 ####################
wx:
  mp: # 公众号配置(必填),参见 https://github.com/Wechat-Group/WxJava/blob/develop/spring-boot-starters/wx-java-mp-spring-boot-starter/README.md 文档
#    app-id: wx041349c6f39b268b # 测试号(牛希尧提供的)
#    secret: 5abee519483bc9f8cb37ce280e814bd0
#    app-id: wx5b23ba7a5589ecbb # 测试号(自己的)
#    secret: 2a7b3b20c537e52e74afd395eb85f61f
    app-id: wxf56b1542b9e85f8a # 测试号(Kongdy 提供的)
    secret: 496379dcef1ba869e9234de8d598cfd3
    # 存储配置,解决 AccessToken 的跨节点的共享
    config-storage:
      type: RedisTemplate # 采用 RedisTemplate 操作 Redis,会自动从 Spring 中获取
      key-prefix: wx # Redis Key 的前缀
      http-client-type: HttpClient # 采用 HttpClient 请求微信公众号平台
  miniapp: # 小程序配置(必填),参见 https://github.com/Wechat-Group/WxJava/blob/develop/spring-boot-starters/wx-java-miniapp-spring-boot-starter/README.md 文档
    #    appid: wx62056c0d5e8db250 # 测试号(牛希尧提供的)
    #    secret: 333ae72f41552af1e998fe1f54e1584a
#    appid: wx63c280fe3248a3e7 # wenhualian的接口测试号
#    secret: 6f270509224a7ae1296bbf1c8cb97aed
    appid: wxc4598c446f8a9cb3 # 测试号(Kongdy 提供的)
    secret: 4a1a04e07f6a4a0751b39c3064a92c8b
#    appid: wx66186af0759f47c9 # 测试号(puhui 提供的)
#    secret: 3218bcbd112cbc614c7264ceb20144ac
    config-storage:
      type: RedisTemplate # 采用 RedisTemplate 操作 Redis,会自动从 Spring 中获取
      key-prefix: wa # Redis Key 的前缀
      http-client-type: HttpClient # 采用 HttpClient 请求微信公众号平台

--- #################### 芋道相关配置 ####################

# 芋道配置项,设置当前项目所有自定义的配置
jszj:
  captcha:
    enable: false # 本地环境,暂时关闭图片验证码,方便登录等接口的测试;
  security:
    mock-enable: true
  pay:
    order-notify-url: https://yutou.mynatapp.cc/admin-api/pay/notify/order # 支付渠道的【支付】回调地址
    refund-notify-url: https://yutou.mynatapp.cc/admin-api/pay/notify/refund # 支付渠道的【退款】回调地址
    transfer-notify-url: https://yutou.mynatapp.cc/admin-api/pay/notify/transfer # 支付渠道的【转账】回调地址
  access-log: # 访问日志的配置项
    enable: false
  demo: false # 关闭演示模式
  wxa-code:
    env-version: develop # 小程序版本: 正式版为 "release";体验版为 "trial";开发版为 "develop"
  wxa-subscribe-message:
    miniprogram-state: developer # 跳转小程序类型:开发版为 “developer”;体验版为 “trial”为;正式版为 “formal”
  tencent-lbs-key: TVDBZ-TDILD-4ON4B-PFDZA-RNLKH-VVF6E # QQ 地图的密钥 https://lbs.qq.com/service/staticV2/staticGuide/staticDoc

justauth:
  enabled: true
  type:
    DINGTALK: # 钉钉
      client-id: dingvrnreaje3yqvzhxg
      client-secret: i8E6iZyDvZj51JIb0tYsYfVQYOks9Cq1lgryEjFRqC79P3iJcrxEwT6Qk2QvLrLI
      ignore-check-redirect-uri: true
    WECHAT_ENTERPRISE: # 企业微信
      client-id: wwd411c69a39ad2e54
      client-secret: 1wTb7hYxnpT2TUbIeHGXGo7T0odav1ic10mLdyyATOw
      agent-id: 1000004
      ignore-check-redirect-uri: true
    # noinspection SpringBootApplicationYaml
    WECHAT_MINI_PROGRAM: # 微信小程序
      client-id: ${wx.miniapp.appid}
      client-secret: ${wx.miniapp.secret}
      ignore-check-redirect-uri: true
      ignore-check-state: true # 微信小程序,不会使用到 state,所以不进行校验
    WECHAT_MP: # 微信公众号
      client-id: ${wx.mp.app-id}
      client-secret: ${wx.mp.secret}
      ignore-check-redirect-uri: true
  cache:
    type: REDIS
    prefix: 'social_auth_state:' # 缓存前缀,目前只对 Redis 缓存生效,默认 JUSTAUTH::STATE::
    timeout: 24h # 超时时长,目前只对 Redis 缓存生效,默认 3 分钟
重点是 spring.quartz 下的配置
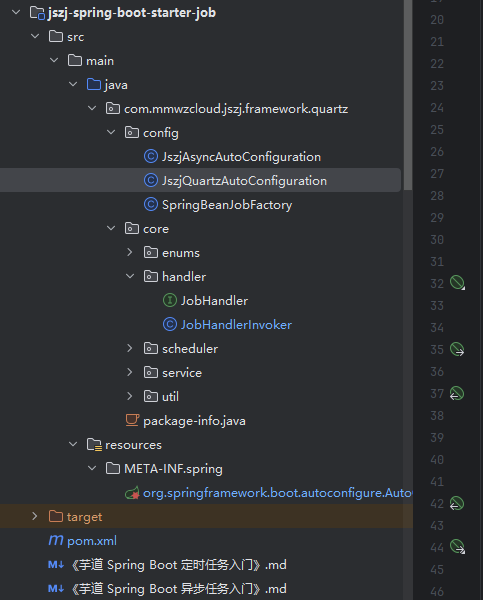
JszjQuartzAutoConfiguration.java
package com.mmwzcloud.jszj.framework.quartz.config;

import com.mmwzcloud.jszj.framework.quartz.core.scheduler.SchedulerManager;
import lombok.extern.slf4j.Slf4j;
import org.quartz.Scheduler;
import org.quartz.SchedulerException;
import org.quartz.impl.StdSchedulerFactory;
import org.springframework.beans.factory.annotation.Autowired;
import org.springframework.beans.factory.annotation.Qualifier;
import org.springframework.boot.autoconfigure.AutoConfiguration;
import org.springframework.boot.autoconfigure.condition.ConditionalOnMissingBean;
import org.springframework.boot.autoconfigure.condition.ConditionalOnProperty;
import org.springframework.boot.autoconfigure.quartz.QuartzProperties;
import org.springframework.boot.context.properties.EnableConfigurationProperties;
import org.springframework.context.annotation.Bean;
import org.springframework.scheduling.annotation.EnableScheduling;
import org.springframework.scheduling.quartz.SchedulerFactoryBean;

import javax.sql.DataSource;
import java.util.Map;
import java.util.Optional;
import java.util.Properties;

/**
 * 定时任务 Configuration
 */
@AutoConfiguration
@EnableScheduling // 开启 Spring 自带的定时任务
@Slf4j
@ConditionalOnProperty(prefix = "jszj.scheduler", name = "enabled", havingValue = "true")
@EnableConfigurationProperties(QuartzProperties.class)
public class JszjQuartzAutoConfiguration {

    @Autowired()
    private DataSource dataSource;

    @Bean
    public SpringBeanJobFactory springBeanJobFactory() {
        return new SpringBeanJobFactory();
    }

    @Bean
    @ConditionalOnMissingBean(Scheduler.class)
    public Scheduler scheduler(QuartzProperties quartzProperties,SpringBeanJobFactory springBeanJobFactory) throws Exception {
        // 手动创建 SchedulerFactoryBean
        SchedulerFactoryBean factory = new SchedulerFactoryBean();

        // 配置属性
        Properties props = new Properties();
        Map<String, String> properties = quartzProperties.getProperties();
        props.putAll(properties);
        factory.setQuartzProperties(props);

        factory.setDataSource(dataSource);
        factory.setJobFactory(springBeanJobFactory);
        factory.setAutoStartup(quartzProperties.isAutoStartup());
        factory.setWaitForJobsToCompleteOnShutdown(quartzProperties.isWaitForJobsToCompleteOnShutdown());
        factory.setOverwriteExistingJobs(quartzProperties.isOverwriteExistingJobs());

        // 初始化
        factory.afterPropertiesSet();
        Scheduler scheduler = factory.getScheduler();
        scheduler.start();
        System.out.println("✅ 手动创建 Scheduler Bean 成功");
        return scheduler;
    }

    @Bean
    public SchedulerManager schedulerManager(Optional<Scheduler> scheduler) {
        if (!scheduler.isPresent()) {
            log.info("[定时任务 - 已禁用][参考 https://doc.iocoder.cn/job/ 开启]");
            return new SchedulerManager(null);
        }
        return new SchedulerManager(scheduler.get());
    }


    /*@Bean
    public SchedulerManager schedulerManager(Scheduler scheduler) {
        *//*if (!scheduler.isPresent()) {
            log.info("[定时任务 - 已禁用][参考 https://doc.iocoder.cn/job/ 开启]");
            return new SchedulerManager(null);
        }
        return new SchedulerManager(scheduler.get());*//*
        return new SchedulerManager(null);
    }*/

}
SpringBeanJobFactory.java
package com.mmwzcloud.jszj.framework.quartz.config;

import org.quartz.spi.TriggerFiredBundle;
import org.springframework.beans.factory.annotation.Autowired;
import org.springframework.beans.factory.config.AutowireCapableBeanFactory;
import org.springframework.scheduling.quartz.AdaptableJobFactory;

public class SpringBeanJobFactory extends AdaptableJobFactory {
    @Autowired
    private AutowireCapableBeanFactory beanFactory;

    @Override
    protected Object createJobInstance(TriggerFiredBundle bundle) throws Exception {
        Object jobInstance = super.createJobInstance(bundle);
        // 注入 Spring 依赖
        beanFactory.autowireBean(jobInstance);
        return jobInstance;
    }
}
至此,可以在后台管理定时任务中,创建任务和执行一次操作了
更多推荐

 3
3 0
0- 0


 已为社区贡献10条内容

所有评论(0)