
three.js中怎么加载 .gltf/glb格式 文件
-
3D编辑器格式 用于特定应用程序(主要是3D编辑器):. .blend (Blender), .max (3d Studio Max), .mb and .ma (Maya), etc...
-
交换格式 有.OBJ, .DAE (Collada), .FBX.等格式。它们被设计出来用于3D编辑器之间交换信息的。因此,它们通常比所需的大得多(内含3D编辑器内所需要的信息)。
-
应用程序格式 用于特定的应用程序:游戏
-
传输格式 gLTF可能是第一个真正意义上的传输格式。我猜想VRML可能会被认为是第一个,但是VRML实际上是个相当糟的格式。 这是gLTF被设计出来擅长做的一些事情,其他格式没有的
-
体积小,适合用于传输 例如:这意味着大量它们的大数据量的数据,像顶点(vertices),被存为二进制格式。当你下载.gLTF格式文件后,可以将它零处理的传入GPU。这是它准备好的。相比较之下,VRML, .OBJ, or .DAE 这些格式 顶点(vertices)的存储和解析都是通过文本(text)。 文本存储的顶点位置(vertex positions)大约有二进制存储的3倍到5倍大。
-
易于被渲染(render) 与其他格式(尤其是应用程序格式)另一个不同是:glTF格式文件中的数据,意味着是用于渲染(render)的,而不是用于编辑的。对渲染不重要的那部分数据大都被删除了。多边形被转为三角形。材质有其应该有的值,可以在任何地方运行。
gLTF是被特别设计的。因此你应该能轻易下载glTF文件,显示它们,很少出麻烦。祝我们好运,真是这种情况,因为没有其他格式已经能够这样做。
我不确定我要展示什么。在某种程度上加载和显示gLTF文件比.OBJ文件要简单。不像.OBJ文件,材质是格式的一部分。我想我需要至少加载一个.OBJ文件,我遇到的问题可能会提供一些良好的信息
在网上搜索我发现 这个低模城市
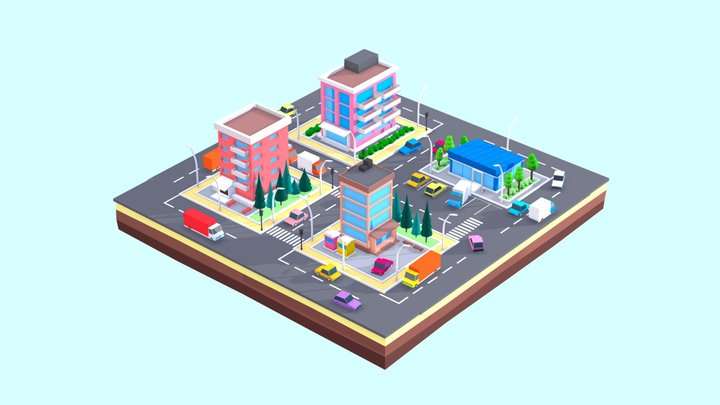
添加图片注释,不超过 140 字(可选)
an example from the .OBJ article从这里开始,我删除了加载.OBJ的代码 ,替换为加载.gLTF的
旧.OBJ代码
-
const mtlLoader = new MTLLoader();
-
mtlLoader.loadMtl('resources/models/windmill/windmill-fixed.mtl', (mtl) => {
-
mtl.preload();
-
mtl.materials.Material.side = THREE.DoubleSide;
-
objLoader.setMaterials(mtl);
-
objLoader.load('resources/models/windmill/windmill.obj', (event) => {
-
const root = event.detail.loaderRootNode;
-
scene.add(root);
-
...
-
});
-
});
新.GLTF代码
-
{
-
const gltfLoader = new GLTFLoader();
-
const url = 'resources/models/cartoon_lowpoly_small_city_free_pack/scene.gltf';
-
gltfLoader.load(url, (gltf) => {
-
const root = gltf.scene;
-
scene.add(root);
-
...
-
});
我像以前一样保持自动框架代码
我们需要包含 GLTFLoader 并删除 OBJLoader.
-
import {LoaderSupport} from 'three/addons/loaders/LoaderSupport.js';
-
import {OBJLoader} from 'three/addons/loaders/OBJLoader.js';
-
import {MTLLoader} from 'three/addons/loaders/MTLLoader.js';
-
import {GLTFLoader} from 'three/addons/loaders/GLTFLoader.js';
像这样运行
神奇吧!它工作了,纹理和其他都工作了。
然后,我想看看我能否给汽车添加绕圈动画(animate),我得检查场景有没有这些汽车的分离的实体,还得检查场景有没有一条路可以用。
我写了一些代码将场景图(scenegraph)打印到 JavaScript console.
打印场景图(scenegraph)代码
-
function dumpObject(obj, lines = [], isLast = true, prefix = '') {
-
const localPrefix = isLast ? '└─' : '├─';
-
lines.push(${prefix}${prefix ? localPrefix : ''}${obj.name || '*no-name*'} [${obj.type}]);
-
const newPrefix = prefix + (isLast ? ' ' : '│ ');
-
const lastNdx = obj.children.length - 1;
-
obj.children.forEach((child, ndx) => {
-
const isLast = ndx === lastNdx;
-
dumpObject(child, lines, isLast, newPrefix);
-
});
-
return lines;
-
}
我将在场景加载完时调用
-
const gltfLoader = new GLTFLoader();
-
gltfLoader.load('resources/models/cartoon_lowpoly_small_city_free_pack/scene.gltf', (gltf) => {
-
const root = gltf.scene;
-
scene.add(root);
-
console.log(dumpObject(root).join('\n'));
Running that 获得清单
-
OSG_Scene [Scene]
-
└─RootNode_(gltf_orientation_matrix) [Object3D]
-
└─RootNode_(model_correction_matrix) [Object3D]
-
└─4d4100bcb1c640e69699a87140df79d7fbx [Object3D]
-
└─RootNode [Object3D]
-
│ ...
-
├─Cars [Object3D]
-
│ ├─CAR_03_1 [Object3D]
-
│ │ └─CAR_03_1_World_ap_0 [Mesh]
-
│ ├─CAR_03 [Object3D]
-
│ │ └─CAR_03_World_ap_0 [Mesh]
-
│ ├─Car_04 [Object3D]
-
│ │ └─Car_04_World_ap_0 [Mesh]
-
│ ├─CAR_03_2 [Object3D]
-
│ │ └─CAR_03_2_World_ap_0 [Mesh]
-
│ ├─Car_04_1 [Object3D]
-
│ │ └─Car_04_1_World_ap_0 [Mesh]
-
│ ├─Car_04_2 [Object3D]
-
│ │ └─Car_04_2_World_ap_0 [Mesh]
-
│ ├─Car_04_3 [Object3D]
-
│ │ └─Car_04_3_World_ap_0 [Mesh]
-
│ ├─Car_04_4 [Object3D]
-
│ │ └─Car_04_4_World_ap_0 [Mesh]
-
│ ├─Car_08_4 [Object3D]
-
│ │ └─Car_08_4_World_ap8_0 [Mesh]
-
│ ├─Car_08_3 [Object3D]
-
│ │ └─Car_08_3_World_ap9_0 [Mesh]
-
│ ├─Car_04_1_2 [Object3D]
-
│ │ └─Car_04_1_2_World_ap_0 [Mesh]
-
│ ├─Car_08_2 [Object3D]
-
│ │ └─Car_08_2_World_ap11_0 [Mesh]
-
│ ├─CAR_03_1_2 [Object3D]
-
│ │ └─CAR_03_1_2_World_ap_0 [Mesh]
-
│ ├─CAR_03_2_2 [Object3D]
-
│ │ └─CAR_03_2_2_World_ap_0 [Mesh]
-
│ ├─Car_04_2_2 [Object3D]
-
│ │ └─Car_04_2_2_World_ap_0 [Mesh]
-
...
从这里我们可以看到所有的汽车,都在它们父节点"Cars"中
-
├─Cars [Object3D]
-
│ ├─CAR_03_1 [Object3D]
-
│ │ └─CAR_03_1_World_ap_0 [Mesh]
-
│ ├─CAR_03 [Object3D]
-
│ │ └─CAR_03_World_ap_0 [Mesh]
-
│ ├─Car_04 [Object3D]
-
│ │ └─Car_04_World_ap_0 [Mesh]
做一个简单的测试,我尝试将这些"Cars"节点的子节点绕它们的Y轴旋转。
在加载场景后,我查找了“Cars”节点并保存了结果。
-
let cars;
-
{
-
const gltfLoader = new GLTFLoader();
-
gltfLoader.load('resources/models/cartoon_lowpoly_small_city_free_pack/scene.gltf', (gltf) => {
-
const root = gltf.scene;
-
scene.add(root);
-
cars = root.getObjectByName('Cars');
然后在render render函数中我们可以设置carsCars每个子节点旋转。
-
function render(time) {
-
time *= 0.001; // convert to seconds
-
if (resizeRendererToDisplaySize(renderer)) {
-
const canvas = renderer.domElement;
-
camera.aspect = canvas.clientWidth / canvas.clientHeight;
-
camera.updateProjectionMatrix();
-
}
-
if (cars) {
-
for (const car of cars.children) {
-
car.rotation.y = time;
-
}
-
}
-
renderer.render(scene, camera);
-
requestAnimationFrame(render);
-
}
于是我们得到
click here to open in a separate window
呃~,看起来很不幸,这场景没有设计汽车动画,因为他们当初不是用于此目的的。这卡车在错误的方向旋转。
这引出一个很重要的点,当你把东西做成3D时,你需要预先计划并设计你的资源(assets),让它们拥有能正确使用的初始功能。所以它们应该有正确的比例...
因为我不是艺术家,我不懂blender,我只能hack这个例子。我们将把每辆车,和它们的父节点,放到另一个 Object3D. 我们将移动这些 Object3D 的对象去移动车,但是我们可以设置汽车的原始Object3D 重新定位它,所以它是关于我们真正需要的地方。
回顾下场景图(scene graph)看起来只有三种车,Car_08", "CAR_03", and "Car_04"。每种汽车都会使用相同的调整。
我给每个汽车都写了代码,将它们的父节点换成新的 Object3D, 将新 Object3D 添加到场景, 应用于每种 类型的车的设置,修正它的朝向。 增加新的 Object3D a cars array.
-
let cars;
-
const cars = [];
-
{
-
const gltfLoader = new GLTFLoader();
-
gltfLoader.load('resources/models/cartoon_lowpoly_small_city_free_pack/scene.gltf', (gltf) => {
-
const root = gltf.scene;
-
scene.add(root);
-
cars = root.getObjectByName('Cars');
-
const loadedCars = root.getObjectByName('Cars');
-
const fixes = [
-
{ prefix: 'Car_08', rot: [Math.PI * .5, 0, Math.PI * .5], },
-
{ prefix: 'CAR_03', rot: [0, Math.PI, 0], },
-
{ prefix: 'Car_04', rot: [0, Math.PI, 0], },
-
];
-
root.updateMatrixWorld();
-
for (const car of loadedCars.children.slice()) {
-
const fix = fixes.find(fix => car.name.startsWith(fix.prefix));
-
const obj = new THREE.Object3D();
-
car.getWorldPosition(obj.position);
-
car.position.set(0, 0, 0);
-
car.rotation.set(...fix.rot);
-
obj.add(car);
-
scene.add(obj);
-
cars.push(obj);
-
}
-
...
这些修正朝向的车
click here to open in a separate window
现在让我们驾驶着它们绕圈
制作一个简单的驾驶系统对这篇文章来说太多了,但作为代替我们可以做一个基于所有道路做一个弯曲路径,然后放置车到路上。下面的图是blender创建的路径。
上传失败
我需要一种方式在Blender之外花去路径数据的方法 幸运的是,我能选择我的路径并通过"write nurbs"导出.OBJ

添加图片注释,不超过 140 字(可选)
打开.OBJ文件我能够获取点列表,我格式化后
-
const controlPoints = [
-
[1.118281, 5.115846, -3.681386],
-
[3.948875, 5.115846, -3.641834],
-
[3.960072, 5.115846, -0.240352],
-
[3.985447, 5.115846, 4.585005],
-
[-3.793631, 5.115846, 4.585006],
-
[-3.826839, 5.115846, -14.736200],
-
[-14.542292, 5.115846, -14.765865],
-
[-14.520929, 5.115846, -3.627002],
-
[-5.452815, 5.115846, -3.634418],
-
[-5.467251, 5.115846, 4.549161],
-
[-13.266233, 5.115846, 4.567083],
-
[-13.250067, 5.115846, -13.499271],
-
[4.081842, 5.115846, -13.435463],
-
[4.125436, 5.115846, -5.334928],
-
[-14.521364, 5.115846, -5.239871],
-
[-14.510466, 5.115846, 5.486727],
-
[5.745666, 5.115846, 5.510492],
-
[5.787942, 5.115846, -14.728308],
-
[-5.423720, 5.115846, -14.761919],
-
[-5.373599, 5.115846, -3.704133],
-
[1.004861, 5.115846, -3.641834],
-
];
THREE.js有几个曲线(curve)的类。 CatmullRomCurve3 那种曲线的事情是尝试通过这些点进行平滑的曲线
事实上直接提供这些点会生成这样的曲线
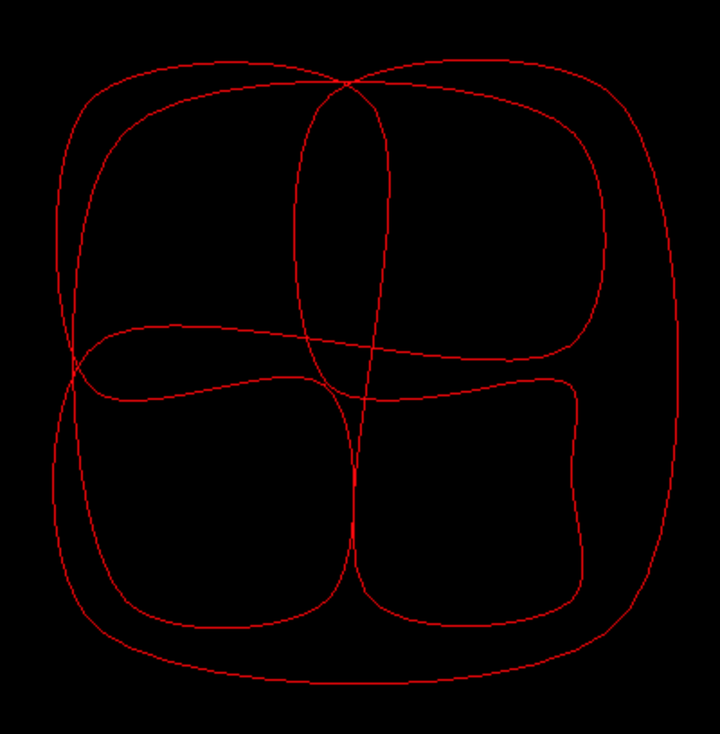
添加图片注释,不超过 140 字(可选)
但是,我想要更尖锐的转角。如果我们计算了一些额外的点,我们可以得到我们想要的东西。 每两对点之间,我们需要在两点之间的10%处和90%处计算额外的两个点,并将它们传递给 CatmullRomCurve3.
这会得到这样的曲线
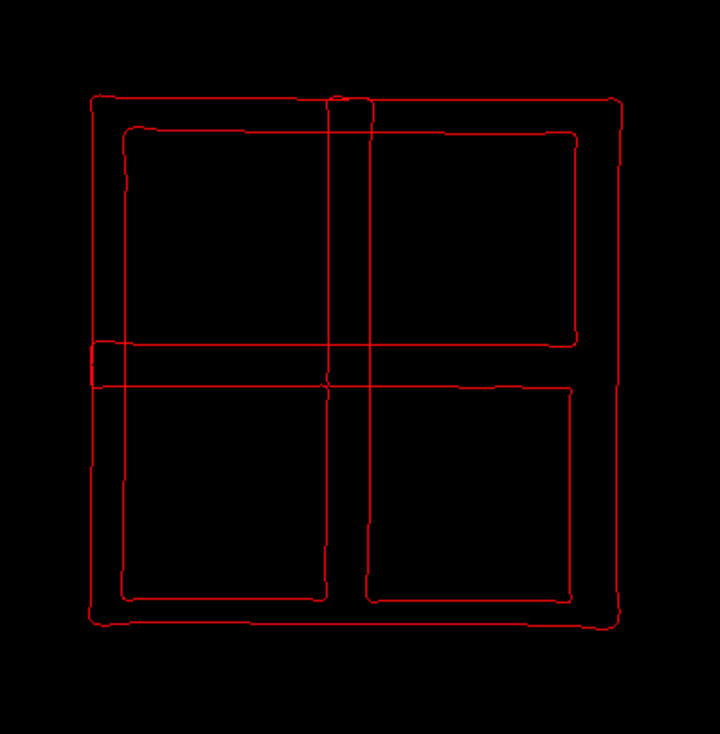
添加图片注释,不超过 140 字(可选)
曲线代码
-
let curve;
-
let curveObject;
-
{
-
const controlPoints = [
-
[1.118281, 5.115846, -3.681386],
-
[3.948875, 5.115846, -3.641834],
-
[3.960072, 5.115846, -0.240352],
-
[3.985447, 5.115846, 4.585005],
-
[-3.793631, 5.115846, 4.585006],
-
[-3.826839, 5.115846, -14.736200],
-
[-14.542292, 5.115846, -14.765865],
-
[-14.520929, 5.115846, -3.627002],
-
[-5.452815, 5.115846, -3.634418],
-
[-5.467251, 5.115846, 4.549161],
-
[-13.266233, 5.115846, 4.567083],
-
[-13.250067, 5.115846, -13.499271],
-
[4.081842, 5.115846, -13.435463],
-
[4.125436, 5.115846, -5.334928],
-
[-14.521364, 5.115846, -5.239871],
-
[-14.510466, 5.115846, 5.486727],
-
[5.745666, 5.115846, 5.510492],
-
[5.787942, 5.115846, -14.728308],
-
[-5.423720, 5.115846, -14.761919],
-
[-5.373599, 5.115846, -3.704133],
-
[1.004861, 5.115846, -3.641834],
-
];
-
const p0 = new THREE.Vector3();
-
const p1 = new THREE.Vector3();
-
curve = new THREE.CatmullRomCurve3(
-
controlPoints.map((p, ndx) => {
-
p0.set(...p);
-
p1.set(...controlPoints[(ndx + 1) % controlPoints.length]);
-
return [
-
(new THREE.Vector3()).copy(p0),
-
(new THREE.Vector3()).lerpVectors(p0, p1, 0.1),
-
(new THREE.Vector3()).lerpVectors(p0, p1, 0.9),
-
];
-
}).flat(),
-
true,
-
);
-
{
-
const points = curve.getPoints(250);
-
const geometry = new THREE.BufferGeometry().setFromPoints(points);
-
const material = new THREE.LineBasicMaterial({color: 0xff0000});
-
curveObject = new THREE.Line(geometry, material);
-
scene.add(curveObject);
-
}
-
}
代码第一部分是创建了曲线。 代码第二部分是从曲线生成了250个点,然后创建了一个对象来显示这些点连起来的线。
运行 the example 我没有看见曲线。 为了让它可见我关闭了深度测试,并最后渲染它
-
curveObject = new THREE.Line(geometry, material);
-
material.depthTest = false;
-
curveObject.renderOrder = 1;
我发现路线实在太小了
上传失败
检查Blender中的层次结构我发现艺术家缩放了节点所有汽车。
上传失败
缩放对于实时3D应用程序是十分糟糕的。这会到这各种各样的问题,并且会以无休止的沮丧结束。 艺术家经常不知道这些,因为在3D编辑程序中缩放整个场景是非常容易的。 但是,如果你决定要做实时3D应用程序,我建议要求你的艺术家/设计人员不要缩放任何东西。 如果他们修改了scale,他们必须找到一种方式应用于缩放后的顶点。这样你就能,在导入程序后不用管缩放了。
还有, 不仅是缩放, 在这个例子中,车辆是通过父节点缩放,偏移的。 Cars 节点. 这将让在世界空间中实时移动车辆变得非常困难。 清楚地说,这个例子中,我们能希望车辆绕着世界空间开,这就会带来问题。 如果有些东西地数据处理在局部空间,如月球绕着地球转,就很少带来问题。
回到我写地打印场景图地方法。 让我们每个节点打印 位置, 旋转, 缩放 。
-
function dumpVec3(v3, precision = 3) {
-
return ${v3.x.toFixed(precision)}, ${v3.y.toFixed(precision)}, ${v3.z.toFixed(precision)};
-
}
-
function dumpObject(obj, lines, isLast = true, prefix = '') {
-
const localPrefix = isLast ? '└─' : '├─';
-
lines.push(${prefix}${prefix ? localPrefix : ''}${obj.name || '*no-name*'} [${obj.type}]);
-
const dataPrefix = obj.children.length
-
? (isLast ? ' │ ' : '│ │ ')
-
: (isLast ? ' ' : '│ ');
-
lines.push(${prefix}${dataPrefix} pos: ${dumpVec3(obj.position)});
-
lines.push(${prefix}${dataPrefix} rot: ${dumpVec3(obj.rotation)});
-
lines.push(${prefix}${dataPrefix} scl: ${dumpVec3(obj.scale)});
-
const newPrefix = prefix + (isLast ? ' ' : '│ ');
-
const lastNdx = obj.children.length - 1;
-
obj.children.forEach((child, ndx) => {
-
const isLast = ndx === lastNdx;
-
dumpObject(child, lines, isLast, newPrefix);
-
});
-
return lines;
-
}
运行的结果
-
OSG_Scene [Scene]
-
│ pos: 0.000, 0.000, 0.000
-
│ rot: 0.000, 0.000, 0.000
-
│ scl: 1.000, 1.000, 1.000
-
└─RootNode_(gltf_orientation_matrix) [Object3D]
-
│ pos: 0.000, 0.000, 0.000
-
│ rot: -1.571, 0.000, 0.000
-
│ scl: 1.000, 1.000, 1.000
-
└─RootNode_(model_correction_matrix) [Object3D]
-
│ pos: 0.000, 0.000, 0.000
-
│ rot: 0.000, 0.000, 0.000
-
│ scl: 1.000, 1.000, 1.000
-
└─4d4100bcb1c640e69699a87140df79d7fbx [Object3D]
-
│ pos: 0.000, 0.000, 0.000
-
│ rot: 1.571, 0.000, 0.000
-
│ scl: 1.000, 1.000, 1.000
-
└─RootNode [Object3D]
-
│ pos: 0.000, 0.000, 0.000
-
│ rot: 0.000, 0.000, 0.000
-
│ scl: 1.000, 1.000, 1.000
-
├─Cars [Object3D]
-
│ │ pos: -369.069, -90.704, -920.159
-
│ │ rot: 0.000, 0.000, 0.000
-
│ │ scl: 1.000, 1.000, 1.000
-
│ ├─CAR_03_1 [Object3D]
-
│ │ │ pos: 22.131, 14.663, -475.071
-
│ │ │ rot: -3.142, 0.732, 3.142
-
│ │ │ scl: 1.500, 1.500, 1.500
-
│ │ └─CAR_03_1_World_ap_0 [Mesh]
-
│ │ pos: 0.000, 0.000, 0.000
-
│ │ rot: 0.000, 0.000, 0.000
-
│ │ scl: 1.000, 1.000, 1.000
这向我们展示了原始场景中的 Cars 已移除其旋转和缩放并应用于其子节点。 这表明用于创建 .GLTF 文件的导出器在这里做了一些特殊的处理,或者艺术家更可能导出了与相应 .blend 文件不同的文件版本,这就是它们不匹配的原因。
这意味着,我可能需要亲自下载这个.blend文件并导出它。导出它之前,我需要检查所有主要节点,并移除它的任何变换。
顶部的所有节点
-
OSG_Scene [Scene]
-
│ pos: 0.000, 0.000, 0.000
-
│ rot: 0.000, 0.000, 0.000
-
│ scl: 1.000, 1.000, 1.000
-
└─RootNode_(gltf_orientation_matrix) [Object3D]
-
│ pos: 0.000, 0.000, 0.000
-
│ rot: -1.571, 0.000, 0.000
-
│ scl: 1.000, 1.000, 1.000
-
└─RootNode_(model_correction_matrix) [Object3D]
-
│ pos: 0.000, 0.000, 0.000
-
│ rot: 0.000, 0.000, 0.000
-
│ scl: 1.000, 1.000, 1.000
-
└─4d4100bcb1c640e69699a87140df79d7fbx [Object3D]
-
│ pos: 0.000, 0.000, 0.000
-
│ rot: 1.571, 0.000, 0.000
-
│ scl: 1.000, 1.000, 1.000
也是浪费。
理想情况下,场景将由一个没有位置、旋转或缩放的“根”节点组成。 在运行时,我可以将所有子节点从该根中拉出,并将它们作为场景本身的父级。 可能有像“Cars”这样的根的子节点,它可以帮助我找到所有的汽车,但理想情况下它也没有平移、旋转或缩放,因此我可以用最少的工作将汽车重新设置为场景。
在任何情况下,最快速的(虽然可能不是最好的)修复,就是只调整用于显示曲线的对象。
这是我完成后的
首先,我调整了曲线的位置,然后发现了可以正常显示的数值,接着我把它隐藏了。
-
{
-
const points = curve.getPoints(250);
-
const geometry = new THREE.BufferGeometry().setFromPoints(points);
-
const material = new THREE.LineBasicMaterial({color: 0xff0000});
-
curveObject = new THREE.Line(geometry, material);
-
curveObject.scale.set(100, 100, 100);
-
curveObject.position.y = -621;
-
curveObject.visible = false;
-
material.depthTest = false;
-
curveObject.renderOrder = 1;
-
scene.add(curveObject);
-
}
然后,我写了代码来沿着曲线移动汽车。 给每辆车选取曲线上的从0到1的位置,用 curveObject对象变换计算出一个世界空间的点 接下来,我们选取曲线远一点的点。 使用lookAt 设置汽车的朝向 并将汽车放置在两点重点。
-
// 创建两个向量用于路径计算
-
const carPosition = new THREE.Vector3();
-
const carTarget = new THREE.Vector3();
-
function render(time) {
-
...
-
for (const car of cars) {
-
car.rotation.y = time;
-
}
-
{
-
const pathTime = time * .01;
-
const targetOffset = 0.01;
-
cars.forEach((car, ndx) => {
-
// 一个介于 0 和 1 之间的数字,用于均匀间隔汽车
-
const u = pathTime + ndx / cars.length;
-
// 获取第一个点
-
curve.getPointAt(u % 1, carPosition);
-
carPosition.applyMatrix4(curveObject.matrixWorld);
-
// 曲线再远点获取第二个点
-
curve.getPointAt((u + targetOffset) % 1, carTarget);
-
carTarget.applyMatrix4(curveObject.matrixWorld);
-
// 把汽车放置在第一个点 (暂时的)
-
car.position.copy(carPosition);
-
// 汽车的第二个点
-
car.lookAt(carTarget);
-
// 放置小车在两个点中间
-
car.position.lerpVectors(carPosition, carTarget, 0.5);
-
});
-
}
当我运行它时,我发现每种汽车车,它们的高度都不是固定的,所以我要给每种车调整一下。
-
const loadedCars = root.getObjectByName('Cars');
-
const fixes = [
-
{ prefix: 'Car_08', rot: [Math.PI * .5, 0, Math.PI * .5], },
-
{ prefix: 'CAR_03', rot: [0, Math.PI, 0], },
-
{ prefix: 'Car_04', rot: [0, Math.PI, 0], },
-
{ prefix: 'Car_08', y: 0, rot: [Math.PI * .5, 0, Math.PI * .5], },
-
{ prefix: 'CAR_03', y: 33, rot: [0, Math.PI, 0], },
-
{ prefix: 'Car_04', y: 40, rot: [0, Math.PI, 0], },
-
];
-
root.updateMatrixWorld();
-
for (const car of loadedCars.children.slice()) {
-
const fix = fixes.find(fix => car.name.startsWith(fix.prefix));
-
const obj = new THREE.Object3D();
-
car.getWorldPosition(obj.position);
-
car.position.set(0, 0, 0);
-
car.position.set(0, fix.y, 0);
-
car.rotation.set(...fix.rot);
-
obj.add(car);
-
scene.add(obj);
-
cars.push(obj);
-
}
结果是
click here to open in a separate window
几分钟运行的还不错
最后我想做的是开启阴影
我获取了所有 DirectionalLight的GUI代码, the article on shadows中的阴影实例 。并粘贴到最新代码
加载完之后,我们需要开启所有物体的阴影
-
{
-
const gltfLoader = new GLTFLoader();
-
gltfLoader.load('resources/models/cartoon_lowpoly_small_city_free_pack/scene.gltf', (gltf) => {
-
const root = gltf.scene;
-
scene.add(root);
-
root.traverse((obj) => {
-
if (obj.castShadow !== undefined) {
-
obj.castShadow = true;
-
obj.receiveShadow = true;
-
}
-
});
我花了将近4小时,尝试搞清楚为啥shadow helpers不工作。因为我忘记了用以下代码开启阴影
-
renderer.shadowMap.enabled = true;
😭
I then adjusted the values until our DirectionLight的阴影 相机的视锥能覆盖所有场景。 我最后完成的设置
-
{
-
const color = 0xFFFFFF;
-
const intensity = 1;
-
const light = new THREE.DirectionalLight(color, intensity);
-
light.castShadow = true;
-
light.position.set(-250, 800, -850);
-
light.target.position.set(-550, 40, -450);
-
light.shadow.bias = -0.004;
-
light.shadow.mapSize.width = 2048;
-
light.shadow.mapSize.height = 2048;
-
scene.add(light);
-
scene.add(light.target);
-
const cam = light.shadow.camera;
-
cam.near = 1;
-
cam.far = 2000;
-
cam.left = -1500;
-
cam.right = 1500;
-
cam.top = 1500;
-
cam.bottom = -1500;
-
...
我设置背景为蓝色
-
const scene = new THREE.Scene();
-
scene.background = new THREE.Color('black');
-
scene.background = new THREE.Color('#DEFEFF');
阴影
click here to open in a separate window
我希望详细讲完这个工程是有用的,并且能作为 在使用场景图(scenegraph)加载文件时 解决一些问题(issues)很好的案例。
有一件趣事,当对比.blend文件时与.gltf文件时,.blend 文件有多个灯光(lights),但加载到场景中后它们不是灯光(lights) 一个.GLTF文件只是JSON文件,因此你能查看它内部。 它由几个数组构成(scenes,nodes, meshes,accessors,materials...),数组中每一项都通过索引来引用其他项。 虽然工作中有扩展,但它们指出了几乎所有 3d 格式的问题。 它们无法涵盖任何情况.
总是需要更多的数据。 例如,我们手动导出的车辆绕着跑的路径。 理想的情况是,这些信息可以成为GLTF文件。但是这么做。我们需要自己写导出器,以及一些如何标记节点以了解我们希望它们如何导出或使用命名方案或类似的东西来从我们使用的任何工具获取数据 用于将数据创建到我们的应用程序中。
所有这些练习都留给了读者了。
更多推荐
 14
14 0
0- 0


 已为社区贡献2条内容

所有评论(0)