
Spock单元测试框架简介及实践
一、前言
单元测试(Unit Testing)又称为模块测试,是针对程序模块(软件设计的最小单位)来进行正确性检验的测试工作。程序单元是应用的最小可测试部件。在过程化编程中,一个单元就是单个程序、函数、过程等;对于面向对象编程,最小单元就是方法,包括基类(超类)、抽象类、或者派生类(子类)中的方法。 —— 维基百科
为什么要写单元测试?
to be or not to be?先说一下为什么会排斥写单元测试,这一点大多数开发同学都会有相同的感受:
- 项目本身单元测试不完整或缺失,需要花费大量精力去填补;
- 任务重工期紧,代码都没时间写,更别提单测了;
- 单元测试用例编写繁琐,构造入参、mock 方法,其代码量往往比业务改动的代码还要多;
- 认为单元测试无用,写起来浪费时间;
- Java语法本身就很啰嗦了,还要去写啰嗦的测试用例;
- ...
那为什么又要写单元测试 ?
- 单元测试在软件开发过程的早期就能发现问题;
- 单元测试可以延续用于准确反映当任何变更发生时可执行程序和代码的表现;
- 单元测试能一定程度上消除程序单元的不可靠,采用自底向上的测试路径。先测试程序部件再测试部件组装,使集成测试变得更加简单。
- 单元测试提供了系统化的一种文档记录,开发人员可以直观的理解程序单元的基础 API。
- ...
为什么要使用Spock?
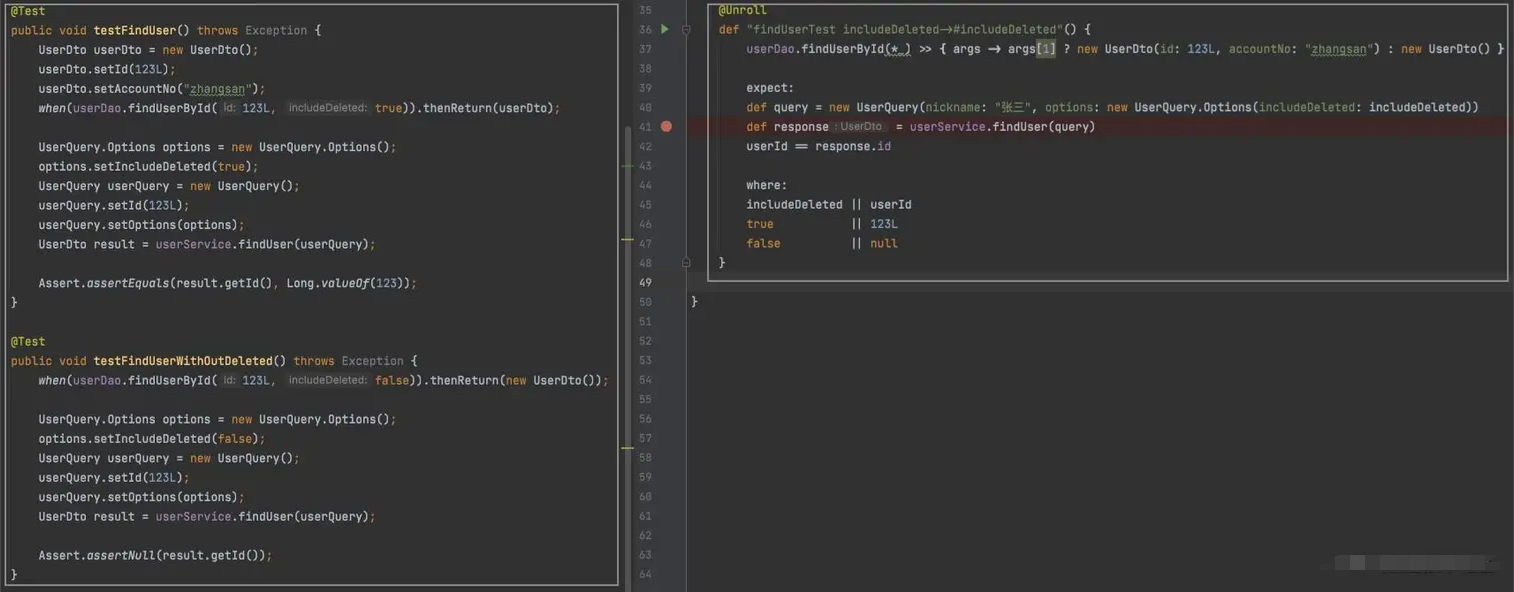
或者说为什么不用 Junit 或其他传统的单测框架?我们可以先看几张图(图左 Junit,图右 Spock)
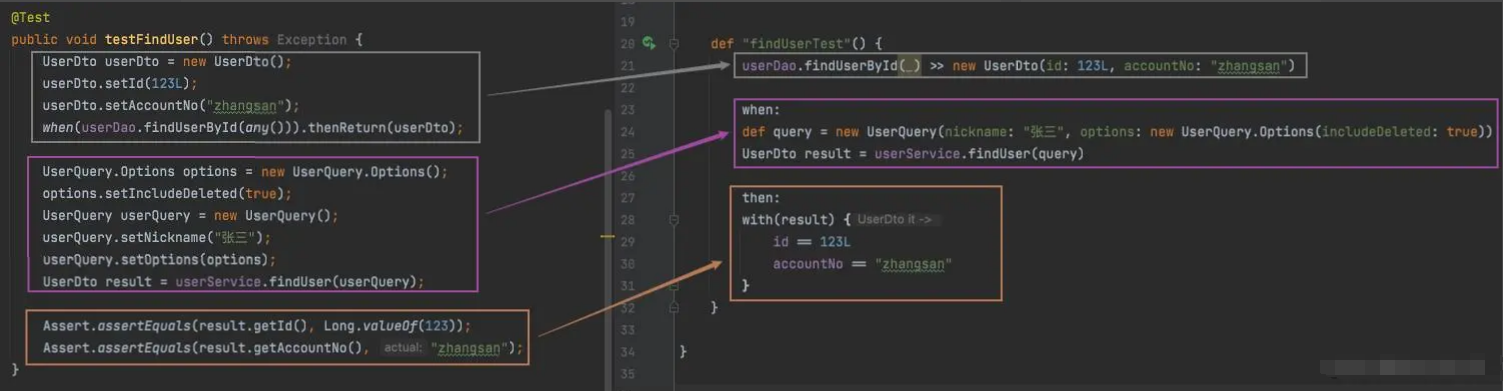
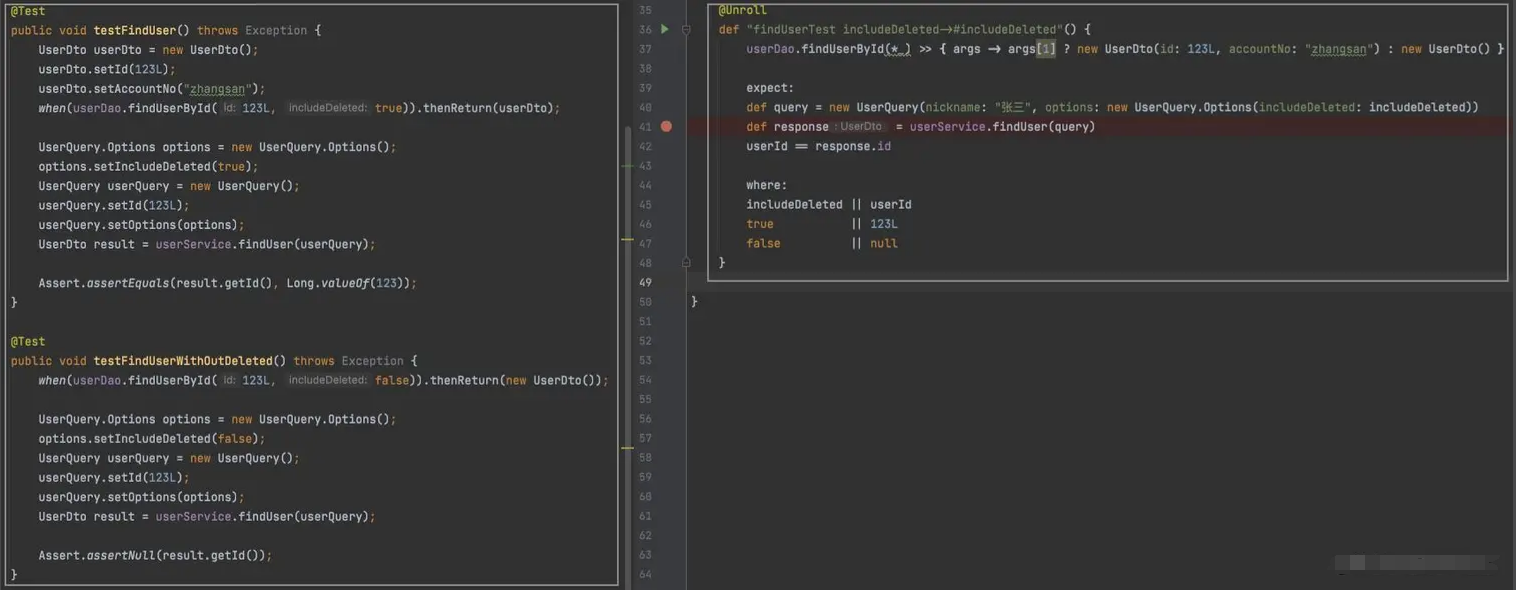
我们能清晰的看到,借助于 Spock 框架以及 Groovy 语言强大的语法,我们能很轻易的构造测试数据、Mock 接口返回行为。通过 Spock的数据驱动测试( Data Driven Testing )可以快速、清晰的汇聚大量测试用例用于覆盖复杂场景的各个分支。
单元测试中的 Java & Groovy
如果感觉图例不够清晰,我们可以简单看下使用 Groovy 与 Java 编写单测的区别:
// Groovy:创建对象并初始化
def param = new XXXApprovalParam(id: 123, taskId: "456")
// Java:创建对象并初始化
XXXApprovalParam param1 = new XXXApprovalParam();
param1.setId(123L);
param1.setTaskId("456");
// Groovy:创建集合
def list = [param]
// Java:创建集合
List<XXXApprovalParam> list1 = new ArrayList<>()
list1.add(param1)
// Groovy:创建空Map
def map = [:]
// Java:创建空Map
Map<String, Object> map1 = new HashMap<>()
// Groovy:创建非空Map
def map = ["key":"value"]
// Java:创建非空Map
Map<String, String> map1 = new HashMap<>()
map1.put("key", "value")
// 实践:Mock方法返回一个复杂对象
{
"result":{
"data":[
{
"fullName":"张三",
"id":123
}
],
"empty":false,
"total":1
},
"success":true
}
xxxReadService.getSomething(*_) >> Response.ok(new Paging(1L, [new Something(id: 123, fullName: "张三")]))
| | | |
| | | 生成返回值
| | 匹配任意个参数(单个参数可以使用:_)
| 方法
对象看到这里你可能会对 Spock 产生了一点点兴趣,那我们进入下一章,从最基础的概念开始入手。
二、基本概念
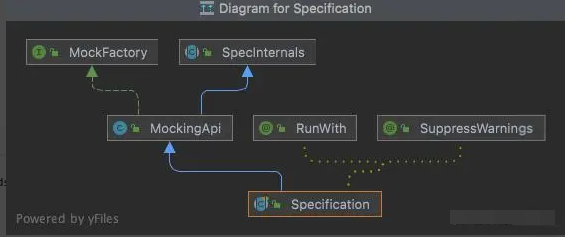
Specification
class MyFirstSpecification extends Specification {

   // fields

   // fixture methods

   // feature methods

   // helper methods

}
Sopck 单元测试类都需要去继承 Specification,为我们提供了诸如 Mock、Stub、with、verifyAll 等特性。
Fields
def obj = new ClassUnderSpecification()
def coll = new Collaborator()
@Shared
def res = new VeryExpensiveResource()实例字段是存储 Specification 固有对象(fixture objects)的好地方,最好在声明时初始化它们。存储在实例字段中的对象不会在测试方法之间共享。相反,每个测试方法都应该有自己的对象,这有助于特征方法之间的相互隔离。这通常是一个理想的目标,如果想在不同的测试方法之间共享对象,可以通过声明 @Shared 注解实现。
Fixture Methods
def setupSpec() {}    // runs once - before the first feature method

def setup() {}        // runs before every feature method

def cleanup() {}      // runs after every feature method

def cleanupSpec() {}  // runs once - after the last feature method
固有方法(我们暂定这么称呼 ta)负责设置和清理运行(特征方法)环境。建议使用 setup()、cleanup()为每个特征方法(feature method)设置新的固有对象(fixture objects),当然这些固有方法是可选的。 Fixture Method 调用顺序:
- super.setupSpec
- sub.setupSpec
- super.setup
- sub.setup
- feature method *
- sub.cleanup
- super.cleanup
- sub.cleanupSpec
- super.cleanupSpec
Feature Methods
-
def "echo test"() { -
// blocks go here -
}
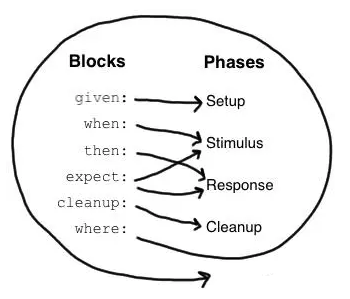
特征方法即我们需要写的单元测试方法,Spock 为特征方法的各个阶段提供了一些内置支持——即特征方法的 block。Spock 针对特征方法提供了六种 block:given、when、then、expect、cleanup和where。
given
given:
def stack = new Stack()
def elem = "push me"
// Demo
def "message send test"() {
given:
def param = xxx;
userService.getUser(*_) >> Response.ok(new User())
...
}given block 功能类似 setup block,在特征方法执行前的前置准备工作,例如构造一些通用对象,mock 方法的返回。given block 默认可以省略,即特征方法开头和第一个显式块之间的任何语句都属于隐式 given 块。
when-then
when:   // stimulus

then:   // response


// Demo

def "message send test"() {

   given:

   def param = xxx;

   userService.getUser(*_) >> Response.ok(new User())


   when:

   def response = messageService.snedMessage(param)


   then:

   response.success

}
when-then block 描述了单元测试过程中通过输入 command 获取预期的 response,when block 可以包含任意代码(例如参数构造,接口行为mock),但 then block 仅限于条件、交互和变量定义,一个特征方法可以包含多对 when-then block。 如果断言失败会发生什么呢?如下所示,Spock 会捕获评估条件期间产生的变量,并以易于理解的形式呈现它们:、
Condition not satisfied:


result.success

| |

| false

Response{success=false, error=}
异常条件
def "message send test"() {

when:

def response = messageService.snedMessage(null)


then:

def error = thrown(BizException)

error.code == -1

}


// 同上

def "message send test"() {

when:

def response = messageService.snedMessage(null)


then:

BizException error = thrown()

error.code == -1

}


// 不应该抛出xxx异常

def "message send test"() {

when:

def response = messageService.snedMessage(null)


then:

notThrown(NullPointerException)

}
Interactions
这里使用官网的一个例子,描述的是当发布者发送消息后,两个订阅者都只收到一次该消息,基于交互的测试方法将在后续单独的章节中详细介绍。
def "events are published to all subscribers"() {

given:

def subscriber1 = Mock(Subscriber)

def subscriber2 = Mock(Subscriber)

def publisher = new Publisher()

publisher.add(subscriber1)

publisher.add(subscriber2)


when:

publisher.fire("event")


then:

1 * subscriber1.receive("event")

1 * subscriber2.receive("event")

}
expect
expect block 是 when-then block 的一种简化用法,一般 when-then block 描述具有副作用的方法,expect block 描述纯函数的方法(不具有副作用)。
// when-then block

when:

def x = Math.max(1, 2)


then:

x == 2


// expect block

expect:

Math.max(1, 2) == 2
cleanup
用于释放资源、清理文件系统、管理数据库连接或关闭网络服务。
given:

def file = new File("/some/path")

file.createNewFile()


// ...


cleanup:

file.delete()
where
where block 用于编写数据驱动的特征方法,如下 demo 创建了两组测试用例,第一组a=5,b=1,c=5,第二组:a=3,b=9,c=9,关于 where 的详细用法会在后续的数据驱动章节进一步介绍。
def "computing the maximum of two numbers"() {

expect:

Math.max(a, b) == c


where:

a << [5, 3]

b << [1, 9]

c << [5, 9]

}
Helper Methods
当特征方法包含大量重复代码的时候,引入一个或多个辅助方法是很有必要的。例如设置/清理逻辑或复杂条件,但是不建议过分依赖,这会导致不同的特征方法之间过分耦合(当然 fixture methods 也存在该问题)。 这里引入官网的一个案例:
def "offered PC matches preferred configuration"() {

when:

def pc = shop.buyPc()


then:

pc.vendor == "Sunny"

pc.clockRate >= 2333

pc.ram >= 4096

pc.os == "Linux"

}


// 引入辅助方法简化条件判断

def "offered PC matches preferred configuration"() {

when:

def pc = shop.buyPc()


then:

matchesPreferredConfiguration(pc)

}


def matchesPreferredConfiguration(pc) {

pc.vendor == "Sunny"

&& pc.clockRate >= 2333

&& pc.ram >= 4096

&& pc.os == "Linux"

}


// exception

// Condition not satisfied:

//

// matchesPreferredConfiguration(pc)

// | |

// false ...
上述方法在发生异常时 Spock 给以的提示不是很有帮助,所以我们可以做些调整:
void matchesPreferredConfiguration(pc) {

assert pc.vendor == "Sunny"

assert pc.clockRate >= 2333

assert pc.ram >= 4096

assert pc.os == "Linux"

}


// Condition not satisfied:

//

// assert pc.clockRate >= 2333

// | | |

// | 1666 false

// ...
with
with 是 Specification 内置的一个方法,有点 ES6 对象解构的味道了。当然,作为辅助方法的替代方法,在多条件判断的时候非常有用:
def "offered PC matches preferred configuration"() {

when:

def pc = shop.buyPc()


then:

with(pc) {

vendor == "Sunny"

clockRate >= 2333

ram >= 406

os == "Linux"

}

}


def "service test"() {

def service = Mock(Service) // has start(), stop(), and doWork() methods

def app = new Application(service) // controls the lifecycle of the service


when:

app.run()


then:

with(service) {

1 * start()

1 * doWork()

1 * stop()

}

}
verifyAll
在多条件判断的时候,通常在遇到失败的断言后,就不会执行后续判断(类似短路与)。我们可以借助 verifyAll 在测试失败前收集所有的失败信息,这种行为也称为软断言:
def "offered PC matches preferred configuration"() {

when:

def pc = shop.buyPc()


then:

verifyAll(pc) {

vendor == "Sunny"

clockRate >= 2333

ram >= 406

os == "Linux"

}

}


// 也可以在没有目标的情况下使用

expect:

verifyAll {

2 == 2

4 == 4

}
Specifications as Documentation
Spock 允许我们在每个 block 后面增加双引号添加描述,在不改变方法语意的前提下来提供更多的有价值信息(非强制)。
def "offered PC matches preferred configuration"() {

when: "购买电脑"

def pc = shop.buyPc()


then: "验证结果"

with(pc) {

vendor == "Sunny"

clockRate >= 2333

ram >= 406

os == "Linux"

}

}
Comparison to Junit
| Spock | JUnit |
|---|---|
| Specification | Test class |
| setup() | @Before |
| cleanup() | @After |
| setupSpec() | @BeforeClass |
| cleanupSpec() | @AfterClass |
| Feature | Test |
| Feature method | Test method |
| Data-driven feature | Theory |
| Condition | Assertion |
| Exception condition | @Test(expected=…) |
| Interaction | Mock expectation (e.g. in Mockito) |
三、数据驱动
Spock 数据驱动测试(Data Driven Testing),可以很清晰地汇集大量测试数据:
数据表(Data Table)
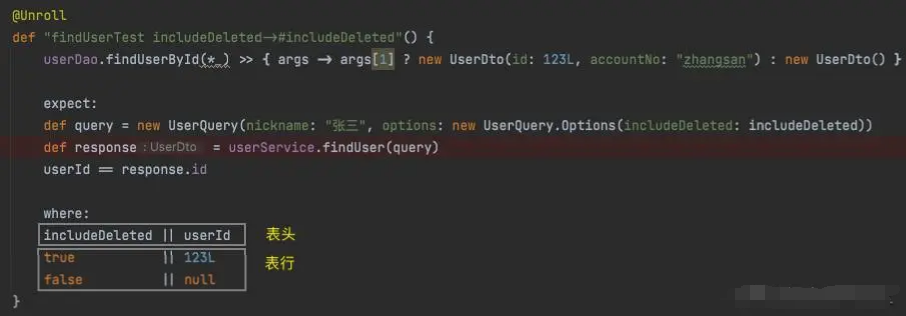
表的第一行称为表头,用于声明数据变量。随后的行称为表行,包含相应的值。每一行 特征方法将会执行一次,我们称之为方法的一次迭代。如果一次迭代失败,剩余的迭代仍然会被执行,特征方法执行结束后将会报告所有故障。 如果需要在迭代之间共享一个对象,例如 applicationContext,需要将其保存在一个 @Shared 或静态字段中。例如 @Shared applicationContext = xxx 。 数据表必须至少有两列,一个单列表可以写成:
where:

destDistrict | _

null | _

"339900" | _

null | _

"339900" | _
输入和预期输出可以用双管道符号 ( || ) 分割,以便在视觉上将他们分开:
where:

destDistrict || _

null || _

"339900" || _

null || _

"339900" || _
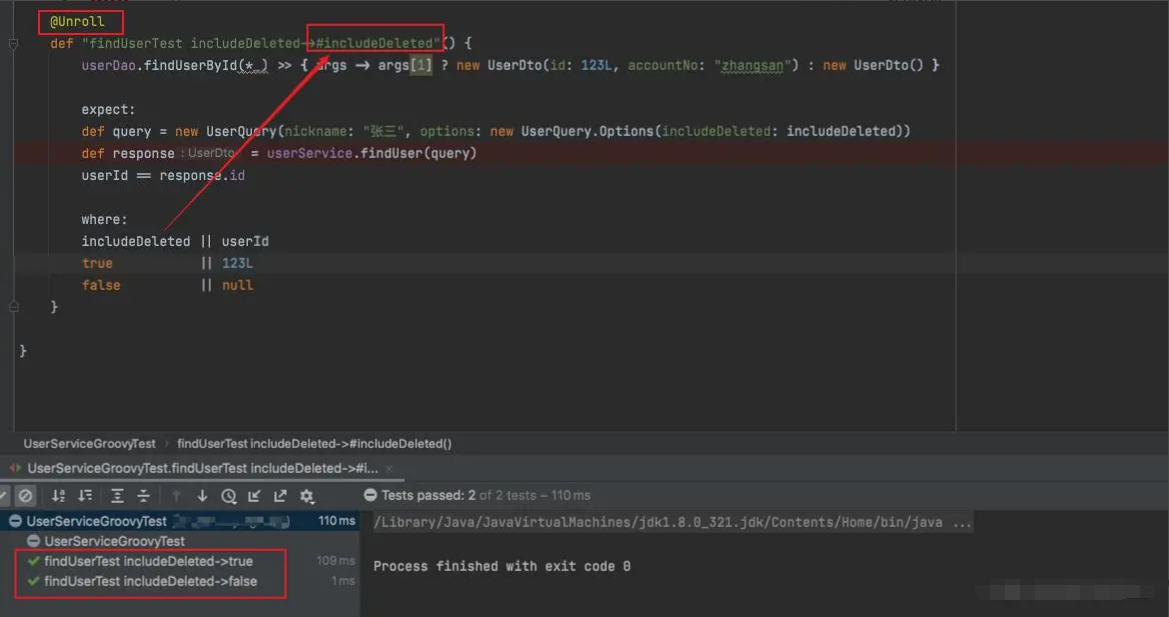
可以通过在方法上标注 @Unroll 快速展开数据表的测试用例,还可以通过占位符动态化方法名:
数据管道(Data Pipes)
数据表不是为数据变量提供值的唯一方法,实际上数据表只是一个或多个数据管道的语法糖:
...

where:

destDistrict << [null, "339900", null, "339900"]

currentLoginUser << [null, null, loginUser, loginUser]

result << [false, false, false, true]
由左移 ( << ) 运算符指示的数据管道将数据变量连接到数据提供者。数据提供者保存变量的所有值,每次迭代一个。任何可遍历的对象都可以用作数据提供者。包括 Collection、String、Iterable 及其子类。 数据提供者不一定是数据,他们可以从文本文件、数据库和电子表格等外部源获取数据,或者随机生成数据。仅在需要时(在下一次迭代之前)查询下一个值。
多变量的数据管道(Multi-Variable Data Pipes Data Table)
@Shared sql = Sql.newInstance("jdbc:h2:mem:", "org.h2.Driver")


def "maximum of two numbers"() {

expect:

Math.max(a, b) == c


where:

[a, b, c] << sql.rows("select a, b, c from maxdata")

}
可以用下划线( _ )忽略不感兴趣的数据值:
-
... -
where: -
[a, b, _, c] << sql.rows("select * from maxdata")
实际对 DAO 层进行测试时,一般会通过引入内存数据库(如h2)进行数据库隔离,避免数据之间相互干扰。这里平时使用不多,就不过多介绍,感兴趣的移步官方文档 → 传送门
四、基于交互的测试
属性Mock
-
interface Subscriber { -
String receive(String message) -
}
如果我们想每次调用 Subscriber#receive 的时候返回“ok”,使用 Spock 的写法会简洁直观很多:
-
// Mockito -
when(subscriber.receive(any())).thenReturn("ok"); -
// Spock -
subscriber.receive(_) >> "ok"
测试桩
-
subscriber.receive(_) >> "ok" -
| | | | -
| | | 生成返回值 -
| | 匹配任意参数(多个参数可以使用:*_) -
| 方法 -
对象
_ 类似 Mockito 的 any(),如果有同名的方法,可以使用 as 进行参数类型区分
subscriber.receive(_ as String) >> "ok"固定返回值
我们已经看到了使用右移 ( >> ) 运算符返回一个固定值,如果想根据不同的调用返回不同的值,可以:
-
subscriber.receive("message1") >> "ok" -
subscriber.receive("message2") >> "fail"
序列返回值
如果想在连续调用中返回不用的值,可以使用三重右移运算符(>>>):
subscriber.receive(_) >>> ["ok", "error", "error", "ok"]该特性在写批处理方法单元测试用例的时候尤为好用,我们可以在指定的循环次数当中返回 null 或者空的集合,来中断流程,例如
// Spock

businessDAO.selectByQuery(_) >>> [[new XXXBusinessDO()], null]


// 业务代码

DataQuery dataQuery = new DataQuery();

dataQuery.setPageSize(100);

Integer pageNo = 1;

while (true) {

dataQuery.setPageNo(pageNo);

List<XXXBusinessDO> xxxBusinessDO = businessDAO.selectByQuery(dataQuery);

if (CollectionUtils.isEmpty(xxxBusinessDO)) {

break;

}


dataHandle(xxxBusinessDO);

pageNo++;

}
可计算返回值
如果想根据方法的参数计算出返回值,请将右移 ( >> ) 运算符与闭包一起使用:
subscriber.receive(_) >> { args -> args[0].size() > 3 ? "ok" : "fail" }异常返回值
有时候你想做的不仅仅是计算返回值,例如抛一个异常:
subscriber.receive(_) >> { throw new InternalError("ouch") }链式返回值
subscriber.receive(_) >>> ["ok", "fail", "ok"] >> { throw new InternalError() } >> "ok"前三次调用分别返回"ok", "fail", "ok",第四次调用会抛出 InternalError 异常,之后的调用都会返回 “ok”
默认返回值
有时候并不关心返回的内容,只需要其不为 null 即可,下述代码的结果和 Stub() 创建的代理对象调用效果一致:
subscriber.receive(_) >> _Spy
Spy 和 Mock、Stub 有些区别,一般不太建议使用该功能,但是这里还是会简单补充介绍下。 Spy 必须基于真实的对象(Mock、Stub 可以基于接口),通过 Spy 的名字可以很明显猜到 ta 的用途——对于 Spy 对象的方法调用会自动委托给真实对象,然后从真实对象的方法返回值会通过 Spy 传递回调用者。 但是如果给 Spy 对象设置测试桩,将不会调用真正的方法:
subscriber.receive(_) >> "ok"通过Spy也可以实现部分Mock:
// this is now the object under specification, not a collaborator

MessagePersister persister = Spy {

// stub a call on the same object

isPersistable(_) >> true

}
交互约束
我们可以通过交互约束去校验方法被调的次数
def "should send messages to all subscribers"() {

when:

publisher.send("hello")


then:

1 * subscriber.receive("hello")

1 * subscriber2.receive("hello")

}


// 说明:当发布者发送消息时,两个订阅者都应该只收到一次消息

1 * subscriber.receive("hello")

| | | |

| | | 参数约束

| | 方法约束

| 目标约束

基数(方法执行次数)
Spock 扩展 → 传送门 Spock Spring 模块 → 传送门
五、进阶玩法
单元测试代码生成插件
Spock框架凭借其优秀的设计以及借助 Groovy 脚本语言的便捷性,在一众单元测试框架中脱颖而出。但是写单元测试还是需要一定的时间,那有没有办法降低写单元测试的成本呢? 通过观察一个单元测试类的结构,大致分为创建目标测试类、创建目标测试类 Mock 属性、依赖注入、还有多个特征方法,包括特征方法中的 when-then block,都是可以通过扫描目标测试类获取类的结构信息后自动生成。
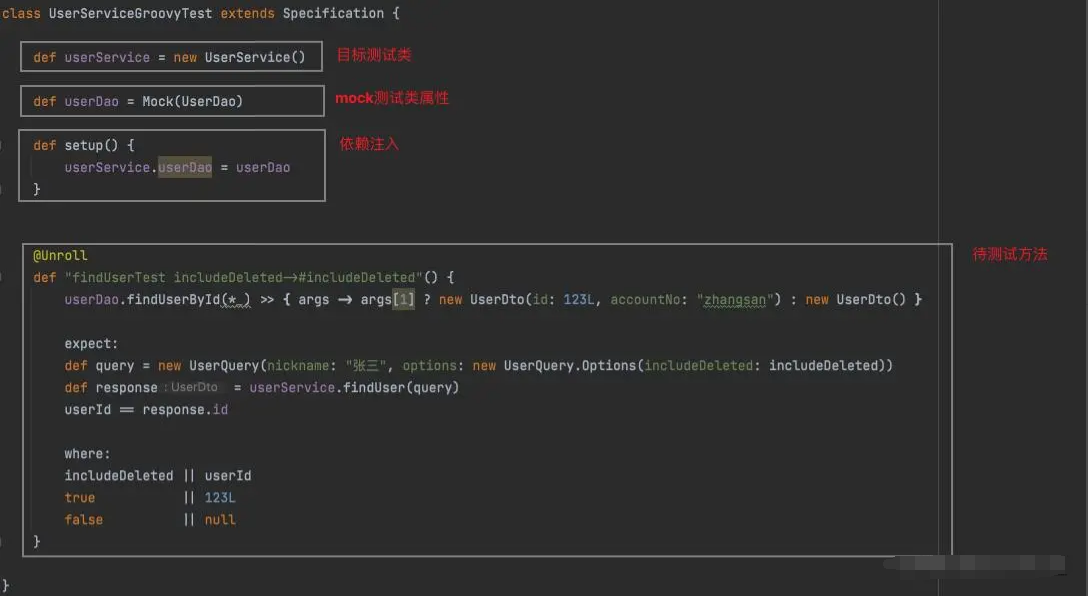
当然我们不用重复造轮子,通过 IDEA TestMe 插件,可以轻松完成上述任务,TestMe 默认支持以下单元测试框架:
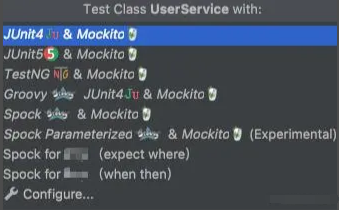
TestMe已经支持 Groovy 和 Spock,操作方法:选中需要生成单元测试类的目标类 → 右键 Generate... → TestMe → Parameterized Groovy, Spock & Mockito 。
但是默认模版生成的生成的单元测试代码使用 的是 Spock & Mockito 混合使用,没有使用 Spock 的测试桩等特性。不过 TestMe 提供了自定义单元测试类生成模版的能力,我们可以实现如下效果:
// 默认模版

class UserServiceTest extends Specification {

@Mock

UserDao userDao

@InjectMocks

UserService userService


def setup() {

MockitoAnnotations.initMocks(this)

}


@Unroll

def "find User where userQuery=#userQuery then expect: #expectedResult"() {

given:

when(userDao.findUserById(anyLong(), anyBoolean())).thenReturn(new UserDto())


when:

UserDto result = userService.findUser(new UserQuery())


then:

result == new UserDto()

}

}
// 修改后的模版

class UserServiceGroovyTest extends Specification {


def userService = new UserService()


def userDao = Mock(UserDao)


def setup() {

userService.userDao = userDao

}


@Unroll

def "findUserTest includeDeleted->#includeDeleted"() {

given:

userDao.findUserById(*_) >> new UserDto()


when:

UserDto result = userService.findUser(new UserQuery())


then:

result == new UserDto()

}


}
修改后的模版主要是移除 mockito 的依赖,避免两种框架混合使用降低了代码的简洁和可读性。当然代码生成完我们还需要对单元测试用例进行一些调整,例如入参属性设置、测试桩行为设置等等。
新增模版的操作也很简单,IDEA → Preference... → TestMe → TestMe Templates Test Class
#parse("TestMe macros.groovy")

#parse("Zcy macros.groovy")

#if($PACKAGE_NAME)

package ${PACKAGE_NAME}

#end

import spock.lang.*


#parse("File Header.java")

class ${CLASS_NAME} extends Specification {


#grRenderTestInit4Spock($TESTED_CLASS)


#grRenderMockedFields4Spock($TESTED_CLASS.fields)


def setup() {

#grSetupMockedFields4Spock($TESTED_CLASS)

}


#foreach($method in $TESTED_CLASS.methods)

#if($TestSubjectUtils.shouldBeTested($method))

#set($paraTestComponents=$TestBuilder.buildPrameterizedTestComponents($method,$grReplacementTypesForReturn,$grReplacementTypes,$grDefaultTypeValues))


def "$method.name$testSuffix"() {

#if($MockitoMockBuilder.shouldStub($method,$TESTED_CLASS.fields))

given:

#grRenderMockStubs4Spock($method,$TESTED_CLASS.fields)

#end


when:

#grRenderMethodCall($method,$TESTED_CLASS.name)


then:

#if($method.hasReturn())

#grRenderAssert($method)

#{else}

noExceptionThrown() // todo - validate something

#end


}


#end

#end

}
Includes
#parse("TestMe common macros.java")

################## Global vars ###############

#set($grReplacementTypesStatic = {

"java.util.Collection": "[<VAL>]",

"java.util.Deque": "new LinkedList([<VAL>])",

"java.util.List": "[<VAL>]",

"java.util.Map": "[<VAL>:<VAL>]",

"java.util.NavigableMap": "new java.util.TreeMap([<VAL>:<VAL>])",

"java.util.NavigableSet": "new java.util.TreeSet([<VAL>])",

"java.util.Queue": "new java.util.LinkedList<TYPES>([<VAL>])",

"java.util.RandomAccess": "new java.util.Vector([<VAL>])",

"java.util.Set": "[<VAL>] as java.util.Set<TYPES>",

"java.util.SortedSet": "[<VAL>] as java.util.SortedSet<TYPES>",

"java.util.LinkedList": "new java.util.LinkedList<TYPES>([<VAL>])",

"java.util.ArrayList": "[<VAL>]",

"java.util.HashMap": "[<VAL>:<VAL>]",

"java.util.TreeMap": "new java.util.TreeMap<TYPES>([<VAL>:<VAL>])",

"java.util.LinkedList": "new java.util.LinkedList<TYPES>([<VAL>])",

"java.util.Vector": "new java.util.Vector([<VAL>])",

"java.util.HashSet": "[<VAL>] as java.util.HashSet",

"java.util.Stack": "new java.util.Stack<TYPES>(){{push(<VAL>)}}",

"java.util.LinkedHashMap": "[<VAL>:<VAL>]",

"java.util.TreeSet": "[<VAL>] as java.util.TreeSet"

})

#set($grReplacementTypes = $grReplacementTypesStatic.clone())

#set($grReplacementTypesForReturn = $grReplacementTypesStatic.clone())

#set($testSuffix="Test")

#foreach($javaFutureType in $TestSubjectUtils.javaFutureTypes)

#evaluate(${grReplacementTypes.put($javaFutureType,"java.util.concurrent.CompletableFuture.completedFuture(<VAL>)")})

#end

#foreach($javaFutureType in $TestSubjectUtils.javaFutureTypes)

#evaluate(${grReplacementTypesForReturn.put($javaFutureType,"<VAL>")})

#end

#set($grDefaultTypeValues = {

"byte": "(byte)0",

"short": "(short)0",

"int": "0",

"long": "0l",

"float": "0f",

"double": "0d",

"char": "(char)'a'",

"boolean": "true",

"java.lang.Byte": """00110"" as Byte",

"java.lang.Short": "(short)0",

"java.lang.Integer": "0",

"java.lang.Long": "1l",

"java.lang.Float": "1.1f",

"java.lang.Double": "0d",

"java.lang.Character": "'a' as Character",

"java.lang.Boolean": "Boolean.TRUE",

"java.math.BigDecimal": "0 as java.math.BigDecimal",

"java.math.BigInteger": "0g",

"java.util.Date": "new java.util.GregorianCalendar($YEAR, java.util.Calendar.$MONTH_NAME_EN.toUpperCase(), $DAY_NUMERIC, $HOUR_NUMERIC, $MINUTE_NUMERIC).getTime()",

"java.time.LocalDate": "java.time.LocalDate.of($YEAR, java.time.Month.$MONTH_NAME_EN.toUpperCase(), $DAY_NUMERIC)",

"java.time.LocalDateTime": "java.time.LocalDateTime.of($YEAR, java.time.Month.$MONTH_NAME_EN.toUpperCase(), $DAY_NUMERIC, $HOUR_NUMERIC, $MINUTE_NUMERIC, $SECOND_NUMERIC)",

"java.time.LocalTime": "java.time.LocalTime.of($HOUR_NUMERIC, $MINUTE_NUMERIC, $SECOND_NUMERIC)",

"java.time.Instant": "java.time.LocalDateTime.of($YEAR, java.time.Month.$MONTH_NAME_EN.toUpperCase(), $DAY_NUMERIC, $HOUR_NUMERIC, $MINUTE_NUMERIC, $SECOND_NUMERIC).toInstant(java.time.ZoneOffset.UTC)",

"java.io.File": "new File(getClass().getResource(""/$PACKAGE_NAME.replace('.','/')/PleaseReplaceMeWithTestFile.txt"").getFile())",

"java.lang.Class": "Class.forName(""$TESTED_CLASS.canonicalName"")"

})

##

##

################## Macros #####################

####

################## Custom Macros #####################

#macro(grRenderMockStubs4Spock $method $testedClassFields)

#foreach($field in $testedClassFields)

#if($MockitoMockBuilder.isMockable($field))

#foreach($fieldMethod in $field.type.methods)

#if($fieldMethod.returnType && $fieldMethod.returnType.name !="void" && $TestSubjectUtils.isMethodCalled($fieldMethod,$method))

#if($fieldMethod.returnType.name == "T" || $fieldMethod.returnType.canonicalName.indexOf("<T>") != -1)

$field.name.${fieldMethod.name}(*_) >> null

#else

$field.name.${fieldMethod.name}(*_) >> $TestBuilder.renderReturnParam($method,$fieldMethod.returnType,"${fieldMethod.name}Response",$grReplacementTypes,$grDefaultTypeValues)

#end

#end

#end

#end

#end

#end

##

#macro(grRenderMockedFields4Spock $testedClassFields)

#foreach($field in $testedClassFields)

#if($field.name != "log")

#if(${field.name.indexOf("PoolExecutor")}!=-1)

def $field.name = Executors.newFixedThreadPool(2)

#else

def $field.name = Mock($field.type.canonicalName)

#end

#end

#end

#end

##

#macro(grRenderTestInit4Spock $testedClass)

def $StringUtils.deCapitalizeFirstLetter($testedClass.name) = $TestBuilder.renderInitType($testedClass,"$testedClass.name",$grReplacementTypes,$grDefaultTypeValues)

#end

##

#macro(grSetupMockedFields4Spock $testedClass)

#foreach($field in $TESTED_CLASS.fields)

#if($field.name != "log")

$StringUtils.deCapitalizeFirstLetter($testedClass.name).$field.name = $field.name

#end

#end

#end
最终效果如下:
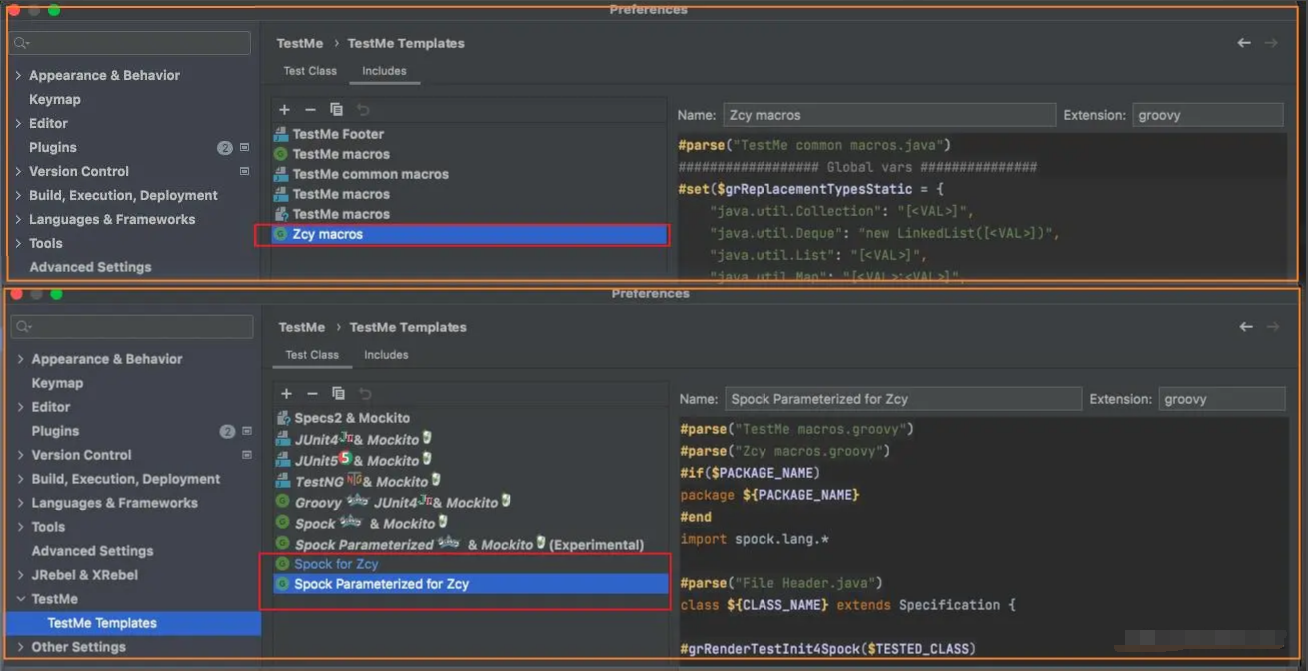
当我们需要生成单元测试类的时候,可以选中需要生成单元测试类的目标类 → 右键 Generate... → TestMe → Spock for xxx。 当然,模版还在持续优化中,这里只是提供了一种解决方案,大家完全可以根据自己的实际需求进行调整。
六、补充说明
Spock依赖兼容
引入Spock的同时也需要引入 Groovy 的依赖,由于 Spock 使用指定 Groovy 版本进行编译和测试,很容易出现不兼容的情况。
<groovy.version>3.0.12</groovy.version>

<spock-spring.version>2.2-groovy-3.0</spock-spring.version>


<dependency>

<groupId>org.codehaus.groovy</groupId>

<artifactId>groovy</artifactId>

<version>${groovy.version}</version>

<scope>test</scope>

</dependency>

<dependency>

<groupId>org.spockframework</groupId>

<artifactId>spock-spring</artifactId>

<version>${spock-spring.version}</version>

<scope>test</scope>

</dependency>


<plugin>

<groupId>org.codehaus.gmavenplus</groupId>

<artifactId>gmavenplus-plugin</artifactId>

<version>1.13.1</version>

<executions>

<execution>

<goals>

<goal>compile</goal>

<goal>compileTests</goal>

</goals>

</execution>

</executions>

</plugin>
这里提供一个版本选择的技巧,上面使用 spock-spring 的版本为 2.2-groovy-3.0,这里暗含了 groovy 的大版本为 3.0,通过 Maven Repo 也能看到,每次版本发布,针对 Groovy 的三个大版本都会提供相应的 Spock 版本以供选择。
最后感谢每一个认真阅读我文章的人,礼尚往来总是要有的,虽然不是什么很值钱的东西,如果你用得到的话可以直接拿走:

这些资料,对于【软件测试】的朋友来说应该是最全面最完整的备战仓库,这个仓库也陪伴上万个测试工程师们走过最艰难的路程,希望也能帮助到你!

更多推荐



 28
28 0
0- 0


 已为社区贡献37条内容

所有评论(0)