
案例学习——Unity体绘制shader初探
本文学习资料来源
Volumetric Rendering——Alan Zucconi
案例学习——Unity体绘制shader初探
1 体绘制引入
在3d引擎中,无论球体,立方体还是什么其他物体都是由面片组成的,因而像是Unity这样的光照系统也只能渲染表面的那些三角面片。
就算是要表现半透明的物体材质,也依然是渲染其表面后,通过例如alphablend的技术,将其与后面的物体颜色进行混合,表现出类似透明的效果。
对于GPU来说,整个3D世界 就是一层壳。
当然,为了突破整个限制,人们也想了很多方法。尽管最后是渲染一个壳,但是依然有方法可以深入。
比如体绘制技术(Volume rendering techniques) ,它便会模拟光线在体积中的传播,从而实现复杂的视觉效果。
我们可以发现Unity中的Unlit的基本的片元着色器模板是这样
 fixed4 frag (v2f i) : SV_Target
            {
                // sample the texture
                fixed4 col = tex2D(_MainTex, i.uv);
                // apply fog
                UNITY_APPLY_FOG(i.fogCoord, col);
                return col;
            }
片元着色器对每一个像素进行调用,在相机视锥内的那些三角形就会被赋予颜色
如下图
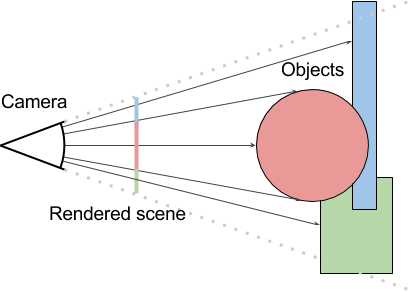
跳脱一点,我们可以这么理解,我们用相机在某个角度看到了一些三角形,片元着色器的作用是去给予它们颜色。
但其实并不需要看到什么物体就给它正确的颜色,我们也可以选择“欺骗”性的赋予颜色。
如下图,我们看到的是一个立方体,但是我们完全可以在它的壳上,想方设法给予一个球体的颜色,看起来好像里面内嵌了一个球似的。
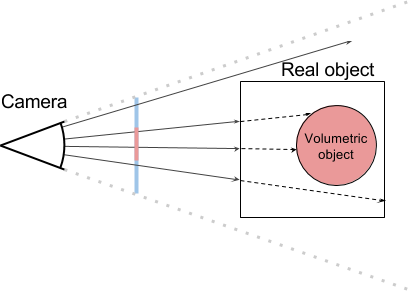
这也是所谓立体渲染的基本思想,想方设法模拟光线在内部会发生什么事情。
如果想要模拟上图的效果,假设我们的主要几何形状就是一个立方体,我们想在其内部立体地渲染一个球体。
但是实际上没有与球相关的mesh,我们会通过shader代码进行“假的”渲染。
- 球体具有一个世界坐标_Centre,半径是_Radius
- 移动立方体不会影响球体的位置,它被表示为绝对的世界坐标
- 其他几何体也影响不了它,因为这个球是被渲染出来的“不存在”的球
1.1 光线投射算法(Ray Casting)
体绘制的第一种方法,光线投射算法(Ray Casting)
伪代码会像这样
float3 _Centre;
float _Radius;
fixed4 frag (v2f i) : SV_Target
{
    float3 worldPosition = ...
    float3 viewDirection = ...
    if ( raycastHit(worldPosition, viewDirection) )
        return fixed4(1,0,0,1); // Red if hit the ball
    else
        return fixed4(1,1,1,1); // White otherwise
}
- raycastHit函数中,给定我们要渲染的点以及从中观察的方向,就可以确定我们是否击中了虚拟红色球体。
于是变成了球体与线段相交的数学问题。
通常Ray Casting效率很低。如果要采用这个方法,则需要用到公式,将线段与某种自定义几何图形求交。这个解决方案限制了可以创建的模型为固定的几种形状,因此很少采用这个方法。
1.2 恒定步长的光线步进(Ray Marching with Constant Step)
就像光线投射的缺点,纯粹的数学解析光线和几何体是否相交是不太灵活的。
如果要模拟任意体积,则需要找到一种不依赖于相交的数学方程的更灵活的技术。
Ray Marching(光线步进)就是一种常用的基于迭代方法的技术。
通常的,射线缓慢扩展到立方体的体积中。在每个步骤中,我们都会查询射线当前是否正在撞击球体。
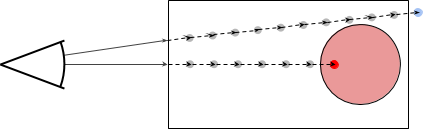
我们在实现上,让每条射线从当前的片段位置开始,向着视线的方向前进一小步,每一步判断射线到球心的距离是否小于半径。
shader实现如下,还是很简单的
// Upgrade NOTE: replaced '_Object2World' with 'unity_ObjectToWorld'
// Upgrade NOTE: replaced 'mul(UNITY_MATRIX_MVP,*)' with 'UnityObjectToClipPos(*)'

Shader "Unlit/Volu1"
{
    Properties
    {
		_Centre ("Centre",Vector) = (0,0,0)
		_Radius ("Radius", Range(0,1)) = 0.8
    }
    SubShader
		{
			Tags { "RenderType" = "Opaque" }
			LOD 100

			Pass
			{
				CGPROGRAM
				#include "Lighting.cginc"

				#pragma vertex vert
				#pragma fragment frag

				#include "UnityCG.cginc"


				struct appdata
				{
					float4 vertex : POSITION;
					float2 uv : TEXCOORD0;
				};

				struct v2f {
					float4 pos : SV_POSITION;    // Clip space
					float3 wPos : TEXCOORD1;    // World position
				};

				float3 _Centre;
				fixed _Radius;

				// 判断是否进入球内
				bool sphereHit(float3 p)
				{
					return distance(p, _Centre) < _Radius;
				}

				//光线步进
				bool raymarchHit(float3 position, float3 direction)
				{
					float STEPS = 64;
					float STEP_SIZE = 0.1;
					for (int i = 0; i < STEPS; i++)
					{
						if (sphereHit(position))
							return true;

						position += direction * STEP_SIZE;
					}

					return false;
				}


				v2f vert(appdata v)
				{
					v2f o;
					o.pos = UnityObjectToClipPos(v.vertex);
					o.wPos = mul(unity_ObjectToWorld, v.vertex).xyz;
					return o;
				}

				fixed4 frag(v2f i) : SV_Target
				{
					float3 worldPosition = i.wPos;
					float3 viewDirection = normalize(i.wPos - _WorldSpaceCameraPos);

					if (raymarchHit(worldPosition, viewDirection))
						return fixed4(1,0,0,1); // Red if hit the ball
					else
						return fixed4(1,1,1,1); // White otherwise
				}
			ENDCG
			}
		}
}
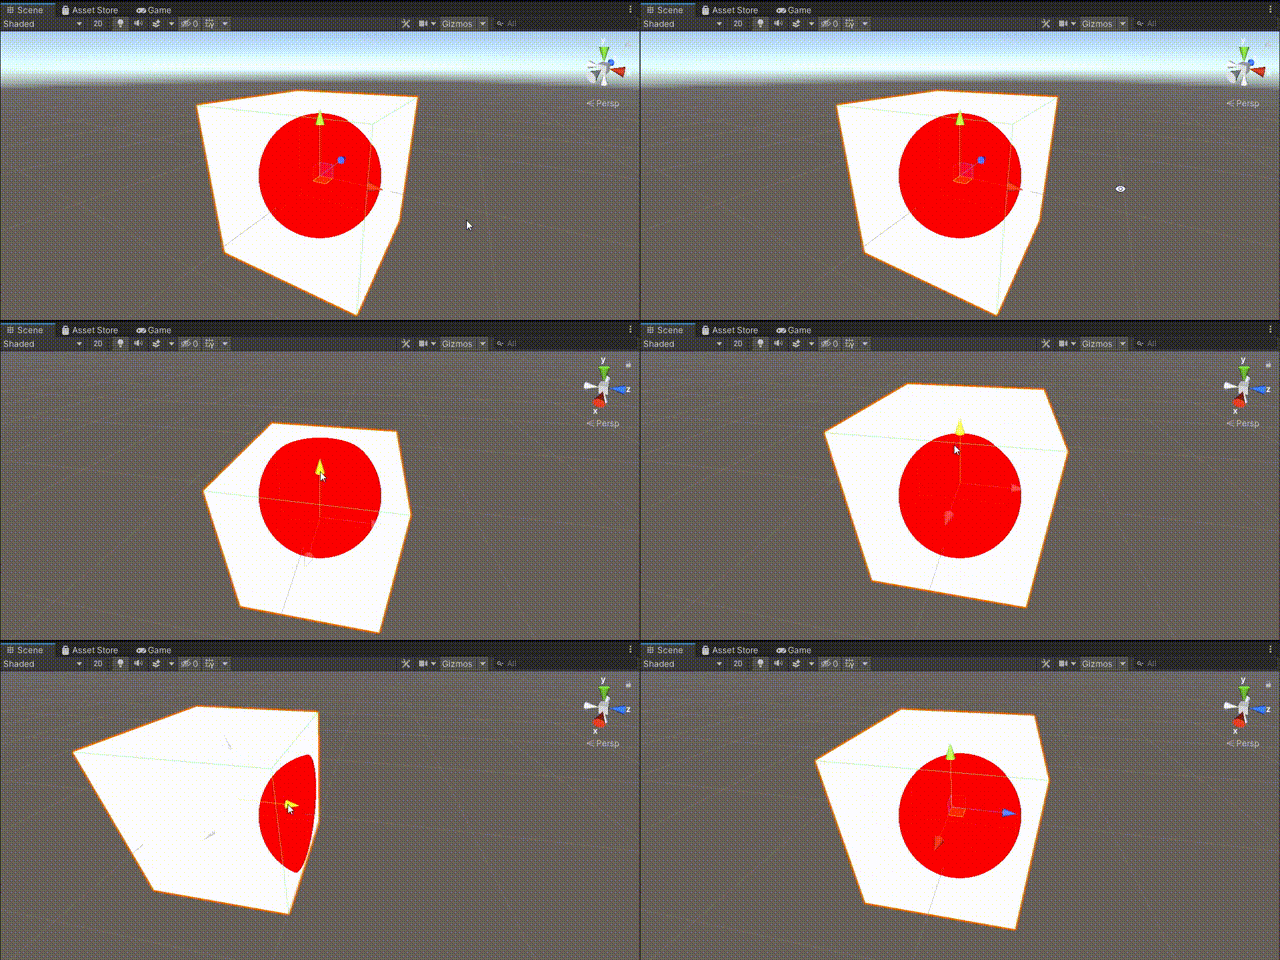
虽然数学判断线段与球体相交会难,但迭代检测点是否位于球体内就很简单了。
结果见下图,仿佛实际上这就是个立方体内无光照的球体
2 距离辅助的光线步进 Distance Aided Raymarching
固定步长的光线步进在第一节已经实现,但固定步长的话效率不太行。
无论填充体积的这个几何体形状如何,光线每次都会前进相同的量。
何况在shader内添加循环会极大地影响着色器的性能。
如果要使用实时体积渲染,则需要找到更好的更有效的解决方案。
我们希望有一种方法可以估算射线在不碰到几何形状的情况下可以传播多远。
为了使该技术起作用,我们需要能够估计与几何体的距离。
我们把之前的判断是否在球内的函数
// 判断是否进入球内
bool sphereHit(float3 p)
{
	return distance(p, _Centre) < _Radius;
}
改成估算距离
//估算距离
float sphereDistance(float3 p)
{
	return distance(p, _Centre) - _Radius;
}
我们用它来估算距离,它也就变成了另一个看起来高端点的东西有向距离函数(signed distance functions)
非常简单,如果结果是正的,我们就不在球内。当为结果是负数时,我们就在球内;当为零时,我们正处于表面。
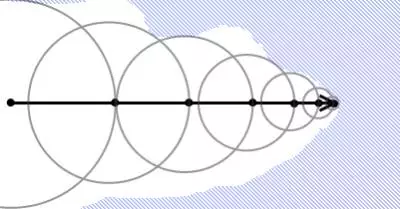
它能做的就是提供一个保守的预估距离,告诉我们射线在到达球体之前还要前进多远。如果使用更复杂的几何形状,这个技术就有价值了。
下图展现了它的工作原理,每条射线在靠近物体时都会尽量走大的距离。通过这样的方式,就可以大幅减少射线命中物体所需的迭代步数了
编写shader如下
Shader "Unlit/Volu1"
{
    Properties
    {
		_Centre ("Centre",Vector) = (0,0,0)
		_Radius ("Radius", Range(0,1)) = 0.8
    }
    SubShader
		{
			Blend SrcAlpha OneMinusSrcAlpha
			Tags { "RenderType" = "Transparent" "Queue" = "Transparent" }
			LOD 100

			Pass
			{
				CGPROGRAM
				#include "Lighting.cginc"

				#pragma vertex vert
				#pragma fragment frag

				#include "UnityCG.cginc"


				struct appdata
				{
					float4 vertex : POSITION;
					float2 uv : TEXCOORD0;
				};

				struct v2f {
					float4 pos : SV_POSITION;    // Clip space
					float3 wPos : TEXCOORD1;    // World position
				};

				float3 _Centre;
				fixed _Radius;

				//估算距离
				float sphereDistance(float3 p)
				{
					return distance(p, _Centre) - _Radius;
				}

				//光线步进
				fixed4 raymarch(float3 position, float3 direction)
				{
					float STEPS = 64;
					float STEP_SIZE = 0.01;
					// Loop do raymarcher.
					for (int i = 0; i < STEPS; i++)
					{
						float distance = sphereDistance(position);
						if (distance < 0.01)
							return i / (float)STEPS;

						position += distance * direction;
					}
					return 0;
				}

				// Vertex function
				v2f vert(appdata_full v)
				{
					v2f o;
					o.pos = UnityObjectToClipPos(v.vertex);
					o.wPos = mul(unity_ObjectToWorld, v.vertex).xyz;
					return o;
				}
				// Fragment function
				fixed4 frag(v2f i) : SV_Target
				{
					float3 worldPosition = i.wPos;
					float3 viewDirection = normalize(i.wPos - _WorldSpaceCameraPos);
					return (1-raymarch(worldPosition, viewDirection)) * float4(1,1,1,1);
				}
			ENDCG
			}
		}
}
重点解释一下函数
如果是和球交不到的那么会return0,在着色时直接纯白
如果和球能交到,则不断步进时,在某一精度返回步进步数,得到一个分数,用来着色时呈现分层透明度
//估算距离
float sphereDistance(float3 p)
{
	return distance(p, _Centre) - _Radius;
}
//光线步进
fixed4 raymarch(float3 position, float3 direction)
{
	float STEPS = 64;
	float STEP_SIZE = 0.01;
	// Loop do raymarcher.
	for (int i = 0; i < STEPS; i++)
	{
		float distance = sphereDistance(position);
		if (distance < 0.01)
			return i / (float)STEPS;

		position += distance * direction;
	}
	return 0;
}
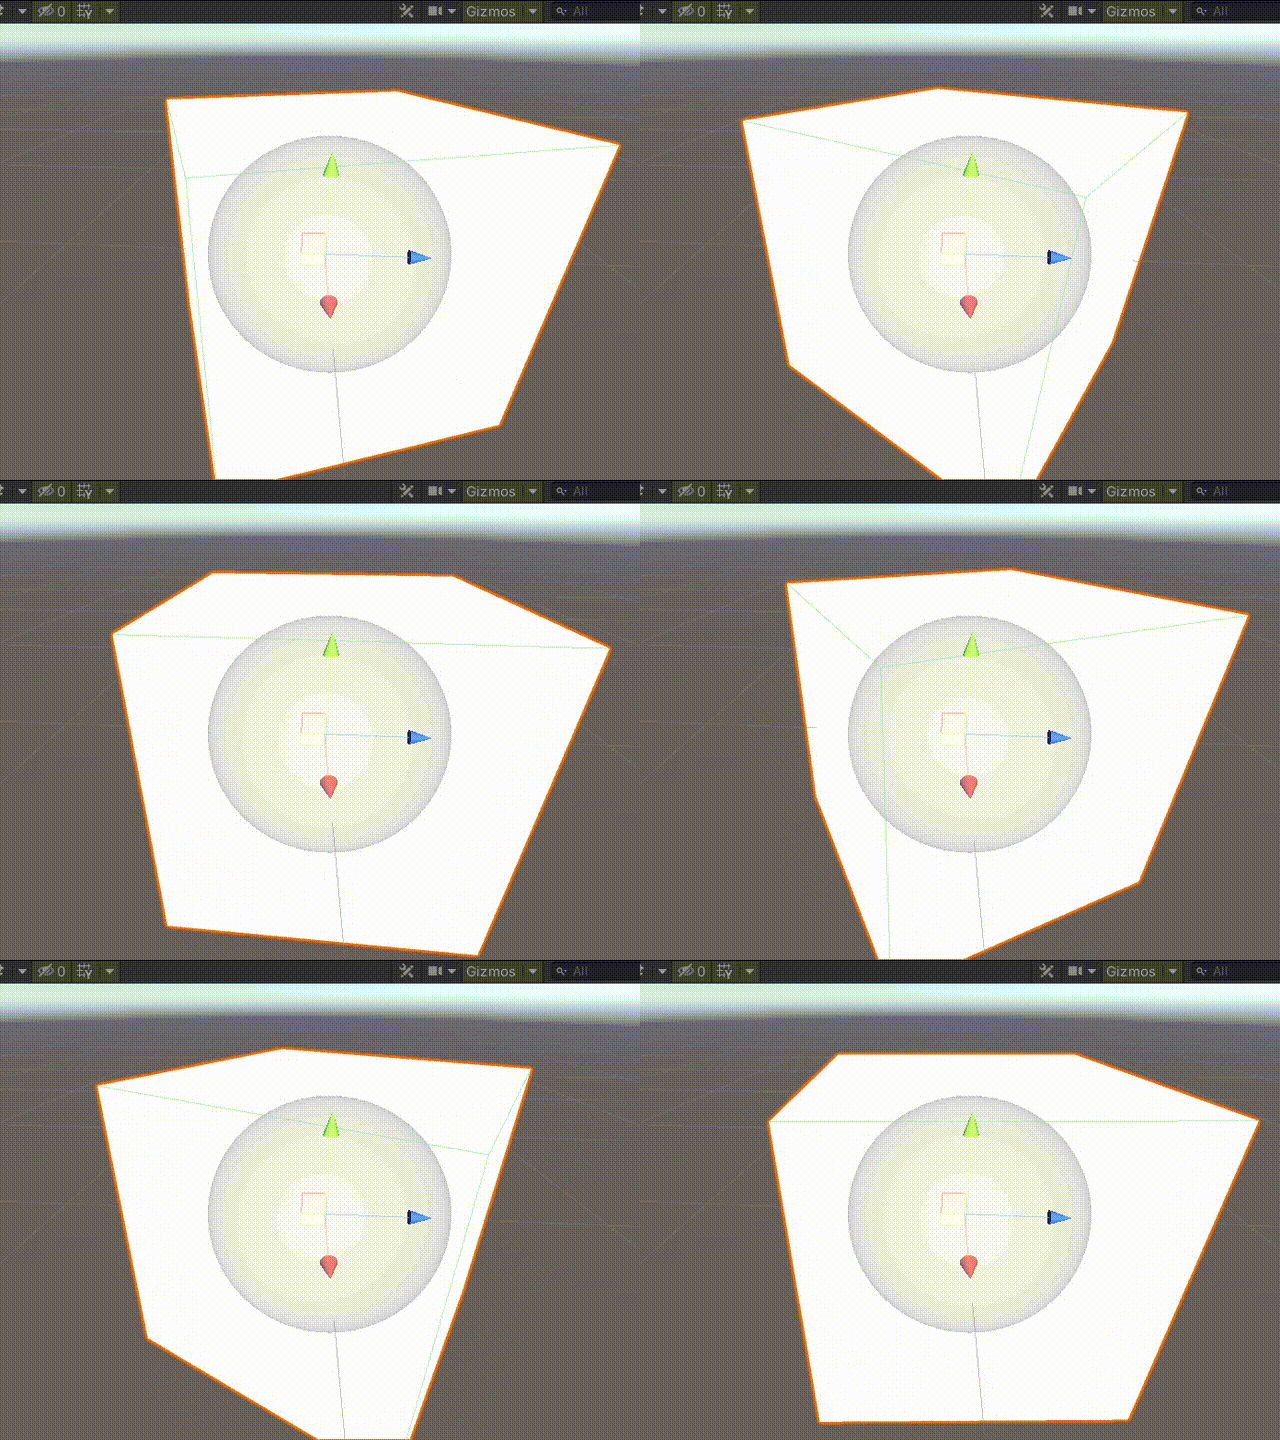
效果如下(花纹为GIF压缩问题,实质为纯色)
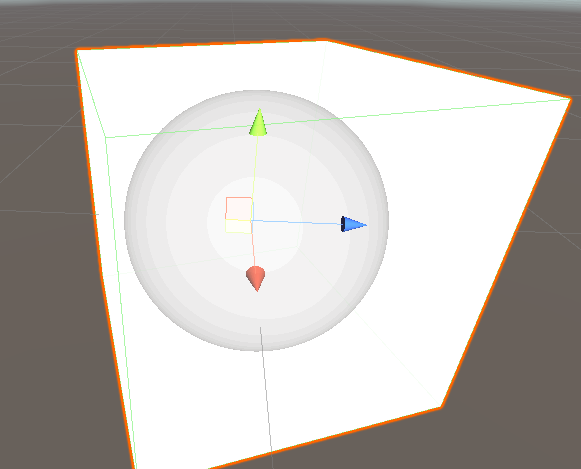
每一个步进层级随着着色点的旋转而变大变小
3 表面着色
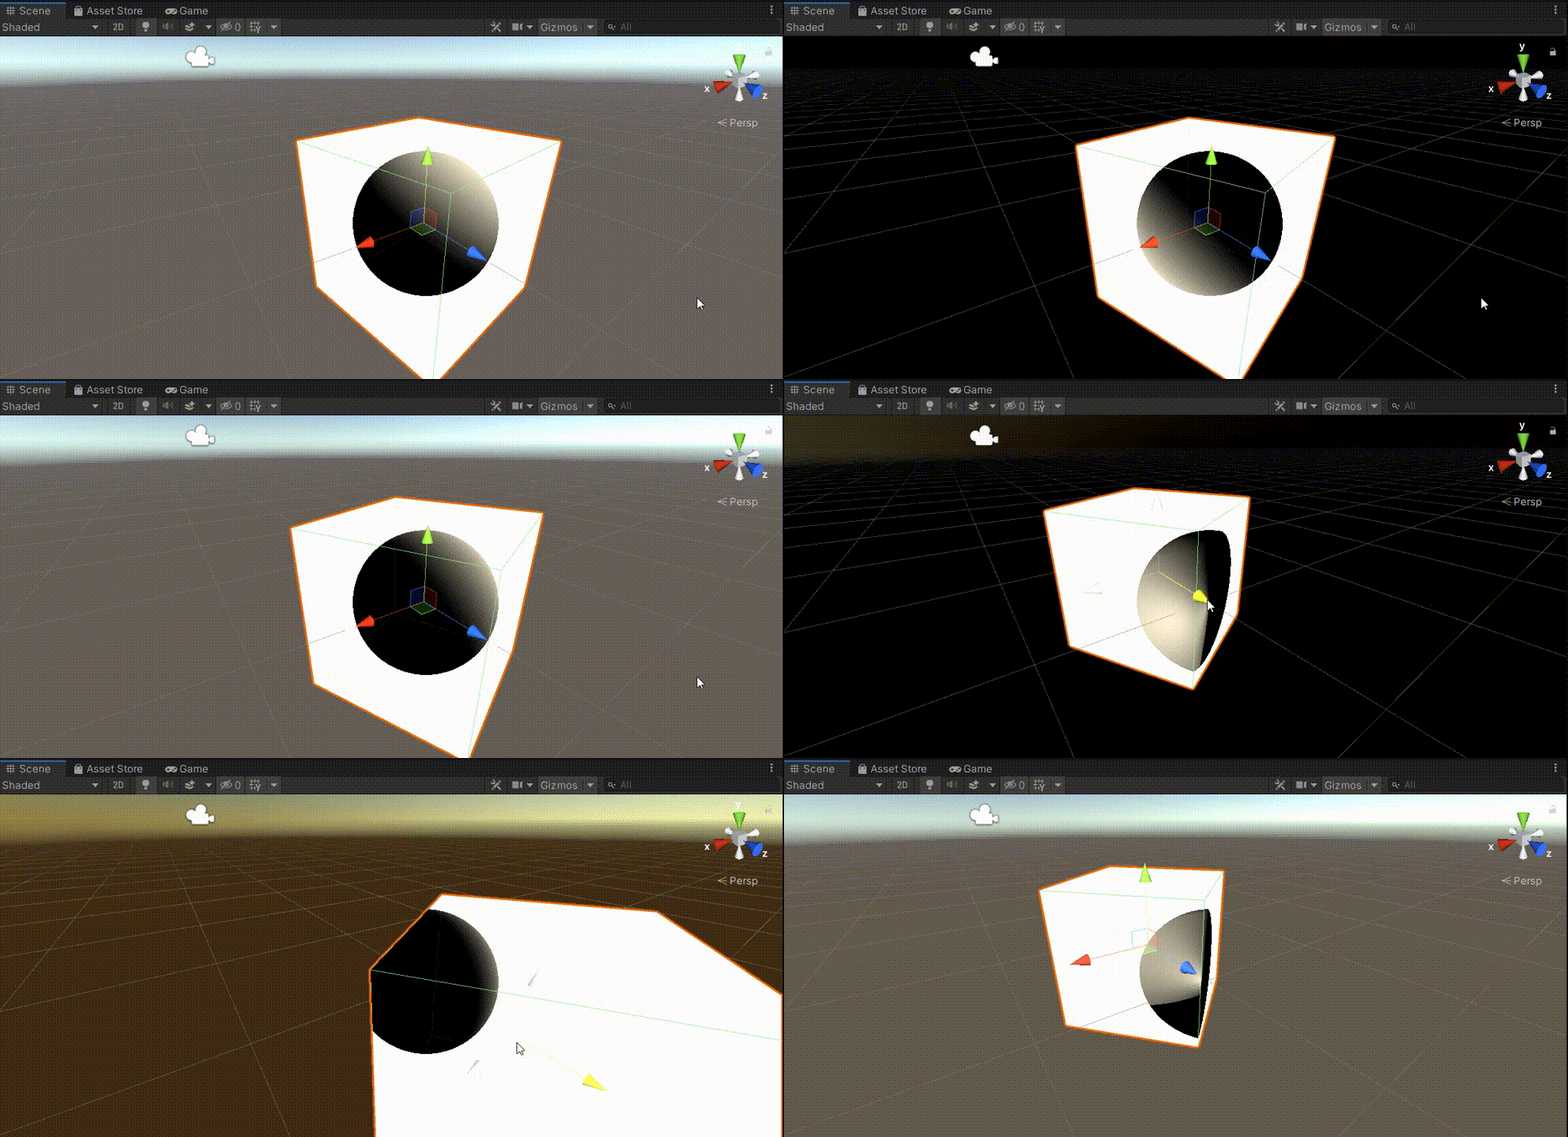
这一节,主要是估算法线和将原本的return i / (float)STEPS;换成了简单的着色模型(兰伯特+布林)
兰伯特和布林就不多赘述了,如何估计法线可以聊一聊
原文给出了一种估算法线方向的技术——对附近点的距离场进行采样,以获得局部表面曲率的估计值。
每个轴上的差异是通过评估该点在这个轴两侧的距离场来计算的
float3 normal(float3 p)
{
	const float eps = 0.01;
	return normalize
	(float3
		(sphereDistance(p + float3(eps, 0, 0)) - sphereDistance(p - float3(eps, 0, 0)),
			sphereDistance(p + float3(0, eps, 0)) - sphereDistance(p - float3(0, eps, 0)),
			sphereDistance(p + float3(0, 0, eps)) - sphereDistance(p - float3(0, 0, eps))
			)
	);
}
- eps代表用于计算表面坡度的距离。该法线估计技术的假设是我们正在着色的表面是相对光滑的。
不连续曲面的坡度用这个方法,并不会正确地逼近着色点的法线方向。
完整代码如下
Shader "Unlit/Volu1"
{
    Properties
    {
		_Color("Color",Vector) = (1,1,1)
		_Centre ("Centre",Vector) = (0,0,0)
		_Radius ("Radius", Range(0,1)) = 0.8
		_SpecularPower("SpecularPower",Range(0,20)) = 4
		_Gloss("Gloss",Range(0,1)) = 0.8
    }
    SubShader
		{
			Blend SrcAlpha OneMinusSrcAlpha
			Tags { "RenderType" = "Transparent" "Queue" = "Transparent" }
			LOD 100

			Pass
			{
				CGPROGRAM
				#include "Lighting.cginc"

				#pragma vertex vert
				#pragma fragment frag

				#include "UnityCG.cginc"


				struct appdata
				{
					float4 vertex : POSITION;
					float2 uv : TEXCOORD0;
				};

				struct v2f {
					float4 pos : SV_POSITION;    // Clip space
					float3 wPos : TEXCOORD1;    // World position
				};

				float3 _Centre;
				fixed _Radius;
				fixed _SpecularPower;
				fixed _Gloss;
				fixed4 _Color;


				//估算距离
				float sphereDistance(float3 p)
				{
					return distance(p, _Centre) - _Radius;
				}
				float3 normal(float3 p)
				{
					const float eps = 0.01;
					return normalize
					(float3
						(sphereDistance(p + float3(eps, 0, 0)) - sphereDistance(p - float3(eps, 0, 0)),
							sphereDistance(p + float3(0, eps, 0)) - sphereDistance(p - float3(0, eps, 0)),
							sphereDistance(p + float3(0, 0, eps)) - sphereDistance(p - float3(0, 0, eps))
							)
					);
				}

				fixed4 simpleLambertBlinn(fixed3 normal,float3 direction) {
					fixed3 viewDirection = direction;
					fixed3 lightDir = _WorldSpaceLightPos0.xyz;    // Light direction
					fixed3 lightCol = _LightColor0.rgb;        // Light color
					fixed NdotL = max(dot(normal, lightDir), 0);
					fixed4 c;
					// Specular
					fixed3 h = (lightDir - viewDirection) / 2.;
					fixed s = pow(dot(normal, h), _SpecularPower) * _Gloss;
					c.rgb = _Color * lightCol * NdotL + s;
					c.a = 1;
					return c;
				}

				fixed4 renderSurface(float3 p, float3 direction)
				{
					float3 n = normal(p);
					return simpleLambertBlinn(n, direction);
				}


				//光线步进
				fixed4 raymarch(float3 position, float3 direction)
				{
					float STEPS = 64;
					float STEP_SIZE = 0.01;
					// Loop do raymarcher.
					for (int i = 0; i < STEPS; i++)
					{
						float distance = sphereDistance(position);
						if (distance < 0.01)
							//return i / (float)STEPS;
							return renderSurface(position, direction);
						position += distance * direction;
					}
					return 1;
				}
				// Vertex function
				v2f vert(appdata_full v)
				{
					v2f o;
					o.pos = UnityObjectToClipPos(v.vertex);
					o.wPos = mul(unity_ObjectToWorld, v.vertex).xyz;
					return o;
				}
				// Fragment function
				fixed4 frag(v2f i) : SV_Target
				{
					float3 worldPosition = i.wPos;
					float3 viewDirection = normalize(i.wPos - _WorldSpaceCameraPos);
					return  raymarch(worldPosition, viewDirection);
				}
			ENDCG
			}
		}
}
4 有向距离函数(Signed Distance Functions)
本节主题是如何在shader中,体绘制出复杂的三维模型。
有向距离函数/有向距离场(Signed Distance Functions) 是用来描述球形,盒子及环面几何体的数学工具。
和传统的由三角形组成的3D模型相比,有向距离函数提供了几乎无限的分辨率,并且适合进行几何体操作。
原文展示了一个动画,如何使用简单的形状去创建一个蜗牛:
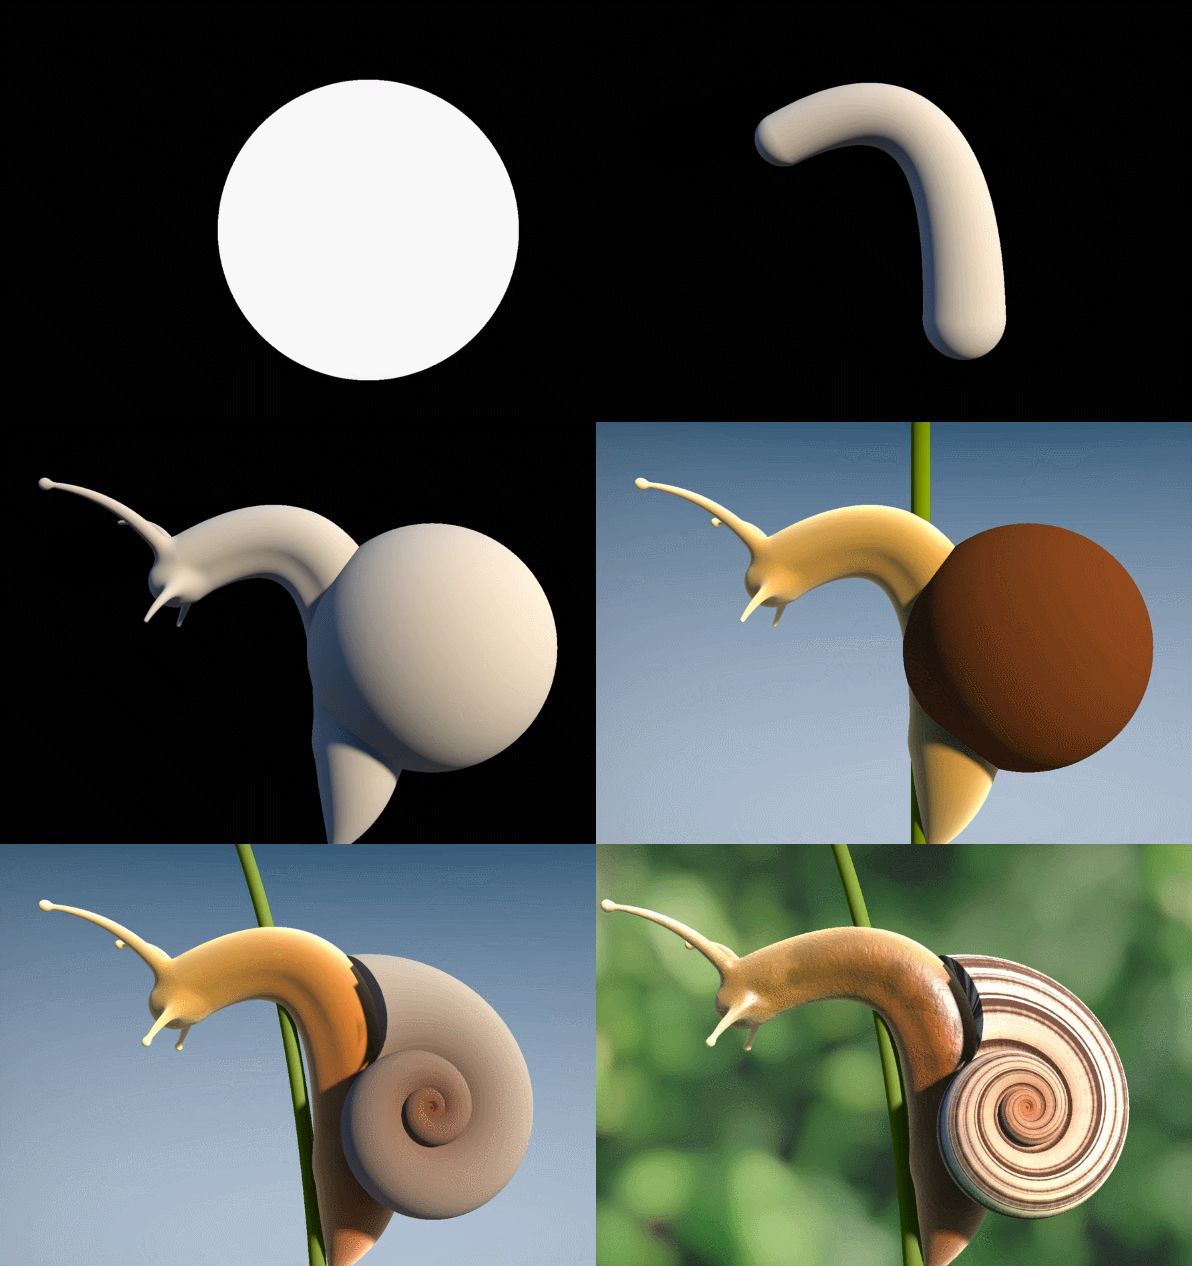
4.1 介绍
大多数现代的3D引擎(比如Unity)都会使用三角形来处理几何体。每一个物体,无论多复杂,都是由原始的三角形所组成。
尽管这是计算机图形学中的实际标准,但不是所有物体都能用三角形表示。像是球形以及其它曲面几何形状就无法被很好细分为平面实体。
虽然我们可以通过在表面覆盖很多很多的小三角形来得到一个近似的球体,但这会增加更多的图形绘制成本。
有什么好的方法可以替代近似呢?其中一个就是使用有向距离函数,它们是我们要表示的对象的数学描述。
当用一个球体方程来取代它的几何形状时,就能把所有由近似描述所带来的错误移除。
我们可以将有向距离函数视作与矢量图等量的三角形,可以放大缩小由SDF构成的几何形状而不丢失细节。
无论离边缘有多近,球体永远都是光滑的。
有向距离函数基于这样一种思想,即每个原始对象都必须有一个对应的函数。它以3D坐标作为参数,并返回一个值,用于表示这个点与物体表面的距离。
在我们之前的球形判断中,就用到了球的SDF函数(这里改了个名)
float sdf_sphere (float3 p)
{
	return distance(p, _Centre) - _Radius;
}
4.2 并集和交集
使用SDF的另一个原因,是因为它们易于合成。
给定两个不同球体的SDF,我们可以将它们合并为一个SDF
返回交集的部分函数如下,很简单,返回距离两个球距离的min
float sdf_sphere(float3 p, float3 c, float r)
{
	return distance(p, c) - r;
}

//估算距离
float sphereDistance(float3 p)
{
	return min
	(
		sdf_sphere(p, _Centre1, _Radius1), // Left sphere
		sdf_sphere(p, _Centre2, _Radius2)  // Right sphere
	);
}
效果如下
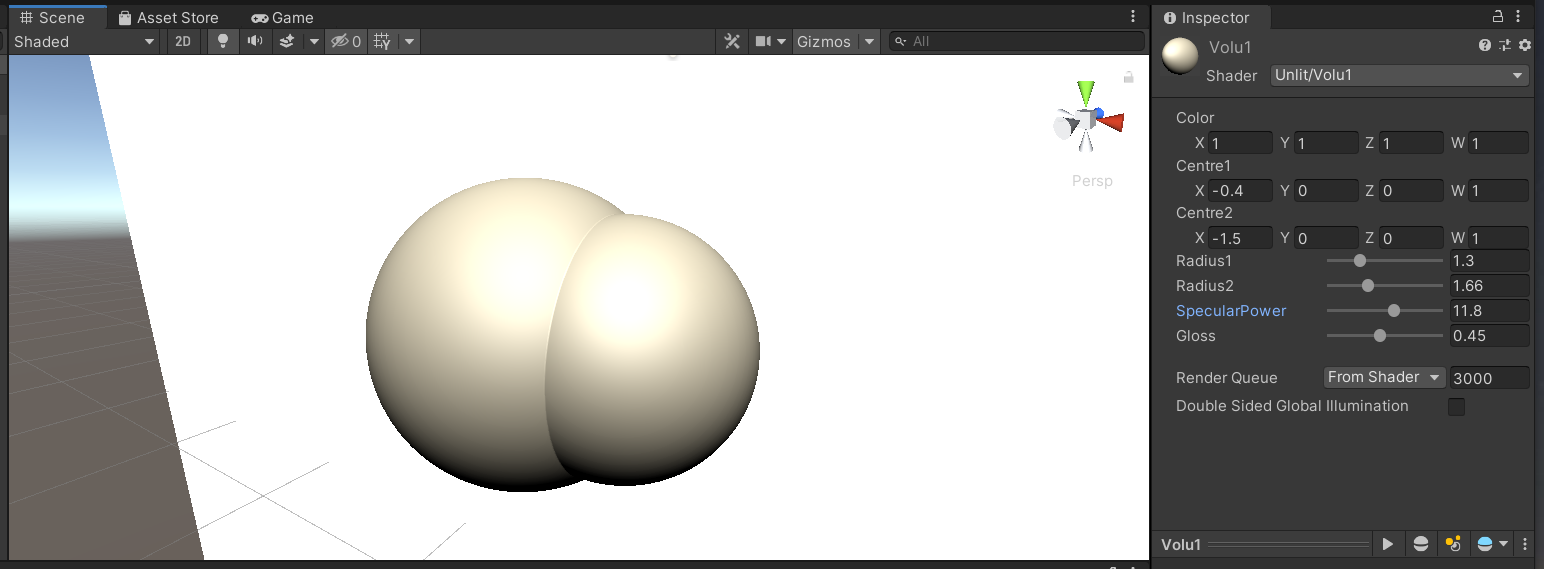
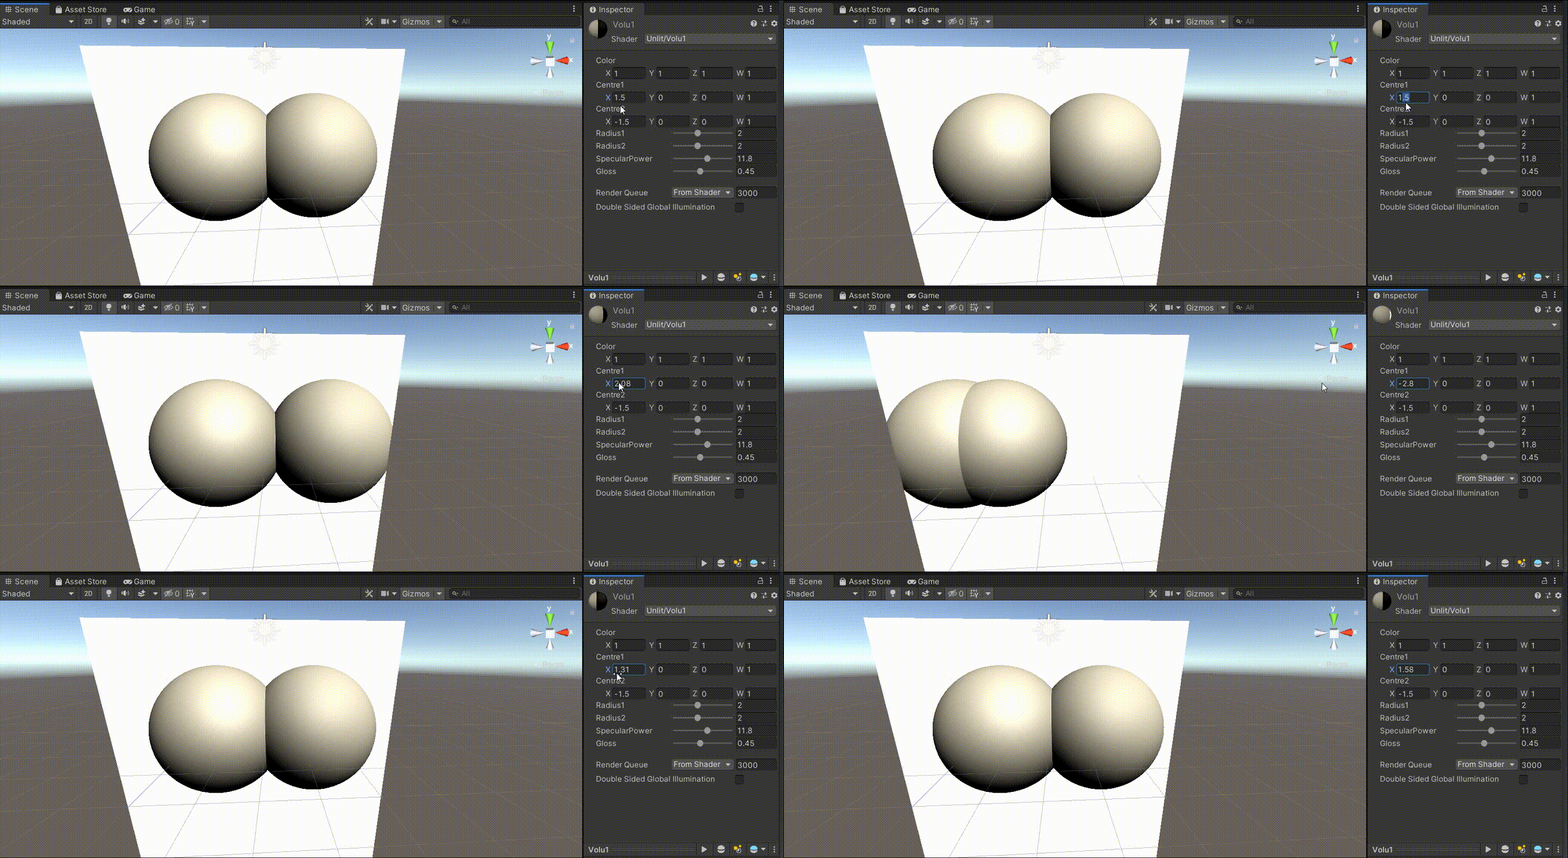
完整shader如下
Shader "Unlit/Volu1"
{
    Properties
    {
		_Color("Color",Vector) = (1,1,1)
		_Centre1("Centre1",Vector) = (1.5,0,0)
		_Centre2("Centre2",Vector) = (-1.5,0,0)
		_Radius1("Radius1", Range(0,5)) = 0.8
		_Radius2("Radius2", Range(0,5)) = 0.8
		_SpecularPower("SpecularPower",Range(0,20)) = 4
		_Gloss("Gloss",Range(0,1)) = 0.8
    }
    SubShader
		{
			Blend SrcAlpha OneMinusSrcAlpha
			Tags { "RenderType" = "Transparent" "Queue" = "Transparent" }
			LOD 100

			Pass
			{
				CGPROGRAM
				#include "Lighting.cginc"

				#pragma vertex vert
				#pragma fragment frag

				#include "UnityCG.cginc"


				struct appdata
				{
					float4 vertex : POSITION;
					float2 uv : TEXCOORD0;
				};

				struct v2f {
					float4 pos : SV_POSITION;    // Clip space
					float3 wPos : TEXCOORD1;    // World position
				};

				float3 _Centre1;
				fixed _Radius1;
				float3 _Centre2;
				fixed _Radius2;
				fixed _SpecularPower;
				fixed _Gloss;
				fixed4 _Color;

				float sdf_sphere(float3 p, float3 c, float r)
				{
					return distance(p, c) - r;
				}

				//估算距离
				float sphereDistance(float3 p)
				{
					return min
					(
						sdf_sphere(p, _Centre1, _Radius1), // Left sphere
						sdf_sphere(p, _Centre2, _Radius2)  // Right sphere
					);
				}
				float3 normal(float3 p)
				{
					const float eps = 0.01;
					return normalize
					(float3
						(sphereDistance(p + float3(eps, 0, 0)) - sphereDistance(p - float3(eps, 0, 0)),
							sphereDistance(p + float3(0, eps, 0)) - sphereDistance(p - float3(0, eps, 0)),
							sphereDistance(p + float3(0, 0, eps)) - sphereDistance(p - float3(0, 0, eps))
							)
					);
				}

				fixed4 simpleLambertBlinn(fixed3 normal,float3 direction) {
					fixed3 viewDirection = direction;
					fixed3 lightDir = _WorldSpaceLightPos0.xyz;    // Light direction
					fixed3 lightCol = _LightColor0.rgb;        // Light color
					fixed NdotL = max(dot(normal, lightDir), 0);
					fixed4 c;
					// Specular
					fixed3 h = (lightDir - viewDirection) / 2.;
					fixed s = pow(dot(normal, h), _SpecularPower) * _Gloss;
					c.rgb = _Color * lightCol * NdotL + s;
					c.a = 1;
					return c;
				}

				fixed4 renderSurface(float3 p, float3 direction)
				{
					float3 n = normal(p);
					return simpleLambertBlinn(n, direction);
				}
				//光线步进
				fixed4 raymarch(float3 position, float3 direction)
				{
					float STEPS = 64;
					float STEP_SIZE = 0.01;
					// Loop do raymarcher.
					for (int i = 0; i < STEPS; i++)
					{
						float distance = sphereDistance(position);
						if (distance < 0.01)
							//return i / (float)STEPS;
							return renderSurface(position, direction);
						position += distance * direction;
					}
					return 1;

				}
				// Vertex function
				v2f vert(appdata_full v)
				{
					v2f o;
					o.pos = UnityObjectToClipPos(v.vertex);
					o.wPos = mul(unity_ObjectToWorld, v.vertex).xyz;
					return o;
				}
				// Fragment function
				fixed4 frag(v2f i) : SV_Target
				{
					float3 worldPosition = i.wPos;
					float3 viewDirection = normalize(i.wPos - _WorldSpaceCameraPos);
					return  raymarch(worldPosition, viewDirection);
				}
			ENDCG
			}
		}
}
4.3 SDF Box
可以看看这个推导
很多几何图形可以用已知的方式进行构建。
如果想更深入,就需要引入新的SDF原型:半空间。
正如其名字的字面意思,它只是一个原始的占据了半个3D空间的东西。
对于点P,它到box的距离是多少呢?
我们只看右上区域,它在①,②,③空间到这个box的距离可以写成下图的三个表达式
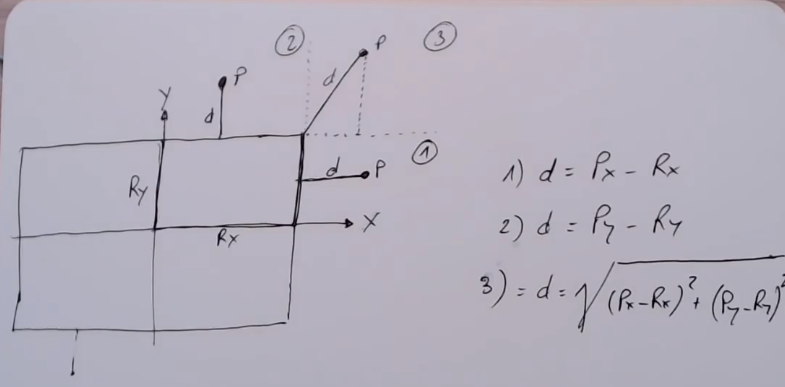
他们可以写成一个表达式
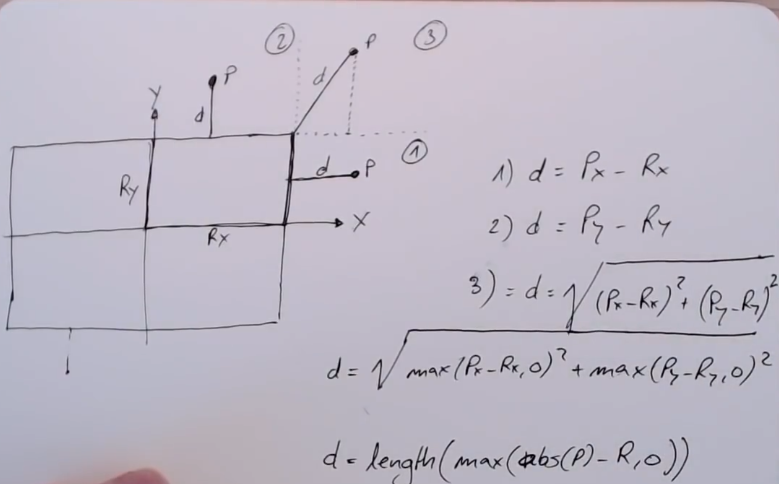
S代表box的尺寸,C代表box的中心
p-c是得到相对位置,再减去S是上面的公式做法
float sdf_box (float3 p, float3 c, float3 s)
{
    float x = max
    (   p.x - c.x - float3(s.x / 2., 0, 0),
        c.x - p.x - float3(s.x / 2., 0, 0)
    );
    float y = max
    (   p.y - c.y - float3(s.y / 2., 0, 0),
        c.y - p.y - float3(s.y / 2., 0, 0)
    );

    float z = max
    (   p.z - c.z - float3(s.z / 2., 0, 0),
        c.z - p.z - float3(s.z / 2., 0, 0)
    );
    float d = x;
    d = max(d,y);
    d = max(d,z);
    return d;
}
效果如下
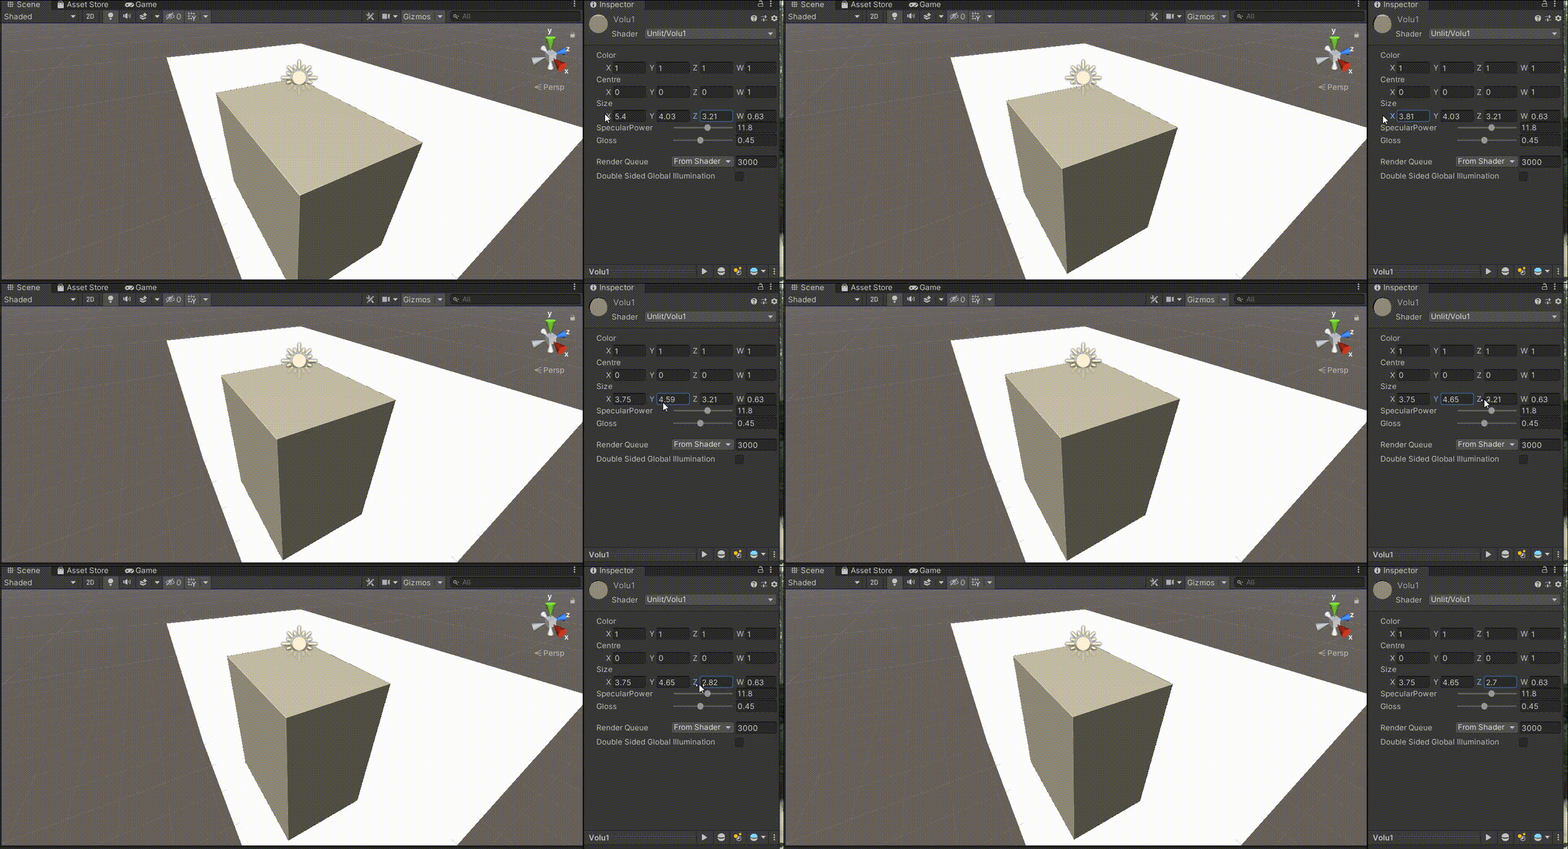
完整代码如下
Shader "Unlit/Volu1"
{
    Properties
    {
		_Color("Color",Vector) = (1,1,1)
		_Centre ("Centre",Vector) = (0,0,0)
		_Size("Size",Vector) = (1,1,1)
		_SpecularPower("SpecularPower",Range(0,20)) = 4
		_Gloss("Gloss",Range(0,1)) = 0.8
    }
    SubShader
		{
			Blend SrcAlpha OneMinusSrcAlpha
			Tags { "RenderType" = "Transparent" "Queue" = "Transparent" }
			LOD 100

			Pass
			{
				CGPROGRAM
				#include "Lighting.cginc"

				#pragma vertex vert
				#pragma fragment frag

				#include "UnityCG.cginc"


				struct appdata
				{
					float4 vertex : POSITION;
					float2 uv : TEXCOORD0;
				};

				struct v2f {
					float4 pos : SV_POSITION;    // Clip space
					float3 wPos : TEXCOORD1;    // World position
				};

				float3 _Centre;
				fixed3 _Size;
				fixed _SpecularPower;
				fixed _Gloss;
				fixed4 _Color;

				float sdf_box(float3 p, float3 c, float3 s)
				{
					float x = max
					(p.x - c.x - float3(s.x / 2., 0, 0),
						c.x - p.x - float3(s.x / 2., 0, 0)
					);
					float y = max
					(p.y - c.y - float3(s.y / 2., 0, 0),
						c.y - p.y - float3(s.y / 2., 0, 0)
					);

					float z = max
					(p.z - c.z - float3(s.z / 2., 0, 0),
						c.z - p.z - float3(s.z / 2., 0, 0)
					);
					float d = x;
					d = max(d, y);
					d = max(d, z);
					return d;
				}

				//估算距离
				float sdf_Distance(float3 p)
				{
					return sdf_box(p, _Centre, _Size);
				}

				float3 normal(float3 p)
				{
					const float eps = 0.01;
					return normalize
					(float3
						(sdf_Distance(p + float3(eps, 0, 0)) - sdf_Distance(p - float3(eps, 0, 0)),
							sdf_Distance(p + float3(0, eps, 0)) - sdf_Distance(p - float3(0, eps, 0)),
							sdf_Distance(p + float3(0, 0, eps)) - sdf_Distance(p - float3(0, 0, eps))
							)
					);
				}

				fixed4 simpleLambertBlinn(fixed3 normal,float3 direction) {
					fixed3 viewDirection = direction;
					fixed3 lightDir = _WorldSpaceLightPos0.xyz;    // Light direction
					fixed3 lightCol = _LightColor0.rgb;        // Light color
					fixed NdotL = max(dot(normal, lightDir), 0);
					fixed4 c;
					// Specular
					fixed3 h = (lightDir - viewDirection) / 2.;
					fixed s = pow(dot(normal, h), _SpecularPower) * _Gloss;
					c.rgb = _Color * lightCol * NdotL + s;
					c.a = 1;
					return c;
				}

				fixed4 renderSurface(float3 p, float3 direction)
				{
					float3 n = normal(p);
					return simpleLambertBlinn(n, direction);
				}


				//光线步进
				fixed4 raymarch(float3 position, float3 direction)
				{
					float STEPS = 64;
					float STEP_SIZE = 0.01;
					// Loop do raymarcher.
					for (int i = 0; i < STEPS; i++)
					{
						float distance = sdf_Distance(position);
						if (distance < 0.01)
							//return i / (float)STEPS;
							return renderSurface(position, direction);
						position += distance * direction;
					}
					return 1;
				}

				// Vertex function
				v2f vert(appdata_full v)
				{
					v2f o;
					o.pos = UnityObjectToClipPos(v.vertex);
					o.wPos = mul(unity_ObjectToWorld, v.vertex).xyz;
					return o;
				}
				// Fragment function
				fixed4 frag(v2f i) : SV_Target
				{
					float3 worldPosition = i.wPos;
					float3 viewDirection = normalize(i.wPos - _WorldSpaceCameraPos);
					return  raymarch(worldPosition, viewDirection);
				}
			ENDCG
			}
		}
}
也有代码更少(但不太精确)的方法
float vmax(float3 v)
{
    return max(max(v.x, v.y), v.z);
}
float sdf_boxcheap(float3 p, float3 c, float3 s)
{
    return vmax(abs(p-c) - s);
}
4.4 线性插值混合 Shape Blending(lerp)
在alphablending中有一种blending是lerp插值,我们可以用到sdf中来
float sdf_blend(float d1, float d2, float a)
{
    return a * d1 + (1 - a) * d2;
}
在两个值之间创建混合, d1 和 d2 ,由值a控制(从零到一)。
这个用于混合颜色的完全相同的代码也可以用于混合形状。
例如,以下代码将一个球体混合到一个立方体中:
d = sdf_blend
(
    sdf_sphere (p,0 ,r ),
    sdf_box (p,0 ,r ),
    (_SinTime [ 3 ] + 1. )/ 2。
);
效果如下
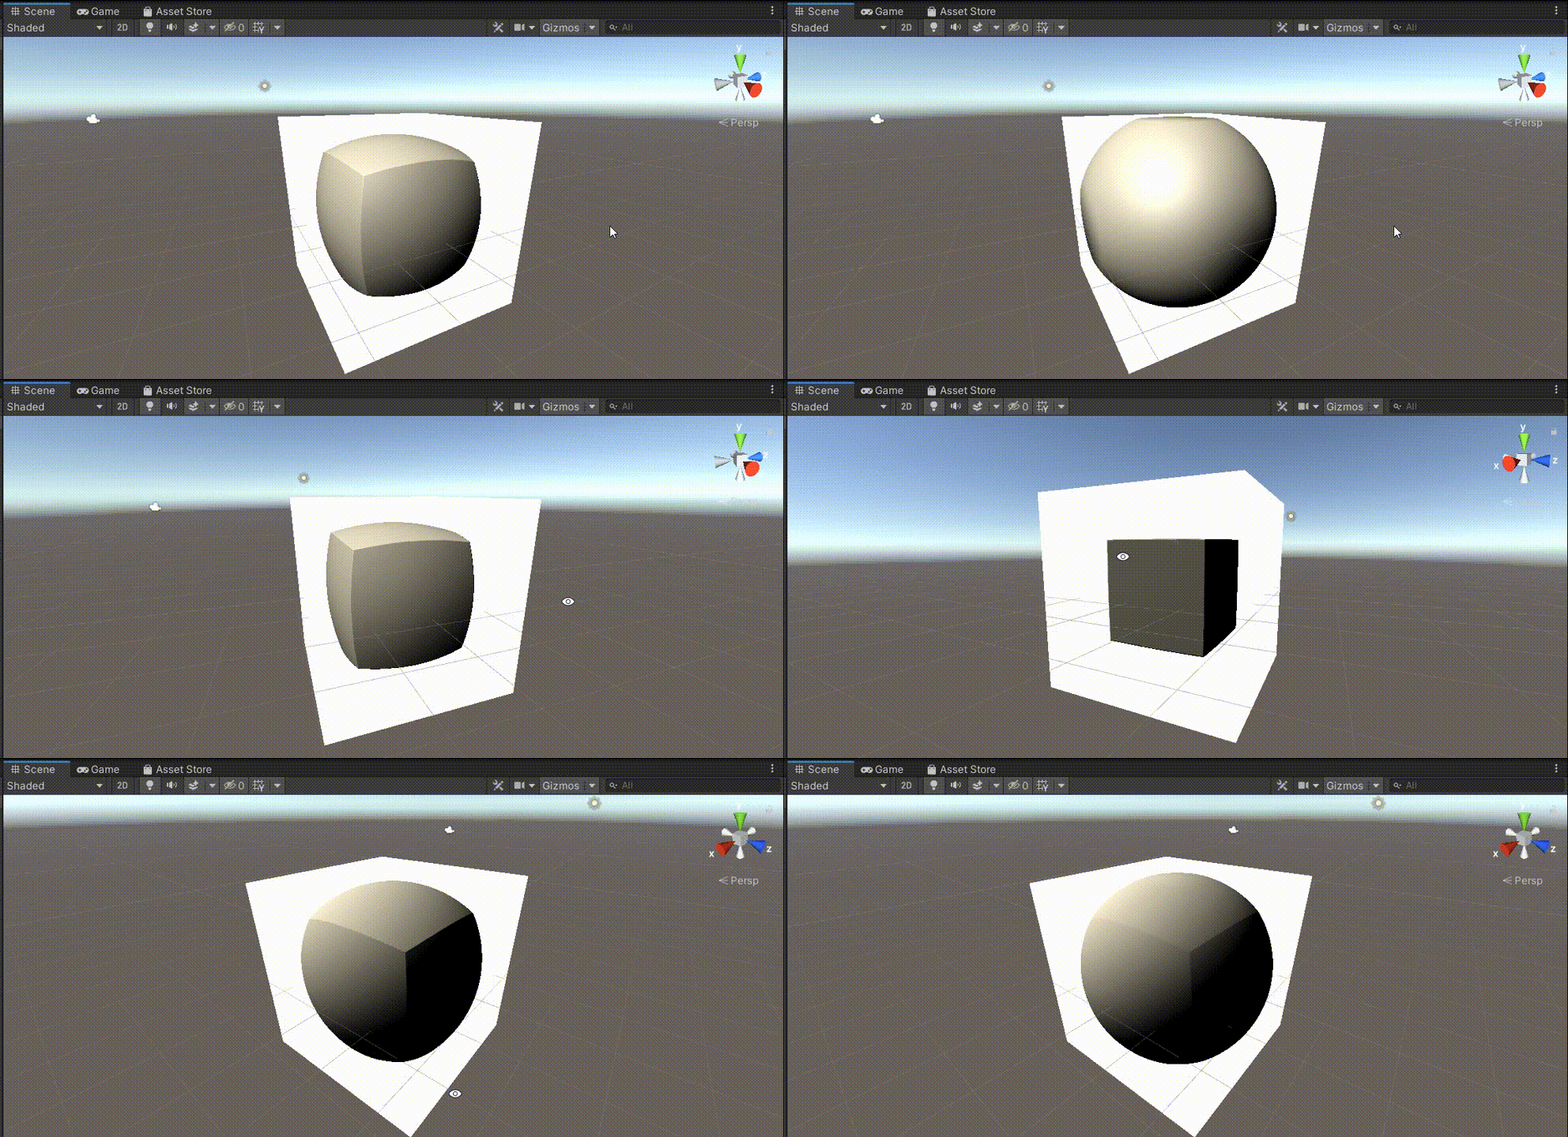
完整代码如下
Shader "Unlit/Volu6"
{
	Properties
	{
		_Color("Color",Vector) = (1,1,1)
		_Centre("Centre",Vector) = (0,0,0)
		_Size("Size",Vector) = (1,1,1)
		_SpecularPower("SpecularPower",Range(0,20)) = 4
		_Gloss("Gloss",Range(0,1)) = 0.8
	}
		SubShader
	{
		Blend SrcAlpha OneMinusSrcAlpha
		Tags { "RenderType" = "Transparent" "Queue" = "Transparent" }
		LOD 100

		Pass
		{
			CGPROGRAM
			#include "Lighting.cginc"

			#pragma vertex vert
			#pragma fragment frag

			#include "UnityCG.cginc"


			struct appdata
			{
				float4 vertex : POSITION;
				float2 uv : TEXCOORD0;
			};

			struct v2f {
				float4 pos : SV_POSITION;    // Clip space
				float3 wPos : TEXCOORD1;    // World position
			};

			float3 _Centre;
			fixed3 _Size;
			fixed _SpecularPower;
			fixed _Gloss;
			fixed4 _Color;

			float sdf_box(float3 p, float3 c, float3 s)
			{
				float x = max
				(p.x - c.x - float3(s.x / 2., 0, 0),
					c.x - p.x - float3(s.x / 2., 0, 0)
				);
				float y = max
				(p.y - c.y - float3(s.y / 2., 0, 0),
					c.y - p.y - float3(s.y / 2., 0, 0)
				);

				float z = max
				(p.z - c.z - float3(s.z / 2., 0, 0),
					c.z - p.z - float3(s.z / 2., 0, 0)
				);
				float d = x;
				d = max(d, y);
				d = max(d, z);
				return d;
			}
			float sdf_sphere(float3 p,float3 c, float3 s)
			{
				return distance(p, c) -s.x;
			}
			float sdf_blend(float d1, float d2, float a)
			{
				return a * d1 + (1 - a) * d2;
			}

			//估算距离
			float sdf_Distance(float3 p)
			{
				return sdf_blend
				(
					sdf_sphere(p, _Centre, _Size),
					sdf_box(p, _Centre, _Size),
					(_SinTime[3] + 1.) / 2.
				);
			}

			float3 normal(float3 p)
			{
				const float eps = 0.01;
				return normalize
				(float3
					(sdf_Distance(p + float3(eps, 0, 0)) - sdf_Distance(p - float3(eps, 0, 0)),
						sdf_Distance(p + float3(0, eps, 0)) - sdf_Distance(p - float3(0, eps, 0)),
						sdf_Distance(p + float3(0, 0, eps)) - sdf_Distance(p - float3(0, 0, eps))
						)
				);
			}

			fixed4 simpleLambertBlinn(fixed3 normal,float3 direction) {
				fixed3 viewDirection = direction;
				fixed3 lightDir = _WorldSpaceLightPos0.xyz;    // Light direction
				fixed3 lightCol = _LightColor0.rgb;        // Light color
				fixed NdotL = max(dot(normal, lightDir), 0);
				fixed4 c;
				// Specular
				fixed3 h = (lightDir - viewDirection) / 2.;
				fixed s = pow(dot(normal, h), _SpecularPower) * _Gloss;
				c.rgb = _Color * lightCol * NdotL + s;
				c.a = 1;
				return c;
			}

			fixed4 renderSurface(float3 p, float3 direction)
			{
				float3 n = normal(p);
				return simpleLambertBlinn(n, direction);
			}


			//光线步进
			fixed4 raymarch(float3 position, float3 direction)
			{
				float STEPS = 64;
				float STEP_SIZE = 0.01;
				// Loop do raymarcher.
				for (int i = 0; i < STEPS; i++)
				{
					float distance = sdf_Distance(position);
					if (distance < 0.01)
						//return i / (float)STEPS;
						return renderSurface(position, direction);
					position += distance * direction;
				}
				return 1;
			}

			// Vertex function
			v2f vert(appdata_full v)
			{
				v2f o;
				o.pos = UnityObjectToClipPos(v.vertex);
				o.wPos = mul(unity_ObjectToWorld, v.vertex).xyz;
				return o;
			}
			// Fragment function
			fixed4 frag(v2f i) : SV_Target
			{
				float3 worldPosition = i.wPos;
				float3 viewDirection = normalize(i.wPos - _WorldSpaceCameraPos);
				return  raymarch(worldPosition, viewDirection);
			}
		ENDCG
		}
	}
}
4.5 平滑过渡 Smooth Union
上一个结果是lerp插值,但其实还有很多插值方法
指数平滑(Smooth Minimum)是其中一种技术
float sdf_smin(float a, float b, float k = 32)
{
    float res = exp(-k*a) + exp(-k*b);
    return -log(max(0.0001,res)) / k;
}
使用这个运算符将两个形状连接在一起时,它们将轻柔地合并,从而创建一个柔和的步骤,以消除任何锋利的边缘。
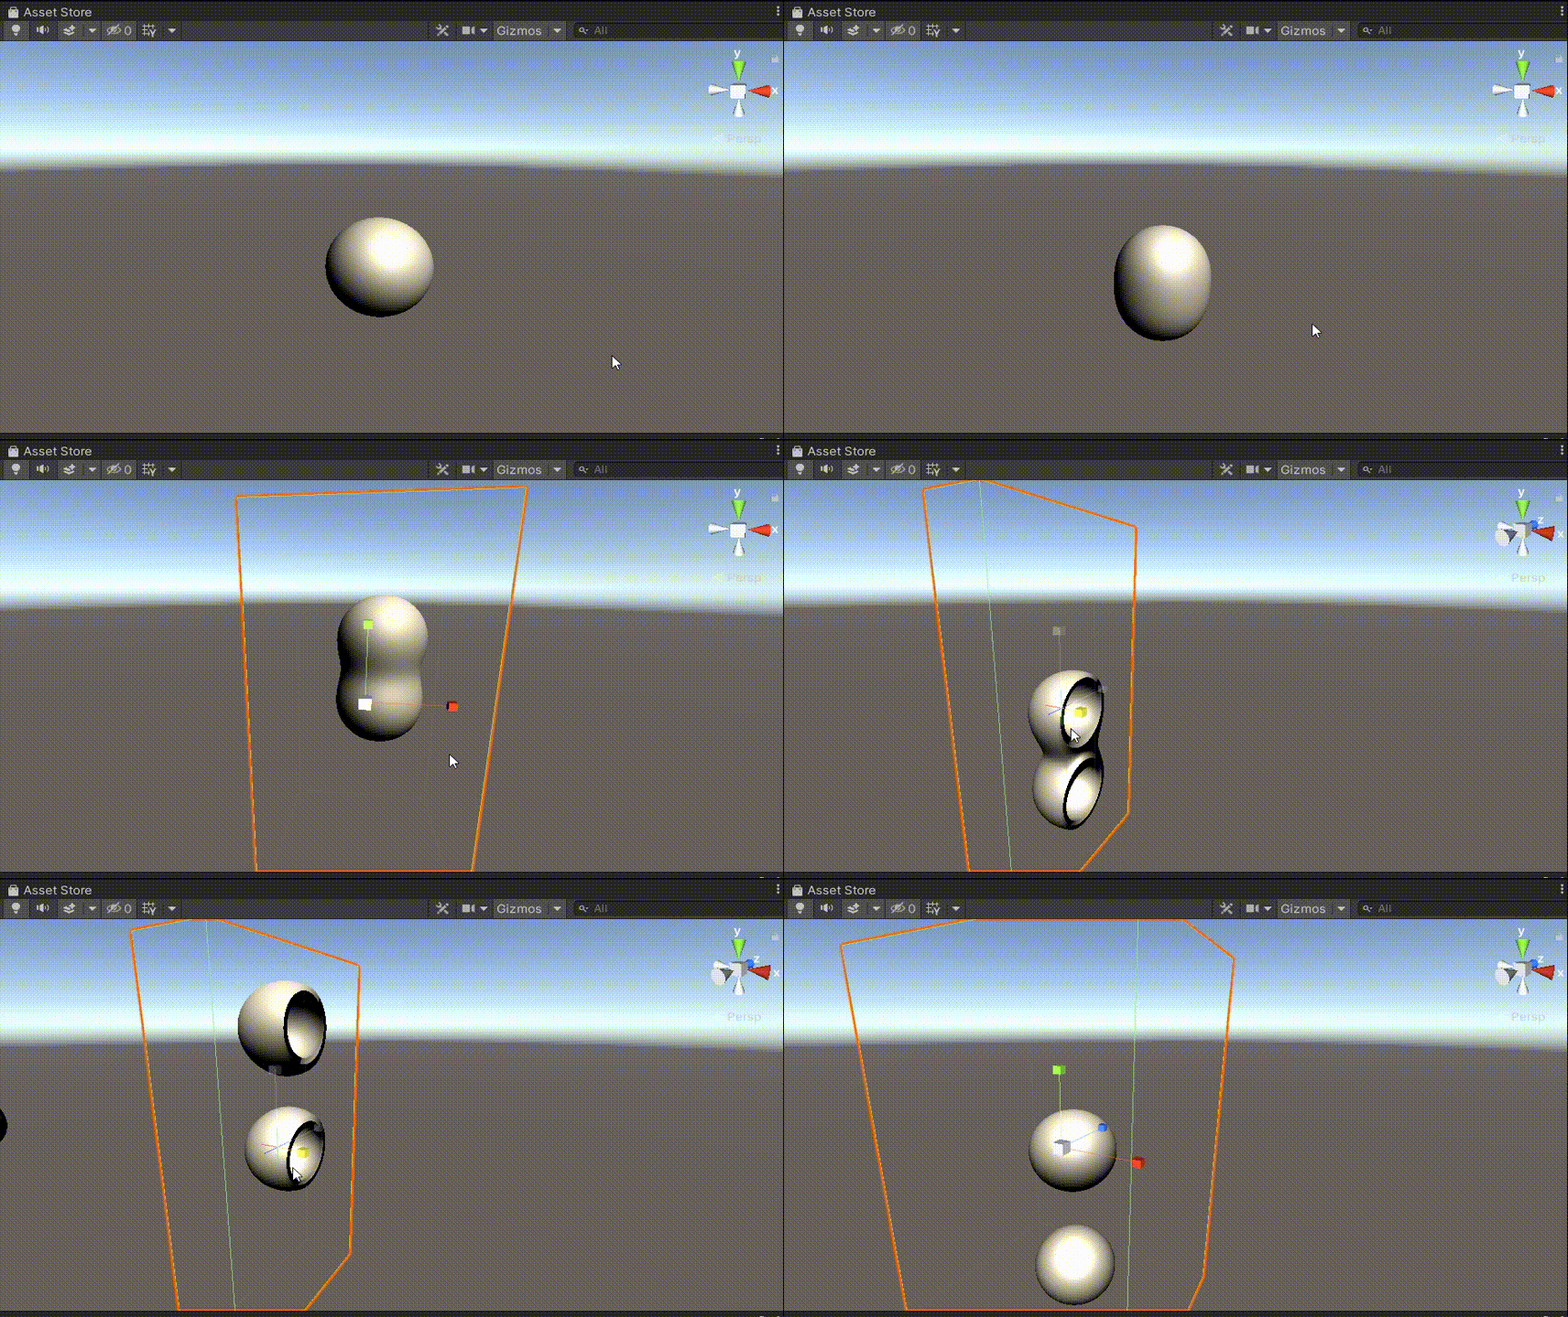
代码如下,主要用了一些sdf的函数
Shader "Unlit/Volu7"
{
	Properties
	{
		_Color("Color",Vector) = (1,1,1)
		_Centre("Centre",Vector) = (0,0,0)
		_Centre1("Centre1",Vector) = (0,0,0)
		_Size("Size",Vector) = (1,1,1)
		_SpecularPower("SpecularPower",Range(0,20)) = 4
		_Gloss("Gloss",Range(0,1)) = 0.8
	}
		SubShader
	{
		Blend SrcAlpha OneMinusSrcAlpha
		Tags { "RenderType" = "Transparent" "Queue" = "Transparent" }
		LOD 100

		Pass
		{
			CGPROGRAM
			#include "Lighting.cginc"

			#pragma vertex vert
			#pragma fragment frag

			#include "UnityCG.cginc"


			struct appdata
			{
				float4 vertex : POSITION;
				float2 uv : TEXCOORD0;
			};

			struct v2f {
				float4 pos : SV_POSITION;    // Clip space
				float3 wPos : TEXCOORD1;    // World position
			};

			float3 _Centre;
			float3 _Centre1;
			fixed3 _Size;
			fixed _SpecularPower;
			fixed _Gloss;
			fixed4 _Color;


			float sdf_sphere(float3 p,float3 c, float3 s)
			{
				return distance(p, c) - s.x;
			}

			float opOnion(float sdf, float thickness)
			{
				return abs(sdf) - thickness;
			}

			float sdf_smin(float a, float b, float k = 32)
			{
				float res = exp(-k * a) + exp(-k * b);
				return -log(max(0.0001, res)) / k;
			}

			//估算距离
			float sdf_Distance(float3 p)
			{
				_Centre.y = _SinTime[3] * 8;
				return sdf_smin(
					opOnion(sdf_sphere(p, _Centre1, _Size), 0.2),
					opOnion(sdf_sphere(p, _Centre, _Size), 0.2),
					1);

			}

			float3 normal(float3 p)
			{
				const float eps = 0.01;
				return normalize
				(float3
					(sdf_Distance(p + float3(eps, 0, 0)) - sdf_Distance(p - float3(eps, 0, 0)),
						sdf_Distance(p + float3(0, eps, 0)) - sdf_Distance(p - float3(0, eps, 0)),
						sdf_Distance(p + float3(0, 0, eps)) - sdf_Distance(p - float3(0, 0, eps))
						)
				);
			}

			fixed4 simpleLambertBlinn(fixed3 normal,float3 direction) {
				fixed3 viewDirection = direction;
				fixed3 lightDir = _WorldSpaceLightPos0.xyz;    // Light direction
				fixed3 lightCol = _LightColor0.rgb;        // Light color
				fixed NdotL = max(dot(normal, lightDir), 0);
				fixed4 c;
				// Specular
				fixed3 h = (lightDir - viewDirection) / 2.;
				fixed s = pow(dot(normal, h), _SpecularPower) * _Gloss;
				c.rgb = _Color * lightCol * NdotL + s;
				c.a = 1;
				return c;
			}

			fixed4 renderSurface(float3 p, float3 direction)
			{
				float3 n = normal(p);
				return simpleLambertBlinn(n, direction);
			}


			//光线步进
			fixed4 raymarch(float3 position, float3 direction)
			{
				float STEPS = 64;
				float STEP_SIZE = 0.01;
				// Loop do raymarcher.
				for (int i = 0; i < STEPS; i++)
				{
					float distance = sdf_Distance(position);
					if (distance < 0.01)
						//return i / (float)STEPS;
						return renderSurface(position, direction);
					position += distance * direction;
				}
				return 0;
			}

			// Vertex function
			v2f vert(appdata_full v)
			{
				v2f o;
				o.pos = UnityObjectToClipPos(v.vertex);
				o.wPos = mul(unity_ObjectToWorld, v.vertex).xyz;
				return o;
			}
			// Fragment function
			fixed4 frag(v2f i) : SV_Target
			{
				float3 worldPosition = i.wPos;
				float3 viewDirection = normalize(i.wPos - _WorldSpaceCameraPos);
				return  raymarch(worldPosition, viewDirection);
			}
		ENDCG
		}
	}
}
4.6 SDF 代数
所有这些SDF的函数和运算符都是有符号距离函数代数的一部分。
旋转,缩放,弯曲,扭曲……所有这些操作都可以通过它执行。
在这篇文章,使用距离函数建模中,介绍了很多
SDF是真的一个很强大的工具。
这节只是对该主题的快速介绍,后续可以提高对SDF的了解。
(想起了games102还是201来着,有关几何的部分,还没去看,抓紧补一补吧)
5 环境光遮挡
快速的AO可以这么做
思想就是步数消耗越多,AO约明显
fixed4 raymarch (float3 position, float3 direction)
{
    for (int i = 0; i < _Steps; i++)
    {
        float distance = map(position);
        if (distance < _MinDistance)
        {
            fixed4 color = renderSurface(position, direction);
            float ao = 1 - float(i) / (_Steps-1);
            color.rgb *= ao;
            return color;
        }
        position += distance * direction;
    }
    return fixed4(1,1,1,1);
}
右边是加了AO的
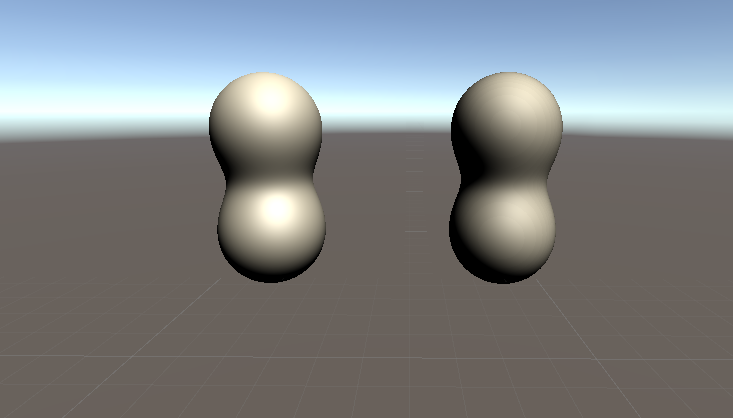
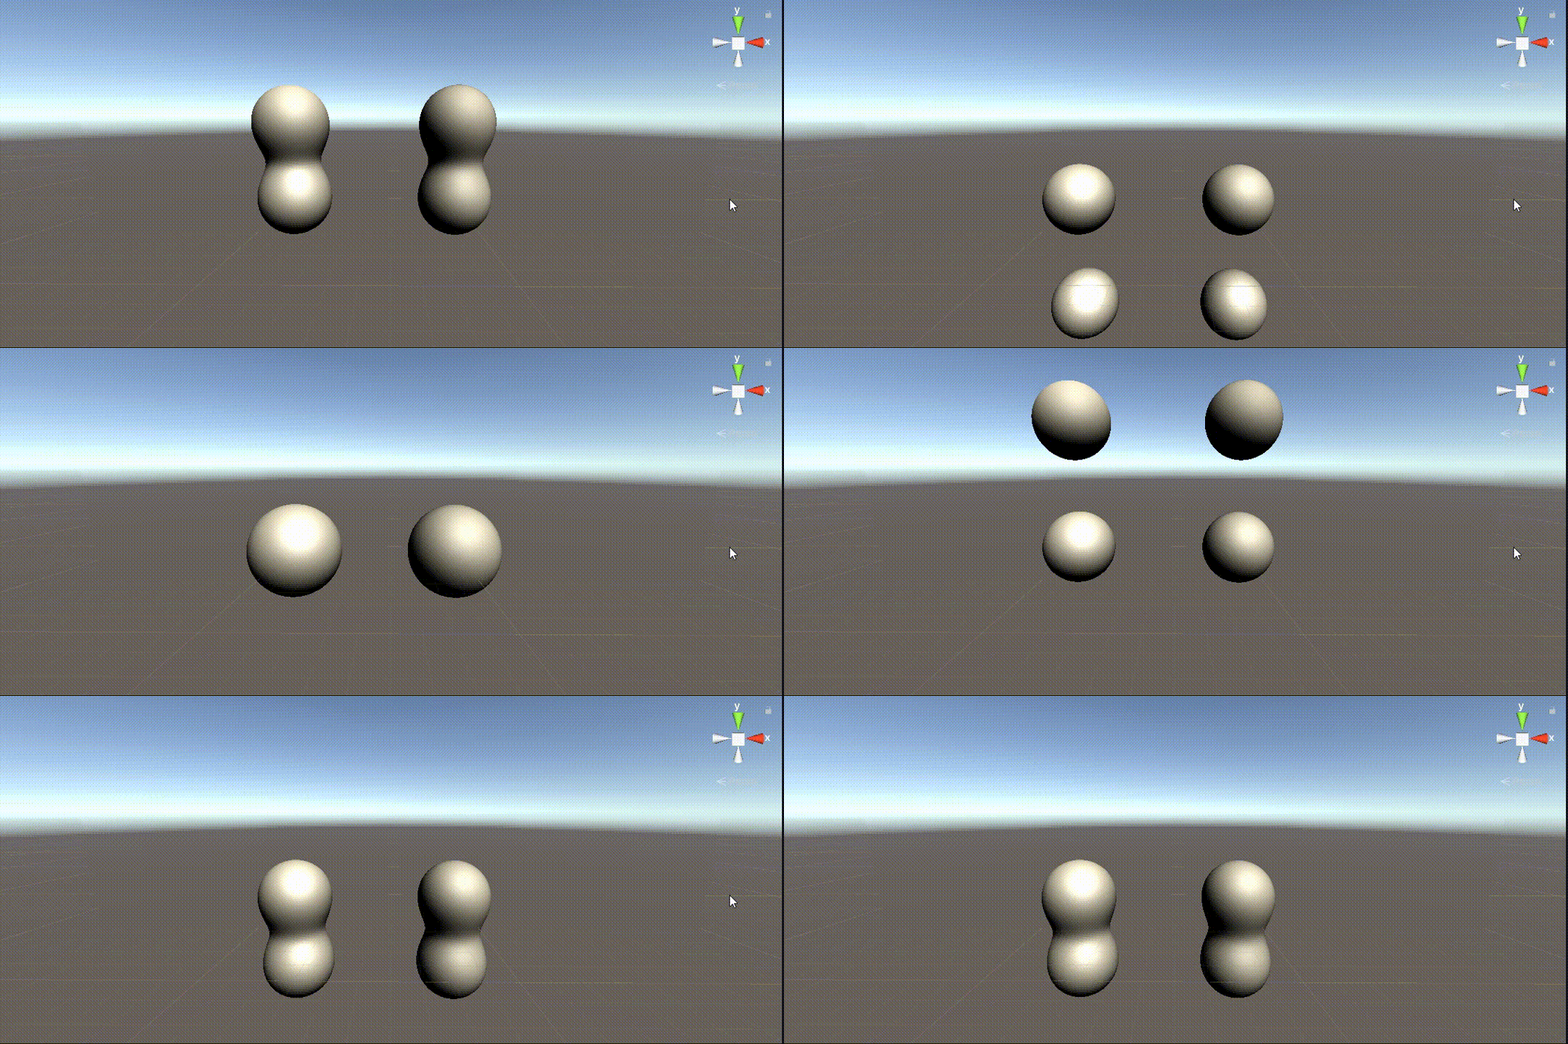
————
SIGGRAPH2006上,有一个更好的解决方案(链接在这里)。
它的做法是沿法线方向采样距离场。
如果没有发现更近的物体,则表明周围区域没有障碍物。
我们迭代_AOStepSize 次,每次去距离表面_AOStepSize个单位。
如果找不到更近的物体,则采样距离的总和将等于_AOStep * _AOStepSize。
这为我们提供了一个可以插值的值,从而环境光吸收系数从0到1。
float ambientOcclusion(float3 pos, float3 normal)
{
	float _AOStep = 30;
	float _AOStepSize = 8.5;
	float sum = 0;
	for (int i = 0; i < _AOStep; i++)
	{
		float3 p = pos + normal * (i + 1) * _AOStepSize;
		sum += sdf_Distance(p);
	}
	return sum / (_AOStep* _AOStepSize);
}

//光线步进
fixed4 raymarch(float3 position, float3 direction)
{
	float STEPS = 64;
	float STEP_SIZE = 0.01;
	// Loop do raymarcher.
	for (int i = 0; i < STEPS; i++)
	{
		float distance = sdf_Distance(position);
		if (distance < 0.01) {
			//return i / (float)STEPS;
			fixed4 color = renderSurface(position, direction);
			float ao = ambientOcclusion(position, normal(position));
			color.rgb *= ao;
			return color;
		}
		position += distance * direction;
	}
	return 0;
}
最右是效果
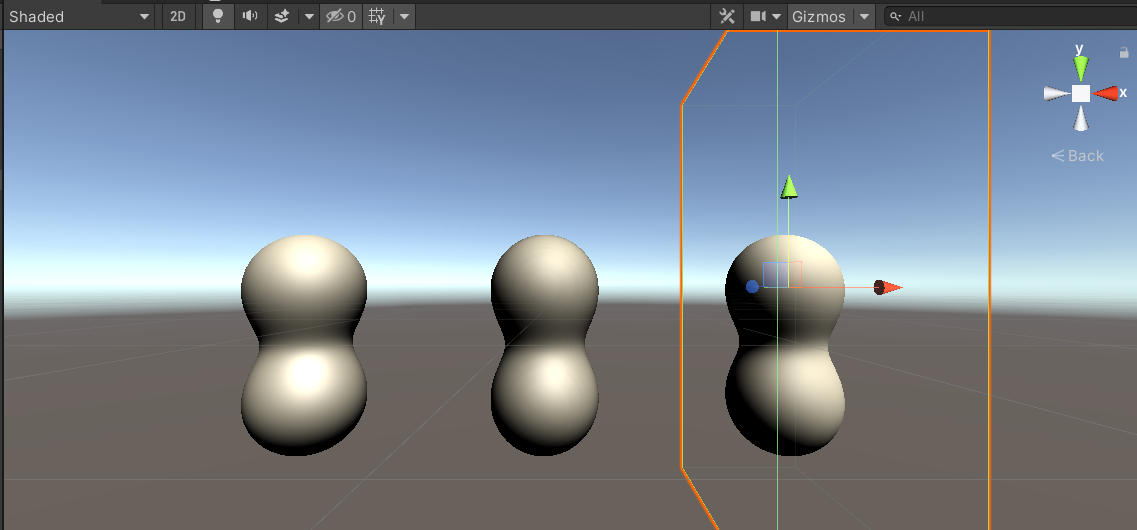
——————
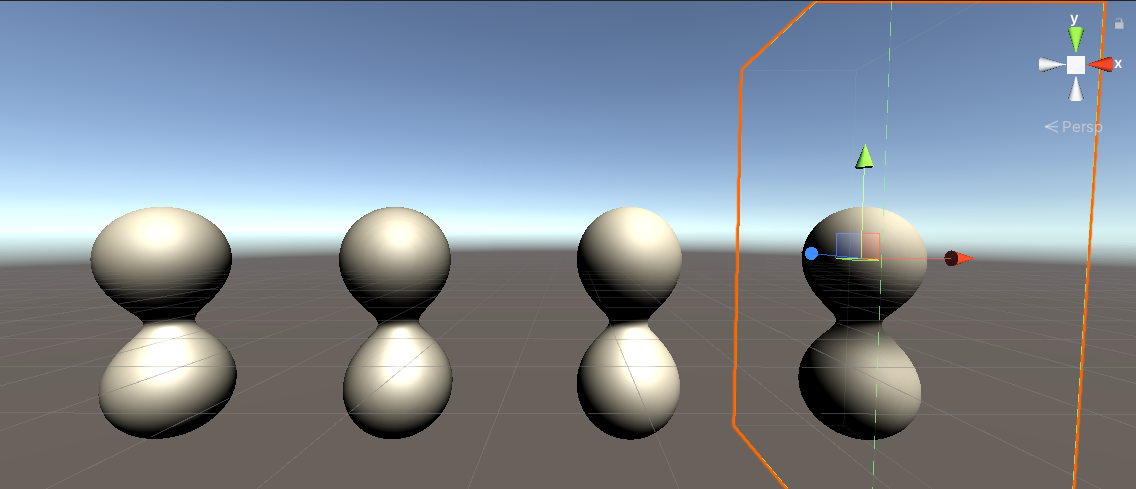
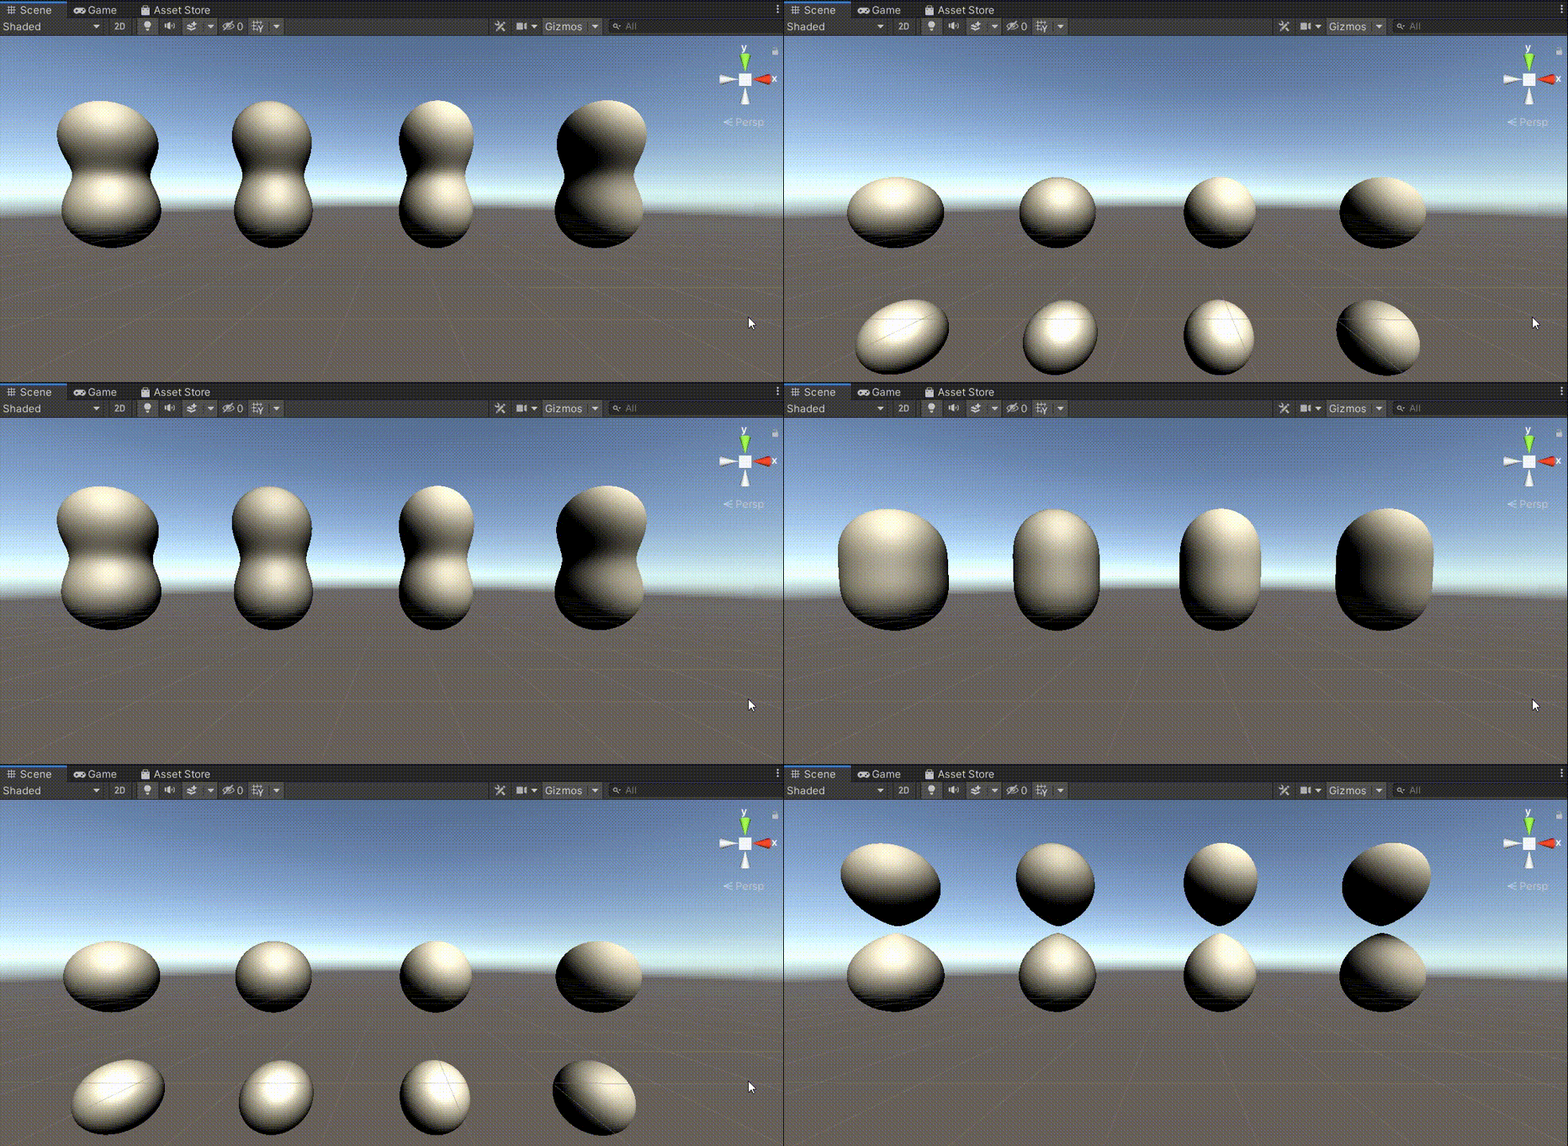
对于该AO,可以进行指数衰减的改良
我们离原始点越远,对样本的重视就越小。我们可以通过引入指数衰减来实现
float ambientOcclusion(float3 pos, float3 normal)
			{
				float sum = 0;
				float maxSum = 0;
				float _AOStep = 30;
				float _AOStepSize = 8.5;
				for (int i = 0; i < _AOStep; i++)
				{
					float3 p = pos + normal * (i + 1) * _AOStepSize;
					sum += 1. / pow(2., i) * sdf_Distance(p);
					maxSum += 1. / pow(2., i) * (i + 1) * _AOStepSize;
				}
				return sum / maxSum;
			}
如果我们找不到更接近的点,那么 sum = maxSum,没有AO
如果在AO的step迭代路上发现了其他物体,distance变小了,那么有更多的遮挡。
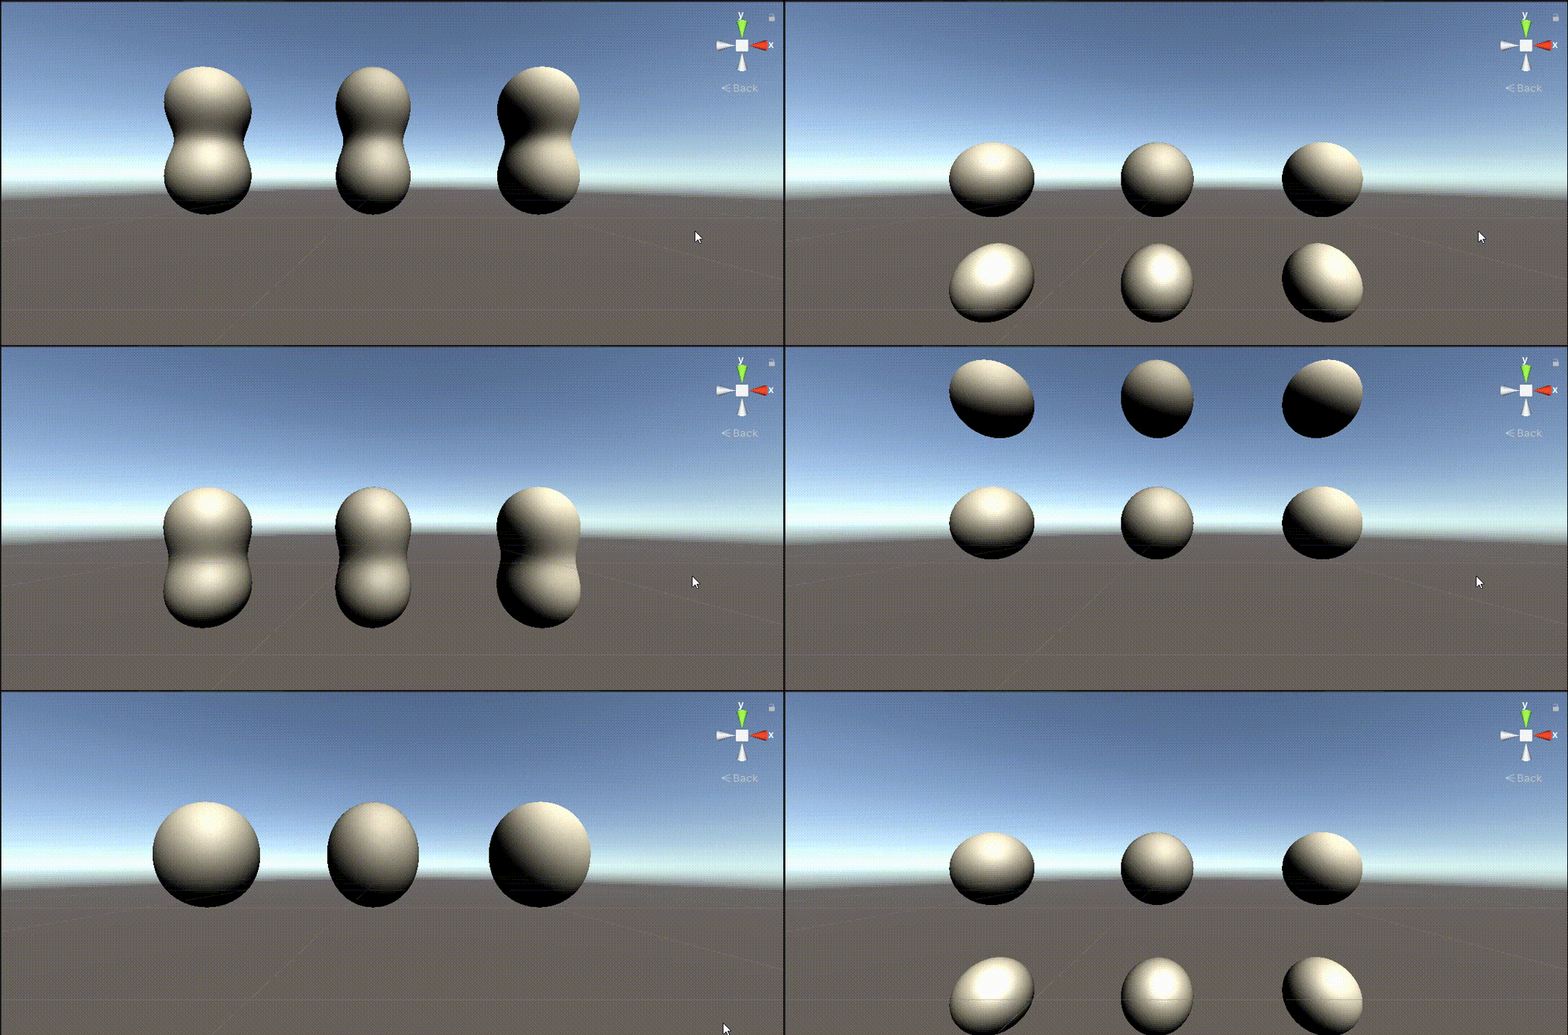
以下动画显示了效果,最右边那一列
以上是对Alan Zucconi大佬那系列文章的小探索,为之后进行体积大气渲染的部分做了铺垫。
更多推荐

 5
5 0
0- 0


 已为社区贡献1条内容

所有评论(0)