
Sprinboot整合Security+jwt实现认证和授权原理解析
文章目录
一、使用Spring Security保护页面和请求
1.启用Spring Security
1) 添加依赖
<dependency>
            <groupId>org.springframework.boot</groupId>
            <artifactId>spring-boot-starter-security</artifactId>
</dependency>
2) 配置Spring Security
添加SecurityConfig全局配置类,该类需要继承抽象类WebSecurityConfigurerAdapter。
@Configuration
@EnableWebSecurity
@EnableGlobalMethodSecurity(prePostEnabled = true)// 设置全局方法有效
public class SecurityConfig extends WebSecurityConfigurerAdapter {
}
@Configuration 注解标记的类,交给Spring容器管理,在启动的时候加载。
@EnableWebSecurity 注解,启用SpringSecurity。
@EnableGlobalMethodSecurity 注解用来表示所有的方法能够通过Security认证。
2.重写configure()方法
我们可以通过重写WebSecurityConfigurerAdapter 的configure() 方法配置Web的安全性, 可以通过Ctrl+Ins键查看override方法,我们可以看到有三种configure()方法。
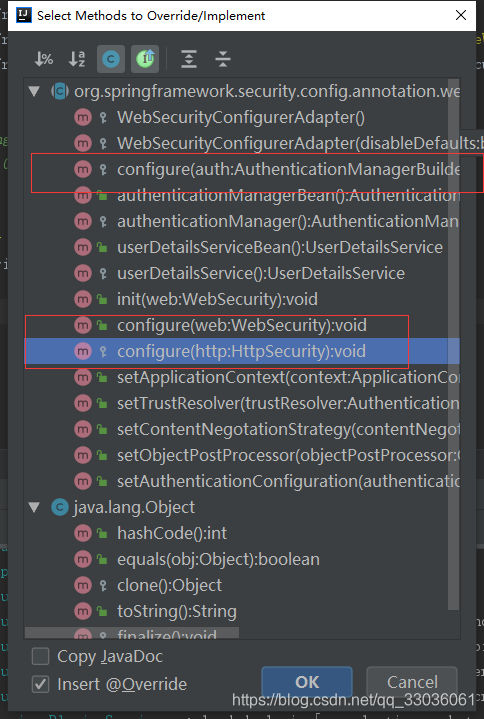
他们各自的用法和说明如下:
| 方法 | 描述 |
|---|---|
| configure(AuthenticationManagerBuilder auth) | 通过重载,配置user-detail 服务 |
| configure(WebSecurity web) | 通过重载, 配置Spring security的Filter链 |
| configure(HttpSecurity http) | 通过重载,配置拦截器保护请求 |
package com.example.shop.config;

import org.springframework.context.annotation.Configuration;
import org.springframework.security.config.annotation.authentication.builders.AuthenticationManagerBuilder;
import org.springframework.security.config.annotation.web.builders.HttpSecurity;
import org.springframework.security.config.annotation.web.builders.WebSecurity;
import org.springframework.security.config.annotation.web.configuration.EnableWebSecurity;
import org.springframework.security.config.annotation.web.configuration.WebSecurityConfigurerAdapter;

/**
 * @author bingbing
 * @date 2021/4/3 0003 21:20
 */
@Configuration
@EnableWebSecurity
public class SecurityConfig extends WebSecurityConfigurerAdapter {

    @Override
    protected void configure(AuthenticationManagerBuilder auth) throws Exception {
        super.configure(auth);
    }

    @Override
    public void configure(WebSecurity web) throws Exception {
        super.configure(web);
    }

    @Override
    protected void configure(HttpSecurity http) throws Exception {
        super.configure(http);
    }
}
通过这些配置后,就能开启 security 保护, 但是会默认拦截所有请求,再次访问之前的请求,没有认证会直接返回401:
{
    "timestamp": "2021-04-03T13:36:40.760+0000",
    "status": 401,
    "error": "Unauthorized",
    "message": "Unauthorized",
    "path": "/product/search"
}
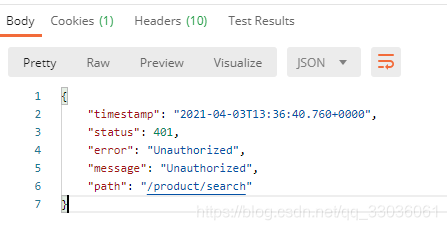
直接访问静态页面,同样也会出现未授权的问题,比如访问swagger-ui:
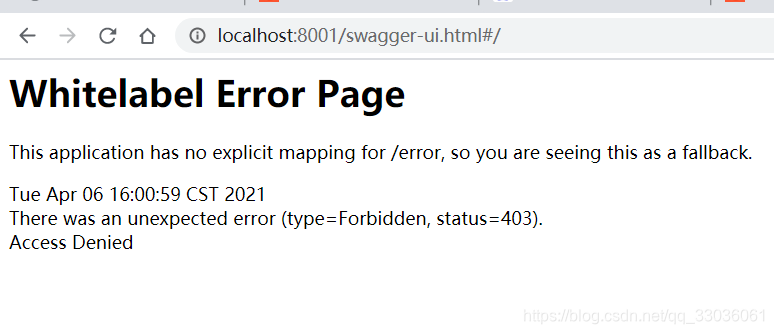
因为springSecurity 会自动扫描antMatchers().permitAll()方法里定义的uri, 匹配的ui将不会被Security拦截, 修改配置, 添加不需要拦截的请求:
- html页面,如swagger-ui.html
- css 样式文件。
- js 文件。
- 登录和注册页面。
根据需要将不需要拦截的页面和地址进行排除掉:
    //认证Http请求
    @Override
    protected void configure(HttpSecurity httpSecurity) throws Exception {
        //禁用csrf和session
        httpSecurity.csrf()
                .disable()
                .sessionManagement()
                .sessionCreationPolicy(SessionCreationPolicy.STATELESS)
                //允许对静态资源访问, 主要包含html、css、js等静态资源。
                .and()
                .authorizeRequests().antMatchers(HttpMethod.GET,
                "/",
                "/*.html",
                "/favicon.ico",
                "/**/*.html",
                "/**/*.css",
                "/**/*.js",
                "/swagger-resources/**")
                .permitAll()
                // 允许登录注册页面访问
                .antMatchers("/admin/login", "/admin/register")
                .permitAll()
                .antMatchers(HttpMethod.OPTIONS)
                .permitAll()
                .anyRequest().authenticated();
        // 禁用缓存
        httpSecurity.headers().cacheControl();
重写修改配置后,重写启动服务器, 访问 localhost:8001/swagger-ui.html, 能访问就表示配置生效。
二、认证和授权
1. 利用jwt生成token
需要的配置:
jwt:
  secret:
    AFJOUO213RF
  expiration:
    86400
  tokenHeader:
    Authorization
  tokenHead:
    Bearer
JwtTokenUtil :
package com.example.shop.common.utils;
import io.jsonwebtoken.Claims;
import io.jsonwebtoken.Jwts;
import io.jsonwebtoken.SignatureAlgorithm;
import org.slf4j.Logger;
import org.slf4j.LoggerFactory;
import org.springframework.beans.factory.annotation.Value;
import org.springframework.security.core.userdetails.UserDetails;
import org.springframework.stereotype.Component;
import java.util.Date;
import java.util.HashMap;
import java.util.Map;

@Component
public class JwtTokenUtil {

    private static final Logger LOGGER = LoggerFactory.getLogger(JwtTokenUtil.class);
    private static final String CLAIM_KEY_USERNAME = "sub";
    private static final String CLAIM_KEY_CREATED = "created";
    @Value("${jwt.secret}")
    private String secret;
    @Value("${jwt.expiration}")
    private Long expiration;

    /**
     * 根据负责生成JWT的token
     */
    private String generateToken(Map<String, Object> claims) {
        return Jwts.builder()
                .setClaims(claims)
                .setExpiration(generateExpirationDate())
                .signWith(SignatureAlgorithm.HS512, secret)
                .compact();
    }

    /**
     * 从token中获取JWT中的负载
     */
    private Claims getClaimsFromToken(String token) {
        Claims claims = null;
        try {
            claims = Jwts.parser()
                    .setSigningKey(secret)
                    .parseClaimsJws(token)
                    .getBody();
        } catch (Exception e) {
            LOGGER.info("JWT格式验证失败:{}",token);
        }
        return claims;
    }

    /**
     * 生成token的过期时间
     */
    private Date generateExpirationDate() {
        return new Date(System.currentTimeMillis() + expiration * 1000);
    }

    /**
     * 从token中获取登录用户名
     */
    public String getUserNameFromToken(String token) {
        String username;
        try {
            Claims claims = getClaimsFromToken(token);
            username =  claims.getSubject();
        } catch (Exception e) {
            username = null;
        }
        return username;
    }

    /**
     * 验证token是否还有效
     *
     * @param token       客户端传入的token
     * @param userDetails 从数据库中查询出来的用户信息
     */
    public boolean validateToken(String token, UserDetails userDetails) {
        String username = getUserNameFromToken(token);
        return username.equals(userDetails.getUsername()) && !isTokenExpired(token);
    }

    /**
     * 判断token是否已经失效
     */
    private boolean isTokenExpired(String token) {
        Date expiredDate = getExpiredDateFromToken(token);
        return expiredDate.before(new Date());
    }

    /**
     * 从token中获取过期时间
     */
    private Date getExpiredDateFromToken(String token) {
        Claims claims = getClaimsFromToken(token);
        return claims.getExpiration();
    }

    /**
     * 根据用户信息生成token
     */
    public String generateToken(UserDetails userDetails) {
        Map<String, Object> claims = new HashMap<>();
        claims.put(CLAIM_KEY_USERNAME, userDetails.getUsername());
        claims.put(CLAIM_KEY_CREATED, new Date());
        return generateToken(claims);
    }

    /**
     * 判断token是否可以被刷新
     */
    public boolean canRefresh(String token) {
        return !isTokenExpired(token);
    }

    /**
     * 刷新token
     */
    public String refreshToken(String token) {
        Claims claims = getClaimsFromToken(token);
        claims.put(CLAIM_KEY_CREATED, new Date());
        return generateToken(claims);
    }
}
2. 利用OncePerRequestFilter对用户进行认证和授权
1) OncePerRequestFilter解析
在使用OncePerRequestFilter过滤器前,先看一张uml图。
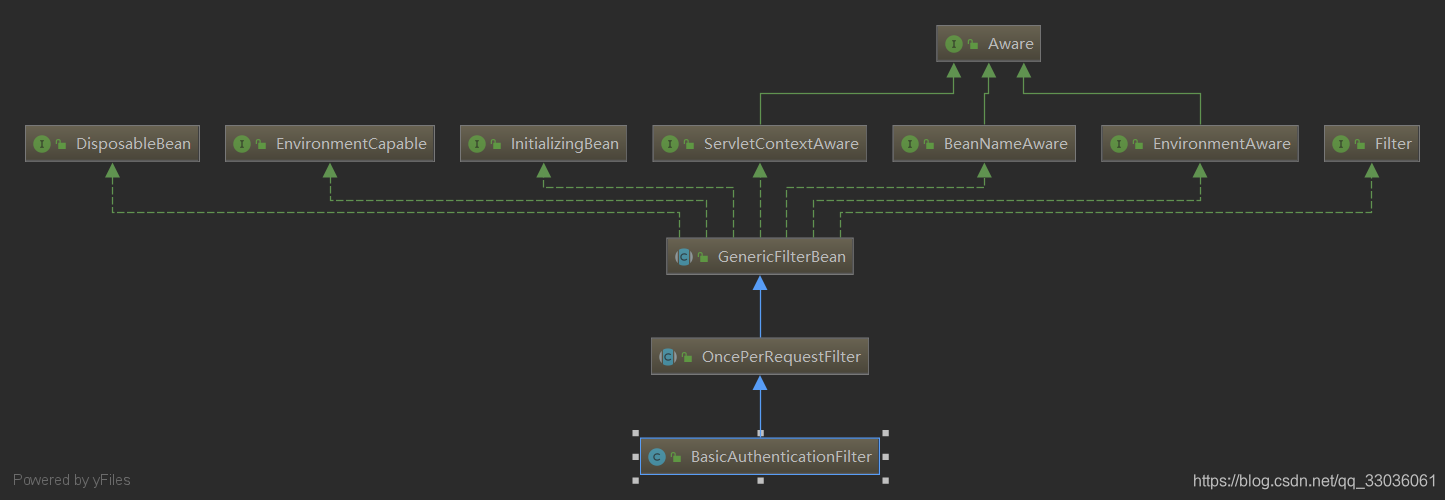
- OncePerRequestFilter 继承了GenericFilterBean, GenericFilterBean该抽象类实现了BeanNameAware、EnvironmentAware、ServletContextAware,主要是设置了Bean的名称和 environment和servletContext。为后续OncePerRequestFilter提供环境和servletContext基础,OncePerRequestFilter 定义了一个 抽象方法 doFilterInternal() ,在他的子类里实现了认证逻辑 。
- OncePerRequestFilter 他的作用是只执行一次的过滤器,不会重复执行。此方法时为了兼容不同的web容器,例如不同版本的servlet, 默认的filter执行的策略也不同,有的会不执行filter, Springboot为使用解决此问题,使用了OncePerRequestFilter保证在不同容器内的过滤器只执行一次。
- BasicAuthenticationFilter实现了OncePerRequestFilter 的doFilterInternal()方法,用来执行默认的Security的认证逻辑。
2) BasicAuthenticationFilter源码解析
让我们来解析一下该类的doFilterInternal源码:
1) 对于需要认证的请求,携带了Authorization请求头。从请求头requestHeader拿到 Authorization, 然后拿到basic 开头的加密串,也就是所谓的token串, 不需要认证的请求,继续执行其他过滤器chain.doFilter(request, response);
2) 使用UsernamePasswordAuthenticationToken 工具类认证token,检验token是否有效。
3) 如果有效,将获取的到的authRequest设置到ServeletContextHolder里 SecurityContextHolder.getContext().setAuthentication(authResult);
BasicAuthenticationFilter里的doFilterInternal源码如下:
protected void doFilterInternal(HttpServletRequest request, HttpServletResponse response, FilterChain chain) throws IOException, ServletException {
        boolean debug = this.logger.isDebugEnabled();
        String header = request.getHeader("Authorization");
        if (header != null && header.toLowerCase().startsWith("basic ")) {
            try {
                String[] tokens = this.extractAndDecodeHeader(header, request);

                assert tokens.length == 2;

                String username = tokens[0];
                if (debug) {
                    this.logger.debug("Basic Authentication Authorization header found for user '" + username + "'");
                }

                if (this.authenticationIsRequired(username)) {
                    UsernamePasswordAuthenticationToken authRequest = new UsernamePasswordAuthenticationToken(username, tokens[1]);
                    authRequest.setDetails(this.authenticationDetailsSource.buildDetails(request));
                    Authentication authResult = this.authenticationManager.authenticate(authRequest);
                    if (debug) {
                        this.logger.debug("Authentication success: " + authResult);
                    }

                    SecurityContextHolder.getContext().setAuthentication(authResult);
                    this.rememberMeServices.loginSuccess(request, response, authResult);
                    this.onSuccessfulAuthentication(request, response, authResult);
                }
            } catch (AuthenticationException var10) {
                SecurityContextHolder.clearContext();
                if (debug) {
                    this.logger.debug("Authentication request for failed: " + var10);
                }

                this.rememberMeServices.loginFail(request, response);
                this.onUnsuccessfulAuthentication(request, response, var10);
                if (this.ignoreFailure) {
                    chain.doFilter(request, response);
                } else {
                    this.authenticationEntryPoint.commence(request, response, var10);
                }

                return;
            }

            chain.doFilter(request, response);
        } else {
            chain.doFilter(request, response);
        }
    }
3) 重写doFIlterInernal()方法
解析了BasicAuthenticationFilter类的doFIlterInernal()源码后,我们可以按照这种模式来自定义token 认证逻辑。
package com.example.shop.component;

import com.example.shop.common.utils.JwtTokenUtil;
import org.slf4j.Logger;
import org.slf4j.LoggerFactory;
import org.springframework.beans.factory.annotation.Autowired;
import org.springframework.beans.factory.annotation.Value;
import org.springframework.security.authentication.UsernamePasswordAuthenticationToken;
import org.springframework.security.core.context.SecurityContextHolder;
import org.springframework.security.core.userdetails.UserDetails;
import org.springframework.security.core.userdetails.UserDetailsService;
import org.springframework.security.web.authentication.WebAuthenticationDetailsSource;
import org.springframework.stereotype.Component;
import org.springframework.web.filter.OncePerRequestFilter;

import javax.servlet.FilterChain;
import javax.servlet.ServletException;
import javax.servlet.http.HttpServletRequest;
import javax.servlet.http.HttpServletResponse;
import java.io.IOException;

/**
 * JWT登录授权过滤器
 */
@Component
public class JwtAuthenticationTokenFilter extends OncePerRequestFilter {
    private static final Logger LOGGER = LoggerFactory.getLogger(JwtAuthenticationTokenFilter.class);
    @Autowired
    private UserDetailsService userDetailsService;
    @Autowired
    private JwtTokenUtil jwtTokenUtil;
    @Value("${jwt.tokenHeader}")
    private String tokenHeader;
    @Value("${jwt.tokenHead}")
    private String tokenHead;

    @Override
    protected void doFilterInternal(HttpServletRequest request,
                                    HttpServletResponse response,
                                    FilterChain chain) throws ServletException, IOException {
        String authHeader = request.getHeader(this.tokenHeader);
        if (authHeader != null && authHeader.startsWith(this.tokenHead)) {
            String authToken = authHeader.substring(this.tokenHead.length());// The part after "Bearer "
            String username = jwtTokenUtil.getUserNameFromToken(authToken);
            LOGGER.info("username:{}", username);
            if (username != null && SecurityContextHolder.getContext().getAuthentication() == null) {
                UserDetails userDetails = this.userDetailsService.loadUserByUsername(username);
                if (jwtTokenUtil.validateToken(authToken, userDetails)) {
                    UsernamePasswordAuthenticationToken authentication = new UsernamePasswordAuthenticationToken(userDetails, null, userDetails.getAuthorities());
                    authentication.setDetails(new WebAuthenticationDetailsSource().buildDetails(request));
                    SecurityContextHolder.getContext().setAuthentication(authentication);
                }
            }
        }
        chain.doFilter(request, response);
    }
}
在源码中使用到了 userDetails作为UsernamePasswordAuthenticationToken 类的参数,因此我们需要在配置类SecurityConfig 重写的UserDetailsService方法
package com.example.shop.config;

import com.example.shop.admin.AdminUserDetails;
import com.example.shop.component.JwtAuthenticationTokenFilter;
import com.example.shop.component.RestAuthenticationEntryPoint;
import com.example.shop.component.RestfulAccessDeniedHandler;
import com.example.shop.mbg.model.UmsAdmin;
import com.example.shop.mbg.model.UmsPermission;
import com.example.shop.service.UmsAdminService;
import org.springframework.beans.factory.annotation.Autowired;
import org.springframework.context.annotation.Bean;
import org.springframework.context.annotation.Configuration;
import org.springframework.http.HttpMethod;
import org.springframework.security.config.annotation.authentication.builders.AuthenticationManagerBuilder;
import org.springframework.security.config.annotation.method.configuration.EnableGlobalMethodSecurity;
import org.springframework.security.config.annotation.web.builders.HttpSecurity;
import org.springframework.security.config.annotation.web.configuration.EnableWebSecurity;
import org.springframework.security.config.annotation.web.configuration.WebSecurityConfigurerAdapter;
import org.springframework.security.config.http.SessionCreationPolicy;
import org.springframework.security.core.userdetails.UserDetailsService;
import org.springframework.security.core.userdetails.UsernameNotFoundException;
import org.springframework.security.crypto.bcrypt.BCryptPasswordEncoder;
import org.springframework.security.crypto.password.PasswordEncoder;
import org.springframework.security.web.authentication.UsernamePasswordAuthenticationFilter;

import java.util.List;

@Configuration
@EnableWebSecurity
@EnableGlobalMethodSecurity(prePostEnabled = true)// 设置全局方法有效
public class SecurityConfig extends WebSecurityConfigurerAdapter {

    @Autowired
    private UmsAdminService umsAdminService;


    @Autowired
    private  JwtAuthenticationTokenFilter jwtAuthenticationTokenFilter;


    //认证Http请求
    @Override
    protected void configure(HttpSecurity httpSecurity) throws Exception {
        //禁用csrf和session
        httpSecurity.csrf()
                .disable()
                .sessionManagement()
                .sessionCreationPolicy(SessionCreationPolicy.STATELESS)
                //允许对静态资源访问, 主要包含html、css、js等静态资源。
                .and()
                .authorizeRequests().antMatchers(HttpMethod.GET,
                "/",
                "/*.html",
                "/favicon.ico",
                "/**/*.html",
                "/**/*.css",
                "/**/*.js",
                "/swagger-resources/**",
                "/v2/api-docs/**")
                .permitAll()
                // 允许登录注册页面访问
                .antMatchers("/admin/login", "/admin/register")
                .permitAll()
                .antMatchers(HttpMethod.OPTIONS)
                .permitAll()
                .anyRequest().authenticated();
        // 禁用缓存
        httpSecurity.headers().cacheControl();
        httpSecurity.addFilterBefore(jwtAuthenticationTokenFilter, UsernamePasswordAuthenticationFilter.class);
    }


    @Override
    protected void configure(AuthenticationManagerBuilder auth) throws Exception {
        auth.userDetailsService(userDetailsService()).passwordEncoder(passwordEncoder());
    }


    @Bean
    public PasswordEncoder passwordEncoder() {
        return new BCryptPasswordEncoder();
    }


    // 重写UserDetailsService
    @Bean
    public UserDetailsService userDetailsService() {
        return username -> {
            UmsAdmin admin = umsAdminService.getAdminByUsername(username);
            if (admin != null) {
                List<UmsPermission> permisstionList = umsAdminService.getPermissionsList(admin.getId());
                return new AdminUserDetails(admin, permisstionList);
            }
            throw new UsernameNotFoundException("用户名或密码错误!");
        };
    }
}
AdminUserDetails 类用来获取用户的角色权限:
package com.example.shop.admin;

import com.example.shop.mbg.model.UmsAdmin;
import com.example.shop.mbg.model.UmsPermission;
import org.springframework.security.core.GrantedAuthority;
import org.springframework.security.core.authority.SimpleGrantedAuthority;
import org.springframework.security.core.userdetails.UserDetails;

import java.util.Collection;
import java.util.List;
import java.util.stream.Collectors;

public class AdminUserDetails implements UserDetails {

    private UmsAdmin umsAdmin;

    private List<UmsPermission> umsPermissionList;


    public AdminUserDetails(UmsAdmin umsAdmin, List<UmsPermission> permissions) {
        this.umsAdmin = umsAdmin;
        this.umsPermissionList = permissions;
    }


    @Override
    // 获取授权
    public Collection<? extends GrantedAuthority> getAuthorities() {
        return umsPermissionList.stream()
                .filter(permisstion -> permisstion.getValue() != null)
                .map(permisstion -> new SimpleGrantedAuthority(permisstion.getValue()))
                .collect(Collectors.toList());
    }

    @Override
    public String getPassword() {
        return umsAdmin.getPassword();
    }

    @Override
    public String getUsername() {
        return umsAdmin.getUsername();
    }

    @Override
    public boolean isAccountNonExpired() {
        return true;
    }

    @Override
    public boolean isAccountNonLocked() {
        return true;
    }

    @Override
    public boolean isCredentialsNonExpired() {
        return true;
    }

    @Override
    public boolean isEnabled() {
        return true;
    }
}
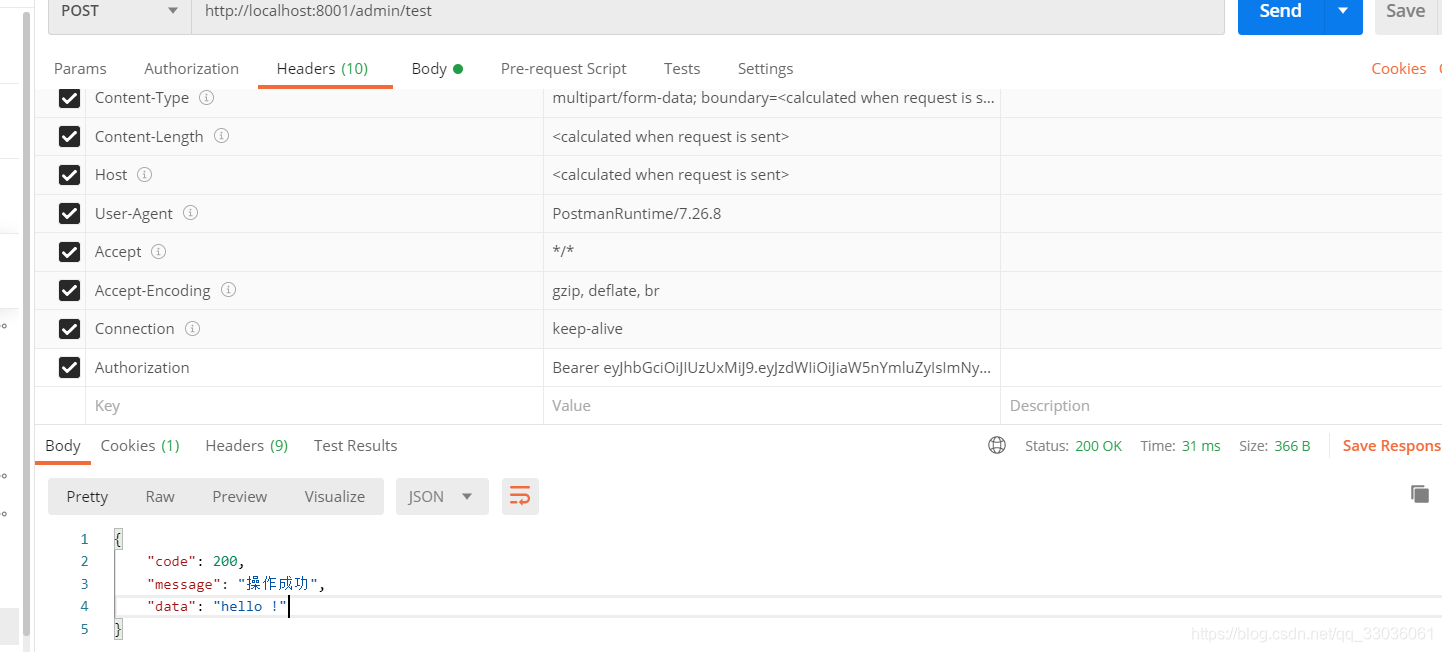
4) 测试携带token访问
在requestheader里添加请求头Authorization, 值为 Bearer
Authorization:Bearer {{admin-token}}
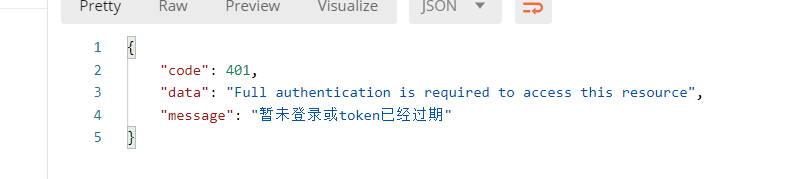
修改Bearer 后的串,重写访问:
更多推荐



 0
0 0
0- 0


 已为社区贡献4条内容

所有评论(0)