
我用matlab调用pytorch包写了一个CNN分类
很多比较新颖的神经网络、深度学习模型一般都是用torch包、tensorflow包写的,这让习惯了MATLAB语言的小伙伴望而却步。
说实话,我人生中第一次接触的编程语言也是MATLAB,用了这么多年的MATLAB,只要看到matlab语言就感觉亲切,至少不会发怵,感觉再难的代码也可以嚼碎了一点点理解。人就是不太愿意接受新鲜事物,当熟悉了一门语言,只要不是逼入绝境,就不想去尝试新的。总觉得别的语言能做的事情,那MATLAB也就必须得能做才行。
从见识到pytorch库的强大后,就老想着为什么只能采用python调用,就不能直接采用MATLAB调用吗?MATLAB具有强大的数据处理能力,矩阵运算能力,再加上可以直接调用pytorch等深度学习包,那这不直接逆天了。
其实只要打通一个模型网络,那剩下的就一通百通,从今往后,只要是你pytorch包有的网络模型,我在MATLAB就可以实现调用!就在昨天下午突然心血来潮,说干就干,搞了多半天,终于是搞定了!这次就先从一个最简单的CNN分类器代码学起。
如果你也对MATLAB调用pytorch包感兴趣,想用MATLAB实现各大深度学习模型,接下来就跟我一起探索吧!
1.前期准备工作
想要实现MATLAB调用pytorch包,前期的准备工作必不可少。
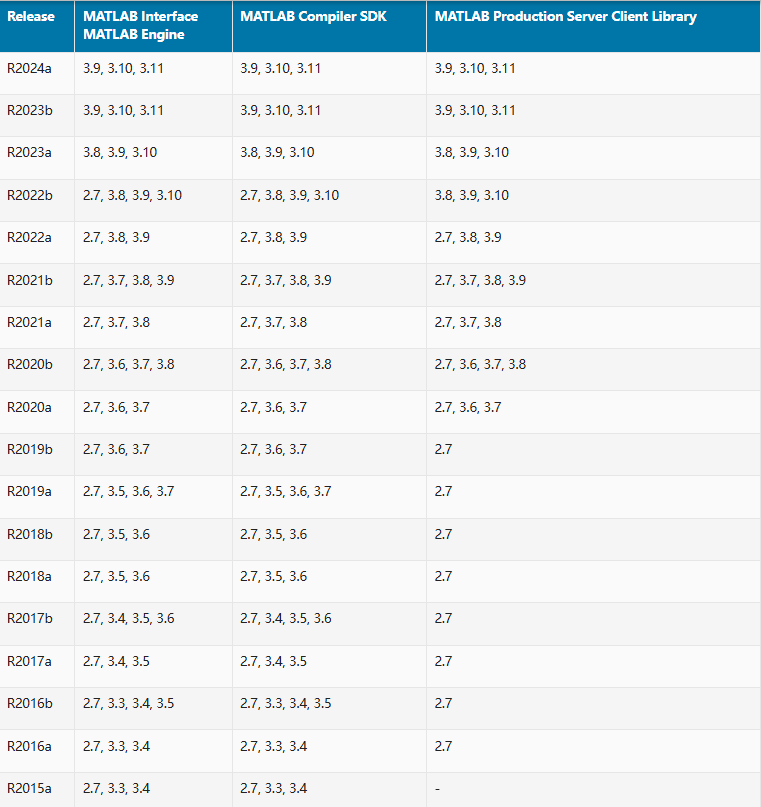
1. 确保你的系统已经正确安装了Python,并且将Python添加到了系统的环境变量中。我这里用的是2024a的matlab版本,安装的python是3.9.4的。不确定安装哪个python版本的小伙伴可以看下图,对照你自己的MATLAB版本去安装对应的python版本即可。
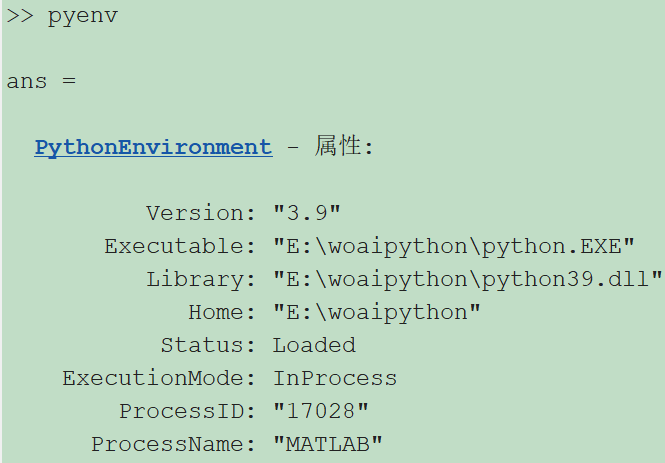
2. 装好python后,在MATLAB命令窗口中,使用pyenv命令检查MATLAB当前使用的Python版本,显示如下,就代表你的MATLAB可以搜索到电脑上的python了。
3. 测试。先给自己的电脑装一个numpy包测试一下吧。安装的时候,可以首先修改你的默认镜像源,然后再装一个指定版本的numpy包。我这里装的是1.26.4版本的numpy包(因为torch这个库里边很多包都是基于1.x版本的numpy写的,如果你装2.x版本的numpy可能会报错,所以这里建议你还是装一个1.x版本的numpy)
# 修改默认镜像源,保证你现在包的时候更迅速!
pip config set global.index-url https://mirrors.aliyun.com/pypi/simple/
#安装指定版本的numpy包
pip install numpy==1.26.4
接下来再MATLAB窗口测试一下。
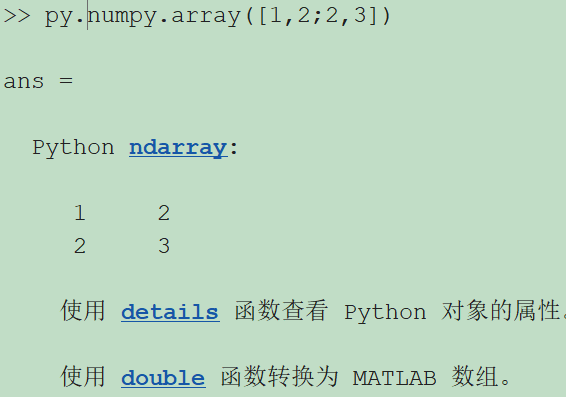
使用py.module_name语法来引入Python模块。module_name是你要调用的Python模块的名称。比如我这里调用numpy包,将[1,2;2,3]的2*2矩阵转换为了python ndarray对象。
好的,能到这里的朋友你已经成功了一多半了,因为接下来的代码编写任务交给我就行了!哦对了,记得再pip一个torch包哦!代码如下:
# 我这里用的是2.3.1版本的torch包
pip install torch==2.3.1
2.MATLAB主脚本编写
%% 初始化
clear
close all
clc
clear class  %准备调用python前,清除一下class
pe = pyenv;  %检验python是否安装正确
if pe.Version == ""
    error("未能正确配置python")
end
clear classes;  %清除所有类,当改写python库的时候方便重新加载
py.sys.path().append(pwd)  %添加自己写的python库路径
mod = py.importlib.import_module('CNN_1D');  %将自己写的pytorch神经网络函数加载进来
py.importlib.reload(mod); %调用


%% 加载数据
data = readmatrix('特征数据.xlsx');
%输入输出数据
input=data(:,2:end);
output =data(:,1);
% 划分训练集和测试集
jg = 500;   %每组实际上有500个样本
tn = 420;    %选前tn个样本进行训练,剩下的用于测试
input_train = []; output_train = [];
input_test = []; output_test = [];
max_sort = 4;  %一共有4类
for i = 1:max_sort  %一共有4类
    input_train=[input_train;input(1+jg*(i-1):jg*(i-1)+tn,:)];
    output_train=[output_train;output(1+jg*(i-1):jg*(i-1)+tn,:)];
    input_test=[input_test;input(jg*(i-1)+tn+1:i*jg,:)];
    output_test=[output_test;output(jg*(i-1)+tn+1:i*jg,:)];
end
input_train = input_train'; label_train = output_train;
input_test = input_test'; label_test = output_test;
%归一化
[inputn_train,inputps]=mapminmax(input_train);
[inputn_test,inputtestps]=mapminmax('apply',input_test,inputps);
inputn_train = inputn_train';
inputn_test = inputn_test';


%% 重头戏来了:采用MATLAB调用CNN1D模型
batch_size = 32; %批训练大小
% # 将测试集和训练集转换为pytorch类型
% CNN_1D就是我自己写的函数,里边集成了模型的构建、预测,以及数据的转换等功能


% 这里调用了CNN_1D种的数据转换功能
% 再给python传递数据的时候记得先把数据转换一下,比如这里的py.numpy.array,就是将MATLAB数据转换为python的ndarry数据
train_dataset = py.CNN_1D.SignalDataset(py.numpy.array(inputn_train), py.numpy.array(label_train));
% 这里调用了torch自带的DataLoader函数
train_loader = py.torch.utils.data.DataLoader(train_dataset,py.int(batch_size),true);
test_dataset = py.CNN_1D.SignalDataset(py.numpy.array(inputn_test), py.numpy.array(label_test));
test_loader = py.torch.utils.data.DataLoader(test_dataset, py.int(batch_size),false);


% 创建1DCNN模型
% 这里的conv_arch是网络模型结构,输入的是((2,32),(1,64).(1,128))
% 代表的意思就是,首先创建了2层滤波器个数都是32的卷积层,然后创建了1层滤波器个数是64的卷积层,然后创建了1层滤波器个数是128的卷积层
% 这里你可以任意修改层数和滤波器个数,至于核大小你如果也想改的话,我这里懒了,就没写出来参数接口,你可以到CNN_1D.py文件里边找到kernel_size进行修改!
modelt = py.CNN_1D.CNN1DClassifier(...
             pyargs( ...
                    'conv_arch',{[int16(2),int16(32)],[int16(1),int16(64)],[int16(1),int16(128)]},...
                    'num_classes',py.int(max_sort),...
                    'signal_length',py.int(size(inputn_train,2)),...
                    'epochs',py.int(200),...
                    'batch_size',py.int(32),...
                    'learn_rate',1e-4));
% 模型训练
modelt.fit(train_loader);


% 模型预测
predicted_labels = modelt.predict(test_loader);
Yhat = double(predicted_labels);
%正确率分析
test_accuracy=(sum(label_test==Yhat'))/length(label_test);
看一下上述代码,是不是非常的简单清晰明了!准备好数据之后,做一个torch类型的转换,然后直接调用写好的CNN_1D函数创建模型实例,最后直接将训练集送入模型训练,最后就是一个预测。
3.CNN_1D的python函数编写
关于这个CNN_1D函数,就得在python里边预先设置好了。下面附上我写的代码供大家参考。
import torch
import torch.nn as nn
from torch.utils.data import DataLoader
torch.manual_seed(200)


# 数据转换的类
class SignalDataset():
    def __init__(self, signals, labels):
        self.signals = signals
        self.labels = labels


    def __len__(self):
        return len(self.signals)


    def __getitem__(self, idx):
        signal = self.signals[idx]
        label = self.labels[idx]
        return torch.tensor(signal, dtype=torch.float32).unsqueeze(0), torch.tensor(label, dtype=torch.long)


# 创建CNN1D模型的类
class CNN1DModel(nn.Module):
    def __init__(self,conv_archs,num_classes,signal_length,batch_size,input_channels=1):
        super(CNN1DModel,self).__init__()
        self.batch_size = batch_size
        self.signal_length = signal_length
        #CNN参数
        self.conv_arch=conv_archs #网络结构
        self.input_channels=input_channels # 输入通道数
        self.features = self.make_layers()
        self.avgpool =nn.AdaptiveAvgPool1d(9)
        #定义全连接层
        self.classifier =nn.Sequential(
            nn.Linear(128*3*3,100),
            nn.ReLU(inplace=True),
            nn.Dropout(),
            #nn.Linear(1024,1024),
            # nn.ReLU(inplace=True),
            #nn.Dropout(),
            nn.Linear(100,num_classes),
        )
    #CNN卷积池化结构
    def make_layers(self):
        layers=[]
        for (num_convs,out_channels)in self.conv_arch:
            for _ in range(num_convs):
                layers.append(nn.Conv1d(self.input_channels,out_channels,kernel_size=2,padding=1))
                layers.append(nn.ReLU(inplace=True))
                self.input_channels = out_channels
                layers.append(nn.MaxPool1d(kernel_size=2,stride=2))
        return nn.Sequential(*layers)


    def forward(self,input_seq):
        # 改变输入形状,适应网络输入[batch,.Hin,seq_length]
        input_seq=input_seq.view(-1,1,self.signal_length)

        features = self.features(input_seq)#torch.Size([32,1,1024])

        x = self.avgpool(features)        #torch.5ize([32,128,9])

        flat_tensor = x.view(input_seq.shape[0],-1)#torch.Size([32,1152])

        output = self.classifier(flat_tensor)    #   torch.Size([32,10])
        return output


# CNN1D模型接口的类,再MATLAB主脚本那里,就是调用的CNN1DClassifier这个类。
# 这个CNN1DClassifier类调用了上面的CNN1DModel,还定义了训练和预测的功能
class CNN1DClassifier():
    def __init__(self, conv_arch, num_classes,signal_length, epochs=50,batch_size=32,learn_rate=1e-4):
        # 定义模型参数
        # conv_arch = ((2, 32), (1, 64), (1, 128))
        # num_classes = 10
        model = CNN1DModel(conv_arch, num_classes, signal_length, batch_size)
        print(model)
        # 定义损失函数和优化函数
        self.device = torch.device("cuda" if torch.cuda.is_available() else "cpu")
        self.model = model.to(self.device)
        self.loss_function = nn.CrossEntropyLoss(reduction='sum')  # loss
        self.optimizer = torch.optim.Adam(model.parameters(), learn_rate)  # 优化器
        self.epochs = epochs
    def fit(self,train_loader):
        # 训练模型
        device = torch.device("cuda" if torch.cuda.is_available() else "cpu")
        for epoch in range(self.epochs):
            self.model.train()
            running_loss = 0.0
            for X_train, Y_train in train_loader:
                X_train, Y_train = X_train.to(device), Y_train.to(device)
                self.optimizer.zero_grad()
                outputs = self.model(X_train)
                loss = self.loss_function(outputs, Y_train)
                loss.backward()
                self.optimizer.step()
                running_loss += loss.item()
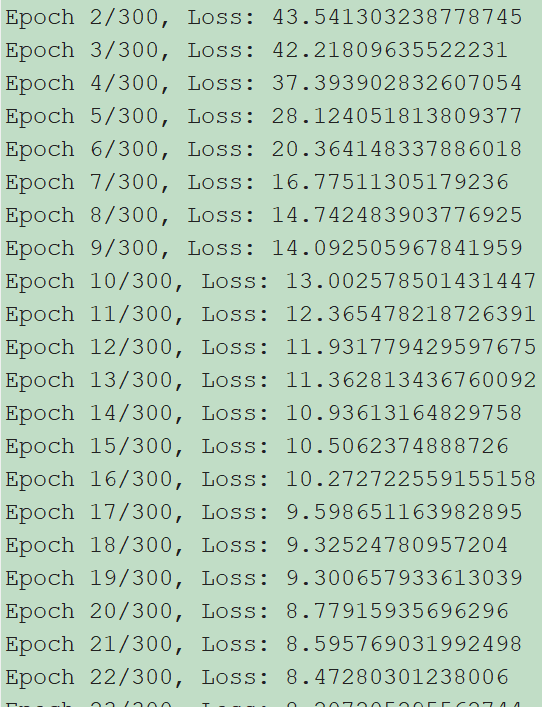
            print(f'Epoch {epoch + 1}/{self.epochs}, Loss: {running_loss / len(train_loader)}')
        torch.save(self.model,'CNN_1d_trained_model.pt')
    def predict(self,test_loader):
        predicted_labels = torch.tensor([])
        # 加载模型
        model = torch.load('CNN_1d_trained_model.pt')
        # model = torch.load('best_model_cnn2d.pt', map_location=torch.device('cpu'))
        # 将模型设置为评估模式
        model.eval()
        # 使用测试集数据进行推断
        with torch.no_grad():
            correct_test = 0
            test_loss = 0
            for X_test, Y_test in test_loader:
                X_test, Y_test = X_test.to(self.device), Y_test.to(self.device)
                test_output = model(X_test)
                probabilities = torch.nn.functional.softmax(test_output, dim=1)
                batch_predicted_labels = torch.argmax(probabilities, dim=1)
                correct_test += (batch_predicted_labels == Y_test).sum().item()
                loss = self.loss_function(test_output, Y_test)
                test_loss += loss.item()
                predicted_labels = torch.cat((predicted_labels, batch_predicted_labels))


        test_accuracy = correct_test / len(test_loader.dataset)
        test_loss = test_loss / len(test_loader.dataset)
        print(f'Test Accuracy: {test_accuracy:4.4f}  Test Loss: {test_loss:10.8f}')
        return  predicted_labels.numpy()
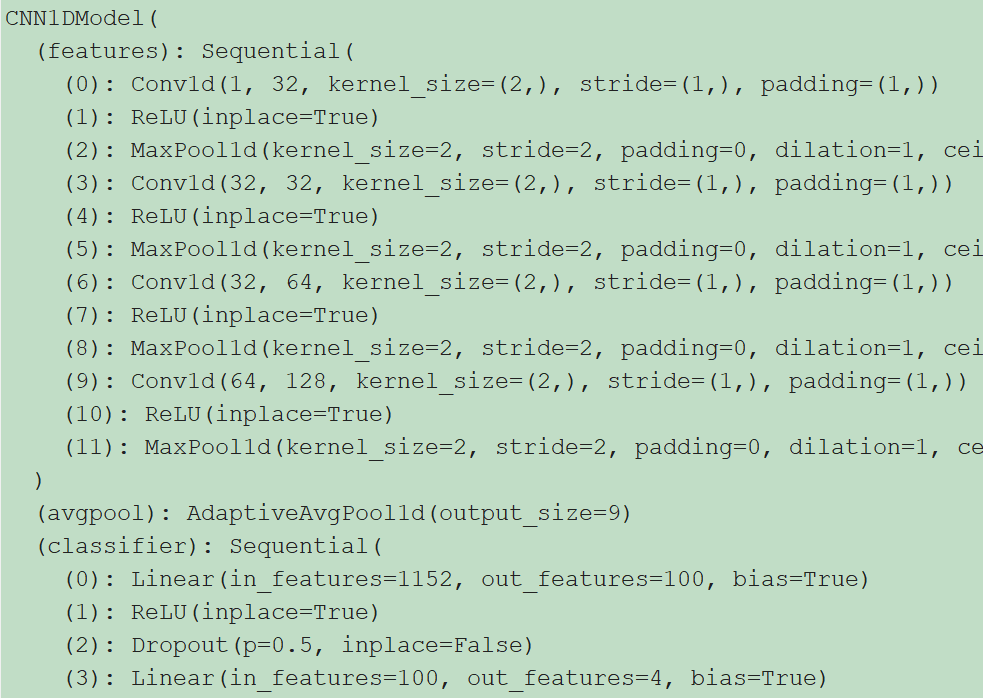
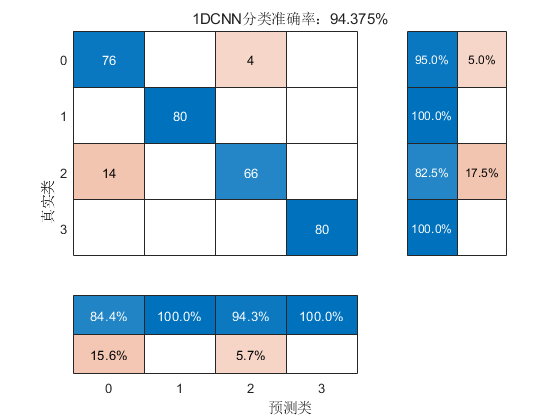
运行结果:
点击下方卡片关注,获取更多代码
更多推荐



 6
6 0
0- 0


 已为社区贡献18条内容

所有评论(0)