
iOS开发 手把手教你使用CreatML训练图像识别模型并运用到app
一、打开CreatML,选择新建一个Image Classification
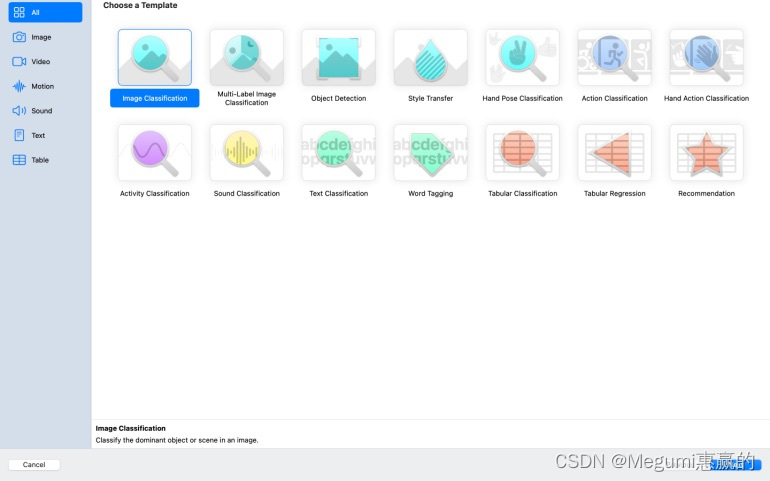
二、将数据分类好存放在文件夹,然后扔到把打包好的文件夹扔到training data里面
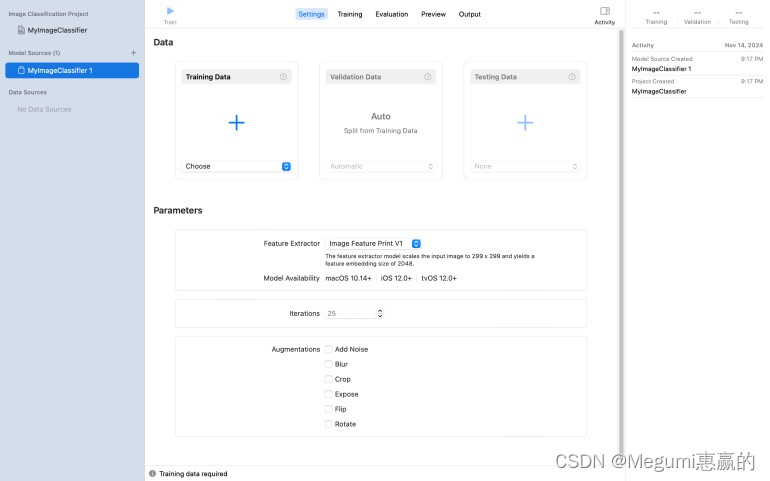
三、等待训练完成后,可以在training界面看模型的准确率,也可以把模型没见过的图片丢到Evaluation里面测试。
四、点击Output -> get 导出模型为mlmodel格式,再把模型文件添加到Xcode工程里。
五、所有用到的变量:
captureSession:用于控制摄像头会话的AVCaptureSession实例。videoOutput:用于输出视频数据的AVCaptureVideoDataOutput实例。videoDataOutputQueue:一个串行队列,用于在接收视频数据时执行回调。previewLayer:用于在预览中显示摄像头视频的AVCaptureVideoPreviewLayer实例。resultLabel:用于在界面上显示识别结果的UILabel实例。model:CoreML模型,定义为Megumi。lastIdentifier:用于存储上次识别结果的标识符。consecutiveCont:用于跟踪连续识别相同结果的次数。requiredConsecutiveCount:设置连续识别相同结果所需的次数阈值。
六、setupCamera方法,用于设置和启动摄像头:
1. 初始化摄像头会话、视频输出、数据输出队列和预览图层
        captureSession = AVCaptureSession()
        videoOutput = AVCaptureVideoDataOutput()
        videoDataOutputQueue = DispatchQueue(label: "videoDataOutputQueue")
        previewLayer = AVCaptureVideoPreviewLayer(session: captureSession)
2.设置预览图层的框架和视频重力,并将预览图层添加到视图的层中。
        previewLayer.frame = view.bounds
        previewLayer.videoGravity = .resizeAspectFill
        view.layer.addSublayer(previewLayer)
3.尝试获取默认视图设备,否则返回
guard let camera = AVCaptureDevice.default(for: .video) else { return }
4.创建一个AVCaptureDeviceInput实例,将它添加到摄像头会话中
        do {
            let input = try AVCaptureDeviceInput(device: camera)
            if captureSession.canAddInput(input) {
                captureSession.addInput(input)
            }
        } catch {
            print("Error creating video device input: \(error)")
        }
5.如果摄像头会话可以添加视频输出,则设置样本缓冲区代理并添加视频输出。
DispatchQueue.global(qos: .userInitiated).async {
            self.captureSession.startRunning()
        }
七、设置结果标签
1.初始化标签并且设置他的位置文本等属性,然后添加到视图中
八、captureOutput方法:在摄像头输出新的样本缓冲区时调用:
1.尝试从样本缓冲区获得图像缓冲区,否则返回
guard let pixelBuffer = CMSampleBufferGetImageBuffer(sampleBuffer) else { return }
2.尝试将CoreML模型转化成VNCoreMLModel,失败则报错并返回
        guard let vnModel = try? VNCoreMLModel(for: model.model) else {
            print("Failed to load the model")
            return
        }
3.创建一个VNCoreMLRequest实例,用于执行模型推理,并设置一个完成处理程序。
let request = VNCoreMLRequest(model: vnModel, completionHandler: { [weak self] (request, error) in
            guard let strongSelf = self else { return }
            if let error = error {
                print("Error during VNCoreMLRequest: \(error)")
                return
            }
            guard let results = request.results as? [VNClassificationObservation], let topResult = results.first else {
                return
            }
在完成处理程序中,检查是否有错误,并将结果转换为VNClassificationObservation数组,如果失败则返回。
4.设置默认的LabelText,检查顶部结果置信度
            var labelText = "No Result"
            if topResult.confidence > 0.8 {
5.针对不同的识别结果设置不同的LabelText,如果置信度不高则提示错误信息
                switch topResult.identifier {
                case "木制品":
                    labelText = "我恨你像块木头"
                case "金属":
                    labelText = "Fe、Cu、Al"
                case "皮毛":
                    labelText = "蛋白质是牛肉的六倍"
                case "电子产品":
                    labelText = "Ag、Au、Cu、Fe、Al"
                case "玻璃":
                    labelText = "Si、O"
                case "食物":
                    labelText = "糖类、脂肪、蛋白质"
                case "石":
                    labelText = "Ca"
                default:
                    labelText = "瓦达西希腊奶"
                }
            } else {
                labelText = "猪脑过载中"
            }
6.更新连续识别计数,只有在达到设置的连续识别次数才会更新LabelText
            if strongSelf.lastIdentifier == topResult.identifier{
                strongSelf.consecutiveCont += 1
            } else {
                strongSelf.consecutiveCont = 1
                strongSelf.lastIdentifier = topResult.identifier
            }

            if strongSelf.consecutiveCont >= strongSelf.requiredConsecutiveCount{
                DispatchQueue.main.async {
                    strongSelf.resultLabel.text = labelText
                }
            }
7.创建一个VNImageRequestHandler实例来执行请求
        })

        let handler = VNImageRequestHandler(cvPixelBuffer: pixelBuffer, orientation: .up, options: [:])
        do {
            try handler.perform([request])
        } catch {
            print("Error performing Vision request: \(error)")
        }
    }
}
完整代码如下(完整代码里还给Label加了识别点击手势跳转界面功能正文里我懒得写了):
tips:一定要在info里添加Privacy - Camera Usage Description的key来申请使用摄像头,不然白瞎了搞那么久
import UIKit
import AVFoundation
import CoreML
import Vision
class ViewController: UIViewController, AVCaptureVideoDataOutputSampleBufferDelegate {
var captureSession: AVCaptureSession!
var videoOutput: AVCaptureVideoDataOutput!
var videoDataOutputQueue: DispatchQueue!
var previewLayer: AVCaptureVideoPreviewLayer!
var resultLabel: UILabel!
let model = Megumi()
var lastIdentifier: String?
var consecutiveCont: Int = 0
let requiredConsecutiveCount = 3
override func viewDidLoad() {
super.viewDidLoad()
view.backgroundColor = .black
setupCamera()
setupResultLabel()
}
func setupCamera() {
captureSession = AVCaptureSession()
videoOutput = AVCaptureVideoDataOutput()
videoDataOutputQueue = DispatchQueue(label: "videoDataOutputQueue")
previewLayer = AVCaptureVideoPreviewLayer(session: captureSession)
// 设置摄像头和预览图层
previewLayer.frame = view.bounds
previewLayer.videoGravity = .resizeAspectFill // 设置视频重力
view.layer.addSublayer(previewLayer)
// 获取摄像头设备并创建输入
guard let camera = AVCaptureDevice.default(for: .video) else { return }
do {
let input = try AVCaptureDeviceInput(device: camera)
if captureSession.canAddInput(input) {
captureSession.addInput(input)
}
} catch {
print("Error creating video device input: \(error)")
}
if captureSession.canAddOutput(videoOutput) {
videoOutput.setSampleBufferDelegate(self, queue: videoDataOutputQueue)
captureSession.addOutput(videoOutput)
}
// 启动摄像头会话
DispatchQueue.global(qos: .userInitiated).async {
self.captureSession.startRunning()
}
}
func setupResultLabel() {
resultLabel = UILabel()
resultLabel.frame = CGRect(x: 20, y: view.frame.height - 50, width: view.frame.width - 40, height: 30)
resultLabel.textColor = .white
resultLabel.textAlignment = .center
view.addSubview(resultLabel)
resultLabel.isUserInteractionEnabled = true
let tapGesture = UITapGestureRecognizer(target: self, action: #selector(labelTapped))
resultLabel.addGestureRecognizer(tapGesture)
}
@objc func labelTapped() {
if resultLabel.text != "猪脑过载中" {
let nextViewController = ViewController2()
nextViewController.modalPresentationStyle = .fullScreen
present(nextViewController, animated: true, completion: nil)
}
}
func captureOutput(_ output: AVCaptureOutput, didOutput sampleBuffer: CMSampleBuffer, from connection: AVCaptureConnection) {
guard let pixelBuffer = CMSampleBufferGetImageBuffer(sampleBuffer) else { return }
// 将Core ML模型转换为VNCoreMLModel
guard let vnModel = try? VNCoreMLModel(for: model.model) else {
print("Failed to load the model")
return
}
let request = VNCoreMLRequest(model: vnModel, completionHandler: { [weak self] (request, error) in
guard let strongSelf = self else { return }
if let error = error {
print("Error during VNCoreMLRequest: \(error)")
return
}
guard let results = request.results as? [VNClassificationObservation], let topResult = results.first else {
return
}
// 根据分类结果设置自定义文本
var labelText = "No Result"
if topResult.confidence > 0.8 {
// 根据不同的分类结果设置不同的文本内容
switch topResult.identifier {
case "木制品":
labelText = "我恨你像块木头"
case "金属":
labelText = "Fe、Cu、Al"
case "皮毛":
labelText = "蛋白质是牛肉的六倍"
case "电子产品":
labelText = "Ag、Au、Cu、Fe、Al"
case "玻璃":
labelText = "Si、O"
case "食物":
labelText = "糖类、脂肪、蛋白质"
case "石":
labelText = "Ca"
default:
labelText = "瓦达西希腊奶"
}
} else {
labelText = "猪脑过载中"
}
// 更新UI
if strongSelf.lastIdentifier == topResult.identifier{
strongSelf.consecutiveCont += 1
} else {
strongSelf.consecutiveCont = 1
strongSelf.lastIdentifier = topResult.identifier
}
if strongSelf.consecutiveCont >= strongSelf.requiredConsecutiveCount{
DispatchQueue.main.async {
strongSelf.resultLabel.text = labelText
}
}
})
let handler = VNImageRequestHandler(cvPixelBuffer: pixelBuffer, orientation: .up, options: [:])
do {
try handler.perform([request])
} catch {
print("Error performing Vision request: \(error)")
}
}
}
更多推荐

 8
8 0
0- 0


 已为社区贡献1条内容

所有评论(0)