
fastApi中的ocr
1. Tesseract
优点:
-
完全免费开源
-
支持100多种语言
-
可以本地运行,无需网络连接
-
适合简单的OCR需求
缺点:
-
准确率相对商业方案较低
-
对复杂布局(如表格)处理能力有限
-
需要自行训练以提高特定场景的准确率
接口常用方法:
由于Tesseract引入是以pytesseract进行封装引入的
tesseract下载路径Index of /tesseract,安装时勾选语言包
# 指定 tessdata 路径
os.environ['TESSDATA_PREFIX'] = r'E:\python\tesseract\tessdata'
pytesseract.pytesseract.tesseract_cmd = r'E:\python\tesseract\tesseract.exe'
# 基本识别
text = pytesseract.image_to_string(Image.open("image.jpg"), lang="eng")

# 获取文本框、置信度等详细信息
data = pytesseract.image_to_data(Image.open("image.jpg"), output_type=pytesseract.Output.DICT)

# 仅识别数字
text = pytesseract.image_to_string(Image.open("image.jpg"), config="--psm 6 digits")

# 获取 OCR 的 HOCR 输出(包含位置信息)
hocr = pytesseract.image_to_pdf_or_hocr("image.jpg", extension="hocr")
-
多语言混合识别:
text = pytesseract.image_to_string(image, lang="eng+chi_sim")
-
输出格式控制:
-
image_to_boxes: 返回字符边界框 -
image_to_data: 返回单词级信息(坐标、置信度) -
image_to_osd: 检测方向和脚本
-
-
自定义配置文件:
创建config.txt文件,内容如:tessedit_char_whitelist 0123456789 # 仅识别数字
调用时加载配置:
pytesseract.image_to_string(image, config="path/to/config.txt")
2. PaddleOCR
优点:
-
由百度开发的中文OCR效果优秀
-
支持中英文混合识别
-
轻量级模型可选
-
支持版面分析
-
相比 Tesseract,它在中文场景和复杂布局(如多方向文本、表格)上表现更优
缺点:
-
英文识别能力不如Tesseract
-
需要一定配置和依赖
核心功能与方法
(1) 单张图片识别(检测+识别)
# 识别图片文本(返回结果包含文本框坐标、文本内容、置信度)
result = ocr.ocr("image.jpg", cls=True)  # cls=True启用方向分类

# 解析结果
for line in result:
    boxes = line[0]  # 文本框坐标(4个点,格式:[x1,y1], [x2,y2], [x3,y3], [x4,y4])
    text = line[1][0]  # 识别文本
    confidence = line[1][1]  # 置信度(0~1)
    print(f"文本: {text}, 置信度: {confidence}, 位置: {boxes}")
(2) 仅文本检测
# 只检测文本位置(不识别内容)
det_result = ocr.ocr("image.jpg", det=True, rec=False)
for boxes in det_result:
    print("文本框坐标:", boxes[0])  # 输出检测框
(3) 仅文本识别
# 对已裁剪的文本区域进行识别(需提供单行文本图片)
rec_result = ocr.ocr("cropped_text.jpg", det=False, rec=True)
print("识别结果:", rec_result[0][1][0])
端到端OCR(检测+识别)
# 默认端到端模式
result = ocr.ocr("image.jpg", cls=True)

# 保存可视化结果
image = draw_ocr("image.jpg", result, font_path="simfang.ttf")  # 指定中文字体
image.save("output.jpg")
表格识别
from paddleocr import PPStructure

table_engine = PPStructure(recovery=True)  # 恢复表格结构
result = table_engine("table.jpg")
for region in result:
    print(region['type'])  # 'table' 或 'text'
    print(region['res'])
多语言混合识别
# 需下载混合语言模型(如中英)
ocr = PaddleOCR(lang="ch_en")
自定义字典
# 添加用户词典(如专业术语)
ocr = PaddleOCR(rec_char_dict_path="custom_dict.txt")
from paddleocr import PaddleOCR
from PIL import Image
import numpy as np
import os

# 设置镜像源(清华源)
# os.environ["PADDLEOCR_MODEL_DOWNLOAD_URL"] = "https://bj.bcebos.com/v1/paddleocr"
# 指定模型路径(绝对路径)
ocr = PaddleOCR(
    use_textline_orientation=True,  # 启用方向分类
    device='cpu',  # 使用 CPU,
    lang="ch"  # 语言类型
)
"""
1.图片识别文字
"""
# 加载图像
img = Image.open("math.png").convert('RGB')
img_array = np.array(img)

# 使用 predict 方法(推荐)
result = ocr.predict(img_array)
# 提取所有文本内容
texts = [item["rec_texts"] for item in result]
print(texts)


"""
2.批量识别照片
"""
results = []
image_dir = "E:/python/api/api/v1/ollama/image/"
#遍历图片
for img_name in os.listdir(image_dir):
    img_path = os.path.join(image_dir, img_name)
    # 加载图像
    img = Image.open(img_path).convert('RGB')
    img_array = np.array(img)

    # 使用 predict 方法(推荐)
    result = ocr.predict(img_array)
    # 提取所有文本内容
    texts = [item["rec_texts"] for item in result]
    results.append(texts)
print(results)


"""
3.解析pdf
"""
from pdf2image import convert_from_path
import cv2

def pdf_to_text_with_predict(pdf_path, poppler_path):
    """
    使用 PaddleOCR 的 predict() 方法处理 PDF 文件
    Args:
        pdf_path (str): PDF 文件路径
        poppler_path (str): Poppler 的 bin 目录路径
    """
    try:
        # 转换PDF为图像(确保格式正确)
        images = convert_from_path(
            pdf_path,
            poppler_path=poppler_path,
            dpi=300,
            fmt="jpeg"
        )
    except Exception as e:
        print(f"PDF转换失败: {e}")
        return

    for i, img in enumerate(images):
        try:
            # 转换为OpenCV格式并验证
            img_np = np.array(img)
            if img_np.size == 0:
                print(f"第 {i + 1} 页为空图像,跳过")
                continue

            img_cv = cv2.cvtColor(img_np, cv2.COLOR_RGB2BGR)

            # ✅ 使用 predict() 方法
            result = ocr.predict(img_cv)

            # 处理新版 predict() 返回结果
            print(f"\n=== 第 {i + 1} 页识别结果 ===")

            # 检查结果有效性
            if not result or not isinstance(result, list):
                print("未识别到有效结果")
                continue

            # 遍历识别结果
            for item in result:
                if isinstance(item, dict):
                    # 新版结构化结果
                    text = item.get('rec_texts', '')
                    confidence = item.get('confidence', 0)
                    print(f"文本: {text} (置信度: {confidence:.2f})")
                elif isinstance(item, (list, tuple)):
                    # 兼容可能的其他格式
                    print("识别到:", item)

        except Exception as e:
            print(f"第 {i + 1} 页处理失败: {e}")
"""
4.识别发票
"""
from paddleocr import PaddleOCR
from PIL import Image
import numpy as np
import re

def text(file_path):
    # 设置镜像源(清华源)
    # os.environ["PADDLEOCR_MODEL_DOWNLOAD_URL"] = "https://bj.bcebos.com/v1/paddleocr"
    # 指定模型路径(绝对路径)
    ocr = PaddleOCR(
        use_textline_orientation=True,  # 启用方向分类
        device='cpu',  # 使用 CPU,
        lang="ch"  # 语言类型
    )

    # 加载图像并增加亮度
    img = Image.open(file_path).convert('RGB')
    img_array = np.array(img)
    # 使用 predict 方法(推荐)
    result = ocr.predict(img_array)  # 使用调整后的图像
    # 提取所有文本内容
    all_texts = [item["rec_texts"] for item in result]
    print(all_texts)
    result = extract_invoice_info(all_texts)
    print("=== 发票信息提取结果 ===")
    print(f"发票号码: {result['invoice_number']}")
    print(f"开票日期: {result['invoice_date']}")
    print(f"合计金额: {result['total_amount']}")
    print(f"开票人: {result['drawer']}")

    print("\n=== 购买方信息 ===")
    buyer = result['buyer_info']
    for key, value in buyer.items():
        print(f"{key}: {value}")

    print("\n=== 销售方信息 ===")
    seller = result['seller_info']
    for key, value in seller.items():
        print(f"{key}: {value}")

def extract_invoice_info(all_texts):
    invoice_number = None
    invoice_date = None
    total_amount = None
    buyer_info = {}
    seller_info = {}
    drawer = None

    # 将二维列表展平为一维列表以便处理
    texts = [item for sublist in all_texts for item in sublist]

    # 状态标志,用于跟踪当前解析的部分
    current_section = None

    for i, text in enumerate(texts):
        text = text.strip()

        # 提取发票号码
        if invoice_number is None:
            if '发票号码' in text or '号码' in text:
                if ':' in text:
                    parts = text.split(':', 1)
                    if len(parts) > 1 and parts[1].strip():
                        invoice_number = parts[1].strip()
                        continue
                if i + 1 < len(texts):
                    next_text = texts[i + 1].strip()
                    if next_text.replace(' ', '').isdigit():
                        invoice_number = next_text

        # 提取开票日期
        if invoice_date is None:
            if '开票日期' in text or '日期' in text:
                if ':' in text:
                    parts = text.split(':', 1)
                    if len(parts) > 1 and parts[1].strip():
                        invoice_date = parts[1].strip()
                        continue
                if i + 1 < len(texts):
                    next_text = texts[i + 1].strip()
                    if any(char in next_text for char in ['年', '月', '日', '-', '/']):
                        invoice_date = next_text

        # 提取合计金额
        if total_amount is None:
            if '价税合计' in text or '金额合计' in text or '合计' in text:
                if '(小写)' in text or '¥' in text:
                    amount_match = re.search(r'¥(\d+\.?\d*)', text)
                    if amount_match:
                        total_amount = f"¥{amount_match.group(1)}"
                        continue

                for j in range(i + 1, min(i + 5, len(texts))):
                    next_text = texts[j].strip()
                    if '¥' in next_text:
                        total_amount = next_text
                        break

        # 检测当前解析部分
        if '购买方信息' in text or '购买方' in text:
            current_section = 'buyer'
            continue
        elif '销售方信息' in text or '销售方' in text:
            current_section = 'seller'
            continue

        # 提取购买方信息
        if current_section == 'buyer':
            if '名称' in text and ':' in text:
                parts = text.split(':', 1)
                if len(parts) > 1:
                    buyer_info['name'] = parts[1].strip()
            elif '纳税人识别号' in text or '统一社会信用代码' in text:
                if ':' in text:
                    parts = text.split(':', 1)
                    if len(parts) > 1 and parts[1].strip():
                        buyer_info['tax_id'] = parts[1].strip()
                elif i + 1 < len(texts):
                    next_text = texts[i + 1].strip()
                    if len(next_text) >= 15:  # 税号通常较长
                        buyer_info['tax_id'] = next_text
            elif '地址' in text and ':' in text:
                parts = text.split(':', 1)
                if len(parts) > 1:
                    buyer_info['address'] = parts[1].strip()
            elif '电话' in text and ':' in text:
                parts = text.split(':', 1)
                if len(parts) > 1:
                    buyer_info['phone'] = parts[1].strip()
            elif '开户行' in text and ':' in text:
                parts = text.split(':', 1)
                if len(parts) > 1:
                    buyer_info['bank'] = parts[1].strip()
            elif '账号' in text and ':' in text:
                parts = text.split(':', 1)
                if len(parts) > 1:
                    buyer_info['account'] = parts[1].strip()

        # 提取销售方信息
        elif current_section == 'seller':
            if '名称' in text and ':' in text:
                parts = text.split(':', 1)
                if len(parts) > 1:
                    seller_info['name'] = parts[1].strip()
            elif '纳税人识别号' in text or '统一社会信用代码' in text:
                if ':' in text:
                    parts = text.split(':', 1)
                    if len(parts) > 1 and parts[1].strip():
                        seller_info['tax_id'] = parts[1].strip()
                elif i + 1 < len(texts):
                    next_text = texts[i + 1].strip()
                    if len(next_text) >= 15:
                        seller_info['tax_id'] = next_text
            elif '地址' in text and ':' in text:
                parts = text.split(':', 1)
                if len(parts) > 1:
                    seller_info['address'] = parts[1].strip()
            elif '电话' in text and ':' in text:
                parts = text.split(':', 1)
                if len(parts) > 1:
                    seller_info['phone'] = parts[1].strip()
            elif '开户行' in text and ':' in text:
                parts = text.split(':', 1)
                if len(parts) > 1:
                    seller_info['bank'] = parts[1].strip()
            elif '账号' in text and ':' in text:
                parts = text.split(':', 1)
                if len(parts) > 1:
                    seller_info['account'] = parts[1].strip()

        # 提取开票人
        if drawer is None:
            if '开票人' in text and ':' in text:
                parts = text.split(':', 1)
                if len(parts) > 1:
                    drawer = parts[1].strip()
            elif '开票人' in text and i + 1 < len(texts):
                next_text = texts[i + 1].strip()
                if len(next_text) <= 10:  # 开票人名字不会太长
                    drawer = next_text

    # 如果通过常规方式未找到,尝试其他策略
    if total_amount is None:
        for text in texts:
            if '¥' in text and any(char.isdigit() for char in text):
                total_amount = text
                break

    return {
        'invoice_number': invoice_number,
        'invoice_date': invoice_date,
        'total_amount': total_amount,
        'buyer_info': buyer_info,
        'seller_info': seller_info,
        'drawer': drawer
    }

# 使用示例
if __name__ == "__main__":
    pdf_path = r"E:\python\api\api\v1\ollama\image\lpf.pdf"  # 替换为你的PDF路径
    poppler_path =r"E:\python\poppler-24.02.0\Library\bin"  # Windows示例路径
    print("开始处理PDF...")
    pdf_to_text_with_predict(pdf_path, poppler_path)
    print("处理完成")
    path = r"E:\python\api\api\v1\ollama\image\fp.png"
    text(path)
enumerate() 是 Python 的一个内置函数,用于在遍历序列(如列表、元组、字符串等)时,同时获取元素的索引和值。它解决了传统遍历中需要手动维护计数器的麻烦,使代码更简洁、更 Pythonic。
1. 基本用法
fruits = ['apple', 'banana', 'cherry']

# 普通遍历(只有值)
for fruit in fruits:
    print(fruit)

# 使用 enumerate(同时获取索引和值)
for index, fruit in enumerate(fruits):
    print(f"索引 {index}: 值是 {fruit}")
输出:
索引 0: 值是 apple
索引 1: 值是 banana
索引 2: 值是 cherry
2. 在 OCR 代码中的作用
在你提供的 PDF 处理代码中:
for i, img in enumerate(images):  # i=索引, img=图像数据
    result = ocr.predict(img)
    print(f"第 {i+1} 页结果:")  # i从0开始,+1表示页码
-
images是通过convert_from_path()转换得到的 PDF 页面图像列表。 -
enumerate(images)会返回:-
i:当前图像的索引(从 0 开始) -
img:当前页面的图像数据(PIL.Image 对象)
-
优势:
-
无需手动定义计数器(如
i = 0; i += 1) -
直接知道当前处理的是第几页(通过
i+1显示人类友好的页码
3.解析识别发票代码
这段代码用于从文本中提取发票号码,逻辑分为两部分:
- 检查当前行是否包含"发票号码"或"号码"
if '发票号码' in text or '号码' in text:#如果当前行包含发票号码或号码,则进一步处理。 - 尝试从当前行提取发票号码(如果有冒号
:)if ':' in text: parts = text.split(':', 1) # 以冒号分割,最多分割一次 if len(parts) > 1 and parts[1].strip(): # 确保冒号后有内容 invoice_number = parts[1].strip() # 提取发票号码 continue # 跳过后续处理 1.parts = text.split(':', 1) 将字符串 text以中文冒号":"进行分割 参数 1表示最多只分割一次,得到一个最多包含两个元素的列表 2.if len(parts) > 1 and parts[1].strip(): 检查分割后的结果: len(parts) > 1确保确实分割出了两部分(即文本中包含冒号) parts[1].strip()确保冒号后面的内容去除首尾空格后不为空 - 如果当前行没有冒号,尝试从下一行提取发票号码
if i + 1 < len(texts):  # 确保有下一行
    next_text = texts[i + 1].strip()  # 获取下一行的内容
    if next_text.replace(' ', '').isdigit():  # 检查是否纯数字(去除空格)
        invoice_number = next_text  # 提取为发票号码
3. EasyOCR
优点:
-
简单易用
-
支持80+语言
-
适合初学者
-
相比 Tesseract 和 PaddleOCR,它的优势在于 开箱即用、多语言支持和 简洁的 API
缺点:
-
准确率中等
-
模型较大
快速识别文本
import easyocr

# 初始化 Reader(指定语言,例如英文和中文)
reader = easyocr.Reader(['en', 'ch_sim'])  # 'ch_sim' 是简体中文

# 读取图片并识别文本
result = reader.readtext('image.jpg')

# 打印结果
for detection in result:
    print(detection[1])  # 打印识别到的文本
输出示例:
[([[10, 20], [100, 20], [100, 50], [10, 50]], 'Hello', 0.99),
 ([[50, 80], [200, 80], [200, 120], [50, 120]], '你好', 0.98)]
每个结果包含:
-
detection[0]:文本框坐标(四个点的[x, y]坐标) -
detection[1]:识别的文本 -
detection[2]:置信度(0~1)
核心功能
(1) 多语言识别
EasyOCR 支持 80+ 种语言,例如:
reader = easyocr.Reader(['en', 'ch_sim', 'ja', 'ko', 'fr']) # 英文、中文、日文、韩文、法文
(2) 检测 + 识别
默认情况下,readtext() 会执行 文本检测(Detection) 和 文本识别(Recognition):
result = reader.readtext('image.jpg')
(3) 仅文本检测
bounds = reader.readtext('image.jpg', detail=0) # 只返回文本,不返回坐标和置信度
(4) 调整识别参数
result = reader.readtext(
    'image.jpg',
    decoder='beamsearch',  # 解码方式('greedy' 或 'beamsearch')
    beamWidth=5,          # beamsearch 的宽度(越大越准,但越慢)
    batch_size=1,         # 批处理大小(GPU 可增大)
    contrast_ths=0.1,     # 对比度阈值(低对比度文本可能被忽略)
    adjust_contrast=0.5,  # 自动调整对比度(0~1)
    width_ths=0.5,        # 合并相邻文本框的宽度阈值
    height_ths=0.5,       # 合并相邻文本框的高度阈值
)
3. 图像预处理优化
EasyOCR 内置预处理,但某些场景需手动优化:
(1) 调整对比度 & 亮度
import cv2

image = cv2.imread('image.jpg')
image = cv2.cvtColor(image, cv2.COLOR_BGR2GRAY)
image = cv2.equalizeHist(image)  # 直方图均衡化
result = reader.readtext(image)
(2) 二值化(黑白处理)
_, binary_image = cv2.threshold(image, 150, 255, cv2.THRESH_BINARY)
result = reader.readtext(binary_image)
(3) 降噪(去模糊)
image = cv2.GaussianBlur(image, (3, 3), 0)  # 高斯模糊去噪
result = reader.readtext(image)
(4) 批量识别(GPU 加速)
results = reader.readtext_batch(['img1.jpg', 'img2.jpg'], batch_size=2) # GPU 批处理
(5) 自定义模型路径
reader = easyocr.Reader(
    ['en', 'ch_sim'],
    model_storage_directory='custom_models/',  # 自定义模型存储路径
    download_enabled=False  # 禁用自动下载模型
)
(6) 识别特定区域(ROI)
import numpy as np

image = cv2.imread('image.jpg')
roi = image[100:300, 200:400]  # 截取感兴趣区域
result = reader.readtext(roi)
4.LaTeX-OCR
✅ 优点
-
高精度识别数学公式
-
相比通用 OCR(如 Tesseract),LaTeX-OCR 针对数学符号、上下标、分式、矩阵等复杂结构优化,识别率更高。
-
适合学术论文、教材、试卷等场景。
-
-
输出 LaTeX 代码
-
可直接生成 LaTeX 格式,方便在 Overleaf、Markdown(
$E=mc^2$)等场景使用。
-
-
支持手写公式识别(部分工具)
-
如 MyScript、Mathpix Handwriting 可识别手写公式。
-
-
开源替代方案可用
-
如 pix2tex(基于深度学习),可本地运行,无需依赖 API。
-
❌ 缺点
-
依赖清晰印刷体
-
手写潦草或低分辨率图片识别率下降。
-
-
复杂公式可能出错
-
嵌套结构(如多重积分、复杂矩阵)可能解析错误。
-
-
部分工具需要付费
-
Mathpix 免费版限制 100 次/月,商用需订阅。
-
-
训练数据要求高(自定义模型)
-
如果需要训练自己的模型,需大量标注数据。
-
二、常用 LaTeX-OCR 工具及方法
1. Mathpix(推荐,高精度)
安装与使用
import requests
import base64

# 使用 Mathpix API(需注册获取 app_id 和 app_key)
def mathpix_ocr(image_path):
    with open(image_path, "rb") as f:
        img_base64 = base64.b64encode(f.read()).decode()

    headers = {
        "app_id": "YOUR_APP_ID",
        "app_key": "YOUR_APP_KEY",
        "Content-type": "application/json"
    }
    data = {"src": f"data:image/png;base64,{img_base64}", "formats": ["latex"]}
    response = requests.post("https://api.mathpix.com/v3/text", json=data, headers=headers)
    return response.json()["latex"]

latex_code = mathpix_ocr("equation.png")
print(latex_code)  # 输出 LaTeX,如 "\frac{x}{y} = \sqrt{2}"
适用场景:学术论文、精准公式提取。
2. pix2tex(开源替代)
安装
pip install pix2tex[gui]  # 安装带 GUI 的版本
pip install pix2tex[gui] -i https://pypi.tuna.tsinghua.edu.cn/simple #镜像版本
使用
from pix2tex.cli import LatexOCR

model = LatexOCR()
latex_code = model(Image.open("equation.png"))  # 识别图片
print(latex_code)  # 输出 LaTeX 代码
适用场景:本地免费使用,适合简单公式。
4. Tesseract + 自定义训练(低成本方案)
如果坚持使用 Tesseract,可尝试:
python
复制
下载
import pytesseract
from PIL import Image

# 预处理图片(二值化 + 增强对比度)
img = Image.open("equation.png").convert("L")  # 转灰度
pytesseract.image_to_string(img, config="--psm 6 --oem 3 -c tessedit_char_whitelist=0123456789+-=(){}[]")
适用场景:简单印刷体公式,无复杂结构。
5.自研OCR
-
优点:
-
完全定制化(针对特定场景优化)
-
数据隐私可控(本地部署)
-
长期成本可控(无API调用费)
-
-
缺点:
-
需标注大量训练数据
-
开发周期长(模型训练/迭代)
-
维护成本高
-
-
适用场景:特殊格式(工业标签/手写体)、数据敏感领域
核心流程
自研 OCR 通常分为以下阶段:
-
图像预处理 → 提升图像质量
-
文本检测(Text Detection) → 定位文本位置
-
文本识别(Text Recognition) → 识别文本内容
-
后处理(Post-processing) → 矫正错误
2. 关键技术方法
(1) 图像预处理
目标:增强文本区域,抑制噪声。
-
灰度化:
import cv2
gray = cv2.cvtColor(image, cv2.COLOR_BGR2GRAY)
-
二值化(固定阈值/Otsu):
_, binary = cv2.threshold(gray, 150, 255, cv2.THRESH_BINARY_INV)
-
去噪(中值滤波/高斯模糊):
denoised = cv2.medianBlur(binary, 3)
-
边缘增强(CLAHE):
clahe = cv2.createCLAHE(clipLimit=2.0, tileGridSize=(8,8))
enhanced = clahe.apply(gray)
(2) 文本检测(Text Detection)
传统方法
-
MSER(最大稳定极值区域) + SWT(笔画宽度变换)
-
OpenCV 轮廓检测:
contours, _ = cv2.findContours(binary, cv2.RETR_EXTERNAL, cv2.CHAIN_APPROX_SIMPLE)
for cnt in contours:
    x, y, w, h = cv2.boundingRect(cnt)
    cv2.rectangle(image, (x,y), (x+w,y+h), (0,255,0), 2)
深度学习方法
-
CTPN(Connectionist Text Proposal Network) → 适合水平文本
-
EAST(Efficient and Accurate Scene Text Detector) → 支持多方向文本
-
DBNet(Differentiable Binarization Network) → 高精度二值化检测
-
YOLOv8/PP-YOLOE(检测+OCR 端到端) → 适用于特定场景(如车牌)
示例(使用 PaddleDetection):
from paddledetection import PPYOLOE
model = PPYOLOE(model_dir='text_det_model')
results = model.predict('image.jpg')
(3) 文本识别(Text Recognition)
深度学习方法
-
CRNN(CNN + RNN + CTC) → 经典序列识别
-
Transformer-based(如 TrOCR) → 高精度但计算量大
-
SVTR(百度自研) → 中文场景优化
示例(CRNN 训练):
import torch
model = CRNN(num_classes=len(charset))  # 字符集大小
criterion = torch.nn.CTCLoss()
optimizer = torch.optim.Adam(model.parameters())
6. MMOCR
优点:
-
支持多种语言和多种算法
-
各组件可灵活替换(如backbone、neck、head)
-
提供大量预训练模型
缺点:
-
资源消耗,部分模型(如SAR)需要较大显存
-
对结构化文档(如表格)支持有
7.GPT-4V
7.1PT-4V 的核心优势(优点)
-
多模态能力
-
同时处理图像和文本输入,支持自然语言交互(如“描述图片内容并总结要点”)。
-
适用于复杂场景:文档解析、图表分析、自然场景文本识别等。
-
-
零样本学习(Zero-shot)
-
无需微调即可完成大多数OCR和图像理解任务,开箱即用。
-
-
语义理解增强
-
超越传统OCR:能结合上下文纠正识别错误(如将模糊的“1O1”修正为“101”)。
-
支持问答和摘要生成(如“图片中的关键数据是什么?”)。
-
-
多语言支持
-
覆盖主流语言(中、英、法等),但非拉丁语系(如中文)精度可能略低于专用OCR工具。
-
-
开发便捷性
-
直接通过API调用,无需训练模型或部署复杂Pipeline。
-
7.2、GPT-4V 的局限性(缺点)
-
精度问题
-
对模糊、小字体或复杂排版(如表格、公式)的识别率低于专用OCR工具(如PaddleOCR)。
-
中文长文本可能出现分段错误。
-
-
成本高
-
API按Token计费,高分辨率图片的Token消耗大(需压缩优化)。
-
不适合高频或大批量处理场景(成本难以控制)。
-
-
响应速度慢
-
平均响应时间3-10秒,远高于本地OCR引擎(如Tesseract)。
-
-
隐私与合规风险
-
图像数据需上传至OpenAI服务器,不适合敏感内容(如医疗记录、身份证)。
-
-
提示词敏感
-
输出质量高度依赖指令设计(需反复调试Prompt)。
-
7.3、GPT-4V 的典型使用场景
| 场景 | 示例指令 |
|---|---|
| 文档文本提取 | “提取图片中的所有文字,保留段落格式。” |
| 表格解析 | “将图片中的表格转换为Markdown格式,确保对齐列名和数据。” |
| 图像问答 | “图中菜单的素食选项有哪些?列出菜品和价格。” |
| 语义纠错 | “识别图片中的代码片段,修正可能的OCR错误(如0/O混淆)。” |
| 多图关联分析 | “对比两张价格表的差异,列出新增商品和价格变化。” |
7.4、高效使用方法与技巧
1. 基础代码示例
from openai import OpenAI
import base64

# 初始化客户端(建议从环境变量读取API Key)
client = OpenAI(api_key="sk-your-key")

# 图片转Base64(需压缩)
def encode_image(image_path):
    with open(image_path, "rb") as image_file:
        return base64.b64encode(image_file.read()).decode('utf-8')

# 调用GPT-4V
response = client.chat.completions.create(
    model="gpt-4-vision-preview",
    messages=[
        {
            "role": "user",
            "content": [
                {"type": "text", "text": "提取图中的文字"},
                {"type": "image_url", "image_url": {"url": f"data:image/jpeg;base64,{encode_image('image.jpg')}"}},
            ],
        }
    ],
    max_tokens=1000,  # 根据文本长度调整
    timeout=20,       # 设置超时
)
print(response.choices[0].message.content)
2. 优化策略
-
图片压缩:限制分辨率(长边≤2048px)和体积(≤500KB),避免超时和高费用。
from PIL import Image import io def compress_image(image_path, quality=85): img = Image.open(image_path) if img.mode == 'RGBA': img = img.convert('RGB') buffer = io.BytesIO() img.save(buffer, format="JPEG", quality=quality) return base64.b64encode(buffer.getvalue()).decode('utf-8') -
指令设计:
-
明确任务:避免模糊指令(如“分析图片”),改为“提取图中所有电话号码”。
-
结构化输出:指定格式(如JSON、Markdown)。
-
-
错误处理与重试:
import time
from openai import APITimeoutError

def call_with_retry(prompt, image_base64, retries=3):
    for i in range(retries):
        try:
            response = client.chat.completions.create(...)
            return response
        except APITimeoutError:
            if i == retries - 1:
                raise
            time.sleep(2 ** i)  # 指数退避
3. 安全与成本控制
-
隐私保护:避免上传敏感图片,必要时模糊关键信息。
-
监控用量:通过OpenAI Dashboard设置API限额警报。
8.商业OCR软件
1. Adobe Acrobat Pro
-
PDF文档OCR
-
保持原始布局
-
多语言识别
2. ABBYY FineReader
-
表格识别准确率高
-
支持190+种语言
-
格式保留能力强
3. Readiris
-
手写识别
-
文档分类
-
批量处理
9.结合swagger测试识别图片并给出答案
9.1目录结构
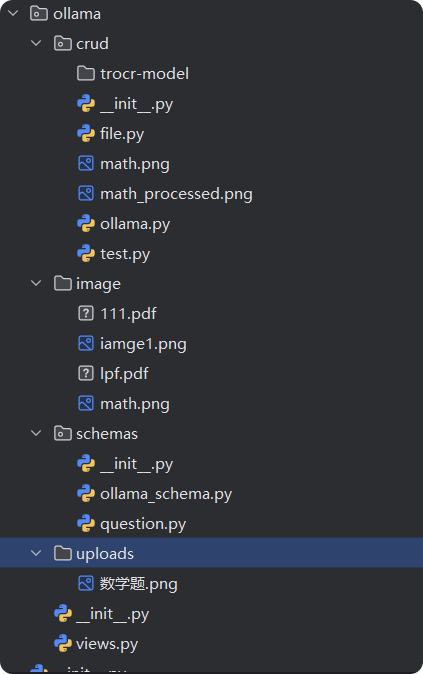
9.2代码实现
9.2.1 views.py
# !/usr/bin/env python3
# -*- encoding : utf-8 -*-
# @Filename    : views.py
# @Software    : VSCode
# @Datetime    : 2021/11/03 17:24:24
# @Author      : leo liu
# @Version     : 1.0
# @Description :


from typing import Any
from fastapi import APIRouter, Depends, Header,Response
from sqlalchemy.orm.session import Session
import pandas as pd
import os
import io
from docx import Document
from extensions import logger
from utils import response_code
from db.session import get_db
from .schemas import ollama_schema
from .crud.ollama import crud_ollama
from .crud.file import crud_file
from fastapi import UploadFile, File, HTTPException,Form


router = APIRouter() #路由分组

# 确保上传目录存在
# 配置
UPLOAD_FOLDER = "uploads"
OUTPUT_FOLDER = "outputs"
os.makedirs(UPLOAD_FOLDER, exist_ok=True)
os.makedirs(OUTPUT_FOLDER, exist_ok=True)

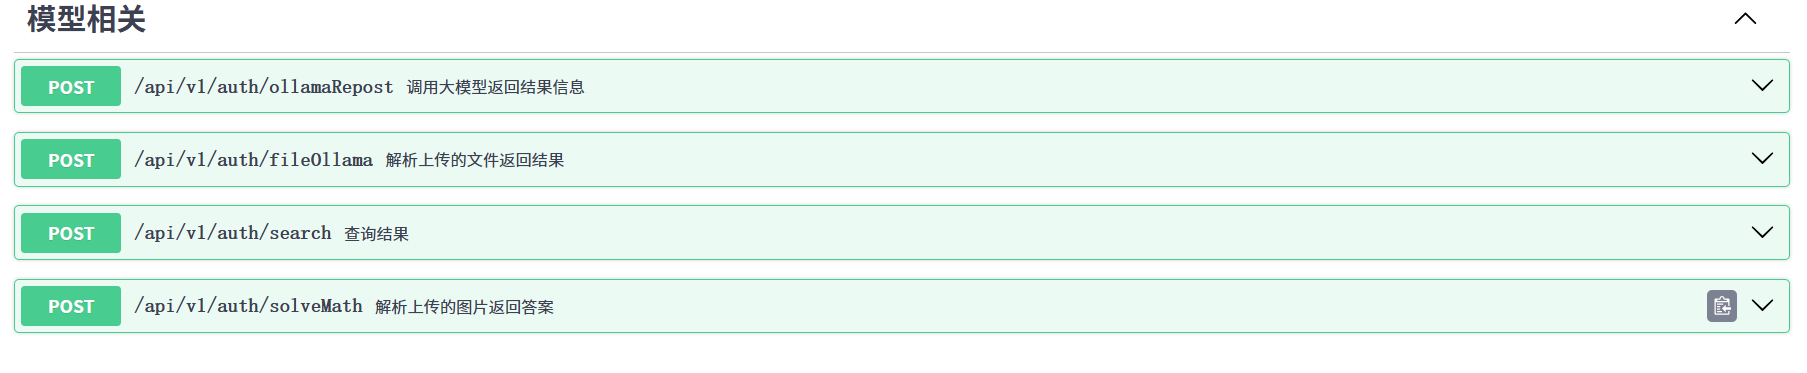
@router.post("/auth/ollamaRepost", summary="调用大模型返回结果信息")
async def ollama_repost(
    *,
    db: Session = Depends(get_db),#依赖注入系统
    param: ollama_schema.ollamaBase,
    model: ollama_schema.ModelConfig,
) -> Any:
    """
    调用大模型返回结果
    """
    logger.info(f"查询的问题->:{param.param}")
    result = crud_ollama.getresult(db,model,param = param)
    logger.info(f"问题解析出的关键字:{result['promptResult']}")
    df = pd.DataFrame(result['sqResult'])
    print(f"学生信息:\n {df.to_markdown(index=False)}")
    logger.info(f"AI分析的结果:\n{result['analysis']}")
    return response_code.resp_200(data=result['analysis'], message="success")


@router.post("/auth/fileOllama",summary="解析上传的文件返回结果")
async def ollama_repost(
    *,
    file: UploadFile = File(..., description="上传的文件"),
    config: str = Form(..., description="模型配置(JSON字符串)")
) -> Any:
    """
    处理上传的文件并调用大模型
    - **file**: 要上传的文件
    - **config**: 可选的大模型参数(JSON格式字符串)
    """
    try:
        # 1. 验证文件
        if not file.filename:
            raise HTTPException(status_code=400, detail="未提供文件名")

        logger.info(f"开始处理文件: {file.filename} (类型: {file.content_type})")

        # 2. 解析文件内容
        file_content = crud_file.parse_file(file)
        logger.info(f"文件解析成功,内容长度: {len(file_content)}字符")

        # 3. 调用大模型处理内容
        logger.info("调用大模型处理内容...")
        model = ollama_schema.ModelConfig.parse_raw(config)
        model_response = crud_file.getresult(model,file_content)
        logger.info("大模型处理完成")
        logger.info(f"返回的AI信息:{model_response['analysis']}")
        return response_code.resp_200(data=model_response['analysis'], message="success")
    except Exception as e:
        logger.info(f"{e}")


@router.post("/auth/search",summary="查询结果")
async def ollama_search(
    param: str = Form("str"),
    config: str = Form(..., description="模型配置(JSON字符串)")
) -> Any:
    """
    - param 需要大模型查询的信息
    """
    try:
        model = ollama_schema.ModelConfig.parse_raw(config)
        query = f"""
         针对{param}返回一个大纲

         格式以

         1.标题
         2.内容

         每行缩进2展示
        """
        model_response = crud_file.getresult(model, query)
        logger.info("大模型处理完成")
        logger.info(f"返回的AI信息:{model_response['analysis']}")
        # 创建一个 Word 文档
        doc = Document()

        # 1. 添加标题
        doc.add_heading("FastAPI 生成的 Word 文档", level=1)

        # 2. 添加正文内容
        doc.add_paragraph("这是由 FastAPI 自动生成的 Word 文档内容。")

        # 3. 添加"内容"到文档
        doc.add_paragraph(model_response['analysis'])  # 关键修改:直接添加到文档

        # 4. 保存到内存(BytesIO)
        file_stream = io.BytesIO()  # 创建空BytesIO
        doc.save(file_stream)  # 将文档写入BytesIO
        file_stream.seek(0)
        # 返回 Word 文件
        return Response(
            content=file_stream.getvalue(),
            media_type="application/vnd.openxmlformats-officedocument.wordprocessingml.document",
            headers={"Content-Disposition": "attachment; filename=output.docx"}
        )
        # return response_code.resp_200(data=model_response['analysis'], message="success")
    except Exception as e:
        logger.info(f"{e}")


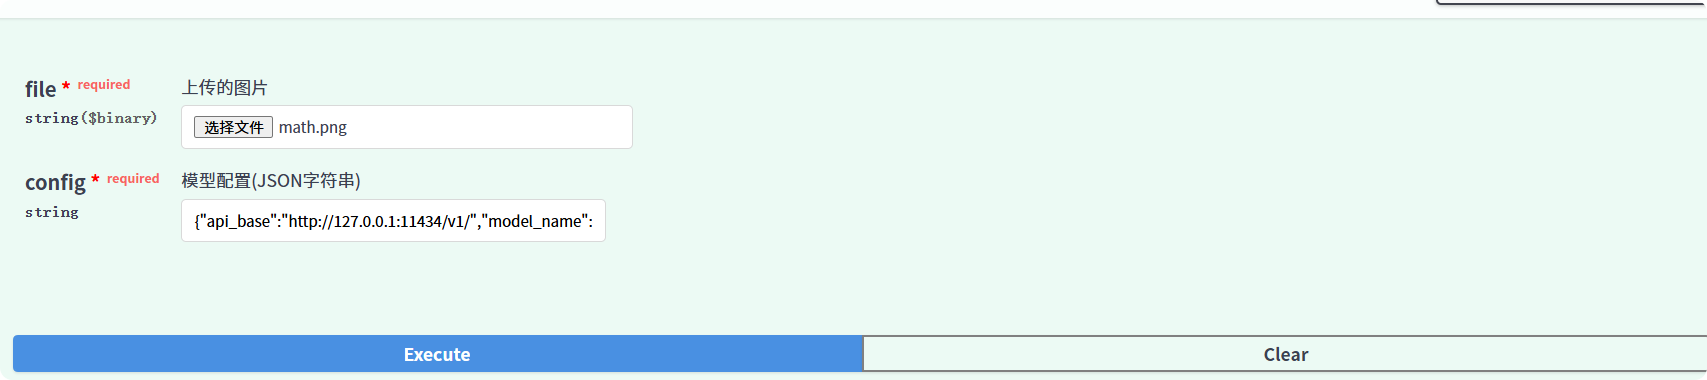
@router.post("/auth/solveMath",summary="解析上传的图片返回答案")
async def ollama_solve_math(
    *,
    file: UploadFile = File(..., description="上传的图片"),
    config: str = Form(..., description="模型配置(JSON字符串)")
) -> Any:
    """
    处理上传的文件并调用大模型
    - **file**: 要上传的文件
    - **config**: 可选的大模型参数(JSON格式字符串)
    """
    try:
        # 1. 验证文件
        if not file.filename:
            raise HTTPException(status_code=400, detail="未提供文件名")

        logger.info(f"开始处理文件: {file.filename} (类型: {file.content_type})")
        # 2. 解析文件内容
        model = ollama_schema.ModelConfig.parse_raw(config)
        import asyncio
        file_content = await crud_file.solve_file(model,file)
        logger.info("大模型处理完成")
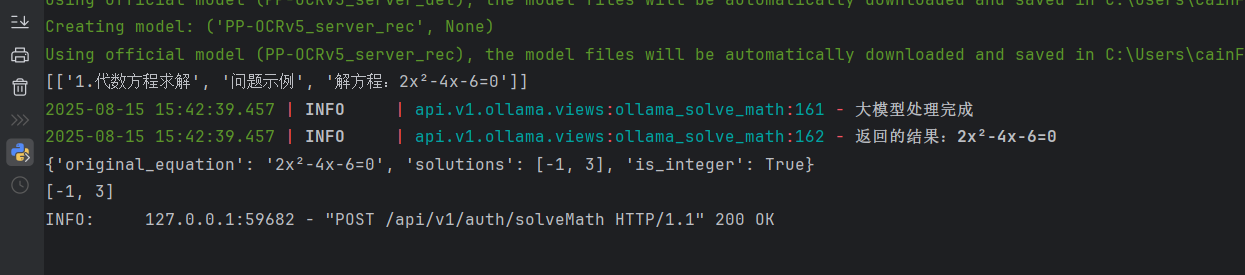
        logger.info(f"返回的结果:{file_content['analysis']}")
        result = crud_file.solve_equation(file_content['analysis'], return_integer=True)
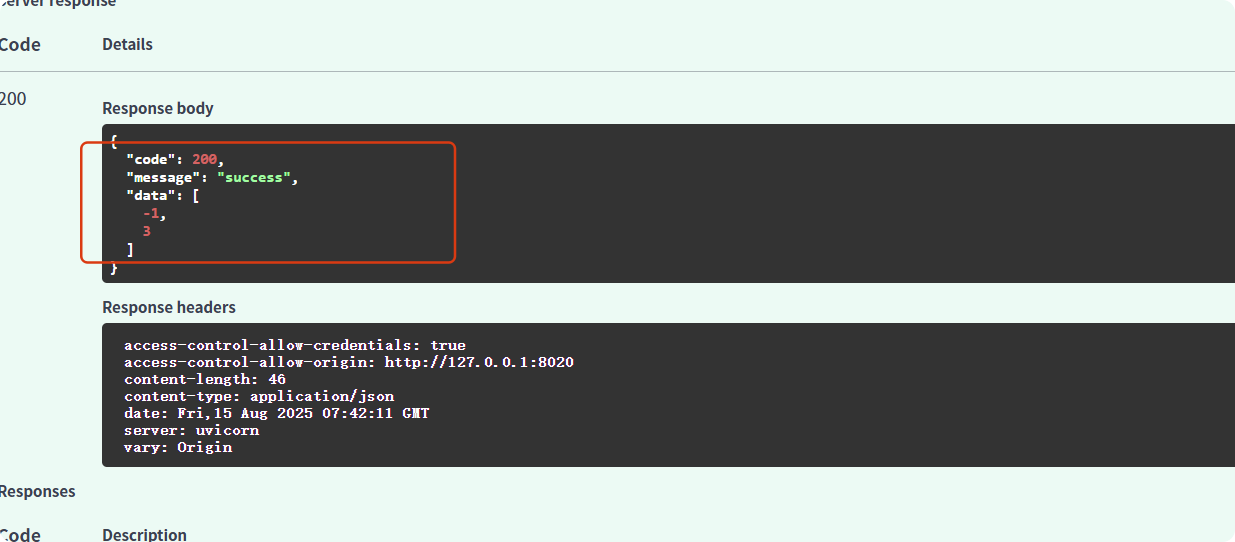
        print(result)  # 输出: [-1, 3]
        print(result['solutions'])
        return response_code.resp_200(data=result['solutions'], message="success")
    except Exception as e:
        logger.info(f"{e}")
9.2.2 ollama_schema.py
#!/usr/bin/env python
# -*- coding: utf-8 -*-
# @Time    : 2020/7/7 16:23
# @Author  : CoderCharm
# @File    : user_schema.py
# @Software: PyCharm
# @Desc    :
"""

"""

from typing import Optional
from pydantic import BaseModel, EmailStr, AnyHttpUrl

class ollamaBase(BaseModel):
    param: str

class ModelConfig(BaseModel):
    """大模型配置"""
    api_base: str                   # API基础地址
    model_name: str                 # 模型名称
    temperature: float
    max_tokens: int
    api_key: Optional[str] = None   # 可选API密钥
    api_version: Optional[str] = None  # 某些API需要的版本号

class ImageToVideoRequest(BaseModel):
    prompt: str = "a beautiful landscape"  # 默认提示词
    frames: int = 24  # 生成的帧数
    fps: int = 24  # 输出视频的帧率
9.2.3 ollama.py
# !/usr/bin/env python3
# -*- encoding : utf-8 -*-
# @Filename    : pfliu.py
# @Software    : VSCode
# @Datetime    : 2021/11/04 21:25:44
# @Author      : leo liu
# @Version     : 1.0
# @Description :

from sqlalchemy.orm import Session
from typing import Dict, List
from openai import OpenAI
from sqlalchemy import text
import re
import json
from ..schemas import ollama_schema
import logging

logger = logging.getLogger(__name__)

class CRUDOllama():

    @staticmethod
    def getPromptResult(db: Session, query: ollama_schema.ollamaBase,model:ollama_schema.ModelConfig) -> str:
        """
        提取关键字
        """
        prompt = f"""
                    输入文本
                    {query.param}

                    提取规则
                    1. 学号:连续数字,长度1-20位
                    2. 姓名:2-4个中文字符

                    返回结果
                    1. 直接输出JSON对象
                    2. 不要包含```json等代码块标记
                    3. 不要有任何额外解释
                    {{
                        "code": ["学号",...],
                        "name":["姓名",...]
                    }}
                    """
        return crud_ollama.call_openai_api(model,prompt)

    @staticmethod
    def get_table_metadata(db: Session) -> Dict:
        """
        获取数据库表结构元数据(安全优化版)

        参数:
            db: SQLAlchemy Session对象

        异常:
            可能抛出数据库相关异常
        """
        metadata = {}

        try:
            # 1. 获取所有基表
            with db.begin() as transaction:
                # 使用参数化查询防止SQL注入
                tables_result = db.execute(
                    text("SHOW FULL TABLES WHERE Table_type = 'BASE TABLE'")
                ).fetchall()

                # 动态获取数据库名
                db_name = tables_result[0][1] if tables_result else ""
                tables = [row[0] for row in tables_result]
                logger.info(f"数据库中的表:{tables}")
                # 获取每张表的列信息
                for table in tables:
                    columns_result = db.execute(
                        text(f"SHOW COLUMNS FROM `{table}`")  # 直接字符串插值
                    ).fetchall()

                    columns = [col[0] for col in columns_result]
                    metadata[table] = {"columns": columns}

            logger.info(f"成功获取 {len(metadata)} 张表的元数据")
            return metadata

        except Exception as e:
            logger.error(f"获取元数据失败: {str(e)}")
            # 根据业务需求决定是否回滚
            if 'transaction' in locals():
                transaction.rollback()
            raise  # 重新抛出异常供上层处理

    @staticmethod
    def get_sql_result(db:Session,model:ollama_schema.ModelConfig,promptResult,metadata):
        """
        获取sql执行结果
        """
        print("正在为您生成sql语句并生成结果中---")
        # 从提取出的信息中查询想要的结果
        code = promptResult["code"]
        name = promptResult["name"]
        # 关键字查询表和sql
        prompt = f"""
        已知需要查询的条件:
            学生id:{code}
            学生姓名:{name}

        已知表结构{metadata}

        任务要求
        1. 分析表结构确定相关的表
        2. 找出表之间的关联字段
        3. 编写能够联合查询学生基本信息,成绩以及获奖信息的SQL语句,格式规范
        4. 直接输出SQL语句内容,不添加任何引号或代码块标记
        5. 使用标准SQL语法,保持合理的缩进和换行
        6. 返回的字段需设置中文别名并去重
        7. 最终结果严格以JSON格式输出,仅包含必要内容:
           {{
               "related_tables": ["表1", "表2", ...],
               "sql": "SELECT ..."
           }}
           其中JSON结构中键名和字符串值使用双引号,整体不包裹任何额外引号或标记,无多余注释
        """
        # 第三步:调用Ollama生成SQL
        try:
            port = crud_ollama.call_openai_api(model,prompt)
            # 获取json格式输出
            cleaned_content = re.sub(r'^```json\n|\n```$', '', port.strip())
            response_data = json.loads(cleaned_content)
            # 获取ollama返回的JSON信息
            print(f"AI分析得出的sql结果:\n {port}")
            print(f"提取AI获取可能相关的表:\n{response_data.get('related_tables', [])}")
            print(f"提取AI获取的sql结果:\n{response_data.get('sql', [])}")
            result= crud_ollama.detailSql(db, ''.join(response_data.get('sql', [])).rstrip(';'))
            return result
        except Exception as e:
            return {"error": str(e)}

    @staticmethod
    def call_openai_api(request: ollama_schema.ModelConfig,prompt) -> str:
        """
        调用OpenAI API
        参数:
            request: 包含prompt和模型配置的请求对象
        返回:
            模型生成的文本
        """
        import openai

        try:
            client = OpenAI(
                base_url=request.api_base,  # Ollama的OpenAI兼容端点
                api_key="ollama"  # 任意非空字符串
            )
            response = client.chat.completions.create(
                model=request.model_name,
                messages=[{'role': 'user', 'content': prompt}],
                temperature=request.temperature,
                max_tokens=request.max_tokens
            )
            return response.choices[0].message.content
        except Exception as e:
            print(e)

    @staticmethod
    def detailSql(db: Session, sql):
        try:
            # 1. 获取所有基表
            with db.begin() as transaction:
                # 使用参数化查询防止SQL注入
                result = db.execute(
                    text(sql)
                ).fetchall()
                return result

        except Exception as e:
            logger.error(f"获取元数据失败: {str(e)}")
            # 根据业务需求决定是否回滚
            if 'transaction' in locals():
                transaction.rollback()
            raise  # 重新抛出异常供上层处理

    @staticmethod
    def getresult(db:Session,model:ollama_schema.ModelConfig,param : ollama_schema.ollamaBase):
        promptResult = crud_ollama.getPromptResult(db, param, model)
        metadata = crud_ollama.get_table_metadata(db)
        sqResult = crud_ollama.get_sql_result(db, model, json.loads(promptResult), metadata)
        prompt = f"""
                针对{sqResult}
                总结该学生的学术表现、获奖情况和综合能力,给出200字左右的评价。
        """
        analysis = crud_ollama.call_openai_api(model,prompt)
        return {
            "promptResult":promptResult,
            "sqResult":sqResult,
            "analysis": analysis
        }


crud_ollama = CRUDOllama()
9.2.4 file.py
# !/usr/bin/env python3
# -*- encoding : utf-8 -*-
# @Filename    : pfliu.py
# @Software    : VSCode
# @Datetime    : 2021/11/04 21:25:44
# @Author      : leo liu
# @Version     : 1.0
# @Description :

from fastapi import  UploadFile, HTTPException,File,UploadFile, HTTPException
import os
import io
import numpy as np
import docx2txt
import tempfile
from pathlib import Path
from sympy import symbols, Eq, solve, sympify, Integer
from sympy.parsing.sympy_parser import (parse_expr, standard_transformations,
                                        implicit_multiplication_application)
import shutil
import aiofiles  # 明确导入
import cv2
# 确保上传目录存在
UPLOAD_DIR = r"E:\python\api\api\v1\ollama\uploads"  # 保存文件的目录
# UPLOAD_DIR = os.path.abspath("uploads")
os.makedirs(UPLOAD_DIR, mode=0o777, exist_ok=True)
from PIL import Image
from ..schemas import ollama_schema
from .ollama import crud_ollama
import logging

logger = logging.getLogger(__name__)

class CRUDFile():

    @staticmethod
    def read_docx_with_docx2txt(file_path):
        """使用docx2txt库解析Word文档"""
        try:
            return docx2txt.process(file_path)
        except Exception as e:
            raise ValueError(f"无法解析Word文档: {str(e)}")

    @staticmethod
    def parse_file(file: UploadFile) -> str:
        """根据文件类型解析文件内容"""
        content_type = file.content_type
        filename = file.filename

        # 创建临时文件
        with tempfile.NamedTemporaryFile(delete=False) as temp_file:
            temp_file.write(file.file.read())
            temp_file_path = temp_file.name

        try:
            # 根据文件类型选择解析方式
            if content_type == "text/plain" or filename.endswith('.txt'):
                with open(temp_file_path, 'r', encoding='utf-8') as f:
                    content = f.read()

            elif content_type == "application/json" or filename.endswith('.json'):
                import json
                with open(temp_file_path, 'r', encoding='utf-8') as f:
                    json_data = json.load(f)
                    content = str(json_data)

            elif content_type in ["application/vnd.openxmlformats-officedocument.wordprocessingml.document",
                                  "application/msword"] or filename.endswith(('.docx', '.doc')):
                doc = crud_file.read_docx_with_docx2txt(temp_file_path)
                content = "\n".join([para.text for para in doc.paragraphs])

            elif content_type == "application/pdf" or filename.endswith('.pdf'):
                import PyPDF2
                with open(temp_file_path, 'rb') as f:
                    reader = PyPDF2.PdfReader(f)
                    content = "\n".join([page.extract_text() for page in reader.pages])

            else:
                # 尝试作为文本文件读取
                try:
                    with open(temp_file_path, 'r', encoding='utf-8') as f:
                        content = f.read()
                except:
                    raise HTTPException(status_code=400, detail="不支持的文件类型")

            return content

        finally:
            # 清理临时文件
            try:
                os.unlink(temp_file_path)
            except:
                pass

    @staticmethod
    def get_file_extension(filename):
        return "png" if filename.lower().endswith('.png') else "jpg"
    @staticmethod
    async def solve_file(model:ollama_schema.ModelConfig,file: UploadFile = File(...)) -> str:
        """根据上传的图片解析内容"""
        filename = file.filename

        try:
            # 根据文件类型选择解析方式
            if filename.endswith('.png') or filename.endswith('.jpg') :
                # 生成安全路径(防止路径遍历攻击)
                safe_path = Path(UPLOAD_DIR) / file.filename
                output_path = Path(UPLOAD_DIR) / f"output.{crud_file.get_file_extension(file.filename)}"

                # 保存文件
                with open(safe_path, "wb") as buffer:
                     shutil.copyfileobj(file.file, buffer)  # 核心保存操作
                # 验证文件是否保存成功
                if not os.path.exists(safe_path):
                    raise HTTPException(500, "文件保存失败")
                print(f"文件保存后的路劲: {safe_path}")
                output_path = crud_file.process_text_image(safe_path,output_path)
                print(f"文件图像优化后的路劲: {output_path}")
                # 3. OCR识别
                import numpy as np
                from paddleocr import PaddleOCR
                ocr = PaddleOCR(
                    use_textline_orientation=True,  # 启用方向分类
                    device='cpu',  # 使用 CPU,
                    lang="ch"  # 语言类型
                )

                # 加载图像
                img = Image.open(output_path).convert('RGB')
                img_array = np.array(img)

                # 使用 predict 方法(推荐)
                result = ocr.predict(img_array)
                # 提取所有文本内容
                texts = [item["rec_texts"] for item in result]
                print(texts)
                # 3. 大模型解析数学题
                input_text  = f"""
                              请将{texts}中的所有中文和其他无用的符号去掉
                              只返回方程
                              """
                analysis = crud_ollama.call_openai_api(model, input_text)
                return {"analysis": analysis}
            return HTTPException(status_code=400, detail="请上传正确的图片格式")
        except Exception as e :
            print(f"{e}")


    @staticmethod
    def process_text_image(input_path, output_path):
        """
        文本图像清晰化处理(边缘保留优化版)
        改进点:
        1. 取消所有模糊操作
        2. 增强边缘对比度
        3. 更精确的二值化
        4. 完全移除形态学操作
        """
        # ===== 1. 安全加载 =====
        input_path = Path(input_path).resolve()
        if not input_path.exists():
            raise FileNotFoundError(f"输入文件不存在: {input_path}")

        # 支持中文路径的读取
        img = cv2.imread(str(input_path), cv2.IMREAD_GRAYSCALE)
        if img is None:
            with open(input_path, 'rb') as f:
                img = cv2.imdecode(np.frombuffer(f.read(), np.uint8), cv2.IMREAD_GRAYSCALE)

        if img is None:
            raise ValueError("图像解码失败")

        # ===== 2. 锐利对比度增强 =====
        # 使用非局部均值去噪替代模糊(保留边缘)
        denoised = cv2.fastNlMeansDenoising(img, h=7, templateWindowSize=7, searchWindowSize=21)

        # 适度直方图均衡化
        clahe = cv2.createCLAHE(clipLimit=1.0, tileGridSize=(8, 8))
        enhanced = clahe.apply(denoised)

        # ===== 3. 背景分析 =====
        mean_val = np.mean(enhanced)
        is_dark_bg = mean_val < 127

        # ===== 4. 精确二值化 =====
        if is_dark_bg:
            # 深色背景:高精度OTSU
            _, binary = cv2.threshold(enhanced, 0, 255, cv2.THRESH_BINARY + cv2.THRESH_OTSU)
        else:
            # 浅色背景:改进的自适应阈值
            binary = cv2.adaptiveThreshold(
                enhanced, 255,
                cv2.ADAPTIVE_THRESH_MEAN_C,
                cv2.THRESH_BINARY,
                blockSize=min(11, max(3, img.shape[1] // 40 * 2 + 1)),
                C=1  # 更小的C值保留更多细节
            )

        # ===== 5. 边缘锐化 =====
        # 仅对文字边缘进行轻微锐化
        laplacian = cv2.Laplacian(binary, cv2.CV_8U)
        sharpened = cv2.addWeighted(binary, 0.8, laplacian, 0.2, 0)

        # ===== 6. 最终优化 =====
        # 确保文字纯黑/纯白
        final = np.where(sharpened > 127, 255, 0).astype(np.uint8)

        # ===== 7. 安全输出 =====
        output_path = Path(output_path).resolve()
        output_path.parent.mkdir(parents=True, exist_ok=True)

        if not cv2.imwrite(str(output_path), final):
            raise IOError("结果保存失败")

        return str(output_path)


    @staticmethod
    def solve_equation(equation_str, return_integer=False):
        """
        求解方程并可选返回整数解

        参数:
            equation_str: 方程字符串,如 "2x²−4x-6=0"
            return_integer: 是否返回整数解 (默认为False)

        返回:
            包含解的字典,整数解时会四舍五入
        """
        try:
            # 预处理
            normalized = (
                equation_str
                .replace("−", "-")
                .replace("²", "**2")
                .replace(" ", "")
            )

            if "=" not in normalized:
                raise ValueError("方程必须包含等号")

            left, right = normalized.split("=", 1)

            # 解析方程
            transformations = standard_transformations + (implicit_multiplication_application,)
            x = symbols('x')
            lhs = parse_expr(left, transformations=transformations, local_dict={'x': x})
            rhs = parse_expr(right, transformations=transformations, local_dict={'x': x})
            equation = Eq(lhs, rhs)

            # 求解
            solutions = solve(equation, x)

            # 处理解
            processed_solutions = []
            for sol in solutions:
                if return_integer:
                    # 检查是否为精确整数解
                    if sol.is_Integer:
                        processed_solutions.append(int(sol))
                    else:
                        # 四舍五入到最接近的整数
                        num = float(sol.evalf())
                        processed_solutions.append(int(round(num)))
                else:
                    processed_solutions.append(str(sol.evalf()))

            return {
                "original_equation": equation_str,
                "solutions": processed_solutions,
                "is_integer": return_integer
            }

        except Exception as e:
            return {
                "error": str(e),
                "input": equation_str
            }
    @staticmethod
    def getresult(model:ollama_schema.ModelConfig,file_content):

        analysis = crud_ollama.call_openai_api(model,file_content)
        return {
            "analysis": analysis
        }


crud_file = CRUDFile()
9.2.4.1上传文件并保存文件
from fastapi import APIRouter, UploadFile, File, HTTPException
from pathlib import Path
import shutil
import os

router = APIRouter()
UPLOAD_DIR = "uploads"
os.makedirs(UPLOAD_DIR, mode=0o777, exist_ok=True)

@router.post("/auth/solveMath")
async def solve_math(file: UploadFile = File(...)):
    try:
        # 验证文件名
        if not file.filename:
            raise HTTPException(400, "未提供文件名")

        # 构造安全路径(使用Path管理路径)
        save_path = Path(UPLOAD_DIR) / file.filename

        # 保存文件(核心修正点)
        with open(save_path, "wb") as buffer:
            shutil.copyfileobj(file.file, buffer)  # 传递file.file而非Path

        # 验证保存结果
        if not os.path.exists(save_path):
            raise HTTPException(500, "文件保存失败")

        return {"status": "success", "path": str(save_path)}

    except Exception as e:
        raise HTTPException(500, f"处理失败: {str(e)}")
    finally:
        await file.close()
| 需求 | 实现方案 | 注意事项 |
|---|---|---|
| 保存上传文件 | shutil.copyfileobj() + 路径处理 | 确保目录存在 |
| 安全文件名 | uuid + 扩展名验证 | 防止路径遍历攻击 |
| 大文件处理 | aiofiles 分块读写 | 避免内存溢出 |
| 返回文件 | FileResponse | 设置合适的 MIME 类型(可选) |
9.3页面展示
更多推荐

 20
20 0
0- 0


 已为社区贡献1条内容

所有评论(0)